Preparatory actions
Sometimes, when preparing the surface for screed, people do not pay attention to important details that, in fact, play a big role. The rough surface must be thoroughly cleaned of debris and small stones.
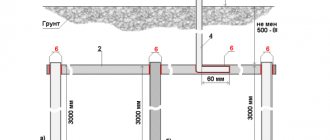
Before properly pouring the heated floor, a damper tape with a thickness of at least 40 mm is laid along the walls of the room in a circle. It is needed in order to prevent future cracks in the concrete layer from the effect of thermal expansion. The damper tape should not be neglected under any circumstances. Cracks in concrete will damage the heating system very quickly. It is necessary to make a heated floor cake on concrete according to all standards.
When the room area is more than 40 square meters. meters, or one of the sides is more than 8-9 meters, the concrete coating must be divided into zones using thermal joints. To do this, use a T-shaped damper tape. It is laid before concrete work begins. Each zone must have its own heating circuit; this should be designed in advance.
Sometimes craftsmen lay reinforcing metal mesh on top of the insulating board. If the heat insulator is durable and the load on the heated floors is not very large, such a mesh can be ignored. The mesh is attached to the concrete through a layer of insulation. The water circuit is twisted with mesh rods. This method is convenient, but not justified in all cases. If the reinforcing layer is laid directly on the heat insulator, the mesh will not withstand the vertical pressure on the floors. It will perform a single function - convenient fixation of the water pipeline.
When using durable insulation (foam glass), the situation will be different. If soft insulation (foam plastic) is used, the screed must be additionally reinforced. Reinforcement, which is placed on top, and not in the concrete itself, neutralizes only horizontal deflections. To prevent the formation of splits, the mesh is placed closer to the center of the concrete covering, above the pipes.
Sometimes they use an option where two meshes are laid: on top of the pipes and under them.
There is another way using one grid. It is raised above the heat insulator by 15-20 mm using pads. The pipes are laid on top.
A screed where the water circuit is completely embedded in concrete will be stronger. But the cost of constructing a heated floor is increasing. The total thickness of the concrete layer will be 20-30 mm greater.
On a note. Before starting concrete work, water should be poured into the circuit, creating working pressure in the pipes. Sometimes they use compressed air. It is prohibited to heat the pipes.
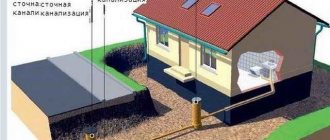
Why do you need to screed a heated floor?
Water pipes are laid on the base or ceiling, and additional utility communications are installed in the utility rooms. This “pie” is filled with a monolithic screed.
It is carried out after installation and testing of systems and ensures:
- surface strength;
- protection of heating elements from overhead load and damage;
- important properties are the accumulation, distribution, and uniform transfer of heat upward, which reduces energy costs;
- reliable base for laying flooring.
The thickness of the monolithic screed is 70-100 mm, the thickness of the water pipes is not included in this calculation. In the room where the heating installation will be carried out, a double screed is carried out: rough (20-30 mm) under the pipes, finishing (30-40 mm) above them. The thicker the layer, the more stable the heating regime.
Pouring water heated floor
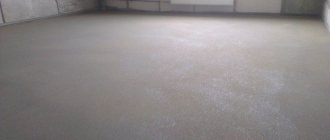
A rough screed is applied to level the base on which the heating system will be laid.
Important! The screed is perfectly aligned with the beacons, the slope does not exceed 0.5 mm - this is a guarantee that the pipes will not bend under their own weight at drops, and there will be no air pockets in them.
A mixture of cement and sand
How to properly fill the floor under heated floors with a water circuit? The most common type of screed is made of cement and sand. It is easy to work with; sand particles act as an excellent plasticizer.
Typically, for concrete work in living rooms, cement-sand mortars of grade 150 are used. For installing a water floor, it is recommended to use M200. With increased loads on the floors, you can use a higher brand:
- M200-M250 when installing floors in retail premises or public buildings;
- M300 is used in warehouses and garages.
Factory mixtures, which will be delivered to the repair site, are purchased at mortar units. In stores they are packaged in bags. You can make the mixture yourself. This is a more labor-intensive way, but economical. You need to maintain the dosage of the components and find river sand with a coarse fraction.
Cement-sand mixtures for damp, wet rooms (bathrooms, swimming pools) are made with M400 cement. M500 cement quickly gains strength and is suitable for rooms with dry floors. The recommended thickness of underfloor heating screed is about 40 mm. In this case, laying a water-heated floor in a screed will be carried out without difficulty.
How to properly fill a warm water floor so that it lasts a long time? It must be resistant not only to mechanical, but also to thermal stress. It is recommended to add polypropylene fiber to the solutions: 900 grams per 1 cubic meter. The cost of such an additive is small, but it will increase the level of strength of the screed and prevent the appearance of small cracks. You should be aware that the fiber additive does not replace the reinforcing mesh.
Option 2. DSP
Cement-sand screed for heated floors is made using floating floor technology, based on a solution of cement, sand and water with the addition of plasticizer and fiber, or based on ready-made dry mixtures.
Important! Plasticizer and/or fiber are mandatory in underfloor heating screed.
- If you are doing TP at home, M200 grade cement is sufficient to prepare the DSP solution. The sand needs to be clean. Sand/cement proportions, 3/1 (three sand - one cement).
- If the heated floor is made in a garage, then the grade of cement is taken higher from M300 to M500, optimally M400.
An obligatory element in the DSP TP solution is reinforcing fiber and plasticizer fibers. Fiber fiber is added in a volume of 900 g. per cube of solution. Fiber plays a reinforcing role.
Important! A plasticizer (this is not fiber) is added to any type of DSP underfloor heating. It (plasticizer) compensates for the thermal expansion of the heated floor, protecting the central fiber board from cracking.
The TsPS TP screed is separated from the base of the floor. For this purpose, a layer of polyethylene with a thickness of 200 microns is laid on the base. For better heat transfer, a layer of heat insulation with a thickness of 20 mm or more is placed under the screed. Important! The foil backing is not insulation.
Important! For trouble-free operation of the heated floor, the heated floor screed must be laid only on a flat, solid base. Unevenness of the base can lead to the formation of air cavities, which can shrink under load. If the base of the floor is uneven, under the heated floor screed, you need to make an additional leveling bonded screed.
The DSP screed will be separated from the walls of the room, for which a damper tape or strips of any solid insulating material 5-10 mm thick are fixed around the perimeter of the room.
A floating DSP screed must be reinforced with a mesh with 10 by 10 cm cells. The reinforcing mesh not only holds the screed together, preventing it from cracking when the floor dries and the heated floor is in use, but also serves as a base for fastening water floor pipes and electric floor cables. It is important to ensure that the mesh rises 10 mm from the film.
The thickness of the screed layer, in the version of a cement-sand screed without fiber with a reinforcing mesh, cannot be less than 10 cm. It is this layer that will ensure the creation of a durable floating slab. In this case, the thickness of the screed must ensure that the pipes (cables) are covered with a layer of at least 30 mm, otherwise there will be strip heating of the floor.
Ready-made mixtures will simplify the work
There are a lot of manufacturers producing ready-made mixtures (levelers), including those suitable for installing heated floor screeds. A solution from this mixture is made by adding water in the proportion indicated on the package. The leveler is laid with or without beacons, depending on the brand and manufacturer.
The use of ready-made mixtures is the best option for installing screeds for heated floors yourself.
Screed from dropouts
If you pass crushed stone through a construction sieve, you will get a fraction of particles up to 1 cm in size. This is screening. It is similar to sand with a coarse fraction, but the grains of sand are round in shape, while the particles of screenings are chipped, with sharp edges. This structural feature significantly increases the strength of the mortar compared to sand. This solution is more difficult to install, but the effort is ultimately worth it.
A warm floor under a solution with this composition is reliable. You can save money by using the M150 mixture. No fiber need to be added.
The inconvenience is that it is difficult to find a concrete layer from screenings at mortar units. Large fractions may be present in the purchased solution. This will significantly complicate the process of leveling the screed. Pebbles larger than 2 cm are acceptable according to GOST, so manufacturers produce such a solution in accordance with the standards.
If you are concerned about the question of how to properly fill a heated floor in a house, it is more advisable to prepare the solution using a home concrete mixer, using fine screenings.
What will be the basis?
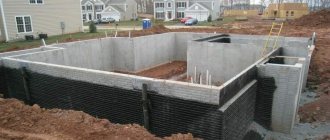
In houses where the floors are made of concrete, as well as on the base (provided the base of the floor is located on a sand cushion), the common method of concrete screed is used. Important! If your house has wooden floors, this method is unacceptable for you. The beams simply will not withstand the load, no matter how thin the layer of concrete screed is. In such situations, a lightweight option is used, its description can be found below.
The first step when installing a heated floor is to prepare the base. The base must be flat; the presence of depressions or protrusions is unacceptable. The difference can be a maximum of 5 mm. If there are defects or stronger differences, you should:
- Fill with fine crushed stone in a thin layer (grain up to 5 mm) and level it.
- Cover the finished leveling layer with film.
- When laying heated floors, use wooden boards to walk on them, otherwise the crushed stone layer itself will create unevenness.
Self-leveling solutions
You can use a self-leveling mixture to screed a warm water floor.
This building material is not cheap. Labor costs are noticeably reduced. Simply add water to the dry mixture, stir, pour it onto the floor and you don’t need to do anything else. The mixture will even out on its own.
The advantage of self-levelers is the harmoniously selected components of the solution, mixed in the factory. The mixture is already enriched with the necessary additives and plasticizers.
The finished leveling solution is poured onto previously prepared floors and stretched over the beacons. If you follow the manufacturer's recommendations, you will get a durable surface that is resistant to temperature changes.
There are some subtleties here that you should be aware of before purchasing a self-leveler. It sets very quickly, and you will need a lot of solution. If you fill the floors in small bathrooms, then there will be no problems. The mixture can be stirred with a drill mixer. But how to quickly mix, at one time, a cubic meter of solution for a room of more than 20 square meters? This is impossible to do in a regular trough. If you fill it in parts, in layers, the quality characteristics will deteriorate. To make such a solution, you need special equipment, a compact mortar mixing plant.
In order to fill large volumes, you can buy or rent such equipment. But under normal conditions, for apartment renovation, this is impractical. The self-leveler will still have to be leveled manually.
Such a solution will pay off in a “burning” facility if you have an unlimited budget. Or when laying heated floors in a small area. There are brands of self-leveling that can be laid in a thick layer. You should know: despite the fact that such a solution sets quickly, it reaches “standard” within 7-15 days, no less.
How to fill with a “wet” screed
If a lot of water is added to the solution, you get a “wet” screed. The solution will be plastic.
The component ratios are as follows:
- When laying heated floors in a dry living space, an M200 solution using M500 cement is suitable. You will need 1 part cement, 3 parts sand and 1-1.4 parts water.
- When laying heated floors in a damp room (in a bathroom), you need an M200 solution based on M400 cement. Take 1 part cement, 2.5 parts sand and 1-1.4 parts water.
- In reality, the volume of liquid depends on the moisture level of the sand and the amount of dust in it. In this regard, water is added gradually, mixed and plasticity is controlled. The result should be a mixture similar to thick sour cream.
- The solution is leveled between the pipes and compacted, removing air bubbles.
On a note. Metal-plastic pipes can become deformed if you walk on them. Polyethylene is more durable in this regard.
The process of leveling the mixture is facilitated by a long rule and pre-placed beacons. The recesses are filled with the mixture and leveled again.
The screed is made from the screenings in the same way. But everything is done more carefully, more labor will be required. The advantage of the “wet” method is the plasticity of the solution, which is easy to level with a rule.
Tools and materials
To carry out installation work on a special home heating system, prepare the following tools:
To keep the hoses on the fittings, you need to buy nylon ties for this.
- Special brand cement and crushed stone screenings, plasticizers. To prepare concrete for pouring (or buy a ready-made solution).
- Insulation. Rolled or matte materials.
- Damper tape. For forming thermal seams.
- Polyethylene film. Used for installation of a hydraulic barrier.
- Metal profiles. “Beacons” are displayed from them.
- Net. Strengthen the structure.
- Nylon ties. For securing the hose to the fittings.
- Hoses or plastic pipes, electric heating elements. The main parts of the technology.
- The lath is usually a spatula. Tools for fixing “beacons” and sealing concrete.
- Level. To carry out control measurements.
- Container or concrete mixer. They prepare the required mixture according to the recipe.
"Semi-dry" method
There is much less water in the solution for the “semi-dry” method. If the mixture is made correctly, it will be moist but not runny.
They check it this way: squeeze a little semi-dry solution in your palm. It should form into a plastic lump without cracks. This is the consistency of a factory-made solution. It is more difficult to level, but then you can rub it to a shine, and ultimately get a surface that is dense and durable in structure.
If you order such a solution ready-made, you need to explain for what purposes it will be used. This concrete layer can withstand heavy loads. It is of higher quality than when laying concrete using the “wet” method.
You will have to grout very carefully; this requires skill and patience. You will need a long trowel or trowel. Semi-dry mixtures from screenings are practically not amenable to smooth grouting, so it is ground with sandy mortar.
How to properly lay a “semi-dry” concrete screed
In order for the concrete layer to be perfectly smooth, you need to position the beacons correctly. The distance between the beacons is left such that the one and a half meter rule can be used. That is, a distance of no more than 140 cm should be maintained between the beacons.
Types of beacons:
- Mortar beacons made of narrow ridges of cement-sand mortar (gypsum cannot be used). Not the most effective method, since the ridges must dry out, and this takes time. In addition, a rule can accidentally “knock down” such pointers.
- Lighthouses made of metal pipes. Pipes or other rigid profiles are strengthened at the required height. A day after laying the concrete, they are removed and the recesses are filled with mortar. Pipes are used several times for this purpose. The only condition is that they must be perfectly even. Both round and rectangular profiles are used.
- Galvanized guides for plaster. The stronger the beacons, the better. The optimal size is 1-1.4 cm. After they have performed their function, they can be left in place or removed after the solution has set. Such beacons are disposable. If you have the skills, you can set them as evenly as possible. Strengthen with mortar, adjusting it to the level using a piece of tile or a brick fragment. The distance between the beacons is 40-50 cm. Sometimes they are installed on special supports that can be adjusted.
What thickness should the screed be?
To understand what the thickness of the concrete screed for water heated floors should be, the following points should be taken into account:
- The concrete layer should not interfere with thermal radiation. The water circuit must perform its function.
- In order for the screed to be strong enough, the thickness of the self-leveling compound should not be less than 2.5 and 4.5 cm.
- The thickness of a regular concrete layer reaches 6-7 cm.
- In total, the thickness of the water-heated floor will be 15 cm.
- If you increase the thickness of the screed, this will lead to the risk of splits in the concrete layer. To prevent this from happening, it is necessary to provide expansion joints.
We do it step by step with our own hands
The installation of a heated floor begins with planning: drawing up a project and an estimate. Independent calculations of the amount of materials will be approximate, so it is worth buying them with a small margin. The project begins by drawing up a diagram of the location of the heating elements. To do this, it is convenient to use graph paper, on which the outline of the room is drawn to scale.
Between the heating elements, gaps of 10-20 cm are made. A larger distance is permissible provided that the house is well insulated. If heat loss is large, the gaps should be minimal. It is possible to lay out the heaters with variable pitches: maintain 10 cm near cold walls, 20 cm near warm walls.
Selection of heaters
Manufacturers of heating equipment offer 2 groups of floor heaters: water and electric. Their applicability is considered individually. Water circuits are organized using metal-plastic pipes up to 100 m long. To ensure operation, pumps, three-way mixers, and programmers are installed in them. If the area of the room exceeds 15 m², several contours are made.
Electric heaters are easier to install; they allow you to install the entire system cheaply and quickly. Heating cables or mats are available for installation. They are small in size, so the apartment owner can do without pouring a finishing screed. This is especially true for wood floors when heaters are installed directly under the floor covering.
For your information!
Electric heaters are controlled by a mechanical or electronic thermostat. The second option has a number of functions that ensure the efficiency and practicality of heated floors.
Thermal insulation
Heat retaining material is an essential component of such a heating system. It serves to prevent heat loss through the ceilings. Foamed polystyrene with a density of 25-35 kg/m³ is used as the main thermal insulation. A material with lower performance will not be able to withstand the weight of the screed. The thickness of polystyrene slabs must be at least 5 cm. If they are laid on the ground or in an unheated room below, it is advisable to increase this parameter to 10 cm. To reduce heat loss, a reflective screen is laid on top of the main insulation. This can be penofol or simple food foil. However, the metallized coating must be protected from the aggressive effects of concrete mortar by covering it with plastic film.
Installation of heating elements
Heaters are placed on top of the thermal insulation. The layout of pipes, heating cables or mats is carried out in accordance with the drawn up diagram. The heating elements are fixed using special plastic fasteners. In addition, you can use profiled polystyrene. The material has grooves or projections that allow pipes or cables to be neatly laid out and secured.
Pouring a heated floor
After installing and testing the heaters, they begin pouring the finishing screed. If a water system is used, a pressure of 0.3 MPa is maintained until the concrete is completely dry. Sand is not used to prepare the solution - it has low thermal conductivity, which reduces the heating efficiency. The concrete mixture is prepared from several components:
- cement grade not lower than 400;
- granite crushed stone (grain size from 5 to 20 mm);
- small granite screenings (up to 5 mm in size);
- water;
- plasticizer.
The solution is evenly distributed over the floor, forming a layer 5-10 cm thick. If the size of the room is more than 30 m² or it is too elongated, expansion joints are made at intervals of 10 m. Concrete hardens within 12 hours, and will gain maximum strength only after a month. At this time, you cannot turn on the heating so that the screed does not burst. After holding, the heating is activated gradually, increasing the temperature by 5°C every 24 hours.
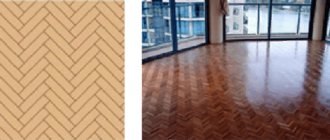
Flooring
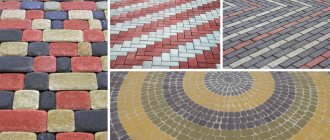
The final coating can be safely laid on the concrete surface. Ceramic tiles are laid on a special adhesive designed for heated floors. Special attention is paid to expansion joints: if the tile gets on it, only one edge is glued, the second is fixed with silicone. This solution will help level out the deformations that occur during thermal expansion.
Knowing all the nuances of pouring a heated floor, you can successfully carry out the repair yourself. The property owner will only pay for consumables, the price of which is not too high, and will be able to save on the services of professional installers.
Caring for wet screed
After the concrete layer is poured, the screed requires maintenance. The room temperature must be maintained at least 5 degrees above zero. The screed must not be allowed to dry out. A day after installation, it is covered with plastic film. The concrete needs to be moistened from time to time for about a month. The strength of concrete depends on this. You can begin installing the water circuit for heated floors no earlier than 28 days later. All this time, the working pressure must be maintained in the pipes, but the heating cannot be turned on.
Results
When installing heated floors, the installation technology is strictly followed. All stages, starting with the selection of building materials, design, installation of the water circuit, laying the screed, require knowledge and experience. It is necessary to select pipes that can withstand the pressure in the system. The water circuit must have acceptable bends so that the coolant circulates freely.
There are many subtleties that, at first glance, are not significant, but can lead to emergency situations if the technology is not followed. You can only undertake the installation of heated floors yourself when you are completely confident that everything will be done correctly. In another situation, it is better to turn to experienced craftsmen.