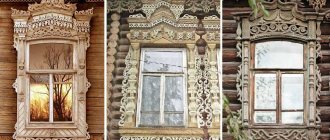
Technology for home production of paving slabs
The technology for producing paving slabs is very simple. But you need to know some points when planning the production process. To carry out the manufacturing process, you need to know 2 main directions: vibration casting and vibration pressing.
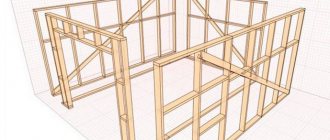
Block making machine diagram
They have some differences between themselves. This is subsequently reflected in the prepared products.
The technology for manufacturing paving slabs at home using vibration casting will require the purchase of an expensive unit, namely: a heat chamber and a vibration process.
The solution with water is poured into the mold, then compaction occurs using vibration and pressure. At the end of these procedures, the workpiece is sent to the drying chamber. The strength is obtained due to the fairly high humidity and temperature, which is excellent for installation in places with heavy loads.
Making paving slabs with your own hands helps to compact the mixture under vibration, that is, the concrete mixture is gradually distributed over the form and is compacted. The mold is moved to the racks for drying.
The workpiece is dried in molds
After two days, the finished tiles are pulled out.
Casting paving slabs with your own hands. Step-by-step instruction.
First, the molds are filled halfway, then compacted on a vibrating table for 3-5 minutes. This is necessary so that the bottom - front side of the tile spills well, and there are no shells left on it from possible air bubbles. While the vibrating table is operating, the solution is added to the top.
The filled forms are moved to a previously prepared flat surface, covered with film and left for at least a couple of days. After hardening, the tiles are removed from the mold and stored under film for the next 10 days. Further, in order for it to gain strength, it is kept in the open air for at least a month.
If you want to further increase the strength, the tiles are reinforced with an iron grid, which is placed in the mold before pouring. In addition, there is an ironing process that increases surface hardness, for which the not yet dried but already hardened tiles are sprinkled with dry Portland cement and rubbed evenly.
Vibration casting at home
Vibratory casting is suitable for the production of paving slabs at home. To do this, you need to purchase inexpensive equipment and tools. As for the vibrating table, it is not difficult to build it yourself. To start making tiles, you must follow these steps:
- preparation of molds;
- mixing the solution;
- forming in a vibrating table;
- holding and drying in molds;
- removal of tiles.
Paving slabs, which were made using vibration technology, are excellent for garden paths. If we are talking about a car park, then it is best to use pressed products.
Pressed tiles are best used for installation in car showrooms
Requirements, varieties
The form used for the manufacture of street tiles should:
- Accurately copy the geometry and drawing of the model.
- Ensure unimpeded removal of the finished product.
- Withstand the specified number of pours without destruction, warping or critical wear. Average values are determined by the tooling material.
Among the latter:
Metal
For the mass production of building products using the vibration pressing method, multi-place molds and punches are made from wear-resistant and durable tool steel. Manufacturers, reducing the cost of tools, choose structural steels: St 3, 20, 45, the durability still amounts to thousands of pieces. Repairs are carried out by surfacing, followed by mechanical or electrical discharge machining.
This option is beyond the capabilities of a typical DIYer, although there are craftsmen who mill dies and assemble presses themselves.
Aluminum stencils are not very common; for individual vibration casting, they can be cast into the “ground” if you have a scrap, crucible, or propane torch. In the future, mechanical processing will be required, the volume of which depends on the quality of the prototype and molding.
The casting process is described in the video:
Making the “furnace”:
Welded strip forms have been implemented. Take rolled stock with a thickness of 2-3 mm, otherwise the stencil will be heavy. Optimized for straight edges, bent curved elements are allowed. Weld seams are carefully cleaned, trying to smooth them flush with the strip, and spot welding of parts is used. Access to resistance welding allows you to obtain neat joints of satisfactory strength.
Practice of welding single and multiple frames:
The author of the next video used broken band saws in an original way.
For a one-time promotion, a U-shaped plasterboard profile is suitable. The shelves are cut on both sides, after which the desired shape is bent. A similar ersatz is suitable for simple designs such as rhombus, square, regular polygon.
Reinforced concrete
It was introduced in small enterprises as an alternative to expensive all-metal ones. I was attracted by the flexibility of developing prototypes. Stages of creating a matrix:
- Assembling the flask.
- Laying the greased template.
- Placement of reinforcement.
- Filling with a mixture of Portland cement, filler, binding polymer, for example, various resins that improve mechanical properties and close pores.
- Drying, cleaning.
The process is labor-intensive and not suitable for relief parts. Bulky equipment is sensitive to impacts and requires lifting mechanisms and hard tables. Resource of at least 200 molds.
Wooden
Fundamentally represents miniature formwork. Made from 20 mm thick boards or waterproof plywood. Grinding of the working edges is required, otherwise the print will be textured and the tile will stick to the formwork. The solution sticks to the wood, so an effective release agent is needed.
For long-term use, select dried, impregnated wood to avoid warping. Plywood is easier to process, but less durable. The main disadvantage is the geometry limited to straight edges. Recommended niche: rapid casting of several dozen products, filling of paths on site in the “old town” style
Elementary formwork:
Progressive way:
Plaster
Gypsum perfectly conveys texture, but fragile molds are not suitable for rough work with mortar. The rational sphere is the production of prototypes and master models. In case of extreme need, one-time repair actions are permissible, when the preservation of the mold is neglected.
Finely ground gypsum (sculptural), grade G-16-B-III, is preferred. It is too wasteful to use sets of modified powder and aqueous-alcoholic solvent.
Standard for gypsum binders: https://docs.cntd.ru/document/gost-125-79.
Prepare a liquid solution: 1 liter of water per 0.7 kg of binder. They are cast in a box, sometimes reinforced with gauze or a thin polymer mesh. When making a template, take into account the expansion of gypsum after hardening by 0.3-1%.
Plastic
The optimal find for single-seat complex configurations such as “clover” and “daisy”. Plastic rigid molds are durable and precise. Does not change dimensions due to moisture, low roughness guarantees high quality prints. Satisfactory durability is combined with reasonable cost and maintainability.
It is used in industry and individual activities for vibratory casting with compaction of the mixture on a vibrating table. The resource is estimated in hundreds of castings, depending on the type of plastic, wall thickness, reinforcement, and the composition being poured. Products made from polypropylene (PP), an impact-resistant ABC plastic, are common. The latter is three times more durable.
For advertising purposes, resistance to 500 cycles is indicated for PP. The number corresponds to critical damage, the beginning of destruction. In fact, the monitored parameters go beyond acceptable limits after fewer operations.
There are a wide range of samples for concrete paths cast directly on site. Without going into the pros and cons of the technology, we note that plastic equipment is the most suitable. The jointing of artificial turf often imitates wild stone and cobblestone paving. Typical cassette dimensions are 600×600×60 mm, jumper thickness is 2-4 mm.
In a workshop environment, plastic waste serves as a semi-finished product. It is dangerous to melt garbage in a garage or shed; without grinding, granulating, or an extruder, nothing good will come of it.
There remains the option of cold-polymerized injection molded plastic. The compositions are two-component: an acrylic-based base, a hardener, some are used in dentistry. There are compositions, for example, AKP-7, obtained by mixing powder with liquid MMA monomer.
Everything would be fine, but the prices are steep. A bottle of reagents with a volume of 100-200 ml costs the same as a serial form. The volumes and prices acceptable in dentures, sculpture, modeling are excessive for an amateur builder.
Advisers advocating homemade plastic cassettes for landscaping should clarify: we are talking about liquid polyurethane plastic, for example: https://www.sazi-group.ru/germetiki/silagerm-4010/
Such materials are somewhat inferior to ABC in terms of mechanical and performance properties. Significantly harder (Shore 70-80D) than polyurethane compounds for “soft” equipment. Low elasticity (elongation at break 5-8%) requires careful stripping.
Technical and economic indicators of various materials according to Lobas NN LLC: su/products/forms" data-mce-href="https://new.lobas.su/products/forms">https://new.lobas. su/products/forms. The information may be useful if the output volume is significant.
Polyurethane
The most commonly used are multi-place matrices. The material perfectly reflects the surface relief and pattern of the standard; It is resistant to cuts and abrasion, does not stretch during use, and ensures removability even with negative edge angles. Some manufacturers claim a resource of up to 5000-10000 fills, practically the value is slightly lower.
Select compounds with Shore hardness 35-55A: https://www.sazi-group.ru/germetiki/silagerm-5000/. Properly prepared polyurethane mass satisfactorily fills cavities without vacuuming. Individual air bubbles are not critical for home construction applications.
Silicone
Silicone budget molds are similar in scope, properties, and molding technology to polyurethane molds. A significantly shorter service life, sensitivity to cuts, and greater adhesion to concrete are noted. According to experts, silicone mixtures are inferior to polyurethane ones in the same price range.
Purchase two- or three-component compositions with a Shore hardness of at least 25A. The hardener is added to the base before pouring. Ready-made sealants are not suitable in consistency and characteristics.
Silicones based on a tin catalyst do not require degassing and do not withstand repeated replication of concrete bricks. Expensive compounds with a platinum catalyst are wear-resistant, accurately convey small details, and require vacuuming.
The leading Russian manufacturer of molding compounds PC SAZI offers a line of silicone compounds: https://www.sazi-group.ru/formovochnye-kompaundy/. In particular, the performance of Silagerm 7101 meets the requirements for the production of paving slabs.
Equipment and tools for the production of paving slabs
Before starting work, you need to prepare equipment and tools. If a person can make a vibrating table on his own, then a vibrating pressing machine must be purchased ready-made.
Then you need to choose a shape for the tile. According to the standard, it is square or in the form of a brick. For this type it is necessary to make formwork from plywood or wood. If we consider the production of paving slabs at home as more complex options, then it is better to use polyurethane or silicone molds. With their help, the tiles turn out just like in the store. It is also possible to make tiles similar to natural stone.
DIY paving slabs
If there are no forms and some tools
Molds for making paving stones can be purchased at a hardware store or made from scrap materials. When purchasing products for FEM casting, it is recommended to take into account the estimated number of cycles. You can create a simple mold using a 5-liter plastic bottle. The cutting height determines the thickness of the product. You can make your own mold from plaster. The fragile template requires careful use. Compaction of the mixture is carried out on a special table, which you can purchase or construct yourself. To do this, you will need to equip the table with a rubber and metal sheet.
Material for production
The basis of any technology is concrete. The following components are required for this:
- water;
- cement;
- crushed stone;
- river sand;
- slaked lime or other plasticizer;
- additives and colors.
To end up with a homogeneous mass, you need to use additional tools: a concrete mixer or a construction mixer. The first tool is designed for large volumes.
Before preparing concrete, you need to prepare a dye. It is necessary for making colored tiles. If ordinary gray paving slabs are made, then there is no need to use color.
Necessary materials
Paving stones are made on the basis of cement mortar, but to improve the quality and appearance of the final products, a number of additional materials are added to the cement mortar. This article will describe the technology for making high quality paving stones. You can reduce your costs on materials by not using some of them, but the quality of the tiles will no longer be as high.
So, to make high-quality paving stones you need to prepare the following materials:
- Portland cement grade M400;
- coarse river or washed sand;
- fine gravel;
- plasticizer or liquid detergent;
- wire or metal rods with a diameter of at least 5 mm;
- pigment dye;
- water repellent;
- pure water.
The amount of cement, crushed stone and sand depends on the required number of tiles, but their volume ratio should be 1:2:3. Instead of metal wire and rods, you can use synthetic reinforcing additives, which are sold in stores.
Adding a plasticizer increases the strength of finished products. This occurs due to improved plasticity of concrete and its better compaction on the forming table.
Treatment with a water repellent will protect the tile from moisture and increase its service life. Pigment dye is needed to give color.
Manufacturing instructions
The walls of the concrete mixer must be slightly damp, so the inside is rinsed with water and then drained. The proportion of water and cement to obtain the required solution must be accurate, otherwise the concrete product will be fragile.
Proportions for making paving slabs
Making paving slabs with your own hands requires mixing the concrete half wet. This is done as follows: there must be 30% less water than cement. For example, 3 buckets of cement are filled with 2 buckets of water.
First, water is added to the concrete mixer, and then the required amount of cement is added. After this, the components need to be mixed and brought to a homogeneous mass. Screenings are added, then a ready-made solution is obtained. After thorough mixing, slaked lime, previously well mixed, is poured in, as well as dye, if necessary.
You need to stir until you get a homogeneous mass. Mixing the solution is easy to do by hand. This requires good physical preparation, as well as a reserve of time.
So that later cleaning and stripping does not bring additional fuss and does not take time, it is necessary to lubricate the mold with a special lubricant.
Be sure to grease the mold for easy removal.
The layer thickness should not be too large, as the product will deteriorate due to bubbles. To successfully carry out the process, it is better to use aerosol lubricants.
Faster and higher-quality tiles can be done with your own hands if a person uses the help of another assistant. He will help you quickly bring the necessary tool or thing.
As for the dye, it must be dissolved in hot water in advance.
Which material is better
In terms of surface quality, flexibility and durability, the leaders are polyurethane, silicone, and plastic . They do not react to moisture, are easy to clean, and can withstand a large number of operating cycles without any problems. At the same time, they are much more difficult to manufacture than wooden products, less durable than metal ones, and much more expensive than plaster ones.
The training of the master should be taken into account . For one it is preferable to work with wood, for another - with metal, etc. The final result is largely determined by the level of professionalism of the manufacturer.
Most often, it is not so much the material that is decisive, but the skills of the worker.
Any product bears the imprint of the master’s personality, so it is difficult to clearly name the best material.
Recommendations
You can make paving slabs at home without a vibrating table, but in this case the quality will not be achieved.
After the forms are filled with the solution on the vibrating table, they must be removed and placed on the rack. Hardening occurs within 2 days. When it gets hot, the molds need to be moistened with a sprayer to prevent the concrete from hardening prematurely.
The process is completed by a stage such as stripping.
Stripping paving slabs
It occurs three days after pouring. Care must be taken here, because the tiles have not yet completely dried and have not gained sufficient strength.
To make the product as strong as possible, it is recommended to dip the molds in hot water at a temperature of 50 to 70 degrees. After 5 minutes, the paving slabs are removed, but before that you need to tap them with a rubber mallet.
After completing the process, the tiles should dry and lie for another 7-8 days. Shrink film is designed for this purpose.
Possible errors, tips
When manufacturing the matrix, if possible, a slight outward inclination of the walls should be maintained.
Important! The inclination of the walls inward, which wedges the casting, is unacceptable!
Too thin walls, especially when working with plastic, will lead to rapid failure of the mold. The thickness should be such as to allow the container with poured concrete to be lifted and carried without destruction.
Wooden and plaster should be periodically coated with paint and varnish, renewing the existing layer. This way the surface will be protected from moisture and warping.
Ready-made plastic containers, scraps of plastic pipes or other profile parts can be used as molds for tiles.
The nuances of tinting hand-made paving stones
To paint tiles, you must use organic or mineral pigments. Artificial colors have a fairly high coloring power and are resistant to temperature changes. Using natural pigments you can create muted natural tones.
There are 2 tinting options:
- diluting the dye in the raw mass;
- painting on the finished product.
Painting paving slabs
The first method will require a lot of cash investment. The price of dry dyes that are water-repellent is quite high. And for the color to exceed all expectations, you will need to add 7% of the total mass of concrete.
The second method is more difficult. The quality of painting depends only on time. To make the task easier, it is recommended to use a spray gun. This option has one drawback - uniform coloring will be very difficult to obtain.
The form is filled with colored concrete, but only up to half. Regular cement goes on top. The time between fillings should not exceed 20 minutes.
Manufacturing nuances
Design
Tiles from a multi-place cassette must be mated without adjustment, be interchangeable, or simply identical. Permissible deviations in the linear dimensions of paving slabs according to GOST 17608-2017 are ± 2 mm. The standard establishes tolerances for straightness, flatness, and perpendicularity of edges. Taking into account the copying of errors, the matrix figure is processed twice as accurately.
Help: https://docs.cntd.ru/document/1200157324
Removability of products is ensured by:
- Shrinkage of concrete
- Figure lubrication
- Collapsible equipment
- Rational biases
- Low surface roughness
For solid molds, the recommended slope of vertical edges is 1:15 (about 4º), contour roughness Ra≤3.2 µm. For flexible polyurethane and silicone stencils, slopes are not important.
It is labor-intensive to make slopes on wooden formwork; they are limited to lubrication and require a detachable structure. Collapsible versions are joined using steel corners, linings, tightened with bolts and clamps. The tie elements are screwed to the boards with self-tapping screws. The pallet is fixed in the same way.
The sides of rectangular split frames are cut 5 cm longer than the sides of the casting. Releases are necessary for the screed. Groove and dowel connections are capricious when disassembled multiple times.
Silicone stencils are reinforced with gauze in layers in weakened areas: corners, deep recesses. The event increases resistance to tearing and reduces the likelihood of early failure.
Technology
Polyurethane and silicone are perhaps the most popular among craftsmen. They are attractive due to the lack of heating during molding and relative harmlessness. The technical processes are fundamentally similar, first of all:
- They create and select a master model.
Templates are made from solid wood, preferably hardwood, plastic, or sculptural plasticine. Wood processing will require a set of chisels, possibly a router. A complex template can be printed on a 3D printer; sanding with sandpaper is required to smooth out the layering. Sculptural plasticine is the most versatile choice.
Important! Inaccuracies and roughness of the template are transferred with some distortion sequentially to the form and product. Therefore, the model is developed especially carefully.
The template can be your favorite paving slab. A standard without chips, dents, and with a clear relief is selected. Sharp edges are rounded, preventing tears in the silicone.
Determined with container:
- Collect or purchase a box of suitable sizes. The depth is equal to the sum of: the height of the tile, the thickness of the bottom of the stencil, the margin (≥ 10 mm). The excess volume around the perimeter will have to be fenced off with a frame to save polymer.
Prepare the model:
- A release agent is applied to the template to prevent fragments from sticking and tearing out. Also cover the contact areas of the container.
Polyurethanes have high adhesion to many substances - a release coating is required. Silicone adheres to porous materials: concrete, clay, gypsum, and does not stick to plasticine or plastic.
Release media are varied: wax or silicone based lubricants; similar sprays: Vs-M, Si-M, Ks-M (castor oil added).
Technical Vaseline, varnish - suitable for silicone. Manufacturers recommend formulations of wax/paraffin dissolved in white spirit:
Before coating, the surfaces are cleaned of dirt, dust, degreased, and dried. Apply 1-2 layers evenly with a brush, carefully coat the corners and depressions. It is recommended to carefully adjust the applied aerosol, smoothing it with a brush.
You should not rely on homemade soap suspensions; their effectiveness is insufficient. Machine oil and grease can disrupt the polymerization reaction.
Start key operations:
- Stir base component A.
- Shake the hardener (catalyst) - ingredient B.
- Measure out the exact amount of base into a clean container.
- According to the passport proportion, substance B is poured into another container or taken with a syringe.
- Mix ingredients A and B, introducing the catalyst dropwise.
- Stir from the walls to the center of the container for 8-15 minutes.
It is convenient to control the uniformity visually by introducing pigments approved by the manufacturer.
The procedure for preparing a polyurethane composition is different:
- The components are thoroughly mixed until combined.
- Measure weight fractions according to the instructions into clean and dry metal, glass or plastic containers.
- Mix with a spatula or drill attachment at a speed of no more than 1 rpm. An increase in speed causes the formation of bubbles and porosity of the frozen mass. Work in rooms with relative humidity up to 30-40%.
Attention! The components of the polyurethane compound are hygroscopic; to avoid delamination after polymerization, store in a hermetically sealed container. Keep any remaining product tightly closed without access to air.
Professionals advise doing a test fill of part of the mold. Helps evaluate the functionality of the separating layer and ensure complete curing of the compound.
The master model sometimes contains substances that inhibit the catalyst, making it difficult for the silicone to harden; pay special attention to plasticines. Amino, sulfur-containing substances are neutralized by tin-based hardeners.
The equipment and polymer mixture have been prepared, checked, and it’s time for pouring. The technique for polyurethanes and silicones is different:
- The silicone composition is slowly poured in a stable, continuous stream at one point so that the polymer spreads evenly over the template. Initially, the flow is directed to the pattern to minimize the appearance of air cavities in critical areas. The minimum thickness is 5 mm.
- Allow the material to cure for 24 hours at a temperature of 22-24ºC or 12 hours at 50ºC. Before use, keep in air for another 24 hours.
The video illustrates the creation of finishing stencils, the technology is identical to our case:
Cheap way:
- The polyurethane mass is applied by pouring or layer by layer with a brush or spatula.
- Alternate coating ensures that trapped air escapes independently. Each layer is smoothed with a spatula, displacing gas bubbles. Using the layer-by-layer method, portions are prepared separately after applying the previous layer.
- When pouring, the primary layer is applied with a soft flute, then poured in a thin stream at one point until the desired level is filled.
Important! When planning the pouring, the ingredients are mixed only by hand with a spatula until a homogeneous paste without clots is formed!
- Remove air: smoothly immerse the spatula to its full depth without touching the template, then quickly pull it out. Repeat the action over the entire area. Let the workpiece sit for 5-10 minutes, iron the top, removing visible bubbles. Alternating these operations several times, degassing is achieved.
- Complete vulcanization occurs within a day. Maximum physical and mechanical properties are achieved after 72 hours. Accelerated vulcanization occurs when heated to 50-60ºC. Residual stickiness is eliminated with isopropyl alcohol, denatured alcohol, and other volatile solvents.
Safety! Provide ventilation and ventilation of the workplace. Wear safety glasses and gloves. Follow the precautions specified in the instructions.
Experience of foreign colleagues:
Specialized forums dedicated to artificial stone allow you to find useful information and ask questions to your colleagues:
https://www.forum.nadomu.com/viewforum.php?f=16&sid=83c427e40db80ca871990689c7968a7e.
Advantages of paving slabs
At this moment, paving slabs are in great demand. It has some advantages:
- vapor permeability and moisture permeability of the coating;
- constructing paths using a more complex method independently;
- suitability of repair;
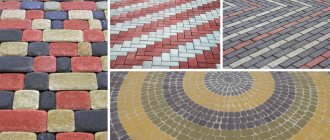
- aesthetics. It appears in all sorts of colors and shapes. If desired, craftsmen can lay out an ornament or some kind of pattern on the path in the garden or dacha.
Schemes for laying paving slabs
Decorative tiles with stone
Paving stones with stones in the landscape style of a private house look quite interesting. The method for making paving slabs at home is quite simple. The usual composition of the solution will help to build attractive country paths. It is often used in combination with natural materials.
To make decorative tiles with stone, you should prepare molds of various sizes. Boards will help you make large squares, and plastic containers are perfect for miniature tiles. River stones must be thoroughly cleaned and all the necessary components must be prepared to prepare the mixture.
It is very important to maintain the ratio of mixing sand with concrete, water and dye. After preparing the solution, you should take care of the form. It is required to lay out a horizontal platform of boards and put polyethylene under the formwork.
Thoroughly coat the mold itself with machine oil. The mixture should be evenly distributed over the area of the mold; a trowel will be useful for this. Then the stones are laid out, they must be selected by color and size, and then placed over the entire area of the mixture. Upon completion, the stones must be added to the solution.
The forms are covered with cellophane and dried for 4 days. The preparations must be sprayed with water 2 times a day. At the moment when the tile begins to move away from the formwork, it should be pulled out and dried without a form.
Making paving slabs with your own hands is quite a fascinating process. With the help of precise instructions, everyone can easily make high-quality and original tiles. It will serve for a long time in the garden or yard. If a person is unsure that the product will be durable during the manufacturing process, then he should study the topic in more detail.
Laying paving stones
The operation requires accuracy and basic construction skills. The main thing is high-quality preparation of the base and compliance with the specified slope. An accurate calculation of the load on the coating is also important. Even exceeding it once will lead to subsidence with the appearance of puddles in this place.
Paving stones 6 cm thick will withstand passenger vehicles, 8 or 10 - trucks. For pedestrian paths, 4 cm is enough. Of course, it is simply necessary to create a certain safety margin. This also applies to the base.
High-quality laying of paving stones with your own hands: step-by-step instructions require strict adherence. It is necessary to take into account the type of soil and terrain. If the work is being carried out for the first time, then it makes sense to practice skills on a small trial area.
Paving, as a rule, is arranged after completion of construction work, site planning, and laying of external utility networks. But if all of the above work is done with your own hands, then driveways or garden paths made of paving stones, at least from the gate to the house, appear earlier. In this case, during construction, the paving must be protected with available materials.
Selecting a laying scheme and marking
Correctly determine the patio area, the width and configuration of garden passages and parking spaces. Dimensions are selected taking into account the geometry and layout of the tiles in order to reduce undercuts.
Before laying paving stones with your own hands, you need to choose its shape. It is better to avoid complex ones. Rectangular pavers are a smart choice. With good skills, you can pour out a parallelepiped and its half. The variety of installation schemes will increase several times.
Here are the main ones.
- Seam to seam.
- Christmas tree.
- Network.
- Dutch.
- Well.
- Take a running start.
- Taking a run with the wave.
- Running run with a diagonal.
Three standard sizes: full, half and quarter, combined with tinting in two or three colors, will allow you to paving paths with paving stones at a high artistic level.
Preparation of materials
After determining the load, size, layout and drawing up a plan on graph paper or in a computer graphics editor, the covered area is determined. This is the basis for calculating the number of paving elements, curb stones, and drainage elements.
Next, the calculation of paving stones includes determining the amount of materials for the paving stones and base. Increasing the nominal volume by 15% will allow you to avoid additional purchases in case of unexpected costs or losses.
Marking for paving stones, choosing a base
Dimensions from the plan are transferred to the terrain. Pegs and cord mark the boundaries of excavation work. At this moment, it would be completely useful to once again make sure that municipal or country communications are not laid underground.
It is also recommended to make 2-3 technological passes under the base for laying with a plastic pipe of 40 - 63 mm. Paths are laid forever, and the need to redevelop or improve the comfort of the area will arise sooner or later. Reserve passages are used for laying electrical cables or water pipes.
The depth of the sand-crushed stone base depends on the type of soil. Wet soils require pavers to be laid on a thicker base than well-drained soils. The paved path should be slightly elevated and have a slope for rainfall drainage at the rate of 5 mm per 1 meter.
The foundation “pie” itself has many options.
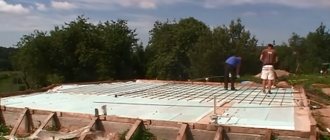
Highest quality and most durable
- Sand – 5 cm.
- Crushed stone – 5 cm.
- Extruded polystyrene foam – 5 cm.
- Concrete slab reinforced (with mesh or reinforcement 6-8 mm with a cell of 200 x 200 mm) -15 cm.
- Sand with cement - 3 cm.
- Paving stones – 6 cm.
Extruded polystyrene foam will prevent heavy soils from freezing and swelling. This option will withstand any reasonable load.
Universal for paths with medium traffic
- Geotextiles.
- Crushed stone pillow – 5 cm.
- Second layer of geotextile.
- Sand – 5 cm.
- Paving stones 6 cm.
Geotextiles will protect the path from germinating plants.
Economical option for light soils
- Geotextiles.
- Sand cushion from 5 to 10 cm.
- Paving stones 6 cm.
Only for the passage of people with low intensity.
Leveling the base
Before making a paving stone path edged with a curb, it is useful to lay the stone over the leveled crushed stone. At this stage, all the shortcomings that can still be corrected will appear. Here it is necessary to make the final trimming of the paving elements.
Laying out the track
A curb stone (on semi-dry concrete) and a drainage system are installed. The sand and crushed stone of the base should be thoroughly compacted with a vibrating plate, or, if it is not available, with a manual tamper weighing at least 5 kg. The slope is set according to the beacons on the sand installation bedding under the paving stones.
Laying paving stones with your own hands starts from the curbs and requires constant control over the horizontality of the paving. Installing the stone in place is done with a rubber hammer. Ready-made paving can be used to move forward.
When laying out traffic passages, it is advisable to place paving stones at an angle of 45° in the direction of movement. This will reduce the load on one element and significantly reduce the noise from car tires.
After laying the entire area, the paving should be compacted with a vibrating plate with a rubber pad. Rubber will prevent damage to the surface of the stone. This additional seal will prevent shrinkage.
Seam filling
Before making paving stones with your own hands, a supply of cement and sand is created. The seams are sealed with a dry cement-sand mixture or the same solution. The sand must be sifted. Dry sealing involves preparing a mixture in a ratio of 1: 6 with grade 500 cement. The mixture poured onto the paving stones is filled into the seams, then the coating is poured with water. After 3 days and there is shrinkage, the operation is repeated.
Sealing with mortar is similar; the mixture is prepared in a ratio of 1: 4 (PTs500). The solution is rubbed into the seams with a rubber or plastic spatula, and the surface is thoroughly cleaned of its residue. Shrinkage is eliminated by re-filling.