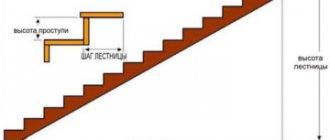
Advantages and disadvantages of concrete floor
The advantages of creating a screed on the floor or ground include:
Concrete floors are strong, durable and easy to install
- reliability and durability;
- high strength (used as a finishing coating in industrial enterprises where floor loads are extremely high);
- levelness of the base for the finished floor;
- availability of material;
- ease of manufacture.
Disadvantages include high thermal conductivity and low noise insulation. This issue is resolved by laying a layer of insulation under the screed, the thickness of which depends on its purpose.
Thickness and level in rooms
When choosing the required thickness of the poured solution, take into account:
- minimum restrictions depending on the type;
- operational load;
- absence or presence of reinforcing materials;
- strength of floors or foundations.
In multi-storey private houses, when the plan provides for 2 floors, an attic or attic space, or a basement, separate calculations are needed for each level of the building. If a “warm floor” system is installed, then you need to pour a layer at least 3 cm thick on top of the water pipes.
For convenience, they adhere to the same level for all floors on the same floor. This greatly simplifies the use of the building in the future. In a toilet, bathroom, sauna or other rooms where there is an increased risk of water spills or water/sewage pipes, it is recommended to install floors lower by 1 or several centimeters from the general level on the floor.
When arranging the screed, the type and characteristics of the decorative coating are taken into account for each room. For example, for tiles you will need approximately 1-2 cm, for linoleum - 0.3-0.7 cm, laminate - 1-2 cm. The screed must be done at such a level that the outer layer is at the same height.
Tools and materials
Filling the floor with your own hands requires careful preparation. To avoid the need to interrupt the work process and go to hardware stores in search of missing materials, it is recommended to make a list of the necessary devices and materials in advance. When compiling it, it would be correct to be guided by the recommendations presented below.
Instrumentation that will be required during the work:
- building level;
- if necessary, guide rails that will allow you to control the thickness of the concrete layer (wooden planks or metal corners can be used as them).
Tools for pouring a concrete floor
Tools include:
- buckets for mixing and transporting concrete mortar;
- shovels for laying the mixture and leveling it;
- trowels for leveling individual sections of the floor.
Pouring a floor in a private house requires the following materials:
- concrete solution;
- waterproofing;
- vapor barrier (when pouring floors on interfloor ceilings);
- reinforcing mesh (if necessary);
- thermal insulation material (if necessary);
- bulk materials, if the base for the floor pie is soil.
To properly pour the floor, you need to choose good concrete. There are two options for the development of events: purchasing a ready-made mixture at a factory or preparing it yourself.
To purchase from the manufacturer, it is enough to know the strength class of concrete.
Table of mortar proportions for screed
For screeding there is no need to use high-class concrete; a mixture of class B12.5 - B15 will suffice. This is true if you are pouring the floor yourself for a residential building where the loads are not very large. It is possible to make a rough layer from a more durable material, but this is not economically profitable; the use of lower classes is not recommended.
If you decide to prepare the concrete solution yourself, then you need to familiarize yourself with its proportions.
The main components of a cement-sand screed:
- cement M400 (CEM 32.5 – marking according to new regulatory documents);
- medium sand;
- water.
If the concrete floor is thick and high loads are expected on it, then crushed stone or gravel is added to this composition.
Screed solutions
Cement-sand mortar for screed
To install screeds, use a traditional cement-sand mortar of a grade not lower than M75. To prepare the solution, prepare a mixture of one part cement and three parts sand. The strength of the finished screed increases if the solution for laying the screed has a thick consistency.
Cement-sand mortar is easier to prepare and easier to lay in a screed than concrete. But the consumption of cement for constructing a screed of the required strength is greater than for concrete. Therefore, a mortar screed turns out to be more expensive than a concrete one.
Cement-sand mortar is recommended for use in thin-layer screeds.
Lime should not be added to the solution. Although lime increases the plasticity of the mortar, it reduces the strength of the screed.
Concrete of normal, densely plastic consistency
Concrete of classes B10, B15, B20 is used for constructing screeds. Crushed stone and gravel are used as concrete filler. The size of the filler granules must be at least three times smaller than the thickness of the screed.
Concrete for semi-dry screed (prance)
To prepare concrete for semi-dry screed, significantly less water is used than usual. A semi-dry screed has a higher compressive strength (up to 35 mPa) than screeds made from mortar and plastic concrete. In addition, it is less susceptible to shrinkage, which reduces the risk of cracks in the screed.
Semi-dry screed is suitable for installing heated floors. It is convenient to prepare concrete for semi-dry screed on a construction site in a special concrete mixer - mixocrete, which prepares the concrete and immediately supplies it with a pneumatic pump through a flexible pipe to the laying site.
Device technology
You should start working only after all supporting structures have been installed: walls, ceilings, roofing. It is important to correctly determine the design of the pie before starting work. It may differ for different cases. There are three options for the location of the concrete screed:
- the base for pouring becomes soil (floors on the ground);
- pouring on the interfloor ceiling;
- pouring over the attic floor when installing a cold attic.
In the first and last cases, it is necessary to lay heat-insulating materials, the layer thickness of which is calculated according to the requirements of heating engineering. In the second case, thermal insulators can be laid for noise insulation reasons, since concrete does not prevent the spread of noise well.
Selection of insulation
Technology of floor insulation with expanded clay
In order not to think about this when it is necessary to pour a rough concrete floor, the issue is resolved before starting work. If you plan to pour it on the ground, then inexpensive expanded clay is most often used as a heat insulator. The thickness of the backfill layer is on average from 30 to 50 cm, depending on the climatic region of construction. You can use a more effective material - extruded polystyrene foam. Its thickness will be in the range of 100-150 mm. When pouring onto the ground, the use of polystyrene foam or mineral wool is highly discouraged due to their low strength and instability to moisture.
For the attic floor under the screed, it is possible to use the following thermal insulation materials:
- extruded polystyrene foam;
- Styrofoam;
- rigid mineral wool slabs.
The best option in terms of price-quality ratio would be the following: a layer of foam plastic with an average thickness of 100 mm is laid on top of the ceiling, and then a layer of extruded polystyrene foam with a thickness of 50 mm. The use of inexpensive polystyrene foam allows you to reduce costs, and durable polystyrene foam increases the quality of the floor.
Scheme of floor insulation with mineral wool
It is important that if polystyrene foam or mineral wool are used as a heat insulator, reinforcement of the floor must be provided.
It can be done using wire meshes with a diameter of 3 mm with cells of 100 by 100 mm. The need for additional reinforcement is due to the low strength of these materials.
How to do it: basic rules
Depending on the base material, the time and method of laying the screed will be selected. Wood often undergoes various changes over time, including shrinkage and warping as a result of drying. This must be taken into account and not put off pouring for several months or years.
The thickness of the applied mortar is also determined by the characteristics of the building and premises. If, over time, the strength of the cement-sand layer is acquired, then the linear dimensions also change. Various tensile and compressive stresses arise.
Attention
When concrete layers dry, they contain a certain amount of moisture, which decreases as it evaporates. If this balance is disturbed due to contact with wood, which absorbs water vapor well, then cracks will appear on the surface of the floor, and sinks will appear on the wooden elements.
The main rules that must be followed when arranging a cement screed with your own hands in a wooden house are as follows:
- Arrangement of the fill should be carried out no earlier than 1–2 years after completion of construction.
- An insulating layer is placed to separate the concrete layer and wooden floors.
- The damper tape must be installed between the rough screed and the wood. This will reduce the stress from the concrete screed on the wooden elements.
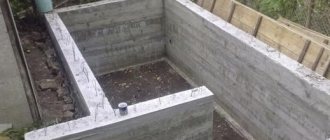
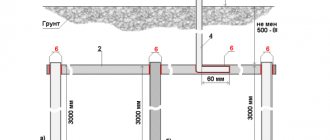
Floor Pie Composition
The composition depends on the purpose. For floors based on soil, the following pie can be given:
- high-quality compacted soil;
- backfill made of coarse sand or crushed stone approximately 30 cm thick (both options can be used);
- rough concrete screed;
- a layer of waterproofing (you can use rolled materials such as roofing felt, linocrom or waterproofing);
- thermal insulation layer;
- concrete floor.
Scheme of floor pie on the ground
If expanded clay is used as a heat insulator, then it is laid directly on the ground, instead of sand and crushed stone backfill.
If you need to fill the floor over the ceiling above a cold basement, then the cake looks like this:
- overlap;
- waterproofing;
- insulation;
- vapor barrier (can be omitted when insulating with penoplex);
- floor screed.
Slab floor diagram
For the interfloor floor and attic floor, the arrangement of layers is the same, but the vapor barrier and waterproofing are swapped. Polyethylene film is often used as both types of moisture protection.
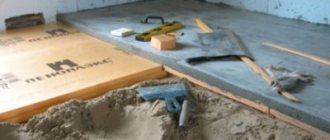
Laying the screed
Laying the screed indoors is done in one step, without interruptions. When planning work, take into account that the traditional solution must be laid within two hours after preparation. The shelf life for mortars prepared from ready-mixes is indicated on their packaging.
The solution is placed a few centimeters outside the doorway, and then the excess is cut off along the border of the expansion joint.
The surface of the screed is smoothed over with a trowel 8-10 hours after laying, until the concrete has completely set. The semi-dry concrete screed laid using a concrete pump is rubbed down after 3-4 hours. Smoothing eliminates minor roughness on the surface. There is no need to grout the screed if tiles will be laid on the screed.
Screed care
The screed should remain damp for a week after installation. At this time, the screed should not lose moisture, otherwise the strength of the screed will decrease. To prevent the screed from drying out, it is covered with plastic wrap or sprayed with water daily.
After seven days, the film is removed, the room is ventilated and the screed is left to dry. After another three to four weeks, tiles can be laid on the screed. Moisture-sensitive floor coverings are laid on the screed after four to six weeks, when the moisture content of the screed is less than 3%.
Work order
If the floor is poured onto the ground, then the order of work is as follows:
- markings on the walls that limit the level of concrete;
- compaction of the base soil (performed by compaction);
- laying bulk materials (sand, crushed stone, expanded clay);
- laying the components of the cake under concrete in order;
- reinforcement if necessary;
- installation of guide rails or formwork with large thickness of the structure;
- preparation of solution;
- filling the floor.
Scheme for pouring concrete onto the floor
If you plan to create a heated floor system, then the pipes should be laid before the floor is made, immediately after reinforcement.
The procedure for interfloor, basement and attic floors looks approximately the same as pouring onto the ground, but compacting the base and laying bedding is excluded.
Tips for completing the work
To ensure quality, the following recommendations should be followed:
- bulk materials are laid in layers, compacting each layer separately;
- It is best to pour concrete in one approach, the maximum number of stages is two;
- concrete needs compaction, for which a vibrator is used;
- To level the solution layer, a rule is used.
- The solution is laid in portions;
- The set of brand strength of the structure occurs in 28 days at a temperature of +20°C.