Methods of laying parquet and common patterns
Parquet is diverse when it comes to piece goods. It is assembled from many elements, like a constructor.
The most popular options for laying parquet are:
- Herringbone.
- Deck.
- Squares.
- Network.
- Checkers.
- Scandinavian style.
- Well.
- Diamonds.
- "Sheremetyevskaya Star"
- Art
There is also a modular option and three-strip parquet. The latter costs less per piece, but is only suitable for rooms with a humidity of 40-60% and a temperature range of 18-24 degrees.
Important
The question often arises: how to properly lay three-strip parquet planks? The technologies here are similar to working with piece material. The stages of operations are identical. Only the three-lane version requires even more careful care.
A must read
What floor to install in an apartment Warm floor in an apartment: a modern choice How to fill the floor in an apartment
Basic installation rules
In order for your parquet flooring to serve you for many years, you must adhere to some basic rules:
- Installation of parquet can be carried out after the floors, walls have been completely finished, and all communications have been installed and sealed.
- The parquet flooring is laid, adhering to the temperature regime and a certain humidity. Room temperature - from 18 to 25 degrees Celsius, humidity of walls and floors - 5-6%, air humidity - 40-60%. It must be taken into account that deviations from these standards often lead to deformation of the material.
- The base on which the parquet is placed must be as level as possible and free from any errors.
- It is necessary to lay the planks exactly following the instructions and the chosen method.
What is important to consider when choosing a layout
When choosing types of parquet installation, consider these factors:
- Overall decorative design plan. The parquet pattern should be optimally combined with the overall design.
- The feasibility of using one or another option. In some situations, more material is wasted.
- Laying method: on plywood or screed.
- Own budget.
The types of parquet installation are determined by these criteria. But keep in mind that no matter which option is chosen, this coating still requires constant care. And it must be rubbed with special compounds to add shine.
Prices for parquet work
The cost of installing parquet flooring largely depends on the chosen material and installation method. For example, installation of artistic parquet or with a complex pattern will differ significantly in price from a simple deck look. The final estimate for the work is calculated directly by the paver when arriving at the site.
Of course, piece parquet flooring is the leader of all floor coverings; with its help you can emphasize the advantages of a room and hide the disadvantages. The high quality of the material ensures durability, and the impeccable appearance will give the room a flawless and sophisticated look.
Parquet laying patterns - advantages and pitfalls
The components are folded into a pattern when laying the parquet. And the principle of the image lies in the correct selection of their parameters and formats. And they are arranged in a specific sequence. To give the coating individuality, I use decorative inserts.
The plane is easily filled with the following shapes: squares, regular triangles and hexagons. To build a composition from irregular shapes, one should be based on Penrose’s theory: the figures and their sizes are correlated in the ornament with a value of 1.618...
The main goal of installation is to create a solid canvas and fit it organically into the interior.
Scheme - herringbone
There are several variations of it. The simplest installation of herringbone parquet is called single straight (classic). The slats for it are rectangular in shape and placed at right angles to each other at an angle of 45 degrees to the wall.
How to lay this version of parquet with your own hands? The work is performed using the following algorithm:
- I make markings, divide the floor exactly in half, and pull the cord tightly.
- To the side of the floor, I collect a dry strip of 5-6 dies, which I fold perpendicularly.
- I draw a wide line of glue along the cord and place the Christmas tree in the middle of the room.
- I lay the parquet along this guideline from top to bottom and to the sides.
- I cut the outer planks in a straight line and make a frame from planks arranged in parallel.
Be sure to leave a gap of 10-20 cm between the wood and the wall. It neutralizes wood movements during temperature fluctuations.
Laying parquet in a herringbone pattern can also occur diagonally.
There is also a double variation. It differs from a straight line in that two bars are placed along each vector.
When laying French herringbone parquet, elements in the form of a parallelepiped are used. I cut them right on the spot. They are more expensive than regular options.
In the Christmas tree covering, the load is distributed evenly, and cracks and warping are almost eliminated. And here, excellent plank geometry is not required. Minor errors are hidden during installation work and sanding. When creating such a layout, I maintain an integer number of rows and an even number of planks in the snake.
Deck layout
How to lay parquet on it, and what are its features? I place the planks one vector at a time in parallel relation to each other. This is an easy method that leaves almost no scraps.
For your information
Typically, deck laying of parquet occurs with a shift of planks: symmetrical or chaotic. In the first option, they shift by 50% or 30% of their length. In the second, I don’t need constant measurements; I work quickly and use planks of different lengths.
It is also possible to lay parquet diagonally here. Examples of the indicated options are reflected below:
.
Squares
Laying block parquet using this method is simple and effective. Here longitudinal and transverse dies alternate. The result is a kind of chess field. To enhance the coverage, I use dark and light wood in combination. At the customer's request, I can surround each module with original thin frames.
There are many variations here. The only negative is that this installation is optimal only for spacious rooms. In a small room, large figures look bulky and visually “steal” the space.
A must read
What floor to install in an apartment Warm floor in an apartment: a modern choice How to fill the floor in an apartment
Scheme - braided
This is the most difficult variation. Parquet arranged in this way belongs to the artistic category.
The circuit is based on a square module. It is framed by boards of contrasting shades. The result is chic and elegant. Only after installation work a lot of waste remains. Therefore, I recommend purchasing materials 20-30% more than the actual area of the room.
Checkers
This is another easy option. Here the squares are assembled from parquet staves and laid with a turn at right angles to each other.
Here we get a game of whole squares in the light. To enhance the effect of parquet with my own hands, I use materials with different textures. For example, I make a combination of walnut and ash.
I lay the “checker” diagonally and place it parallel to the walls.
Laying parquet diagonally according to this pattern has the following features:
- 50% of parquet flooring used must have a right-hand lock. The other 50% is left.
- When using materials with different textures, it is necessary to redo some of the locks of the boards. For this purpose, other grooves and ridges are created. The work is paid separately.
- The reserve for cutting usually remains in the range of 0-15%.
- When dividing the length of the boards by the width, there should be no remainder. To do this, use material 5 x 40 x 6 x 42 cm. This is how I assemble the correct squares.
Scandinavian style
Its second name is Swedish. This method results in the creation of a beautiful ornament with a modest waste of wood. How to lay out this type of parquet with your own hands? You should know its specifics and technology.
Here the lines of the figures form pairs of rivets. Their ends are limited by a half die. When forming an adjacent line, I shift such dies to the center of the component of the previous row. To achieve a unique effect, I use separating plates of other tones.
Advice
How to lay Swedish parquet correctly? You need to know the main difficulty in your work. It occurs when milling locks on the end sides of dies, which I cut in half. In rare cases, it is possible to mount halves without fixing one of the sides (but usually I do not recommend doing this).
The diagonal version of the scheme is used very rarely. Parallel variation requires a reserve of dies of 3-5%. After all, you have to trim the first and last figure in each row.
Laying parquet in a “well”
Here squares are joined, enclosed in single or double tiles, as in a chess configuration. This pattern when laying parquet has many analogies with a lattice, for which it is also called “Basket”.
To achieve the best effect, I use wood in contrasting shades for the interior boards and frame.
Laying parquet on your own without the proper experience will bring a lot of costs and technical difficulties. I do not recommend this method for beginners. And if you need a “well”, involve specialists.
The planks are used here, as in the “braided” pattern, both diagonally and parallel.
Example of work:
Diamonds or “Sheremetyevo” pattern
This pattern is created very painstakingly, but it turns out quite impressive. Here the figures immediately catch the eye.
Laying block parquet of this type has the following specifics:
- The planks are laid out as a surrounding border in combination with calm images, for example, a spruce tree.
- To visually increase the volume, diamonds made of three types of wood are laid out. They are selected according to the taste of the owner. For example: oak, walnut and pine.
Example result:
"Sheremetyevskaya Star"
The design is similar to a honeycomb. The simple components here form hexagons. If you choose the right tones of the edges, the image turns out to be more optically voluminous.
Material consumption is determined by its width. Waste is usually 15-25%.
I do not recommend doing this installation on your own due to its complexity.
Artistic parquet
This is the most elegant and complex option. It includes friezes, figured elements and borders.
Laying artistic parquet gives scope for design ideas. The results can be varied, for example:
The composition is thought out even before the components of the structure are created. Valuable species are used to make rivets. They are decorated with patterns made from other materials. To prevent cutting from disturbing the design, friezes are used.
Laying artistic parquet has the same stages as working with other piece options. Only the room should maintain a constant temperature of 18-23 degrees. And waterproofing must be installed in the rough foundation.
Also, this parquet deteriorates from sanding. For this reason, a strong varnish coating should be formed on it: from 3 to 7 layers.
Modular parquet
This is a subtype of garden parquet for interior use, reminiscent of tiles in structure.
Products from different companies differ in quality and performance. Almost all of them are equipped with tongue-and-groove locks. Depending on the style, the face layer may have a chamfer. If the end side of the parquet is treated with special means, then this is not difficult to determine visually: there is a thin light film on the locks.
How to lay modular parquet? There are two options here:
- Entirely throughout the room.
- In combination with parquet boards of the same thickness.
The base is created as for another type of parquet. When laying on flat concrete, no plywood underlay is used.
The product is mounted to the floor using two-component elastic adhesive. Pins are used to secure the tiles.
If the front side of the product is laminated, then after the glue has hardened, it is only washed. When laying such parquet in combination with other types, it is sanded, puttied and varnished.
Have questions ? Call!
Preparatory stage of work
Before starting the main stage of work, a number of important preparatory activities should be carried out.
1. Preparing the base
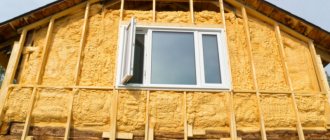
Requirements for the base for laying boards in a floating manner. Old wooden, tile or stone floors, a base made of concrete or self-leveling mixtures, etc. can be used as a base for parquet boards. Textile coverings (carpet, linoleum, carpet) are not suitable as a base material. Regardless of the type of base used, it must be level, dry, durable and clean. The evenness of the base is checked over the entire area of the upcoming installation, using a rule of at least 2 meters in length. The clearance between the base and the rule should not exceed 2-3 mm over a length of 2000 mm. If necessary, the base should be leveled or sanded in accordance with the specified requirements. The moisture content in a concrete or sand-cement base should not exceed 2%. Heated floors should be used as a base with extreme caution. The heating temperature of the base surface should in no case exceed +27 °C. Fluctuations in floor temperature during the day should remain within 5 °C. It is not recommended to lay parquet boards made of wood species that are especially sensitive to changes in humidity and temperature, such as beech, maple, olive or wenge, on heated floors.
Requirements for the base for laying boards using the rigid fastening method. Just like for a floating floor, the base for rigid fastening of the parquet board must be dry, level, clean and durable. In addition, it should be as suitable as possible for complete surface gluing of parquet and be able to reliably hold nails or screws inside it. The ideal base is moisture-resistant plywood, comparable in thickness to parquet boards. Plywood, in turn, must also be securely attached to a wooden or concrete base using glue and self-tapping screws. The surface of the plywood must be sanded, and the plywood itself must be laid in compliance with a technological gap of 5 mm wide between the sheets. Attention! The use of “warm floor” systems under such a foundation is unacceptable.
2. Layout diagram
Before starting work, you need to decide on the direction of laying the parquet boards in each room. Usually the board is laid in the direction of daylight falling into the room. In elongated rooms, it is recommended to lay parquet boards in the longitudinal direction (material waste will be 3-5%). In rooms with complex geometric shapes, you can lay the board diagonally (material waste will be 7-10%). If the base is an old wooden floor, the parquet should be laid across the boards of this floor. Rooms with different laying directions must be separated by expansion joints, which are then closed with overhead thresholds.
3. Preparing materials and tools for work
Minimum set of tools. To lay parquet boards you will need the following tools: a saw with a thin blade, a hammer, a sharp knife, a marking square, a drill, a chisel, a tape measure, a pencil, a wooden or plastic hammer (at least 30 cm long with straight edges), wooden wedges, a spatula and mounting foot.
Preparing the board and related materials for use. Before starting work, prepare the parquet board for installation. It is recommended to keep unopened packages of parquet boards in the room where they will be installed for at least 3-5 days to better adapt the boards to the microclimate of the room. Parquet packs should only be opened as work progresses. Before laying the boards, you need to make sure that they have no defects. If a damaged board is found, it can be replaced with a board without flaws by contacting the seller, or used at the beginning or end of a row during the installation process. The room in which installation will be carried out must be well lit and have optimal temperature (18-24 ° C) and air humidity (40-60%). Do not forget to prepare for work all the materials necessary for installation: the substrate and, if necessary, glue, plywood, hardware, rags to remove excess glue.
Important points to consider when laying parquet boards using the floating method
Before starting work, be sure to read the installation manual and operating rules for parquet boards compiled by its manufacturer. Below are only general recommendations for laying parquet boards, and also list typical mistakes that inexperienced craftsmen make when carrying out installation work.
1. Brief step-by-step instructions for floating installation
First of all, you need to measure the width of the room and calculate how many rows of boards will be needed. If the width of the last row is less than 40 mm, cut the boards of the first row with a saw, reducing their width.
Spread the underlay on the base of the floor, if necessary, fastening adjacent sheets of material with adhesive tape so that they do not bend during installation.
Start laying from left to right (Fig. 1), from the solid wall of the room, placing the first board with the longitudinal tenon to the wall. The distance of 7-10 mm between the boards and the wall must be adjusted using wedges.
Install the next board with the short side facing the previous board. Connect the boards to each other tenon into groove (Fig. 2). Continue laying in this way until the end of the first row.
Using a saw, cut the last board of the row to size, taking into account the expansion joint, and lay it.
Start the next row (Fig. 5) with a piece cut from the last board laid. Adjacent boards should overlap each other by at least 30-50 cm (Fig. 3). For a tight connection, it is necessary to lightly knock adjacent boards together using a hammer and a hammer (Fig. 8). Attention! Do not use cutting boards as a support. Continue assembling the parquet board until you reach the last row.
The last row. Measure the width of the last row at several points (including the expansion joint), mark a cutting line and cut the boards to the appropriate size. Lay the boards down and press them firmly into place, for example using a jig. Place a protective pad between the wall and the mounting lug to prevent damage to the wall. Install spacer wedges.
2. Main mistakes during installation work
Even after studying the instructions for laying parquet boards, many make typical mistakes and miscalculations, namely:
- lay the parquet board on a poorly prepared base;
- carry out installation work in a room with improper temperature and humidity conditions;
- they are not satisfied with the technological seam at the border of the board with other floor coverings and when approaching vertical obstacles (walls, columns, built-in furniture);
- when laying, use cutting boards of smaller than acceptable sizes;
- leave the distance between the end joints of boards in adjacent rows less than 30 cm;
- loosely connect the docking joint (tenon and groove) of the board.
Important points that must be taken into account when laying parquet boards using the method of rigid attachment to the base
1. Brief step-by-step installation instructions with gluing to the base
Once again, make sure the readiness and quality of the base, materials and tools for laying the board in this way.
Assemble the parquet boards in the same order as for assembling the boards using the floating method, first applying a layer of glue to the base or back of the board.
Press each glued board firmly to the base using nails or a heavy weight. Do not remove the load until the glue has completely dried.
Avoid contact of adhesives with oiled or varnished surfaces. Immediately remove excess glue protruding onto the surface with a damp cloth, preventing it from drying out.
Do not subject the floor to heavy loads in the first few hours after installation until the adhesive has completely dried.
2. Main mistakes during installation work
The method of rigid attachment to the base requires much more experience in carrying out parquet work. But even professional parquet floorers sometimes make mistakes:
- do not clean the base from dust and dirt, which leads to deterioration in the quality of gluing;
- use low-quality, improperly prepared or unsuitable glue;
- do not control glue consumption;
- they do not press the boards tightly enough to the base, leaving “air pockets” between them;
- do not remove glue residues from the surface of the board in a timely manner.
Is it possible to lay parquet on concrete?
The answer is yes if there is a completely flat surface. Laying parquet on a screed is carried out only with glue, which, after drying, is highly elastic. Nails and screws are not needed here. The method is not particularly difficult, but is rarely used, as it results in a creaky floor.
Reason: Concrete and wood expand differently under the influence of temperature and moisture. And often the planks move away from the surface and touch each other under load.
For your information
Therefore, if you plan to lay block parquet on smooth concrete, I recommend creating an additional layer in the form of plywood between it and the parquet. It will prevent the material from coming off and will create a non-squeaky coating.
Laying artistic parquet
Artistic parquet is a unique material with which you can realize the most daring design solutions. Its varieties allow you to make the most complex designs on the floor surface. This type of parquet is mainly made from oak, ash or maple wood. Modules for laying have two types; they can be threaded or made as a single panel.
Sometimes the compositions of such parquet consist of many modules of different sizes and different types of wood, which give the floor a special look and personality. In addition, for greater effect and elegance, various semi-precious stones are laid on the floor. Installation of piece artistic parquet is considered the most complex process; this work takes a lot of time, and requires high professionalism and skill from a specialist.
The layout of panel artistic parquet is mainly made on a screed coated with a primer, this makes it possible to abandon plywood. Piece strips are mostly placed on plywood, which is secured with glue or screws. There are several main directions used in these works in artistic style:
- Classic. This pattern is distinguished by strict symmetries, mainly geometric shapes predominate.
- Modern. The most popular type with smooth lines and patterns.
- Art Deco. This is a mixed style, performed without sharp transitions in soft colors.
- Baroque. It is considered to be the most complex and elaborate look, emphasizing luxury.
Despite the quality, uniqueness and elegance of such a coating, artistic parquet is in little demand due to the high cost of the material and the complexity of the work.
Laying technology
To perform the correct work with your own hands, step-by-step instructions must be followed. It consists of the following points:
- Preparing the base.
- Laying and fixing plywood.
- Sanding plywood and its joints.
- Technological break: 2-3 days.
- Surface priming.
- Laying parquet according to a specific pattern.
- Glue drying: 5-7 days.
- Grinding.
- Putty.
- Re-sanding.
- Creation of the finishing coating.
Parquet flooring - pros and cons
Compared to other floor coverings, parquet has advantages and disadvantages.
Advantages of parquet:
- naturalness;
- wear resistance;
- maintainability;
- environmental friendliness;
- beautiful appearance and the ability to implement various design solutions in the interior;
- no static electricity.
Disadvantages of parquet:
- sensitivity to moisture;
- high price;
- the complexity of the installation process;
- the need for additional finishing of the laid parquet and subsequent maintenance.
Laying on screed
It occurs only after the above actions. Laying parquet on a concrete screed should only be done after the composition has completely dried. The interval depends on the thickness of the base. If it is 5 cm, then you can lay parquet only after 4-6 weeks.
Be sure to use suitable tools for laying parquet. Their list includes:
- Parquet hammer.
- Electric jigsaw.
- Sharpened knife.
- Tools for marking: tape measure, cord and pencil.
- Level.
- Drill.
- Limiters.
- Tamping block.
- Stainless steel spatula.
- Construction vacuum cleaner.
- Angle grinder.
Also needed:
- Waterproofing film.
- Wood putty.
- Adhesive primer.
- Impregnation for concrete.
- Parquet varnish.
Parquet flooring is laid on a screed using adhesive compounds. They are selected according to the type of wood and the specifics of the material. I suggest studying the table with characteristics:
| Type of glue | Peculiarities | Suitable breeds | Drying time |
| Dispersive | Environmental Safety | Moisture resistant (larch, oak, etc.) | Till 12 o'clock |
| Synthetic | High elasticity and strength | 15 minutes | |
| Two-component | In liquid format it is toxic. After drying, it loses elasticity. | Any | Up to 8 hours |
| Polymeric | Soundproofing effect. Strong smell. Hardens under the influence of moisture. | Moisture resistant | Up to 24 hours |
Types of installation
How is parquet board laid? Traditional laying with parallel stripes is called classical.
Classic laying of parquet boards
It remains popular because it does not require special skill - the slats have tongue-and-groove locking joints. All that remains is to connect the boards to each other, corresponding to the laying area.
Other types:
- French Christmas tree
- English Christmas tree
- Dutch styling
- Artistic parquet
Helpful information
Any technology that differs from the classical one requires an increase in the number of parquet boards - consumption increases up to 50%.
Laying on plywood
In this process, the rows of its sheets are shifted so that the seams of the previous line are in the center of the next one. They are separated from each other by a gap of 3-5 mm, and from the walls - 1 cm.
To prevent the plywood and parquet seams from matching, I place them differently. If the plywood lies straight, then the parquet is laid diagonally and vice versa. The technology of laying parquet on plywood is based on this.
The plywood is attached to the base with self-tapping screws. If the fasteners do not hold well, I prime the base and cover it with glue, then lay down plywood. After 2-3 days I polish it until all the differences in altitude disappear.
The correct technology for laying parquet on plywood also depends on the parameters of the materials.
Plywood density should reach two thirds of the thickness of the parquet strip. Example: Plank – 1.5 – plywood – 1 cm.
I recommend cutting a standard plywood sheet into 4 pieces. This format eliminates the appearance of squeaks and the parquet coming off.
Have questions ? Call!
Parquet preparation
Before laying the parquet board yourself, the manipulations with the purchased coating are as follows: it is removed from the packaging and laid out on a horizontal surface. The boards are left for several days in a room where adaptation to the climate will take place. In the future, this will affect the better quality of the surface - it will not move or warp, the planks will calmly accept the established position. Next, a selection of parquet is made - boards with minimal defects are set aside, they will be used for trimming or inserting.
Laying out the coating
This is a mandatory item in the step-by-step instructions for laying parquet with your own hands. This material needs to be kept indoors for several days. It acquires functional moisture. Usually 2-3 days are enough. Afterwards you can start the workflow. Arm yourself with:
- With a notched spatula (tooth parameter – 3-4 mm),
- A piece of parquet (length – 10-15 cm),
- Rubber hammer.
I place the piece on a board and tap it with a hammer. This way I eliminate the gap and protect the parquet from damage.
Next comes the main process. If you do the work yourself, the step-by-step instructions should not be ignored. The stages are:
- At the wall along which the installation will follow, the initial plank is mounted on self-tapping screws. It will provide the necessary gap and the possibility of bonding the coating.
- Applying glue to a small area. This will allow you to stack several elements.
- Laying parquet flooring. The tenon goes to the beam. The board is pressed. Gaps are eliminated. When working with nails, the elements are placed in the groove. Two - on the extreme sides, one - in the middle, one more - in the side.
- Installation of the second rivet. It is tapped and fixed to the end of the line. The final die is cut off. There is 1 cm left from it to the wall. To ensure this gap, a wedge is driven between it and the wall.
- The beginning of the second line. Comes from a cut plank. The groove of the supplied die is coated with a small layer of glue. The plank should press tightly against the laid out line and against its “neighbor” in the row. Existing gaps are eliminated.
- Glue drying.
After work, I remove the bar at the starting line and the wedges around the entire perimeter.
A must read
What floor to install in an apartment Warm floor in an apartment: a modern choice How to fill the floor in an apartment
How to lay strip parquet
To get a high-quality coating, you need to approach parquet installation with all seriousness. This work requires a special approach and compliance with all installation rules.
- Preparing the base. Preparatory work is considered the most important stage, since the durability of the parquet flooring directly depends on the characteristics of the floor surface. The concrete base must have a smooth surface, without any flaws. It is important to take into account that 1-1.5 months must pass after screeding so that the concrete floor is completely dry and does not subsequently lead to deformation of the parquet.
- Waterproofing. After it has completely dried, you need to waterproof the floor. To do this, you can use a special primer or epoxy resin. The selected composition is used to prime the entire floor where the parquet flooring will be laid.
- Installation of plywood. After completing the first stage, the subfloor is laid using moisture-resistant plywood. Please note that plywood must be at least 12 mm thick; thinner material is not suitable as it will not be able to fulfill its function. Plywood perfectly levels the surface, protects the coating from shrinkage, and serves as a good thermal insulation base. Before laying it, as a rule, the material is cut into squares of 50 X 50 cm. Plywood can be laid simply on a concrete base or mounted on logs.
- If plywood is mounted on a screed, then a layer of glue is applied to its surface, sheets of plywood are placed and secured with screws or nails. It is necessary to take into account that there should be a small gap of 1-1.5 mm between the sheets, and a gap of 3-4 mm should be left between the plywood slabs and the wall, this will help in case of expansion of the plywood to prevent the parquet flooring from deforming.
- You can also lay plywood on joists, without having to level the base of the floor. In this case, a layer of special film is laid out on the floor, which serves as waterproofing. Logs are placed on the film at a distance of 30-40 cm and secured with dowels and special corners. It is necessary to ensure that the logs lie level; to do this, if necessary, place wooden stands under them in case of unevenness. Having arranged the logs, you can attach plywood to them, nailing them along the edges and in the middle, not forgetting to also leave small gaps.
- The next stage is laying parquet using the selected technology, depending on the type, which will be discussed in the next paragraph.
- Putty. Using a special putty composition intended for wood, all cracks and irregularities are eliminated and allowed to dry.
- Sanding block parquet. For these works, a grinding machine is used, which smoothes out roughness and makes the surface perfectly smooth.
- Tinting of piece parquet. If necessary, you can tint, emphasizing the shade and structure of the selected wood. Varnish or oil coating. This is required to protect the wood from moisture and various mechanical damage. Apply varnish or oil evenly with a roller over the entire surface of the floor in several layers, allowing each of them to dry well.
- Installation of skirting boards and thresholds.
Sanding, putty
Two angle grinders are used. One work is in the center, the second is under the walls. They contain sandpaper with different grain parameters. For the initial pass it is 40, for the second – 80, third – 100, last – 120.
To eliminate cracks, a mixture of putty and wood dust is used. It is applied to the surface with a wide rubber spatula. The entire surface is covered.
When the putty is completely dry, the floor is sanded with a belt angle grinder, the paper in it has a grain size of 100 and 120. Then the dust is removed with a vacuum cleaner.
To lay or not to lay underlayment
Experts unanimously say that before laying parquet, it is necessary to cover the screed with moisture-resistant plywood. Many home-grown self-taught practitioners object to them in their reviews, saying that this is a completely unnecessary step and a waste of money; parquet holds up well on a concrete floor. It must be said that there is a certain reason for both arguments.
Of course, if you look at how parquet is laid in old houses, specifically on concrete without a plywood backing, you may be inclined to agree with the opinion of the craftsmen. But the thing is that the technology for laying parquet has changed a lot. Previously, it was laid using a hot method, using molten bitumen mastic, but today a special glue is used for installation; it is its use that determines the base for parquet in the form of plywood.
If the parquet is laid using a rigid method, then it is quite possible to neglect the plywood backing. But a floating floor, be it natural, classic piece or panel parquet, is still better to lay on plywood, as it is easier to drive pins into it.
But from the point of view of practicality, it is still better to lay plywood, since it will serve as additional noise and heat insulation; you must agree, this is a fairly compelling argument in favor of the substrate. The parquet can then also be laid on plywood using glue.
A cork underlay is relevant if a floating floor is installed; it is not practical to lay parquet in this way
For floating installation, you can use a cork backing instead of plywood. It is elastic, will smooth out even the smallest bulges and debris on the screed, in addition, the cork will serve as a protective layer for the joints between the dies, whether you like it or not, and concrete dust during the operation of the floor still clogs the locking joint. The cork backing is also an additional hydro-, sound- and noise barrier, and contributes to the uniform distribution of mechanical load over the entire surface.
Varnishing parquet
The choice of varnish is an individual matter, as regards the level of gloss. An important aspect is its base: solvents, water, polymer resins, etc.
The number of layers determines the gloss index. So, for gloss you need 5-6 of them.
Solvent-based options give this effect. But they have a pungent odor and can chip when subjected to mechanical stress. There are also very durable, but very expensive varnishes in this category.
Advice
I recommend taking dispersion versions with one or two components. The former do not smell, but dry for a very long time, the latter are very toxic and smelly, but dry quickly.
Tools and materials
For parquet laying work, certain tools may be required, as well as a number of materials. The list is approximate, since the need to use some of them will depend on the method by which the parquet is laid. May be useful:
- jigsaw or saw;
- grinding machines;
- drill, dowels and screws;
- hammer;
- measuring instruments and pencil;
- notched spatula;
- brushes and primer;
- moisture-proofing material;
- adhesive composition;
- nails, parquet staples;
- varnish
Notched trowel
It is necessary to pay special attention to the purchase of the parquet itself - its service life will directly depend on its quality. You should not buy low quality, cheap or damaged material. Also, the parquet must be chosen in a color that matches the overall style of the room where the renovation is being carried out.
Installation on concrete floor
On a note! Oak parquet is the most durable and reliable, as well as durable, but is quite expensive. Maple and beech materials are cheaper, but not much inferior in quality to oak.
Parquet primer and its features
Before working with varnish, I prime the floor. The type of product is determined by the base of the varnish. I advise you to buy formulations from the same brand.
The floor is primed twice. The primer is applied with a long-handled roller. When the initial layer has dried, I examine the surface. If it is rough, I sand it with a machine with a 120 blade until smooth. I repeat the priming. If there are rough areas after it, I eliminate them using an angle grinder.
A must read
What floor to install in an apartment Warm floor in an apartment: a modern choice How to fill the floor in an apartment
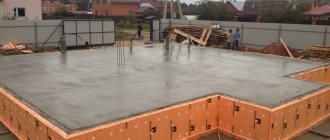
Preparatory work. Concrete screed
Before installation, to adapt to temperature and humidity conditions, the parquet board must “rest” in the room for at least a day .
The dies are carefully sorted by color before laying.
Inexpensive types of parquet may have knots - such boards are laid in the most inconspicuous places - under furniture or household appliances.
The classic way to lay a parquet board is to install it on a concrete screed. A layer of concrete will not only help to hide defects, but will also allow you to perfectly level the surface .
To make the parquet look perfectly smooth and neat, after applying the base layer of concrete, it is advisable to additionally level the floor using self-leveling self-leveling mixtures .
To prevent water from leaking out of the concrete solution, before pouring it, the floor is waterproofed with a film with a slight overlap on the wall .
To remove residual moisture, the concrete pour is thoroughly dried - a 1 cm thick screed takes a week to dry, and a 2 cm thick coating takes at least two weeks. If the difference in floor height is too large, the thickness of the screed can be significant, so reinforcement is used to strengthen the surface . Complete drying of a thick layer of reinforced screed takes at least a month.
Important! To check the moisture content of concrete, place a piece of plastic film on it and press it with a brick or other heavy object.
If condensation forms on its surface after a day, the concrete base has not dried out enough.
Laying television, telephone or other low-current cables in plastic pipes under the screed is possible, but it is more reasonable to lay them in holes specially designed for such purposes in the slabs .
Before installation, a diagram of the location of all cables is drawn up - in this case, during repair work, damage to the parquet will be minimal.
How to apply varnish to parquet
At this stage I use a roller or brush. I take into account the consistency of the varnish. If it is viscous, then after application the surface is not smooth. I apply the varnish in two layers without changing the condition of the surface. Before forming the third layer, I dilute the varnish a little, reducing its consistency. It turns out to be slightly below standard.
I take my time with the work; the next layer is formed after the previous one has completely dried. I apply the varnish, spreading it evenly over the surface. I eliminate puddles and drips immediately.
When the layer dries, there may be drips. I remove them with 120-150 grit sandpaper. The next layer is created after removing the dust.
Laying plywood with your own hands
After the concrete coating has dried sufficiently, to improve the adhesion of the adhesive joint, the floor is treated twice with a primer with an antiseptic .
Do-it-yourself laying of piece parquet boards must be carried out only after preliminary waterproofing with moisture-resistant plywood .
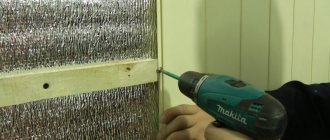
Most often it is laid in two layers, and the total thickness should be no more than 20 mm . Each layer is laid using glue with additional fastening with self-tapping screws, leaving a gap of 10 mm between the wall and the plywood covering. The joints formed between the sheets are carefully filled with sealant . To ensure a tighter fit and compensate for thermal expansion, each sheet of plywood is cut into four equal parts using a circular saw . To install self-tapping screws, nine holes are prepared in each sheet.
The screws must be recessed into the wood a few millimeters - otherwise, when subsequently cleaning the joints, damage to the grinding machine drum may occur.
Before laying, a layer of adhesive is applied to the concrete base using a notched trowel.
To level the plane under the parquet board and place communications, logs can be installed under the plywood , and their adjustment to the required level is achieved using a special key.
Even in the case of an ideal screed and correct laying, small differences in height are formed between the fragments of plywood sheets, which can be easily removed using a grinding machine with a 36-40 grit abrasive .
When laying a floor without using plywood, it is better to use glue based on MS polymers or polyurethanes .
Preparing the screed for laying plywood or parquet with glue
Regardless of whether the parquet is laid on a concrete floor or plywood is laid first and then dies, the screed must be primed. It is better to choose a solution with antiseptic properties, so that even with high humidity the tree is reliably protected from fungi and other biological impurities.
But mainly, the primer is applied to increase the adhesive characteristics of the surface; good adhesion of the materials will ensure a long service life of the parquet. The type of primer must match the type of adhesive, for example, if the adhesive composition is rubber-based, then the primer must be rubber-based using solvents.
Primer should be applied in 2 layers. First, the entire surface is thoroughly coated with a roller, and after an hour a second layer is applied. The second layer can be sprinkled with quartz sand with a very fine fraction, this will increase adhesion many times over. After the primer has dried, the excess sand is swept away.
About the concept of “parquet”
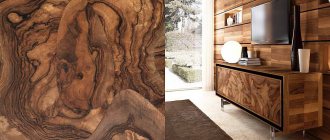
Parquet is narrow rectangular planks or small elements of other shapes, consisting entirely of wood. Manufacturers and sellers often offer parquet or solid boards under the name “parquet”, but these are different materials. They are installed using similar, but not the same technology. Features of these coatings:
- A solid board is a solid wooden panel, usually rectangular in shape; due to its large size, its installation is much easier and faster.
- Parquet board is a three-layer panel measuring 14 x 100 cm. The bottom layer is plywood, the middle layer is cheap wood, the top layer is more expensive.
Another type of wooden flooring is panel parquet (modular). In essence, this is the same three-layer parquet board, only square in shape. It is correct to call parquet the following types: piece, typesetting, artistic.
How to remove stains from parquet
With further use of the coating, stains may appear that cannot be washed with a damp cloth. To remove such stains, special means are used, but there are also traditional methods that are more gentle and no less effective.
How to remove stains from parquet
- A fresh blood stain can be removed with a cloth soaked in cold water. If the blood has dried, then a small amount of ammonia is added to the water and only then the rag is wetted.
- Black stripes from shoes can be easily removed with a nylon cloth - you just need to rub the surface a little.
- The wax stain is first frozen, then carefully cleaned off with a plastic spatula. A soft material is placed on the remaining wax and ironed.
- To remove chewing gum or paint, you can only use special cleaning products. In this case, it is important to read the instructions in advance, since amateur activities will lead to irreversible damage to the material.
How to remove stains from parquet - To remove nail polish, use a mixture of water and acetone.
Attention! It is unacceptable to use acetone in its pure form.
Parquet
For a more detailed introduction to the installation technology, watch the video below.
Hungarian Christmas tree
Hungarian Christmas tree
The second most popular pattern for laying parquet, which is considered “classic”. With this installation, thanks to the different angles of light incidence, it seems that the texture of the parquet blocks is different, and the pattern becomes very textured.
To lay parquet with a Hungarian herringbone pattern, 2 types of parquet blocks are required: with a right and a left lock. Typically, the packaging of parquet for installation in the “Hungarian” pattern consists of dies with a right and left lock in a 1:1 ratio. The supply of material for laying a Hungarian Christmas tree should be at least 7-10%.
Laying is done both along the walls and diagonally. In the first case, installation always starts from the center of the room.