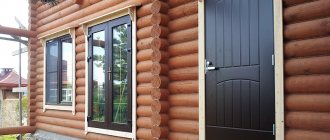
The process of constructing a private wooden house consists of several stages, one of which is related to the construction of the floor structure. Its type is chosen at the design stage of the structure and many factors are taken into account. What kind of floors there are in a wooden house, and the features of their designs will be discussed in this article.
Floors in a wooden house
Floor on the first floor - design features
The floor on the ground floor in a wooden house, when there is an unheated basement underneath, has its own characteristics. In this regard, several types of structures can be distinguished:
1. Cold floor construction, installed on an earthen base (without underground). The installation of this type of cold floor is possible only if there is dry soil under the building and a high location of the floors of the lower floor, under which a layer of compacted sand is laid. Another layer of clean, calcined, dry sand is poured on top of it. Logs made of coniferous timber with a thickness of more than 150 mm are buried in the formed soil base and rest against special recesses in the walls of the house. On top there is a single plank flooring, the thickness of which is from 30 to 40 mm.
Wooden floor on the ground
2. Warm floors with a cold underground are recommended in areas where there is a high groundwater level. This design is arranged as follows:
- cleaned sand in a layer of 10 - 15 cm is laid on the ground in the underground and compacted;
- install supports with a height of at least 50 cm. To do this, you can pour concrete mortar into vertically buried pipes with a metal frame of the required height;
- a double layer of waterproofing material and wooden dies 3 cm thick are laid on top of the supports;
- load-bearing beams are laid.
To install thermal insulation, it is necessary to install a subfloor laid on slats nailed to the ends of the joists. For flooring, cut unedged boards are used. Then a layer of vapor barrier and insulation are laid. After this, a plank covering is laid over the beams.
Warm floor with cold underground
3. The installation of a cold floor with a warm subfloor is recommended where the soil has a low level of soil water. In the same way as in the previously described method, the structure is installed, but the stage of installing a subfloor with insulation is skipped and a clean floor is installed.
General principles of wood flooring
The floorboards themselves are always laid on logs , but the logs themselves can be laid either on a concrete or even earthen base, or on supports - usually brick, wood or metal pillars. Rarely, but still used is a technology in which the ends of the joists are embedded in opposite walls or laid on specially provided ledges near the walls and operated without intermediate supports. However, in this case, it is very difficult to cover wide spans - logs of a very large cross-section and weight are required, and it is almost impossible to install them correctly alone...
The installation of wooden floors on a concrete base is practically no different from the installation of floors in an apartment with floors made of reinforced concrete slabs. The situation is much more complicated with the installation of a floor on the first floor of a private house , since in this case it is highly desirable to install a ventilated and DRY underground. Its presence largely determines the strength and durability of the finished floor, especially in cases of high groundwater.
What should a wooden house be like?
The floor in a wooden house should be strong, durable, warm and smooth, with an aesthetic appearance.
When performing work on installing a floor in a wooden house independently, they take into account the above requirements, and also determine the procedure for performing the upcoming work, take into account the characteristics of the structure of the building and the individual characteristics of the operation of the house. First, you need to consider the different flooring options that can be installed in a wooden house, study their pros and cons and, taking into account the operating conditions, choose the appropriate option.
Natural wood in the interior of a country house
An important criterion that the floor must meet is its evenness. Regardless of the flooring material, it must meet sanitary, hygienic, structural, operational and aesthetic requirements.
Features of wood construction
In order for the floor in a wooden house to last for many years, it is necessary to lay it in compliance with all requirements and recommendations.
A wooden base, like any other, has its advantages and disadvantages. The advantages include:
- safety for health, the tree does not emit any hazardous substances;
- you can design any design structure;
- if necessary, all work can be carried out with available tools and materials.
We must not forget that in order for the floor in a wooden house to last for many years, it must be laid in compliance with all requirements and recommendations. This will prevent the floor from sagging, because then you will either have to replace the floor or be puzzled by the question of how to raise it.
The disadvantages include:
Making subfloors in a wooden house with your own hands
- complexity of installation;
- high price;
- duration of work;
- difficulty in leveling the structure.
Types of floors
Floors in wooden houses are made of wood or concrete - the most common building materials. The technology of installing a “warm floor system” can also be implemented.
Now there are several types of “warm floors” on the construction market. They differ in the type of coolant and operating efficiency. Which heated floor is better? We'll tell you in our article.
Concrete floor
A popular way to obtain a level base in a relatively short time is to pour a concrete screed. While it may take a month for the screed to dry completely, installing a new wooden one will take longer.
Concrete screed
The advantages of concrete floors are as follows:
- A significant reduction in the cost of the finishing coating device.
- After the screed has dried, a flat base is obtained, but which can be laid with any finishing material.
- With an initially high-quality screed, additional leveling before the final stage of work may not be necessary, which will save time, physical effort and costs of materials.
- The screed can be installed independently, without the involvement of specialists.
You will learn how to install a concrete floor in a private house yourself in two main options - on the ground and on the floors - in our article.
Among the disadvantages, one can note the large weight of the monolithic floor structure and, as a result, an increase in the load on the foundation. Therefore, the necessary foundation calculations are performed at the house design stage. Another nuance is that when the walls vibrate, the screed may crack, which will lead to heat loss. Therefore, when installing a heated floor, it is necessary to perform high-quality thermal insulation of the base.
How to insulate a concrete floor in a private house? Read here.
Installation of the "warm floor" system
Wooden floor
Another common material for flooring in a wooden house is natural wood. Its advantages include the following:
- Environmentally friendly material with a rich natural pattern.
- Wood is safe because it does not contain harmful additives, it is completely natural and does not release harmful toxins into the environment.
- An aesthetic appearance and an organic combination of wood with the rest of the surfaces of the building, while the concrete floor will not look natural.
- When installing a wooden floor, you can refuse other finishing materials. With the help of varnishes, oils, stains and other impregnations, a finished wooden base can become stronger, more durable and acquire an original, noble appearance.
- Wood is very durable and, depending on the species, you can choose a material with certain performance properties and texture.
Wooden flooring can even be used in the hallway
The undeniable quality of natural wood gives an atmosphere of warmth and comfort, creates an optimal microclimate and comfort in the home.
Important! The wooden floor is repairable. To carry out routine repairs of its fragment, it is not necessary to dismantle the entire flooring; a separate fragment can be replaced. This will require a minimum set of tools and construction skills.
Replacing floorboards
Among the disadvantages of a wooden floor, the high cost of the material and the labor involved in its installation are noted. In addition, it can be quite difficult to obtain a perfectly level base.
Design parameters of the base
What the floor will be like in terms of functionality and visual perception is up to you, but in any case it should be:
- Smooth.
- Warm.
- Practical.
- Aesthetic.
- Durable.
What needs to be done to achieve these conditions - let's figure it out together.
In fact, installing a floor in a wooden house can be divided into three stages:
- Study of the general structural properties of the floor pie.
- Consideration of installation technology of its various types.
- Selection and implementation of an acceptable option.
Schematic diagram of a floor on joists - the most popular option
Frankly speaking, in terms of the most suitable materials for arranging floors in a house made of timber or a log house, only two materials can be considered: concrete and wood.
Note! Regardless of what type of flooring is preferred, modern technologies make it possible to install a heated floor system.
Concrete floor
Advantages: significantly less time is spent on completing all the work than when installing a full flooring made of lumber. The second indisputable advantage of a concrete floor is its cost-effectiveness - the cost of finishing is significantly reduced. Well, and finally, the process of pouring a concrete base itself does not require special construction skills, everything is quite simple: a screed purchased from a specialized store is poured according to the set levels. The result is a perfectly flat surface on which any floor covering can be laid.
Disadvantages: with minimal vibrations of load-bearing walls, cracking of the concrete base is possible, and this will at least lead to heat loss. Installing such a floor significantly increases the load on the foundation, so if the correct calculations are not made first, problems may arise with this part of the building structure.
Wooden floor
Advantages: undoubtedly environmentally friendly - no harmful substances are released during operation. Unique solutions in terms of interior design. If necessary, repairs can be performed using available materials and tools.
Important! In order for a wooden floor to be practical and durable, during installation it is necessary to comply with all technical requirements and recommendations set out in the relevant regulatory framework.
Disadvantages: relatively high cost and complexity of installation work. In addition, a lot of labor is required during installation, and it is very difficult to achieve ideal evenness of the coating.
This is what a subfloor in a wooden house looks like
Is a subfloor needed in a wooden house and why do we need additional expenses for its arrangement? And what is meant by this name? We will talk about all this in detail in a special article:.
If everything is more or less clear with a concrete floor, then it is worth dwelling on the wooden option in more detail, since laying the floor in a wooden house directly depends on the technical features of the cake. As a rule, we are talking about a multilayer structure consisting of the following elements:
- Rough floor.
- A layer of thermal and waterproofing.
- Finish floor.
- Flooring.
Attention! If you intend to install a “warm floor” system, then the space between the rough and finishing layers is ideal for this. Moreover, it is quite possible to form a closed autonomous heating system, absolutely invisible to prying eyes and very effective.
Wooden floors can be single or double layer. In the first case, installation can be performed without using logs. This mainly depends on the distance between the joists and the thickness of the floorboard.
It happens that the wall structures of a wooden building, under the influence of various circumstances, shift slightly, followed by the subfloor shifting. And it is the multilayer structure of the floor in a wooden house that ensures the strength and immobility of the upper floor covering.
Attention! If beams are inserted into the walls of the house, then laying logs, which are bars 5x5 cm or 6x6 cm, is a prerequisite. The reason is the large intermediate distance between the beams.
Also, logs are extremely necessary when the flooring is carried out using support pillars and the step between them and the beams is 100 cm. The distance between the beams itself depends on the thickness of the board.
Which is better - concrete or wood?
At the design stage of a private house, you must immediately decide what the floor will be - wooden or concrete. To choose the most suitable option, you need to know what the difference is between these floors.
Price
To fill a screed 5 cm thick, you will need 0.5 bags of cement (300 rubles/bag) and 1.5 (50 rubles/bag) bags of sand. Thus, 1 m2 of screed will cost an average of 225 rubles. If the work will be performed by a hired person, then the cost of the work must be added to this amount - 250 rubles / m2.
Average cost of concrete screed
If we take as a basis dry timber 10 x 10 cm, in increments of 40 cm (400 rubles/m2) and OSB boards (600 rubles/m2) 18 mm thick. With the work of a carpenter, the cost will be 1250 rubles/m2.
Average cost of plank flooring
Communications
In modern houses, the heating, water supply and sewerage systems are laid inside the floor structure. In the event of a pipe break, wooden ones can be quickly sawed and access to communications can be gained. With concrete floors it is more difficult - to remove the screed you will have to use a professional tool, and the process itself will take a lot of time and effort.
Deadlines
The screed gains full strength within 28 days from the date of pouring. Moreover, it gains 70% of its strength in the first week. All this time, the solution gives off moisture and nothing can be laid on it.
Wooden floors can be used immediately after installation.
Filling the screed
Durability
If the installation of a wooden floor is not carried out by a professional craftsman, then after a couple of weeks you can hear a characteristic creaking sound when walking on the floor. Concrete screed does not have this drawback. Moreover, when work is performed by hired workers, the result and quality of their work can be assessed immediately.
Rich texture of natural wood
Weight
The weight of 1 m2 of OSB sheet with a thickness of 18 mm is 12 kg, logs per 1 m2 weigh about 25 kg, depending on the type of wood. Thus, 1 m2 of wooden floor will weigh about 40 kg. And 1m2 of screed with a thickness of 5 cm weighs 100 kg.
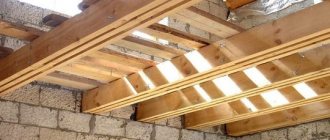
Posts or beams
The installation of floors in a private house begins with the installation of foundation columns. In most cases, these are brick-lined or poured concrete structures. As an option, durable wood is used: oak, beech, ash, but their service life rarely exceeds 10 years. For more information about installing floors in a timber house, watch this video:
First you need to select the location of the columns. To do this you need to use a tape measure and lacing. The rope is stretched between the walls in the center of the room. Notes are made in the ground at intervals of 80–100 cm from each other. These are the locations of the pillars. Then you can be guided by the following rule: the distance from the posts depends on the thickness of the lag or cut. The larger the beam, the greater the distance allowed.
To accurately determine the distance between the columns, it is recommended to use the table.
Once the installation locations have been determined, you can begin installing the poles. The best option would be to pour separate foundations under them, going 50 - 100 cm deep.
Their height should exceed the ground level by 5 - 10 cm, after which a layer of waterproofing is laid and the main element is mounted. The average width depends on the height of the structure and ranges from 40 to 50 cm.
To avoid leveling the floor and make your work easier, you need to take care of the correct horizontal level even at the stage of preparing the base for the posts and monitor its compliance throughout the entire installation process.
The process of constructing floors on pillars
When constructing such a floor, the following procedure must be followed:
- Prepare the base. To do this, marking and excavation of soil with a plant layer is carried out. The resulting depression is filled with crushed stone and sand on top, which is then compacted.
- Then the brick support pillars are installed, taking into account the basic design requirements regarding the height of the finished floor and the structure below it.
- It is mandatory to take into account the ratio of the height of the support column and the section of the brick. So, with a support height of 25 cm and above, the recommended width of the support column is equal to two bricks.
- It is necessary to start installing supports first along the perimeter of the future room, and then within the specified boundaries.
- I lay two layers of roofing material on the upper plane of each column to ensure waterproofing of the structure.
- Then the wooden linings are fixed. Logs made of logs or timber are installed on them. The width of the step of their location relative to each other is chosen depending on the width of the floor boards to be laid.
- Slag backfill, the height of which does not reach the log by 5 cm, is used to prevent the mobility of the floor structure in the cold season when the soil freezes. The remaining free space provides ventilation to the structure.
Block pillars
Laying the floor on top of the installed joists is done using boards, which begin to be laid at a distance of 1.5 cm from the wall. The resulting gap performs a ventilation function, which is very important for the correct and long-term operation of a natural wood floor.
The boards are attached to the joists using long nails driven at an angle of 45 degrees. While the wood is not completely dry, install temporary skirting boards.
Floor construction on pillars
We build a wooden floor on pillar supports
Floor diagram in a wooden house on pillar supports
Construction of a floor of this design is advisable if you do not intend to lay support or load-bearing beams into the walls of your house for the construction of the floor. In this case, the floor will be constructed according to a free “floating” scheme and will not be connected in any way to the external walls of the building. Also, this floor design is used in the construction of floors in wooden buildings on soils with a high level of soil water.
The flooring in a house made of wood of this design can be divided into two types.
- Single flooring made of wooden planks . This type of floor is the easiest to construct and subsequently use and repair. It is recommended to use this design in small country houses built for seasonal use.
- Double floor . This type of floor is built in buildings intended for year-round use. When using this technology, two floorings are built: black and finished, insulation is placed between them to prevent heat loss and moisture penetration.
Main types of wooden floors
Technology for constructing floors in houses made of wooden materials on supports
Step 1. Excavate the soil in your subfloor space. The pit must be dug more than half a meter deep from the lower level of the planned floor. Place a cushion of crushed stone, gravel or organic-free river sand in the dug pit. It is recommended that the upper edge of the cushion rise above the ground level in the area near the foundation by about 20 centimeters.
Underground
Step 2. Support-pillars for the floor can be formed from red burnt brick. So, if you plan to lay the floor on supports 25 centimeters high, then its optimal width will be 1.5 bricks. If the support height is more than 25 centimeters, the pillar is placed in two bricks.
Pillar supports for floor construction
There are other technologies for installing supports. For example, you can place monolithic concrete pillars in the underground. In this case, the concrete solution is poured into a pre-built wooden formwork, inside which a metal frame made of reinforcement is mounted.
Concrete mortar can also be poured into sections of asbestos-cement pipes installed vertically and deepened into a gravel bed, inside which a reinforcement frame is also placed.
Pipe support pillars
In any case, when choosing a technology for constructing support pillars, you need to pay attention to their uniform upper level. The best device for control is a laser level or level. The distance between the support pillars horizontally and vertically is about a meter.
Step 3. A layer of waterproofing is laid on each support pillar. The easiest way to do this is to use two combined layers of sheet insulation, for example roofing felt.
We waterproof the pillars with sheet roofing material
roll waterproofing
Step 4. A 30 mm thick wooden plate is placed on the waterproofing layer.
Supports with dies
Step 5. Logs are laid on the support pillars. They are usually built from thick wooden beams, cut from softwood and treated with an antiseptic. The connection points of the lags should be on the support pillars. During construction, control the horizontal position of the upper surface of the joists. The position of the joists can be adjusted using counter wedges. Depending on the width of the wooden boards used in the construction of the floor, the distance between adjacent logs can vary in the range of 60-80 cm.
Laying wooden joists
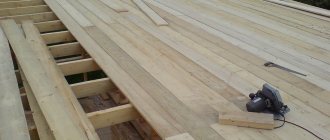
Step 6. Plank flooring is laid on the laid logs. To create an aesthetic appearance, it is better to lay wooden floor boards parallel to the directions of light falling from the room windows. The first board is laid with a gap from the wall of up to 15 mm. Then this space will be covered with a plinth, but the gap will ensure the movement of air into the underground space.
Single plank flooring
Step 7. Solid wood boards are attached to the logs using nails. The minimum length of the connecting nail should be twice the thickness of the board. The nails are driven in at an angle so that the axis of rotation of the nail does not coincide with the plane of the interface between the board and the supporting beam. The optimal tilt angle is 30-45 degrees to the vertical. The heads of the nails are completely recessed into the board with blows from the sharp side of the hammer. Then, after the puttying and painting process, the nail heads will disappear from view.
We nail the boards at an acute angle
Step 8. A plinth strip is nailed on top of the boards along the perimeter of the walls. A temporary plinth is installed near two walls of the room opposite each other, which is fixed a couple of centimeters from the walls. The slots will provide ventilation until the final drying of the array of boards, and then they will be covered with a permanent baseboard.
Nailing a wooden plinth
Please note that if a room with a floor on concrete or brick pillar supports is not heated in the winter, the supports may “lead” and the geometry of the wooden floor structure will be disrupted. A layer of slag can provide additional thermal insulation to the underground space, but there must be a space of at least 5 centimeters between its upper edge and the wooden floor to ensure ventilation.
Single layer floor
The single floor structure can be placed on poles, as described above. Only on top of the supports are beams placed, on top of which the flooring is made of tongue-and-groove boards.
The second option is to install the floor along beams embedded in the body of the load-bearing enclosing structures of the building. Beams serve as the basis for the floor, and brick supports are no longer required.
Logs for single-layer flooring
Due to the large free distance between the beams, the fastening of the flooring from the boards is carried out along the sheathing:
- The sheathing is made of timber with a square section of 5-6 cm.
- The pitch of the timber in the sheathing depends on the thickness of the floor board. The thinner the board, the smaller the distance between the lags.
- During the installation of the sheathing, it is important to control its horizontal position so that the end result is an even plank covering.
- Fastening the boards begins after all the logs are installed in their places and securely fixed with nails.
- If it is not planned to lay additional decorative covering on top of the flooring - laminate, tile, linoleum, then it is finished.
- After the single decking is installed, it is covered with two layers of protective varnish.
Instructions for attaching plank flooring
Advice. If the flooring is rough, then you can use an unedged board to construct it.
When making a single floor, no serious professional skills or significant time and financial costs are required. But its disadvantage is its low thermal insulation properties.
Wooden floor in a private house: features of flooring
Answering the question of what can be made from boards, it should be noted that wood has a long history and is considered a universal material that is widely used in the construction of structures and for interior decoration of housing. Such demand and popularity are associated with the special qualities of natural wood.
A wooden floor in a private home, assembled from solid boards, can last for 100-150 years if properly maintained.
Wood is an environmentally friendly and safe material. Natural wood flooring is characterized by strength, reliability, wear resistance and durability. It has an attractive appearance. This floor has a unique pattern that is not repeated. Different types of wood have a unique color and texture, which allows you to choose the material to suit any room interior.
Wood is characterized by a low thermal conductivity coefficient, due to which it retains thermal energy for a long time. The material is pleasant to the touch and has a specific natural smell.
Natural wood is considered a simple and easy to process material. Laying a wooden floor can be done independently, without special skills or special tools.
Despite significant advantages, wood also has characteristic disadvantages. The material can transmit noise, so when laying such floors, a soundproofing layer should be provided. Wood is prone to rapid ignition, and therefore it must be impregnated with fire retardants.
Wood has high thermal insulation, so such a floor will provide high comfort even in the winter season.
Wood is capable of absorbing moisture, which leads to the development of microorganisms in its thickness and to the formation of a ridge. To eliminate this deficiency, the material must be treated with special antiseptics and other protective agents. To increase its moisture-resistant properties, wood should be coated with varnish, paint or drying oil, which will protect it from swelling and bending under the influence of moisture.
On a note! Wood is not recommended for use in rooms with high humidity.
Double floor design
The optimal solution for arranging the floor in a wooden house is a two-layer structure, consisting of a rough and finishing layer. Installation of such a structure occurs in the following way:
- The subfloor is installed from unedged boards up to 4.5 cm thick, treated with an antiseptic compound. In this case, preference should be given to coniferous wood - it is durable, resistant to moisture, dampness and decay.
- The boards are laid close to each other, and a layer of thermal insulation made of mineral wool, polystyrene foam, expanded clay or sawdust is laid on top.
- In addition to insulation, it is necessary to steam and waterproof the structure to extend its service life.
- The finished floor boards are laid as for other types of structures, leaving a gap of 1.5 cm between them with the subfloor.
A clean floor can serve as a finishing coating or serve as a basis for laying decorative flooring, which will not only decorate the room, but also increase the thermal insulation properties of the floor.
Double floor design
Selection of floor designs
Based on the choice of materials, the floor can be either wood or concrete covered with wood materials. Most often, developers choose wooden floors. And the reason for this choice is not only the aesthetics of the style and design priorities. It is wooden floors that most closely correspond to the currently fashionable environmental conditions.
At the same time, the floor in a wooden house made of planks has undoubted advantages over a concrete floor structure. The main advantage is the low thermal conductivity of such floors. Wood has the ability to retain heat in a home while keeping cold air out from below. Wooden houses are characterized by frost resistance, sound insulation, and strength.
But despite all the vast practical advantages, wooden floors are less durable than concrete floors; they are more susceptible to moisture, as a result of which they quickly become unusable. For the same reason, and also taking into account the structural characteristics of wood, wooden floors more often require maintenance - painting, varnishing. One of the operational needs is to adjust boards every few years, which become deformed when they dry out. As a result, it is necessary to eliminate the resulting gaps.
However, this same property can become a priority - if there is noticeable deformation, it is possible to update the floor and change the design of the room. But wooden floors, in contrast to their minor shortcomings, have the main advantage - a low price. Wood is an accessible and inexpensive material. As for durability, durable types of wood with a dense structure - oak, larch, birch, cedar - can serve as floorboards for decades.
Start of work - installation of the subfloor
A subfloor when installing plank flooring is necessary for several reasons:
- To increase the operational life of the structure due to the presence of high-quality floor ventilation.
- It serves as a solid base for laying insulation and finishing flooring.
- Makes the frame of the building more rigid.
Before starting work on the installation of the rough structure, check the following:
- The wood chosen as the material for the construction of the subfloor must have an optimal level of humidity - this will eliminate possible deformation of the structure during its subsequent use.
- The boards should not have obvious defects.
- If an inexpensive board can be used for the subfloor, then for the finished floor it is purchased with a reserve, so that later you do not have to look for material of the same shade.
Double floor
Preparation
Installation of the subfloor can be carried out both on the ground and on the floors. In any case, it is necessary to carry out a set of preparatory measures:
- The walls of the building must be equipped with ventilation windows, closed from the outside with special grilles.
- All wooden parts are treated with antiseptic compounds to increase the service life of the structure.
- Taking into account the size of the room in which the floor will be installed, calculate the required amount of material.
- Throughout all work, it is important to monitor the horizontal position of the floor structure to prevent the formation of a slope.
- Timber and logs are subject to processing, in which they are cut to eliminate slopes and bevels.
Treating boards with an antiseptic
Laying the subfloor
To ensure that the floor does not creak, does not vibrate, is smooth and warm, it is necessary to pay special attention to the laying of the subfloor and, first of all, to the joists.
Attaching the log
The logs should be suspended on the beam supports in increments of 60 cm - insulation will be laid in the gap formed. It is not worth saving on beams in order to avoid sagging and vibration of the floor during operation.
The step can be reduced if the load on the coating is to increase
Where heavy equipment, such as a stove or fireplace, will subsequently be installed, the floor is reinforced by placing beams in 30 cm increments.
Additional lag fixation
Fastenings in such places are also further reinforced.
The process of attaching slats
At the bottom, beams are nailed across the beams. Between floors, beams are nailed along the beams - this will save the height of the room and, if necessary, use the upper beams as a decorative element in the interior after their additional finishing.
Fastening bars along beams
In the gap, an OSB sheet is laid on the beams.
Laying OSB sheet
After this, mineral wool slabs are laid in a checkerboard pattern, and on top there is a continuous layer of vapor barrier, which covers the logs and is fixed with a construction stapler. The vapor barrier seam is taped.
Laying vapor barrier
The second layer of vapor barrier is laid overlapping, and a ventilation gap is formed on top. To do this, use a 40 x 100 mm block, screwed to the floor joists. The finishing floor will be installed on top of these bars.
Bar for organizing ventilation
Important! All wooden elements must be treated with antiseptic compounds.
Video - Insulating a wooden floor
Concrete base for flooring
A concrete floor will increase the load on the foundation.
A wooden house evokes an association of comfort and warmth, creates a special atmosphere, and a feeling of safety for the health of all residents. At the same time, wood requires certain care and compliance with the requirements for its operation. Taking this into account, the flooring can be made of concrete, plywood, laying slab flooring on the logs. When giving preference to one type of floor, you should proceed from such requirements as practicality, durability and warmth.
A concrete floor increases the load on the foundation of a house, but it is much easier to make than other types of flooring. The arrangement of such a floor requires laying a reinforced screed made of concrete mortar. This type of flooring has a number of advantages, as it has a long service life and is distinguished by its reliability.
Laying a floor in a wooden house consists of several sequential steps. To lay concrete mortar on the ground, you must first compact the ground, pour a cushion of sand and lay a small layer of crushed stone.
Instead of crushed stone, you can use expanded clay, which will also serve as floor insulation.
Then the laid base is compacted and leveled with a small layer of sand. To perform waterproofing, you can use a flooring made of several layers of polyethylene film, on which the concrete solution will be laid directly.
Installation of a floor in a wooden house begins with pouring concrete mortar no more than 25 cm thick. Its level should be checked using pre-installed beacons or marks marked along the perimeter of the walls. It takes a month for the concrete solution to set and dry completely. During this time, the floor surface should be periodically moistened with water.
The final arrangement of the floor in a wooden house can be done with a cement screed or using a self-leveling mortar, a variety of which is offered by retail chains.
Finished floor installation
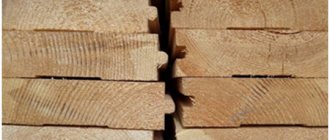
To obtain an aesthetically attractive and durable finished floor, it is recommended to use a milled board with a tongue-and-groove fastening.
tongue and groove board
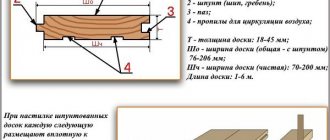
Table 1. Instructions for laying finished floorboards
| Illustration | Description |
| The first board is laid with a groove against the wall, leaving an expansion gap. | |
| It must be secured with self-tapping screws so that you can later cover the attachment point with a plinth. There are 2 options for further fastening the boards. | |
| The first option uses self-tapping screws that are twice as long as the floorboard. | |
| Self-tapping screws are screwed into each joist in the center of the board. Subsequently, the caps can be masked using wood putty. | |
| Then take the next board and align the tenon with the groove. | |
| If necessary, the boards are adjusted by hitting them with a mallet through a block. | |
| Or they press it with a chisel. | |
| The second fastening option involves screwing self-tapping screws at an angle of 45 degrees into the tenon. To prevent the board from bursting, you must first drill a hole for the screw. | |
| With this option, the boards fit closer to each other, and the fastening elements are invisible. |
After all the boards are laid, their surface is sanded and coated with wear-resistant varnish in several layers.
Sequence of actions when laying a wooden floor
The basis for laying the boards are logs. They can be mounted in different ways:
- Relying on the structural elements of the walls;
- With fastening on the lintels of load-bearing structures;
- With laying on poles;
- With installation on insulating materials;
- With fastening on transverse stiffening joists.
If it is planned to install a single floor without a rough layer, the logs in such a structure can be laid on the lintels of the supporting structures, as shown in the photo below:
In this case, it is important to ensure that the edges of the joists are tightly located on the base of the jumpers. For greater durability, it is recommended to place a waterproofing film or roofing felt under the joists. The lags are fastened using brackets. To ensure that the floor plane is not skewed later, when laying the joists, it is necessary to check the horizontal compliance of the plane in different places of the floor using a water level.
The stability of the future floor is ensured by the uniform arrangement of the logs - the distance between them should not exceed 1 meter. Ideally, the distance between the logs is 50-60 cm. Boards, carefully adjusted to each other, are attached to the top of the logs using screws or nails. The first board is additionally attached to the wall with a bracket to avoid inaccuracies during installation. Upon completion of the work, the bracket is removed.
Concrete floor in a wooden house
The most common way to install a concrete floor in a wooden house is to pour it over the ground, but with the obligatory condition that the ground must be dry.
Construction of a concrete floor on the ground
Stage 1 – preparation
Preparatory work includes the following steps:
- Using a level, determine the main indicators and calculate the excavation work.
- To prevent soil subsidence and cracking of the concrete floor in the future, the soil is carefully compacted using special devices.
- A well-compacted sand cushion is placed over the ground. The backfill will be denser if you pour material that exceeds the required volume by 25%, moisten it and compact it thoroughly using a roller or vibrator.
- An expanded clay or gravel layer is laid on the sand.
Petrol single-pass vibrating plate Masalta MS 125-4
Stage 2 - waterproofing
At the next stage , it is necessary to waterproof the base so that it does not absorb moisture from the concrete screed, and it will also protect the floor from ground moisture. For this purpose, roll materials based on bitumen are used. You can use thick plastic film.
The waterproofing material is laid overlapping, extending it onto the wall by 20 cm, and then the joints are taped. It is important that the material is homogeneous and without damage.
An alternative method is the coating method, when mastic waterproofing is applied at the stage of pouring the subfloor.
Dense polyethylene as a waterproofing layer
Stage 3 - pouring the subfloor
The subfloor or technological floor serves as the basis for the hydro- and vapor barrier layer. For its production, concrete of class B7.5 - B10 and crushed stone of size 50-20 are used. There are no strict rules for pouring the rough layer, the main thing is that its thickness is about 50 mm, and the difference does not exceed 4 mm.
Stage 4 – vapor barrier and insulation
A vapor barrier material in the form of inexpensive membranes made of fiberglass or polyester is laid on top of the subfloor. PVC membranes are a durable material that is not afraid of rotting. Insulation is laid over the vapor barrier - this can increase the energy efficiency of a living space by 20%. The following materials can be used as insulation:
- Mineral wool, the density of which does not exceed 120 kg/m3. To prevent it from accumulating cotton wool, it is insulated with polyethylene.
- Where the floor is subject to heavy loads, it is recommended to use extruded polystyrene foam, which deforms when compressed and then returns to its original state.
- When using polystyrene foam, it is covered with polyethylene on all sides to give strength.
Types of insulation
Stage 5 – final screed
At the final stage, the final screed is performed, which will become the basis for the decorative flooring. It can be monolithic or dry. In the first case, pouring a solution with a coarse filler in the form of crushed stone, stones, small pebbles or a cement-sand composition (quartz sand) is carried out along the beacons. Begin pouring the screed from the far corner of the room, leveling the solution using the rule. Complete drying of the screed occurs after 30 days.
Monolithic screed
An alternative is a dry screed based on fiberboard, plywood and asbestos-cement sheets, gypsum boards. The technology is simple and fast:
- Line with plastic film.
- A technological gap of 1 cm is left along the walls, into which soundproofing material is placed.
- Sand backfill is 5 cm thick.
- The sheet material is laid in two layers and securely fixed to each other using self-tapping screws or construction adhesive.
- Perform puttying and sanding of joints.
Dry screed
Installation of floorboards
Depending on the chosen method of how the floor will be installed in a private house, the procedure for further work may differ significantly. The simplest is to install a single floor.
To make a double wooden covering with insulation placed inside, you will need to spend much more time and consumables.
Single
After the cuts are fixed, tongue-and-groove boards 4–5 cm thick are laid on them. Fixation to the beam is carried out using self-tapping screws or nails. Having completed the installation, it is allowed to lay the floor covering or paint the constructed floor.
Mostly a single floor is installed for a country summer house, which is used only in warm weather.
Double with insulation
If the floor is being laid for a house in which you will live permanently, it is recommended to use a double floor with thermal insulation in between. This technology will require more time and money, but the result will not keep you waiting long. The floor will be much warmer, and living in the house will be more comfortable. For more information about installing a wooden floor, watch this video:
The installation procedure is as follows:
- Between the wooden beams installed as joists, sheets of plywood are laid, which are attached to crosscuts or pillars.
- The resulting cells between the logs are filled with thermal insulation. In this case, it is allowed to use mineral wool, a mixture of sawdust with clay or glass wool.
- Subfloors are installed on the joists. In this case, you can use not full-fledged boards, but scraps with a thickness of at least 20 mm. It is also possible to use material of a lower grade of wood.
- Having completed the flooring, the boards are attached to the joists.
- Waterproofing is laid on top of the boards. You can use regular polyethylene and cover it on top with a foam sheet made of this material. The top layer needs to be placed 6 cm on the wall and secured with stationery tape.
- Having completed the installation of waterproofing, it is allowed to begin laying finished wooden floors and laying the finishing decorative coating.
When installing rough wooden floors in a private house, you need to leave a gap of 2 - 3 cm from the end board to the wall. This is necessary for the temperature shift of the wood and will help to avoid possible swelling of the surface.
Wood is considered a natural and environmentally friendly material that requires mandatory care. Despite the superficial complexity of flooring for a private home, even a person who does not have sufficient multifaceted experience in this field can perform this work.
Finishing materials
The material for finishing the floor in a wooden house is selected depending on the interior design. If the appearance of the house inside retains the color of natural wood, which on the walls and ceiling is not hidden behind other finishing, then the flooring should be organically combined with it.
Table 2. Types of flooring
| Illustration | Description |
Boards – larch, cedar, pine | In a wooden house, the best solution would be to install a floor made of natural wood. It will organically fit into the interior with wooden wall paneling. Wood has low thermal conductivity, it is environmentally friendly and safe. Natural wood flooring is distinguished by a variety of textures and rich natural patterns. |
Parquet | A beautiful and natural floor covering for a wooden house can be obtained by laying parquet made of natural wood, which has high aesthetics, a variety of shades and good performance. |
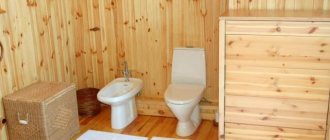
Ceramics in wet areas | In rooms with high humidity - bathroom, shower bath, kitchen, as well as in the hallway, laying tiles will be a practical solution. |
Laminate | An alternative material to expensive natural wood is laminate, which is highly durable, wear-resistant and decorative. This material imitates many, even rare and very expensive types of wood. |
If fiberboard or chipboard is chosen as the base for the floor
Using this method, you can also raise the floor with your own hands in a wooden house. In order to lay the subfloor, you can choose plywood, chipboard or fiberboard. This material is characterized by reliability, strength, and does not lend itself to deformation. In addition, if necessary, materials such as fiberboard or chipboard can be easily dismantled and replaced.
Important! Fiberboard, chipboard or plywood are not recommended for use in conditions of frequent temperature changes, as well as in rooms with high humidity. For example, it is not advisable to lay them in baths or bathrooms.
The layout of the sheets must be previously thought out and marked. Then, in accordance with the markings, lay the lags. In the photo you can see an example of such a scheme.
Scheme of laying chipboard, fiberboard on the floor
To lay the floor flat, you can use beacons. To do this, you need to install them on the entire floor surface. For these purposes, the entire area of the room is divided into squares of 30-40 cm, into the corners of which self-tapping screws are screwed. To install beacons you will need a level. After this, you can lay the logs, which will later be covered with chipboard or fiberboard.
The thickness of the chipboard or fiberboard sheets determines the distance between the logs. In general, it is no more than 40 cm. When boards are installed across the beams, they should be fastened at a distance of half a meter from each other.
DIY wooden floors in a private house
To prevent sagging logs, you can also make substrates from pieces of chipboard or fiberboard, which must first be lubricated with parquet glue. Impregnating the entire floor surface with glue will prevent cracking. Between the logs and sheets of chipboard, fiberboard or plywood we make a layer of moisture-proof material.
It is desirable that all edges of the sheets used fall on the logs, and the sheets of chipboard (fibreboard) themselves are laid at a distance of a couple of millimeters from each other, this is necessary in case of deformation of the material. The joints must be sanded to level the surface. In the video you can see how to lay sheets of plywood (chipboard, fiberboard or other material).
Sequence of installation work
The method of installing floors in a wooden house using support pillars is often practiced. The latter are easy to make from baked red brick. There are other options, for example, fragments of asbestos cement pipes or pillars made of concrete poured into the formwork (in both cases, a reinforcement cage is installed in the body of the structure).
Step-by-step instructions for installing a floor on brick supports:
- A pit is created in the subfloor space at least 0.5 m below the proposed floor level. A crushed stone or gravel cushion is poured into it. It should end 0.2 m above the level of the adjacent soil.
- Brick columns are formed. If their planned height is about 0.25 m, they are made one and a half bricks wide, if more - two. The horizontal and vertical distance between the pillars is approximately 1 m. They should end at the same height. To ensure that this rule is followed, you should purchase a laser level.
- A waterproofing gasket is placed on top of each supporting element. It is easy to make from two sheets of roofing felt. Then 3 cm thick wooden dies are placed on top of the spacers.
- Then the logs are mounted on the supports. They are made from thick bars cut from coniferous trees and impregnated with antiseptic compounds. The joist connection areas should be located on the support posts. It is important to ensure that the horizontal planes of the upper planes of the beams are at the same level. The pitch of the lag depends on the width of the boards used for the subfloor. Usually it is 0.6-0.8 m.
- After this, they begin to install the boards. It is advisable to place them parallel to the direction of the light flow coming from the window. The first board is mounted, leaving a gap from the wall (1-1.5 cm). These slits help air circulation.
To fix the flooring to the joists, simple nails are suitable. In this case, the length of the fastening elements must be at least twice the thickness of the board. They should be driven in at an angle (30-45 degrees to the vertical line) so that the axis of rotation is not identical to the plane of contact between the flooring and the logs. The head should be driven into the wood using the pointed part of the hammer.
After installing the rough part, you can lay waterproofing and insulation, and lay out the finishing coating on top.
Single plank covering
A single floor can be implemented on a structure made of support pillars. In this case, beams are attached to the support posts, and a covering of tongue-and-groove boards is laid on top of the beams. Such a floor in a wooden house fully corresponds to the above-described structure, assembled on support posts.
There is another option for single flooring: when the covering is mounted on beams embedded in load-bearing walls. In such a situation, there is no need to build brick supports. The role of the working base will be performed by load-bearing beams. Since the distance between them is usually very large, before working on the plank flooring, a sheathing of joists should be constructed.
The design of the floor involves the use of timber with a side of a square section of 5-6 cm as a lag. In a wooden house, the pitch between the lags is determined by the thickness of the final covering board. The thicker the tongue and groove board, the larger the pitch between the joists can be. When installing the sheathing, experts recommend constantly monitoring the evenness of its surface. Only a well-assembled sheathing will allow you to lay a smooth plank covering without any problems.
When the logs are assembled and secured with nails, you can proceed to the installation of the single flooring itself. The flooring can serve as both a rough and a finishing coating. If you are not going to additionally lay a decorative covering in the form of linoleum or other material on the floors in a wooden house, then the boardwalk will be considered finished. After completing all work, it is recommended to cover the finished surface with several layers of protective varnish.
If you cover the wood floor with any other material, it will actually act as a subfloor. To install the rough coating, it will be enough to use unedged material.
Installation of single floors on support columns or on a lathing made of logs is quite simple to do with your own hands. This coating is done quickly and easily, and does not require significant costs. The disadvantage of single-layer floors in a wooden house is their low degree of thermal insulation. In winter, the soil in the underground room will freeze. In the case of using support pillars, this can cause displacement of the brick pillars and the coating itself. A single floor can be used either for houses that involve living in the summer, or if there is heating in the cold season.
Flooring technology in the house
Regardless of the type of house (frame construction or classic log house), the technology for performing the work remains generally the same. So it’s enough to consider once how to properly make floors in a wooden house, the sequence of actions will remain almost unchanged.
Which wood to choose
When choosing the type of wood, the main criterion is its strength, resistance to moisture and all other factors that may affect it during operation. When choosing boards for a finished floor, an aesthetic component is also added; if no further finishing is planned, then the front part of the boards should look good.
To answer the question of what kind of wood to make the floor of a house from, we can suggest several types of trees:
- maple - has sufficient moisture resistance, is easy to process and looks good;
- oak – does not need recommendations, such a floor will be as durable as possible. The wood is very durable, and the appearance is simply excellent;
Oak planks look great
- pine - suitable only if the resin content is low. In rooms using such boards, the pleasant aroma of pine needles is preserved;
Note! There is no point in considering spruce wood as a replacement for pine. The fact is that a large number of knots reduces the strength, and the workability of the wood is worse because of this.
- larch is considered perhaps the best option. In addition to strength comparable to oak boards, larch is also protected by nature from insects (gum in the wood provides this protection). A slight disadvantage may be the price; lumber from larch is more expensive than from pine.
Beginning of work
Laying the boards is the final stage; before that you will have to work with the installation of the wooden floor. Both beam, ribbed and beam-ribbed floors can be used.
To solve the problem of how to make floors in a wooden house, you need to install floor beams. In the case of frame construction, this stage is combined with the installation of the lower trim, so there will be much less work.
If the foundation of the house is earthen, then you can proceed as follows:
- level the soil base;
- divide it into squares with arbitrary steps (no more than 2-3 meters). Brick columns will need to be erected at the resulting nodes;
Note! The top surface of all posts should be at the same level. Control can be performed either using a laser level, or using a regular level and string stretched between the walls.
- further instructions suggest filling the space between the columns with a heat insulator, for example, expanded clay. The backfill is not brought to the top of the columns, leaving a gap of approximately 20-30 cm;
- After the solution has hardened, you can lay wooden beams on the posts.
Single floor on the first floor
Beams can be attached to the wall using ordinary steel angles or using special brackets. You need to especially carefully control the position of the beams - the difference in height along the top surface should not be more than a couple of centimeters diagonally across the room.
Rough and finishing floor
When studying the question of how to make double floors in a wooden house, terms such as finished and rough (sub) floors will definitely come up. A subfloor is understood as a horizontal surface made of boards, which is needed either to lay insulation or to give greater rigidity to the floor.
Scheme of the proposed design
In this example, the subfloor will be at the bottom of the beams. To make it convenient to install it, small wooden blocks of 3x3 or 4x4 cm are attached flush to the bottom of the beams.
As a result of these manipulations, the beam acquires a T-profile. The subfloor boards are simply laid on the bars and secured with nails; this concludes the question of how to make a subfloor in a wooden house can be considered closed.
Insulation can be placed in the space between the beams. To prevent it from getting wet, a waterproofing agent (ordinary film) is placed at the bottom of the resulting cells, then a layer of insulation, a vapor barrier film, is placed.
One of the options for a wooden floor cake
And only after this can you begin installing the finished floor boards. If you plan to leave the floor plank, then you can use a tongue and groove board; due to the tongue-and-groove connection, high joint strength will be achieved.
In the photo - tongue and groove boards
As for what kind of floor to make in a wooden house, no one forces you to make it plank. You can use OSB boards as a finished floor, and lay laminate or linoleum on top of them.