Warm floor installation.
Each type of underfloor heating has one thing in common - wires, film or pipes are installed under the floor covering. The mounted parts serve as heating devices. Floors with film and wires are suitable almost always and everywhere. Water heated floors are mainly installed in private homes. We will look in more detail at a warm floor in which pipes are installed.
There are two types of water floor systems:
- Concrete (or wet) heated floors. This type is called a “wet” floor because during the installation process the pipes are filled with a cement-sand mixture.
- Light heated floors. In this case, the pipes are located in the grooves of the polystyrene foam base or the base made of boards. Lightweight systems are installed in rooms where cement screed cannot be made.
We will consider installing a warm water floor. Installation of this type of floor is quite easy if you already have at least basic skills in installing heating systems and some experience in construction. Otherwise, some installation issues should be discussed with experienced builders.
What kind of room should there be, preparation and leveling of the floor
Due to the fact that the structure is heavy, with a long length of pipes and connecting units, the installation has its own technological features.
As a result, it is necessary to lay each layer strictly according to the instructions. But first, we will look at the features of preparing the premises.
Watch the video
WARM FLOOR in 1 day! DIY water heated floor part 1
Premises requirements
Water-heated floors are recommended for construction in private buildings - find out how to install them yourself on a concrete floor. In multi-storey buildings, in addition to the heavy load on the floors, there is a risk of flooding of the apartment from below.
In addition, the coolant circuit is connected to the general heating system, but it is most often not intended for this purpose. This can lead to cold risers in your or a neighboring apartment. This is due to the reluctance of the relevant authorities to issue permits for the installation of this system in multi-storey buildings.
For your information! Today, two systems are often installed in new buildings: one for standard heating, and the other for warm floors.
The ideal solution is to make a water-heated floor yourself, even at the time of building the house. When installing the structure in a finished house, you should consider:
- the height of the ceilings, since such a structure leads to a significant decrease in them;
- size of doorways - their required height is not less than 210 cm;
- foundation strength.
In addition, the heat loss rate should not exceed 100 W/m2.
Base requirements
When installing a water floor correctly, a prerequisite is the presence of a smooth and clean rough surface. If the property is old, you need to dismantle the old floor screed and level the base.
The process is complex and time-consuming, but it is necessary. After which, the base is thoroughly cleaned of debris and dust.
For a water floor to work well, you need a horizontal base without differences; deviations of no more than 10 mm are permissible. If cracks or flaws are found, they must be repaired.
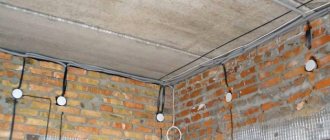
If you are the owner of a new home with panel ceilings, then the heating elements can be installed directly on them.
What pipes to use for a warm water floor.
Pipes for heated floors
The best option for installing a water floor is PEX or PERT pipes. PEX - pipes are pipes made of cross-linked polyethylene. PERT - pipes, they are based on reinforced polymer. Of these options presented, it is better to look at PEX pipes. They are more elastic, unlike PERT pipes. These pipes also have an increased cross-linking density (about 85%). And that is why, unlike PERT pipes, they have an increased “memory effect”. That is, after stretching, PEX pipes have an increased ability to return to their original state. Heating pipe standard. They have a diameter of 16, 17 and 20 mm. The thickness of the tube wall is about 2 mm.
When selecting pipes in a store, we recommend paying attention to the brands Uponor, Tece, Rehau, Valtec. Their high quality can be noted.
Selection of pipes and their installation
The following types of pipes are suitable for water heated floors:
- Copper;
- Polypropylene;
- Polyethylene PERT and PEX;
- Metal-plastic;
- Corrugated stainless steel.
They have their own strengths and weaknesses.
| Characteristic Material | Bend radius | Heat transfer | Elasticity | Electrical conductivity | Life time* | Price for 1 m.** | Comments |
| Polypropylene | Ø 8 | Low | High | No | 20 years | 22 RUR | They bend only with heat. Frost-resistant. |
| Polyethylene PERT/PEX | Ø 5 | Low | High | No | 20/25 years | 36/55 RUR | Can't withstand overheating. |
| Metal-plastic | Ø 8 | Below the average | No | No | 25 years | 60 RUR | Bending only with special equipment. Not frost-resistant. |
| Copper | Ø3 | High | No | Yes, requires grounding | 50 years | 240 RUR | Good electrical conductivity may cause corrosion. Grounding required. |
| Corrugated stainless steel | Ø 2.5-3 | High | No | Yes, requires grounding | 30 years | 92 RUR |
Note:
* pipe characteristics are considered when operating in water-heated floors.
** Prices are taken from Yandex.market.
The choice is very difficult if you try to save on yourself. Of course, you don’t have to consider copper ones - they’re very expensive. But corrugated stainless steel, at a higher price, has exceptionally good heat transfer. The difference in temperature in the return and supply is the largest. This means that they give off heat better than their competitors. Considering the small bending radius, ease of operation and high performance characteristics, this is the most worthy choice.
Pipe laying is possible in a spiral and snake. Each option has pros and cons:
- Snake - simple installation, almost always a “zebra effect” is observed.
- Snail – uniform heating, material consumption increases by 20%, installation is more labor-intensive and painstaking.
But these methods can be combined within one circuit. For example, along the walls “facing” the street, the pipe is laid in a snake pattern, and in the rest of the area in a snail pattern. You can also change the frequency of turns.
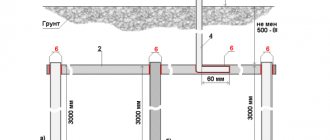
There are generally accepted standards that professionals are guided by:
- Step – 20 cm;
- The length of the pipe in one circuit is no more than 120 m;
- If there are several contours, then their length should be the same.
It is better not to install pipes under stationary and large-sized interior items. For example, under a gas stove.
IMPORTANT: be sure to draw the installation diagram to scale.
Laying begins from the collector. Unwinding the coil, fix the pipe according to the diagram. It is convenient to use plastic clamps for fastening.
Corrugated stainless steel is produced in coils of 50 m. To connect it, proprietary couplings are used.
The last element laid between the turns of pipes is a temperature sensor. It is pushed into a corrugated pipe, the end of which is capped and tied to a mesh. The distance from the wall is at least 0.5 m. Don’t forget: 1 circuit – 1 temperature sensor. The other end of the corrugated pipe is led out to the wall and then along the shortest path is brought to the thermostat.
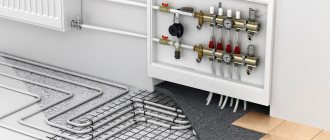
Heated floor collector unit.
In addition to pipes for a warm water floor, you will need a unit responsible for distributing the heating mixture through the pipes.
Basic elements of a heated floor collector
Components of this unit:
- Adjustment valves with or without flow meter
- Air exhaust device (operating in auto mode)
- Manifolds with balancing valves
- Valves for stopping the coolant supply and flow metering device
- Set of fittings for connecting individual parts
- Fixation brackets
- A special manifold cabinet is also needed to accommodate all components of the device (usually it is located in some niche)
Schemes for laying the thermal circuit.
Laying schemes for heated water floors
To avoid many mistakes during the floor installation process, before starting work, you should draw for yourself a diagram of the thermal circuit. Also, if repairs are required later, you will greatly simplify your task.
- Laying a warm water floor in a “snake” pattern. This is the easiest way to lay a pipe. The main disadvantage of this method is the rather large temperature difference at the ends of the circuit (from 5 to 10 degrees). This is due to the fact that the coolant, passing through the pipe from beginning to end, cools down significantly.
- Laying a heated floor in a “snail” pattern. The method is much more difficult to install than the “snake” method. But in the end, the floor temperature over the entire floor surface will be almost the same
- Combined method of installing heated floors. Usually the edges of the room are laid out as a “snake”, and the main part as a “snail”.
To achieve acceptable pressure inside the pipes, the following rules must be observed:
- All circuit pipes used in the work must be of the same length.
- One circuit should not extend beyond the boundaries of one room
- The floor area of a room heated by one circuit is no more than 40 sq.m.
- In areas where furniture and plumbing fixtures are located, a contour is not required
Laying the heat insulator
Extruded polystyrene foam and cross-linked polyethylene foam, only these two materials can be used for thermal insulation in a water heated floor system.
Before laying the heat insulation sheets, a damper tape 10-12 mm thick is glued around the perimeter of the room. It serves not only to compensate for the thermal expansion of the screed, but also to prevent heat from escaping into the walls. In height, it should protrude beyond the boundaries of the top layer of the screed.
The heat insulation sheets are laid out staggered and always on top of the waterproofing layer. For waterproofing, it is best to use polyethylene film with a thickness of 0.2 mm.
If you decide to make the thermal insulation thickness 10 cm, then it will be better if you lay two layers of slabs 5 cm thick. Be sure to have a spacing between the layers.
There is an option to use special slabs designed for organizing water-heated floors as a heat insulator. Their difference is in the bosses on one of the surfaces. A pipe is laid between these bosses. But their cost is unreasonably high. In addition, not all pipes will be supported in such slabs. For example, polypropylene and polyethylene pipes are too elastic and will require additional fixation.
The pipes are not attached to the heat insulator. The fastener must pass through the foam layer and be fixed in the screed. This is a very labor-intensive process considering the amount of work involved.
Mounting tapes are a more acceptable solution, but it is very difficult to lay a pipe on them in a spiral (snail).
The best option would be to fix the pipes on the mesh. In this case, the mesh will serve specifically for fastening pipes, and not for reinforcing the screed.
There are special meshes made of biaxially oriented polypropylene, or you can use a simple masonry mesh.
See also: Warm floors - which type to choose? Options
Construction of a base for a heated floor.
Warm floors must be installed on a solid foundation. For example, on a concrete slab. Then the thickness of the “general” floor layer will not exceed 8 cm. When laying the floor directly on the ground, it is necessary to level it as much as possible and insulate it as best as possible. The thickness of the insulation will depend on the weather conditions of the area and the specific location. In the event that the warm floor is laid above the basement, or on floors above the first, the thickness of the insulation will be minimal. About 3 cm.
Insulation and waterproofing.
Professionals advise laying waterproofing (for example, a thick film) to protect the insulation from cement-sand mortar and to avoid the formation of condensation.
Instead of thick plastic film, you can use roofing felt. Pieces are cut from a roll of film or roofing felt along the length of the room and laid overlapping each other (overlapping about 20 cm). Also, the waterproofing must be wrapped on the walls.
Insulation is placed on top of the laid waterproofing, which serves to retain heat in the room. Of the many options that modern manufacturers can offer, professionals advise choosing from two options:
- Extruded polystyrene foam. It has all the necessary advantages. It has reduced thermal conductivity and increased moisture resistance. It is also very wear-resistant.
- Expanded polystyrene in the form of profile mats. The main feature of this type of insulation is the surface with protrusions. This makes it easier to lay pipes. The pitch of the protrusions in this insulation is 5 cm. The main disadvantage is the increased cost compared to EPS.
When choosing the thickness of the insulation layer, several important conditions should be taken into account.
- When laying insulation directly on the ground, its thickness must be at least 10 cm. You can also consider the option of two-level installation. Two layers of insulation 5 cm thick.
- When laying insulation in the room under which the basement is located, a layer of 5 cm.
- When laying on all subsequent floors, its thickness can be up to 3 cm.
To attach the insulation you will need umbrella dowels or disc dowels. Harpoon clamps are required to secure the pipes.
Procedure for laying out insulation:
- Level the surface where the thermal insulation will lie. This is best done with sand or rough screed.
- Laying pieces of waterproofing. The seams must be taped.
- Direct laying of insulation boards joint to joint. (marked side should be up)
- The seams between the plates must also be taped.
- Secure the insulation with dowels.
If you lay insulation in two layers, you should follow the principle of brickwork. The seams of the top and bottom layers should not match.
Installation of a heating circuit with pipes.
Before laying pipes on the insulation, mark them with a marker. Subsequently, you will need to make “moves” for the pipes using a knife according to the markings.
Installation of heated floors
Here you need to remember to take into account the turns, diameter and pitch of the pipes. Also during this stage, a manifold cabinet should be installed. You can also install corrugation to protect the pipes at the junction of the pipes with the unit and the floor. During this stage, the damper tape should be secured. You cannot use or solder polypropylene pipes.
Procedure for laying pipes:
- We attach a fitting and a protective corrugation to one end of the unwound pipe and connect it to the manifold. (the pipe should be unwound in sections of 10-15 m.)
- We lay out the pipe along the contour previously marked with a marker. We fix it using harpoon clamps (fastening occurs on straight sections of the pipe, every 30-40 cm). Harpoon clamps should not be installed immediately, but only after laying out 5-10 m of pipe
- Having laid the pipe along the entire marking, we bring it to the collector and cut it off. We put on the fitting and attach it to the manifold. Mark the length of the contour segment. This will be required for subsequent balancing.
Pipe laying should begin from the furthest zones from the collector. We lay each water circuit in a similar way. When installing the pipe, be careful when walking. It is better to lay some kind of flooring for walking.
Operating principle of VTP
Warm floor diagram with a ready-made module
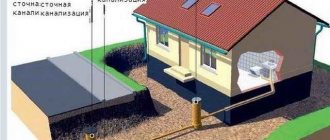
Plastic or metal pipes are placed in the cement screed, through which coolant heated in the heating boiler continuously flows thanks to a circulation pump. It gives off heat to the screed, after which it returns back to the boiler. The screed transfers heat to the finishing coating by convection, and it heats the air in the room. If the HTP is the only source of heating, then the temperature is regulated on the boiler. If the heated floor complements radiator heating, then temperature control is carried out using a mixing unit, in which the heated and cooled coolant is mixed in a set proportion.
Connecting a heated floor to the system
Thus, the entire system consists of a heating boiler, a common heating riser, a distribution unit and pipes through which the coolant circulates. The coolant can be ordinary water or a special liquid, such as antifreeze.
Collector and operating diagram of a water heated floor
The distribution unit, in turn, consists of a circulation pump, a mixing unit and a manifold group, which carries out the “wiring” of various heating circuits.
Reinforcement of heated floors.
The main function of the reinforcing mesh is to increase the strength of the entire structure. Whether it is necessary or not, and whether it is worth spending money on it, is up to you to decide.
The main condition for laying the mesh is that it should be located above the pipes.
For reinforcement, a mesh with a mesh size of 10 by 10 cm is suitable. You can use either metal or plastic mesh. The main thing is that it should be without a corrugated surface, in order to avoid damage to the pipes. Small pieces of mesh are laid out overlapping each other and secured with plastic clamps.
Installation Guide
Installation work on constructing a water floor in a private house with your own hands is a step-by-step process.
5 key rules for installing water heated floors
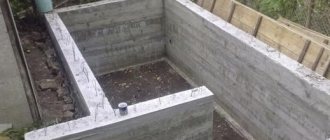
Subfloor
It is better to start constructing a heated water floor at the construction stage of the building. If there is no foundation in the house, and the structure is being installed on the ground, you must first pour a sand “cushion”. The sand must be compacted well, and a plastic film laid on top of it as waterproofing. After which, you can start pouring the cement screed.
To install a subfloor, you can buy a ready-made mixture or prepare a solution yourself. Since the base for the floor requires a level surface, it is better to fill the surface yourself using beacons.
To do this, piles of mortar are made over the entire area of the room with a certain step, and metal profile beacons are installed in them. At this level, the screed is poured and leveled. Only small differences are permissible; if there are protrusions of 1 - 2 cm, they should be sealed.
When installing a water floor on the ground, heat loss will be higher, so the coolant circulating through the main must have a higher temperature.
If a warm water floor is installed on a finished base, it must be cleared of debris and cracks and depressions must be repaired.
Waterproofing
Before you begin laying the waterproofing material, you should beat off the stripes on the walls - the level of the finished floor. Then remove the debris that was caused by this work, and only then proceed to waterproofing.
Thick polyethylene film or glass insulation is suitable as vapor and waterproofing. The waterproofing is laid overlapping each other and the walls.
When using film, the joints between the strips are taped. If stekloizol is used, then the places where the material is applied must be lubricated with bitumen mastic. Only after it has completely dried, glass insulation is laid down, and the joints are sealed using a gas torch.
For your information! Bituminous mastic is toxic, so work should be carried out with open windows.
Installation of damper tape
The main purpose of the damper tape is to compensate for the thermal expansion of the screed. Its standard thickness is 5 mm, and its height is from 10 to 15 cm.
Tape is applied around the perimeter of the room; it should be located above the concrete screed. Its excess, after pouring the screed, will need to be cut off with a knife.
Laying thermal insulation
Thermal insulation boards are laid tightly and joined together with side grooves. Installation begins from the far corner of the room. When using extruded polystyrene foam, the sheets are laid with the marked side up.
The slabs are fixed using disc-shaped dowels in the corners and center, and the seams are taped. If it is necessary to install a second layer of insulation, the laying direction should be changed.
To avoid damaging the slabs during installation, you need to walk on them on thin boards.
For your information! If large gaps form between the sheets and the wall, they can be sealed with scraps of insulation or blown out with foam.
Marking and laying pipes
When using heat-insulating material with markings, the process of laying the heating element is simplified. If there is no such label, you need to make it yourself. To do this, marks are made on the surface of the slabs using a marker, taking into account the laying step of the contour. According to the marks, a pipe laying line is marked with a molar thread, which is then drawn with a marker.
Before installing the pipeline, the manifold cabinet is installed and all connecting valves are prepared.
The rules for laying the water circuit are as follows:
- 20 meters of pipe are unwound from the bay, it is better to do this using special equipment so that the product does not break;
- a heat-insulating sleeve and connecting fitting are put on the end;
- the end is connected to the collector;
- the contour is laid according to the markings and diagram made;
- pipes are secured with harpoon clamps;
- The pipeline is laid in such a way that the second end returns to the collector; it should also be connected to it.
Important! The size of all hinges must be written down on the opposite wall.
If there are transit pipes that pass through the walls, then they should be additionally insulated.
Installation of reinforcing mesh
To add strength to the structure, a reinforcing mesh is laid on top of the heating circuit. A suitable option is a metal mesh with cells 10 by 10 cm, and rods 3 mm thick. It is also possible to use a plastic mesh model. The mesh sheets are fastened to each other using wire.
System pressure testing
Before you start pouring the concrete screed, you need to check the operation of the system - do a pressure test. This activity must be done, because if the system leaks after pouring the screed, it will be difficult to fix the problem.
To do this, the line is filled with water and left for a day, while the pressure is set to 5 bar. If a leak is detected, it is sealed and the process is repeated. If during this time the pressure decreases, this indicates the presence of problems with tightness, which should also be eliminated before pouring the screed.
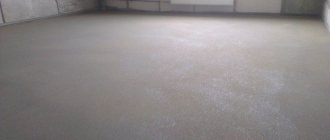
Laying cement screed
When starting to install a screed in a private house with your own hands, you need to increase the pressure in the circuit to 5 bar. And also, you first need to install beacons, the process of concreting on them will be easier.