Upper harness knots
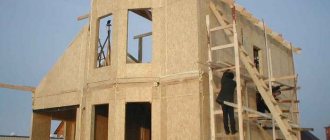
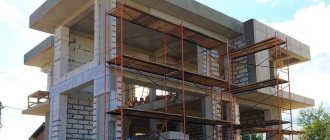
The arrangement of the upper trim begins after the installation of the corner vertical posts. If the walls are more than six meters long, intermediate supports are also pre-installed.
When performing work, you should adhere to a number of rules:
- the harness is formed from two boards;
- rows of boards are laid in a checkerboard pattern so that the joints do not intersect;
- for fastening, use nails 6 cm or more in length;
- the areas where the boards join together are moved to the middle of the vertical posts;
- The ends of the boards are fixed with two nails.
After installing the trim, intermediate wall racks are installed, taking into account the location of windows and doors.
Internal frame lining
For the internal cladding of the frame, OSB boards (9 mm) or moisture-resistant plasterboard (12.5 mm) can be used. At the same time, plasterboard is more pliable in work, but OSB boards give the walls additional rigidity. Their use for internal and external cladding eliminates the need to install jibs.
Oriented wood boards for interior cladding are installed in the same way as for exterior cladding. The technology for working with drywall is slightly different. Sheathing can be done in several ways:
- Attach the sheets directly to the frame posts, having previously reinforced them with horizontal beams with a section of 50x50 mm.
- Install metal sheathing along the frame in increments of 40-50 cm.
- Attaching drywall to a frame is the “American” way.
In this case, there should be no gaps between the sheets. The joints are subsequently puttied. Self-tapping screws are used to secure the casing.
Walls erected in accordance with frame construction technology are a good basis for durable finishing of the facade and rooms. Being confident in the reliability of the “skeleton” of the house, you can enjoy the possibilities of its decorative design.
Different methods of building houses and their comparison
Modern wooden houses are:
- Chopped (logs are used);
- Cobblestones (made from solid timber);
- From laminated veneer lumber;
- Frame.
Log houses are built from solid tree trunks, which affects their cost, and it will be difficult for a non-professional builder who does not have the skills to build this type of housing to meet all the requirements applied when installing log joints.
The price of one square meter goes beyond 10,000 rubles for turnkey construction.
Houses made of timber (solid or glued) are also quite expensive, tens of thousands of rubles per square meter of living space. Although such buildings have serious advantages - high strength, good environmental properties, and the ability to manufacture large span structures.
The most accessible for citizens inexperienced in construction are frame houses. In order to understand the principle of construction and begin building housing, basic skills in handling simple power tools and time for work are sufficient (all stages of construction can be completed in one summer season - 2-3 months). The cost per square meter is 5-10 thousand rubles.
For example, for a temporary house for hunting or fishing located in the southern regions, capital insulation of walls and ceilings is not required, and in the northern regions it would be appropriate to create a double frame and appropriate finishing.
At the same time, the construction of a frame house requires careful study of all its elements; this is one of the disadvantages of such projects. After all, with a minimum of materials, you need to build reliable and durable housing that will not be destroyed by strong winds and will not sag in a year on poor soil.
Types of frame-panel houses
German, Canadian, Swedish, Finnish and American developments in the field of frame housing construction present different methods of constructing a building. They are based on the principle of economy and energy efficiency. Such structures are becoming increasingly popular in our country.
Canadian "Platform"
The method was developed in Canada, where it is very widely used for the construction of small private houses. Construction is carried out floor by floor, starting with the construction of the foundation and floor. On the finished base - the platform - the walls of the first level are assembled and installed.
Three types of panels are used - OSB, GVL. The first are oriented strand boards made from wood components and glue, the second are gypsum fiber sheets reinforced with cellulose. They are attached to the frame with self-tapping screws.
The ceiling will be the floor of the second floor or attic. Construction is being carried out sequentially. The use of lifting mechanisms and the involvement of a large number of labor are not required.
After the walls are erected, the roof is installed, and insulation is carried out. They install doors, windows, lay communications, and perform exterior and interior decoration.
Frame houses made of SIP panels
The structural insulating sandwich panel consists of two moisture-resistant oriented strand boards OSB and an inner layer of expanded polystyrene. Construction is carried out sequentially, connecting SIP panels to each other with a tongue-and-groove lock. They are attached with polyurethane foam and self-tapping screws to beams 9 cm thick, filling all the voids with sealant.
The walls have low thermal conductivity. A standard 14 cm panel protects against the cold in the same way as 1.5 meter thick brickwork.
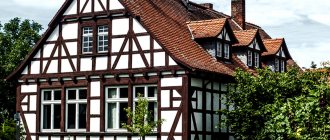
German technology "Fachwerk"
A special feature of half-timbered systems is the external location of the frame. The lattice structure of small sectors is filled with polypropylene or mineral wool slabs and sandwich panels.
The frame is made of laminated veneer lumber. It is strong, durable, and resists precipitation well. Rigidity is imparted by elements of cross-shaped planks, which simultaneously perform a decorative function - man, St. Andrew's cross, wilderman. The insulation is reliably protected by moisture- and windproof membranes.
Swedish technology
The layout of a frame house, made using Swedish technology, has a design similar to the traditional one, but differs in the presence of double lathing.
Layers of external fencing (starting with the outer one) are attached to the frame made of wooden beams - facade cladding, windproof board made of MDVP installed with a ventilated gap, basalt wool, vapor barrier.
The next layer is a counter-lattice, intended for covering with hypocardboard or other material and laying communications. Installing an additional frame allows you to avoid damage to the vapor barrier when installing pipes and wiring, and also to lay another cross-layer of thermal insulation.
The foundation, through the surface of which more than 5% of heat is lost, is constructed using USHP technology - an insulated Swedish plate. Extruded polystyrene foam, reinforcing mesh, a heating system are laid on a crushed stone base, and poured with concrete. Thermal insulation of the blind area and plinth is required; it is included in the continuous continuous base of the USP. A kind of bowl is formed for installing floors on the ground.
The energy efficiency of such a solution is 25-30% higher than classic options for frame buildings.
A frame house is a kind of constructor. Its diagram is drawn up at the design stage, taking into account the construction technology, type of soil, climatic conditions
When assembling, it is important to ensure the rigidity and stability of the structure, reliable insulation, use high-quality materials, fasteners
Framed floor
Canadian technology for the construction of frame houses implies the following implementation of the floor in this building. First of all, the logs are installed in pre-prepared grooves in the grillage. If you install logs in succession, you will get a kind of lathing; the block for the logs should have a cross-section of 150x50 mm, in some cases – 100x50 mm. The logs are fixed using self-tapping screws or nails; you can also use dowels, corners, and screws.
Plywood or SIP panels are laid on the installed floor sheathing. The panel or plywood must be securely fastened to the joist so that your floor does not creak during operation. SIP panels will make the floor much warmer, and installing such a floor is much easier. SIP panels are laid using a tongue-and-groove system, resulting in a much stronger structure.
Ensuring frame rigidity
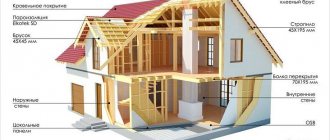
Classic frame houses are structures whose frame diagram includes the following elements:
- Upper and lower frame beams;
- Vertical racks;
- Jib;
- Jumpers;
- Elements of the roof truss system.
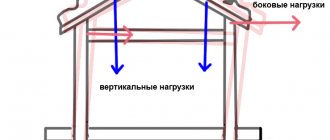
The frame is schematically a system of fixed rods that absorb compressive, tensile and bending loads.
The cross-section of the support posts is selected according to their load-bearing capacity. For external walls it is 150x50 mm or 200x50 mm, for partitions 100x50 mm.
It is not advisable to increase the cross-section of the load-bearing beam to accommodate insulation. It is much more rational to lay thermal insulation in 2 layers - one between the racks, the second along the outer sheathing with bandaging. This measure will help avoid heat loss through wooden beams, trim, corners, and frames of openings.
The pitch of the racks for one-story houses is 600 mm. This is a convenient interval for laying basalt wool, fastening OSB or gypsum fiber sheets without trimming. For higher building heights, it is recommended to place the supporting elements at a distance of 400 mm.
Window and door openings are reinforced with horizontal beams made of timber laid on edge. If the gap is more than 800 mm, its thickness must be at least 150 mm. If the crossbar is not strong enough, when it bends, the window frame will become pinched. Cracks may appear on the glass, facade and finishing. The cross-section of the vertical posts is increased when transmitting point loads from the roof ridge and large openings.
Inside the frame, in the load-bearing walls, horizontal lintels are laid 50 mm thicker than the supporting post. The connections increase the spatial rigidity of the structure and serve as support for the top sheet of insulation. They are mounted staggered, flush on the inside of the wall.
For stability, the frame is reinforced with jibs or solid cladding. Jib - boards sized 100x25 mm or 150x25 mm located at an angle of 40-60°. Their upper and lower ends are cut into the frame beams and secured along the length to the posts with 2-3 nails.
If rigid sheathing slabs - OSB or multi-layer plywood - are installed, installation of jibs is not necessary. The sheets are laid with seams staggered to bandage the frame and increase its rigidity. The panels cannot be mounted vertically. At the corners of the windows, solid elements are installed, rather than pieces or trimmings. Sheathing thickness – 11-12 mm.
The front door is another area where it is important to strengthen the frame. Closing and opening leads to vibration of the entire structure and destruction of the finish
The side racks are further strengthened by joining two boards; the walls are sheathed with a single sheet of multi-layer plywood.
The interfloor strapping is designed to tie the frame, and not go in a circle. First, the timber is installed at the intersections of external and internal walls, then at corners and partitions. The remaining areas are filled last.
Select high-quality fasteners of appropriate thickness and length.
Bottom frame on a columnar foundation
The fasteners described above are used to secure the bottom frame of a frame house on a slab or strip foundation. In the same case, if you use a columnar base, it is recommended to choose a slightly different scheme:
- In order to make installation as convenient as possible, it is necessary to equip the upper part of the supports with flat horizontal headbands with holes.
- It is necessary to lay wooden beams on these headrests; they act as a grillage. Then, recesses of the required length are drilled in the wooden beams. They need to be drilled to fit the holes that already exist in the headbands.
- Secure the beam with bolts or screws.
- It is imperative to secure the timber to the foundation.
It is worth noting that shallow slabs and tapes can move at low temperatures, and over considerable distances. Therefore, you can guarantee durability and reliability only if you make a high-quality connection between the lower trim and the extra one.
Types of frame residential buildings
It is impossible to build a proper frame house if the diagram is drawn up without taking into account the type of structures and assembly technology. Various types of residential buildings have been developed for mass development:
- Frame;
- Frame-panel.
In addition, combined or modified systems are used in frame housing construction.
The basis of the houses is a post-and-beam frame that absorbs loads from walls, ceilings, roofing, finishing and filling of openings. The differences are in the order of construction operations, assembly speed, mechanisms and technologies used.
Foundation of a Canadian house
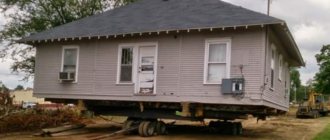
The construction and installation of a frame house using Canadian technology with your own hands should begin with the foundation . In order for the entire frame structure to be stable and stand reliably, a columnar foundation is often chosen, as well as a pile foundation or a slab foundation poured from concrete. Since the weight of a Canadian house is relatively small, soil shrinkage will be minimal.
When laying the foundation, you should also take care of sufficiently high-quality waterproofing of the concrete. Asbestos pipes are used as the base. To do this, holes about a meter deep are made in the soil at a distance of 80 cm, into which pipes up to 1.5 m high and 20 cm in diameter are inserted. After this, the space around the pipes is filled with earth, and concrete is poured inside. This technology will strengthen the entire foundation and give it rigidity and strength.
Frame house projects photos and prices: layout features
The size of the frame house project depends on financial capabilities and needs, the number of family members, etc. However, frame houses, the designs of which are available, allow, all other things being equal, for the same money to order buildings of large dimensions. If funds allow, the home should be as comfortable, convenient, thoughtful as possible, not necessarily huge. If there are not enough funds yet, then it is better to postpone construction and think everything over carefully, rather than rush and choose an inexpensive, but obviously inconvenient “project” for permanent residence. Otherwise, even those funds that exist will be used irrationally and thrown away. It is worth remembering that reconstruction or changing the layout are extremely expensive things and sometimes it is easier and cheaper to demolish everything and rebuild it rather than redo it.
Great attention should be paid to the stairs. It can be both pompous and look simple, but the most important thing is that the angle of inclination of the marches should be as flat as possible for convenience and safety - after all, not everyone and does not always have the strength, health and desire to climb steps with a 45 or 60 degree inclination! 2 flights per floor are better than 1 - it will be much safer if you fall from the steps
However, recently there has been a fashion for one-story frame house projects, and of considerable size. It is clear that they are often ordered made from a frame, because such buildings save money. One-story buildings are already somewhat more expensive per 1 square meter. compared to two-story ones - this is where frame projects come to the rescue. In one-story frame houses (photo projects and prices of which are on the website), the problem with stairs has been radically solved - it simply does not exist.
There should be several bathrooms in a modern home - at least one on each level. 3 or 4 or 5 bathrooms is normal for a frame house project of an average size or slightly larger than average (here we are not talking about castles or villas). If you think about it, the cost of bathrooms is quite small, there is always enough space for them in a house from 100, and even more so from 200 square meters, and they are of decisive importance, especially in the case of a large family or frequent guests. The same applies to the kitchen - well, it doesn’t make sense to build 100-200-300 m or more if the kitchenette is small, like in the Khrushchev-era buildings. Usually they make a kitchen and a separate dining room, that is, 2 rooms, but they are located side by side, through a convenient wide arch or opening. Sometimes they have one, but very large kitchen-dining room. It is in these rooms that we spend the most active time - in the kitchen, dining room, living room, bathroom, but not in the bedroom and especially not in the corridors. The hallway and boiler room are also important (designed according to certain standards, depending on the type of fuel used and the availability of main gas).
Without exception, all frame houses, the photo projects and prices of which are given here, without question, can be supplemented with a terrace or veranda, or an additional porch, but its cost will be considered as an additional option.
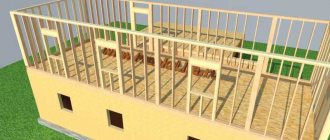
Knots of a frame wooden house
The main components include floor, roof and wall systems. They, in turn, consist of subassemblies. Let's take a closer look at each of them.
Bottom harness knot
The bottom strapping node is the place where the strapping bars are attached to the foundation. Docking is carried out using foundation bolts, clamps or other available methods. Before laying the beams, the joint is waterproofed.
Joining the strapping bars together at the corners
Another structural unit of the lower trim of a frame house is the place where the beams meet each other at the corners. Docking is done using the “paw” or “half-tree” method. For a tighter connection, use bolts or metal corners.
Installation of floor and ceiling beams
The floor beams are laid with the required spacing and rested on the strapping beam. Ceiling beams are installed in the same way.
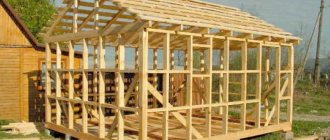
Installation of vertical racks
When building a frame house, the corner vertical posts are installed first, then the intermediate ones. Several nodes are distinguished here: the joints of the vertical posts in the corners with the upper and lower trim, as well as the connection of the posts with the trim beams.
To secure the vertical posts, grooves are made in the corners and metal corners are used as an addition. Attaching the intermediate posts is done in the same way.
Top harness knot
The bars of the upper harness are attached in the same way as the bars of the bottom. They join in the corners and with the frame posts.
Using additional “connections”
To make the frame strong, it is reinforced with diagonal and vertical supports. Although such a solution is rare. Basically, OSB boards with which the frame is sheathed are sufficient for reinforcement.
Knots of the rafter system
The rafter system consists of a large number of units:
- Nodes for supporting rafters on a ridge girder
- Knots for supporting rafters on the mauerlat (top frame beam)
- Connections between rafter legs and crossbars and other struts
- Connections between rafter legs and counter-lattice beams
- Connection of lathing with counter-lattice
The rafter legs at the ridge are connected to each other end-to-end or overlapping. To attach the rafters to the mauerlat, cuttings are made on them. Boards or bars are used as crossbars and other supports. The counter-lattice beams are mounted at the same pitch as the rafters directly on top of them. The sheathing is made from boards, sparse or solid, depending on what type of roofing is used.
You can find out more about how installation is carried out and the connection points of a frame house are worked out on our website.
When planning a house, it is important to know the structure of a frame house, all the nuances of construction, so that no unexpected problems arise during the construction of the house. Having the necessary information, it will not be difficult to build a frame house yourself
Read about the construction of a frame house here.
Wall corner
The corner of a frame house is the place of maximum heat loss. As a rule, it is in the corners that condensation accumulates and it is them that need to be insulated first. Therefore, even at the stage of assembling the frame, it is necessary to ensure that the corners of the future frame house are warm. How to do it?
Smooth fixing plates are placed on the outside of the vertical beam. They connect adjacent single-level surfaces of the vertical post and horizontal beams. The fixing corners are located on the side. They connect mutually perpendicular surfaces
What else is important to know about angles?
When building in regions with cold climates, not solid wooden beams are used as vertical posts, but a corner post is assembled from separate boards. The resulting structure resembles a well. Insulation is installed in this internal space, which retains heat and limits possible heat loss.
Installation of corners in the frame of the house.
The window assembly in a frame house must also be warm; for this, single racks are used, but the load on window and door openings is removed using a crossbar. The crossbar is attached along the entire length of the frame wall by cutting into all vertical posts
It is important to take into account that under each window opening there must be at least 1-2 vertical support boards
Walls of frame houses - their structure and construction technologies
Walls erected in compliance with the technology provide a comfortable microclimate in the house, ample opportunities for decorating its interior and safety.
Layer-by-layer wall construction
All external walls of frame houses are a “pie” made of various materials. They form it as follows:
- The frame fixed to the foundation is covered from the outside with sheathing material.
- It is covered with a layer of waterproofing.
- A lath is attached over the waterproofing for installation of façade finishing material.
- Insulation is laid inside between the frame posts.
- Cover it with a vapor barrier material.
- Install the internal wall cladding. Usually it serves as the basis for working with finishing materials.
The result is a multi-layer “pie” of the wall, which demonstrates high strength and insulation characteristics. However, the entire range of work does not always take place. Its completeness depends on the chosen construction technology.
Canadian and Finnish technologies for raising the walls of frame houses
Canadian and Finnish frame construction technologies make it possible to build a residential building from environmentally friendly building materials in a short time. However, they have one fundamental difference. It lies in the method of raising the load-bearing walls of a frame house.
Finnish technology involves performing all work on the construction of walls - from installing the frame to vapor barrier - directly on the construction site.
Canadian technology makes it possible to further reduce the construction time of a house through the use of ready-made SIP panels. Usually they are a “pie” of two layers of sheathing material and insulation laid between them. The thickness of the panels and the materials used to make them may vary.
Note! After installing the frame, insulating it and covering it with finishing material, the wall thickness for central Russia is 150-200 mm
House projects using DOK technology
Frame house with attic
Two-story frame house with a garage, built using DOK technology
One-story frame house with an attic and a balcony One-story frame house with a pitched roof and a bay window One-story house with an open terrace and a planken facade On our website you can familiarize yourself with the most popular house projects from construction companies presented at the Low-Rise Country house exhibition.
Any architectural project is suitable for building a house using double-frame technology, so the customer can choose a different structure and design for the future home. The use of new generation technologies and high-quality building materials will allow you to get a beautiful, high-quality and comfortable home. You can diversify the exterior and interior design of your home using various finishing materials.
Frame houses are buildings that are quite comfortable and durable, of course, if they were erected in accordance with existing rules. The design of a frame structure consists of numerous components, fundamental - basic, and auxiliary. Absolutely any of the existing components of a frame wooden house during construction will certainly require especially close attention: there simply cannot be any trifles here. After all, if all the elements of such a structure are fastened and joined incorrectly, living in the building will not only be uncomfortable, but very dangerous for you and your loved ones. One day, from an incorrectly distributed load, such a house risks simply “falling apart” into pieces.
Double top harness
Double top frame made of boards, also a distinctive feature of the American frame
Double top harness
Double piping again provides reinforcement along the top of the wall for deflection from the load from above - load from the ceiling, rafters, etc.
In addition, pay attention to the overlaps of the second row of strapping
- Overlap in the corner - we tie two perpendicular walls together.
- Overlap in the center - we tie together 2 sections of one wall.
- Overlap along the partition - we tie the partition together with the outer wall.
Thus, the double piping also fulfills the second task - ensuring the integrity of the entire wall structure.
In the domestic version you can often find the top frame made of timber. And this, again, is not the best solution. Firstly, the beam is thicker than a double frame. Yes, it may be better for deflection, but it is not a fact that it is necessary, but the cold bridge at the top of the wall will be more significant. Well, it’s more difficult to implement this overlap to ensure the integrity of the entire structure. Therefore, we return again to the question: why make it difficult if you can make it simpler and more reliable?
Correct jib in a frame house
Another cornerstone. Surely you have come across the phrase “jibs made incorrectly.” Let's talk about this. Firstly, what is a jib? This is a diagonal element in the wall, which provides spatial rigidity for shear in the lateral plane. Because thanks to the jib, a system of triangular structures appears, and the triangle is the most stable geometric figure.
So, when they talk about the correct jib, they usually talk about this option:
Correct jib
Why is this particular jib called “correct” and what should you pay attention to?
- This jib is installed with an angle of 45 to 60 degrees - this is the most stable triangle. Of course, the angle may be different, but this range is best.
- The jib cuts into the upper and lower trim, and does not just rest against the rack - this is quite an important point, in this way we tie the structure together.
- The jib cuts into every post in its path.
- For each node - adjacent to the harness or rack, there must be at least two fastening points. Since one point will give a “hinge” with a certain degree of freedom.
- The jib cuts into the edge - this way it works better in the structure and interferes less with the insulation.
And here is an example of the most “wrong” jib. But nevertheless, it occurs all the time.
Incorrect jib
This is just a board stuck into the first opening of the frame. What is so “wrong” about it, since formally it is also a triangle?
Firstly, the angle of inclination is very small. Secondly, in such a plane the jib board works worst of all. Thirdly, it is difficult to fix such a jib to the wall. Fourthly, pay attention to the fact that cavities that are extremely inconvenient for insulation are formed at the junctions with the frame. Even if the jib is carefully trimmed and there is no gap at the end, there is no escape from the sharp corner, and properly insulating such a corner is not an easy task, so most likely it will be done somehow.. Another example, also common
This is a jib embedded in the racks, but not embedded in the harness
Another example, also common. This is a jib cut into the posts, but not cut into the harness.
The jib is not embedded in the harness
This option is already much better than the previous one, but, nevertheless, such a jib will work worse than one embedded in the harness, and the work will take 5 minutes more. And if, moreover, it is fixed to each rack with only one nail, then its effect will also be minimized.
We won’t even consider the options for all sorts of small defective “corners and braces” that do not reach from the top harness to the bottom.
Formally, even the most crooked jib makes at least some contribution. But once again: why do it your own way if a good solution already exists?
This is where we finish with the American frame and move on to the Scandinavian one.
Double skin technology
If it is impossible to strengthen the frame with a reinforced profile, then you can use a method called “double cladding technology.”
How to strengthen a plasterboard wall using double sheathing: a 50 mm profile is simply sheathed with two layers of plasterboard, the width of the partition increases to 100 mm, but the strength will increase significantly. An even better result can be obtained by using intersection of seams - not only strength increases, but also sound insulation.
A layer of mineral wool is laid between the profiles, this will help improve heat and sound insulation. It is best to lay the wool when one side is already fixed. For ideal sound insulation, get rid of all voids between sheets, as well as cavities where sound can resonate.
The gypsum board is attached to the profile with self-tapping screws. You need to carefully ensure that they are screwed in completely and that the caps do not protrude. Otherwise, in the end you will have to struggle with finishing work, because the protruding parts will interfere with the puttying process. If you screw the screws in too tightly, the cap will compromise the integrity of the sheet, which will negatively affect the strength of the connection.
The Knauf profile is well suited for assembling the frame. It is available in different widths, thickness also varies, which will help you find the option that suits you, and high-quality metal will provide the necessary strength.
Knots of the rafter system
The roof structure consists of many elements and connecting units, including:
- fixing the rafters to the ridge girder;
- fastening the rafters to the bars or boards of the top trim;
- joining the crossbar and rafter legs;
- connecting the counter-lattice to the rafters;
- the junction of the sheathing and counter-lattice.
The listed fastenings are made using nails, plates and metal corners.
To fix the load-bearing elements, reinforced corners made of hardened steel are used. Metal thickness – 3-4 mm.
The design and components of the rafter system are shown in the photo below.
The strength of the connection depends on the quality of the fasteners used and the wooden structural elements themselves. The lumber must be well dried. Wet wood shrinks greatly - there is a risk of “rupture” of nodes and joints.