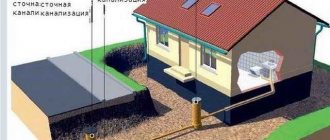
A concrete cellar is a reliable and durable structure designed for storing crops, wines, food and everything that needs to be kept cool. A properly equipped cellar will always be dry, will not freeze or warm up, maintaining approximately the same air temperature, regardless of weather conditions.
Despite the fact that many modern building materials have appeared on the market today, there are various building construction technologies, the process of creating a typical cellar under a residential building is the same as many years ago. The cellar can be made of plastic, concrete slabs, different configurations and designs, but the simplest and most expedient way is still to fill the cellar with concrete.
What you need to know about the cellar before construction
Before you start searching for building materials and starting work, you need to understand all the nuances, disadvantages and advantages of different approaches. It is important to study and take into account some features before implementing the project.
Important nuances of building a cellar:
- Depending on its depth and location, a concrete cellar can be underground, above-ground, built separately from the house or inside the building. It is most effective to equip the cellar completely in the ground, but this option will require a lot of money, time, and effort. Partially recessed structures are often made (about half the height), which is quite enough to protect the room from freezing and ensure comfort in operation.
- Any materials except porous ones are suitable for building a basement. It’s not worth building a cellar using the currently popular aerated concrete blocks: the material absorbs moisture, causing it to accumulate in the room, and can quickly collapse. You can use gas blocks only if you install several layers of waterproofing all around, but this is very expensive.
- A good modern option could be a ready-made plastic cellar box, which comes with a hatch, shelves, ladder, and ventilation system. You need to make a concrete caisson under it, and plastic cellars are expensive, but they save you from many problems.
- A concrete basement today is the most acceptable option, as it is inexpensive, durable and reliable.
- The roof of a cellar can be arched (for partially buried or above-ground projects) or flat (for a completely buried room).
- The floor is left earthen (if the groundwater lies much lower) or filled with concrete and waterproofed (more reliable).
- The cellars are insulated with the same soil that was removed during the digging of the pit.
Carrying out marking and ground work
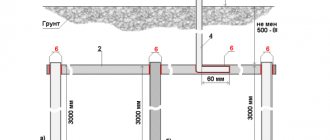
Layout diagram for the future foundation.
Markings are made on the ground where construction will take place; it must be done carefully and correctly, otherwise the walls may become deformed. Pegs are driven into corners and intersections of walls and the symmetry of the markings is checked by measuring the diagonals. If the size of the diagonals coincides, it means that the markings were done correctly, and if not, adjustments must be made and only after that begin earthworks.
Trenches are dug to the required depth according to the markings. It is necessary to ensure that the walls of the trench do not have ledges and are level, otherwise the soil may crumble.
Which concrete cellar design option to choose?
It is quite possible to build a concrete cellar with your own hands. But first you need to decide on the construction technology - the basement can be assembled from ready-made reinforced blocks or by pouring concrete mixture into pre-prepared formwork (also reinforced with steel rods). Usually the monolith is poured on heaving soils, which contain a lot of loam.
It must be remembered that in both options, the cellar floor must be equipped with a drainage system and a layer of waterproofing, then the surface must be reinforced and filled with a concrete mixture of at least 20 centimeters. It is advisable to make the floor reinforced and durable in any case, since the groundwater level can change, as well as the soil load on the structure. And the base is capable of taking on about 30% of the wall load.
Prefabricated structures that use concrete blocks and slabs in their construction are less durable, more expensive and susceptible to moisture.
Monolithic
Monolithic concrete cellars are constructed by filling the box with concrete. Before starting work, it is imperative to examine the area - determine the groundwater level, find out the presence of gas mains, water supply lines, communication lines, cable channels, sewer pipes, etc. at the site.
To equip a concrete cellar, choose the type of structure (ground, underground), dig a pit of the required depth, fill the bottom with a layer of drainage, then lay a layer of roofing material for waterproofing, reinforce it with steel rods, install the formwork and fill the structure with concrete.
The resulting basement is reliable, durable, able to withstand the load of soil, moisture, and the effects of various negative factors.
Made
The finished concrete cellar is made after pouring the floor, assembled from foundation blocks. The blocks are assembled using masonry mortar with waterproofing additives. Assembly occurs thanks to masonry mortar and special grooves. After assembly, the entire surface of the blocks is treated with a waterproofing agent (such as Dehydrol Lux brand 3).
It is very difficult to build a prefabricated concrete basement with your own hands - it’s all about the weight of the blocks (from 100 kilograms), which, even if it is theoretically possible for one person, is still difficult to lift. In this case, special equipment is used.
The main advantages of building a basement from prefabricated blocks are the speed and ease of construction, the resistance of the blocks to biological negative factors (fungus, mold), and frost resistance. The blocks are presented in different sizes and shapes, so choosing elements of optimal dimensions will not be difficult. Provided that the waterproofing layer is properly installed, a prefabricated basement can be equipped even with a high groundwater level. Among the disadvantages of this option, it is worth mentioning the high cost of both the blocks themselves and the work using them.
Stage 3: reinforced concrete floor
At this stage, the ceiling and lintels are cast.
The next step in the construction of the cellar is the formation of lintels and the placement of formwork under the ceiling. A solid wooden flooring is installed from a 40-gauge board, and the supports are made from timber with a section of 100x150. At this stage, it is important not to skimp on consumables. The base must be strong and support the weight of liquid concrete. As a base, you can use a galvanized U-shaped metal profile for the roof
The monolithic concrete floor is poured when the formwork and reinforcement are prepared. The protruding reinforcements from the wall are bent and connected to the frame of the floor slab. Concrete being poured
When pouring concrete, it is necessary not to lose momentum and immediately begin compacting the concrete. Don't forget to use a vibration machine
Before the concrete has set, we level it with a trowel, since the area of the monolithic floor is large, we use a trowel with a long metal pipe-handle
It is advisable to do grinding (leveling) more carefully
After 2-3 days, the formwork can be removed and finishing work can begin and the next stage - backfilling, but first it is necessary to complete the communications - this is the installation of ventilation and drainage
Advantages and disadvantages of concrete cellars
Concrete structures have certain pros and cons that need to be studied before creating a project and implementing it.
The main advantages of a concrete cellar:
- Strength – the ability to withstand considerable loads, resistance to seasonal movements.
- Simplicity - doing everything yourself is not difficult and is quite possible for one person.
- Long service life - more than 20 years.
- Resistance to frost - provided that waterproofing is carried out in the cellar, there will never be frost, regardless of the ambient temperature and the level of soil freezing.
- Hygiene.
- Resistance to various chemical influences.
- Low cost.
Among the disadvantages of a concrete cellar, it is worth highlighting: a high level of thermal conductivity (which is why it is desirable to carry out waterproofing and thermal insulation), the risk of cracks appearing during the installation process (usually due to non-compliance with the technology).
Due to the huge number of advantages and the minimum number of disadvantages, a poured concrete cellar is considered the most optimal choice.
Brickwork
Now a little about laying the walls. If you still decide not to bother with casting, but to build basement walls from brick, then you should definitely follow some immutable rules. The first thing is, of course, to use high-quality material. Secondly, don’t rush to drive out the verticals. Correct laying always starts from the corners and should be no more than 5-7 rows in “one sitting.” Otherwise the wall may “float”.
Brickwork of basement walls
Advice!
Another important point - include the following item in your work plan - the organization of ventilation ducts directly during laying or pouring, so that later you do not waste time and effort on gouging out holes in the right places.
Also interesting is the method of constructing a basement, when the walls rise 500-600 mm above ground level. The result is no longer a basement, but something like a basement floor, in which openings can be made for translucent structures (windows in common parlance).
Ground floor made of brickwork
This will not only allow you to have normal natural lighting, but also ensure maximum air flow to ventilate the basement. So to speak, we kill two birds with one stone. And let's move on to the next important section.
Brickwork of basement walls
Calculation of concrete composition
Taking into account the fact that for a cellar it is desirable to prepare concrete with high characteristics of resistance to moisture, the quality of the material plays a major role here. There should be no lumps in the cement, so it must be sifted through a 1x1 millimeter sieve to remove them.
The composition is usually the following: part cement, part sand, 3 or 4 parts crushed stone/gravel, the optimal amount of water to obtain a solution of the desired consistency. To make calculations for concrete grades more accurately, you can use a special online calculator.
Foundation blocks
I would like to touch on another option for installing a basement in a private house. True, this approaches the topic of “do-it-yourself construction” with great reserve, but still... A few words about the basement walls made of reinforced concrete foundation blocks. To install such, by no means light and bulky structures, you will need a crane and a team of professionals. It is almost impossible to cope with such a task on your own. The only advice we can give you is to check the installation of the first row of blocks. Armed with a level, check for horizontal and vertical distortions. The smoother the walls are, the less consumables you will spend on finishing work in the future. Everything must go strictly according to plan.
Laying foundation blocks
Let's return to our sheep. The walls have already been built, insulated and insulated. We add soil to the wall, compacting it tightly. All that remains is to make a blind area to prevent moisture from entering. After this, you can safely begin installing the ceiling. Our basement is ready.
Blind area
However, before finishing this topic, I would like to give some interesting recommendations regarding the use of the basement of a private house.
Installation of foundation blocks
Construction of a monolithic cellar
To create a concrete cellar with your own hands, you will need certain tools, materials, and knowledge. Required materials: cement, sand, crushed stone (gravel), steel reinforcement, plywood or formwork boards, binding wire, waterproofing materials, pipes for drainage and ventilation. Tools: everything for working with concrete, excavation work.
Designation of building dimensions
The dimensions of a concrete basement depend on its purpose and the owners’ plans for the premises. Standard dimensions are 2 by 4 meters. Much depends on where you plan to build the basement, the characteristics of the area, and the possibility of arranging a room of the desired size.
Selection of possible depth
The depth of the basement directly depends on the level of groundwater. To find out, they first carry out exploratory drilling to a depth of 3 meters, insert a wooden strip and leave it for several hours. If the lath is dry, groundwater goes much deeper.
The level of burial depends on the type of basement - whether it will be above ground or underground, and the possibility of making ceilings of optimal height. If groundwater lies high and close to the room, there is no need to build a basement at all - this decision can lead to useless waste.
Technical preparation for construction
Before filling the cellar with concrete, it is necessary to choose the right location and determine the level of groundwater. You cannot build a cellar near the foot of hills, as rainwater will flow down and flood the structure. It is best to build a cellar on the top of a hill (if it is a separate room).
The depth of groundwater is determined as follows: drill a hole 3 meters deep with an ordinary garden drill (if the soil is complex and with stones, it is better to use special equipment). According to the standard, there should be at least 50 centimeters from the wet soil to the bottom point of the cellar. The cellar is usually made at a depth of a maximum of 2-2.5 meters, so drilling 3 meters is usually sufficient.
The presence of water can be determined with a borehole depth gauge or a regular rod (as described above). All technical work is carried out in the wettest time of the year (autumn or spring).
Pit development
Before pouring a concrete cellar with your own hands, you need to carry out excavation work. First, the area is thoroughly cleared, the top layer of soil and turf are removed, and the boundaries of the pit are marked with pegs and a cord. The main part of the soil is dug with an excavator; a third of the volume can be cut out with a bayonet shovel.
Wet soils are dug with a drainage system in place: a concrete pit or well 50-80 centimeters deep below the pit level is made separately from the pit, and the water is removed with a drainage pump. The bottom and walls of the pit are leveled, leveled very evenly, then crushed stone is filled in and compacted several times.
Drainage for a modest investment
Drainage is a necessary measure to eliminate the risk of flooding. To successfully deal with backwater, you can create a network of trenches. Special pipes (drains) are installed, which are laid around the perimeter of the room and insulated with layers of geotextile and gravel. These will be coarse filters that will prevent the pipes from becoming clogged with sand.
The drains are placed at a slope so that the water flows away by gravity. The pipes are connected to a common pipeline that goes into a storage well (in this case, a pump is used that pumps water out of the well as it fills) or a pit or ravine.
Formwork assembly
To pour the concrete floor, formwork is installed from panel boards 3-4 centimeters thick and 25 centimeters wide, which, after dismantling, can be taken to create a wooden floor frame.
How the work is carried out:
- Cutting boards to required sizes.
- Assembling panels around the perimeter of the base.
- Installation of the reinforcement frame along the wooden contour, connection of the reinforcement with the steel frame of the stairs to the cellar (if poured).
- Hammering pegs vertically to secure the boards.
- Installation of spacers in the formwork for rigidity.
- Installation of pipes in the frame to create a ventilation system.
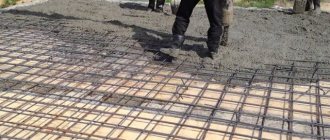
Reinforcement
The reinforcement frame is installed around the entire perimeter of the pit and in the walls, which makes it possible to make the floor reliable and strong, not afraid of heaving, and the walls able to withstand the roof and soil pressure. The reinforcement uses corrugated steel rods with a cross-section of 8-10 millimeters, which are laid in a grid format. The elements are knitted with special wire. The frame must be raised above the floor using special clamps or pieces of brick.
Base
Before pouring the concrete cellar with your own hands, you need to make a high-quality foundation. The bottom and walls must be perfectly flat, without loose soil. A layer of sand and gravel (10 centimeters each) is poured onto the bottom; if the soil is wet, another 10 centimeters of fatty clay must be laid on top. Each layer of the pillow is carefully compacted.
A layer of waterproofing is laid on top - you can use polyethylene film or roofing felt. Wet soil requires multi-layer waterproofing. They lay the floor and go onto the walls of the pit. Then the floor is poured with a concrete solution in a layer of 13-15 centimeters. Filling is carried out without interruptions, with uniform distribution of the layer and compaction with a deep vibrator or bayonet.
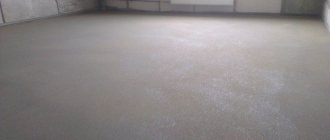
8 hours after pouring, excess moisture from the screed will evaporate, the layer can be rubbed and sanded to obtain a smooth surface. Further work should be continued only after 28 days.
Walling
After the floor has hardened and gained strength, you can begin building the walls. First, they make formwork for the walls (partially removable or simply removable). If the structure is partially removable, build one wall (the surface of the pit acts as the second) - a simpler option, but it requires more material consumption and is not always suitable. Removable formwork is made in the format of a double-sided box with two walls connected firmly to one another.
Formwork for walls can be made from moisture-resistant plywood, edged boards, OSB boards, etc. The inside of the structure can be lined with polyethylene. The thickness of the cellar walls is usually up to 15 centimeters. A reinforcement frame is mounted between the walls of the shields - from vertical ties and horizontal jumpers located in the corners. The elements are connected with knitting wire.
The walls are poured in layers up to 25 centimeters thick, with the obligatory compaction of the mixture with a bayonet or vibrator. If the vibrator is powerful, you can fill it in layers of 60 centimeters. After each layer of concrete is poured, anchor loops are placed in it to tie the frames together. This is how the walls are built to the required length.
After 6-7 days, the formwork can be dismantled. Concrete requires proper care - spraying with water, protection from ultraviolet radiation. After 28 days the walls are ready.
Roof
The roof is poured in the same way as the walls. First, install the bottom of the formwork, supporting it with reliable racks on the floor. Along the perimeter of the cellar, boards are installed on edge, which extend beyond the edges of the walls by 10 centimeters. If the roof should be vaulted, lintels of the desired shape are installed across it. The jumpers are tied to the perimeter box and supported with posts in the center and along the edges.
A continuous plank sheathing is installed on top of the crossbars, covering it with roofing felt. Two ventilation ducts from sewer pipes with a diameter of 110 centimeters are also installed here. One pipe should reach the floor, the second with its edge reaching the roof.
Now the reinforcement frame is mounted - if the roof is vaulted, the rods are bent at the desired angle with a special tool. If the roof is flat, the reinforcement is laid out in the same way as on the base. The ends of the reinforcement are connected to the ends of the rods left when pouring the walls. It is necessary to ensure that the entire frame is embedded in the thickness of the concrete. Afterwards, the external formwork panels are installed and the roof is poured.
Filling is carried out as usual. If the roof is pitched, the vibrator cannot be used. Concrete can be bayoneted, then it needs to be smoothed with a trowel and cared for during the drying process. The ceiling can also be made from a reinforced concrete slab, which will save time and effort, but you will have to use special equipment to deliver it.
Waterproofing
After the concrete has hardened, the roof must be covered with a layer of waterproofing to reliably protect it from precipitation. Here it is better to choose roofing material. And on top you can install a layer of thermal insulation - turf and soil, in addition to rigid polystyrene foam. If you are concreting a basement in a private house, you can refuse these activities.
A concrete cellar is the best solution for those who need to create a high-quality and reliable place to store food and more. Provided that the technology and work rules are followed, it is quite possible to create a high-quality concrete cellar with your own hands.
How are walls poured with concrete?
Installation of formwork for pouring concrete.
For basements, it is recommended to construct monolithic walls using solid strip foundation technology. The structure can be filled in several stages:
- preparation of trenches;
- laying sand cushions;
- installation of formwork;
- laying a waterproofing layer;
- reinforcement;
- pouring concrete.
It is necessary to install the formwork for the walls after the concrete floor has completely dried, otherwise the fresh masonry will be pressed through and beveled.
Return to contents
Selecting wall size
When constructing monolithic walls, their thickness is selected depending on the expected number of storeys of the house and the type of soil. Thickness can vary between 20 and 40 cm.
Return to contents
Preparing the trench
When using monolithic casting technology, it is necessary to dig trenches under the walls of the future basement. One of their parts will be a strip foundation. The depth of the trenches should be 150-200 m, width - 0.4-0.6 m.
Return to contents
Installing a sand cushion
The layer of sand cushion should be at least 20-40 cm. This value depends on the expected size of the walls and the total load. The sand layer is compacted. For complete compaction you need to wait three days.
Return to contents
Installation of formwork
To install removable formwork, wooden or aluminum panels are used, for non-removable formwork, polystyrene boards are used. The latter option further acts as a thermal insulation layer.
Waterproofing
The walls need waterproofing. The process is carried out at the stage of medium hardening of concrete. To do this, the joints between the walls and the floor, the seams are cut into grooves measuring 3 x 3 cm with a grinder. These grooves are filled with a penetrating waterproofing substance.
No less important is the final waterproofing of the walls. Using a brush or spray, the penetrating substance is applied to the surface, previously cleaned of traces of grease and cement laitance. After which the joints and seams on the wall are covered with a polymer film and periodically moistened for two to three days.
Return to contents
Reinforcement and concrete masonry of the wall
Despite the strength of high grades of concrete, there is a risk of partial destruction of the structure due to soil vibration. To avoid this, it is recommended to strengthen monolithic walls with a metal frame made from an assembly of steel rods in the form of vertical columns, transverse beams and reinforcing mesh.
Reinforcement is carried out in 2 or 3 layers depending on the size of the wall. Sometimes the reinforcement is laid in the middle, and the mesh and thick wire are placed at a distance of 15% from the edges on each side. We fill the walls with waterproof concrete W10 and higher. The M300 grade with strength B22.5 and workability P1 or P2 is suitable. When constructing a wall, it is important to connect a new portion of concrete with the unhardened layer that was previously laid inside the formwork.
Return to contents