Modern interior design involves a unique design of all surfaces in an apartment or house, among which the floor occupies one of the important places. A new and very original technology has appeared - installation of self-leveling floors.
Until recently, there was an opinion that self-leveling floors are intended only for industrial buildings, and their production is available only to professionals. However, the situation has changed: self-leveling floors are increasingly found not only in industrial premises, and people far from the profession of a builder are successfully taking on their own production.
How to make self-leveling floors with your own hands
Self-leveling floor - what is it?
Self-leveling floors, or as they are also called “liquid linoleum,” are a type of floor covering made of polymer materials. Thanks to the application technology (filling), a continuous, flat surface is obtained over the entire area. The thickness of the self-leveling floor varies from 1 to 8 mm, depending on the expected operational load on the floor, as well as the temperature and humidity of the room.
The history of self-leveling floors began in the late 1980s in the USA. At first they were made from a gypsum-cement mixture and were intended only for industrial premises. Later, epoxy and polyurethane bases began to be used, and this gave impetus to the widespread use of self-leveling floors in a variety of areas.
Advantages of self-leveling floors
The list of operational, sanitary, hygienic and aesthetic characteristics of self-leveling coatings makes them indispensable for premises where there are increased requirements:
- reliability, resistance to mechanical damage;
- ability to withstand the aggressive effects of gasoline, solvents, alkalis and acids;
- resistance to high humidity;
- low abrasion rates: no dust during operation;
- fire safety;
- absence of static electricity on the surface;
- presence of antibacterial properties;
- high aesthetic indicators.
Recommendations from experts
Builders who specialize in installing self-leveling coatings recommend pouring with a partner. This greatly simplifies installation and speeds up the process. The quality of self-leveling floor largely depends on the speed of application and leveling of the mixture over the entire area.
In the room where you plan to pour the self-leveler, doors and windows must already be installed. This requirement provides the necessary microclimate for hardening of the self-leveling floor. And most importantly, experts advise not to do the installation yourself if you don’t have the skills to do the job and the area of the room exceeds 40 square meters.
Types of self-leveling floors
Depending on the source materials, the following groups of self-leveling floors are distinguished:
Cement-acrylic self-leveling floors
They are based on cement mixtures. Their price is the most affordable of all. Indispensable as a way to level the surface for other floor coverings. Can be used independently in cases where there are no high requirements for quality and decorativeness;
Polyurethane self-leveling floors
Consist of a polyurethane base and coloring pigment. They are used where there are dynamic and vibration vibrations, as they combine strength and elasticity. Have zero dust formation. In composition they can consist of two or one components. They are organically combined with a wide variety of colors and decorative elements, and accordingly, when finished, they acquire a unique look.
The following are used as decorative components:
- chips - flat pieces of paint;
- flocks - thin plates of various shapes: stars, scales, etc.;
- glitter - sparkles.
Epoxy self-leveling floors
Contains epoxy resins. Their strength is high, their durability allows them to successfully withstand aggressive environments and withstand static loads greater than polyurethane coatings. They have high decorative properties.
Methyl methacrylate self-leveling floors
The basis of MMA coating is methyl methacrylate resins. They have the highest price and the cost of work on their installation. Filling of highly filled floors on a methyl methacrylate basis is possible at sub-zero temperatures, however, they have the shortest hardening time.
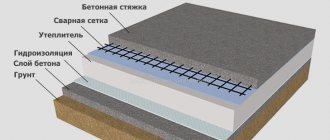
Self-leveling floor device
At the first stage of working with self-leveling floors, the base of the subfloor is prepared.
Preparing the base for self-leveling floor
Preparing the base
The success of the entire work largely depends on the quality of the foundation. The ideal base for applying a self-leveling floor is a concrete screed.
At the same time, you can use wooden, metal bases or old ceramic coating, provided that several basic requirements are met:
- maximum smooth surface: roughness within 2x2 mm is possible;
- absence of oil and grease stains;
- lack of moisture: concrete moisture content is allowed within 4–5%.
To achieve these parameters, it is necessary to perform a whole range of work consisting of the following stages:
Alignment
To eliminate irregularities, the surface must be milled and polished. The remaining machine oil from the surface should be cut out, then poured with concrete, allowed to dry and finally leveled. If it is impossible to carry out the specified amount of work, pouring a new concrete screed will be required.
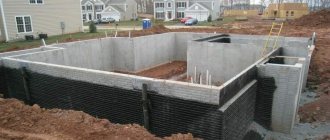
Eliminating dampness
If work is carried out on the lower (first or basement) floor, the presence of a waterproofing layer is checked. In case of its absence, waterproofing is installed to prevent the penetration of moisture from groundwater. Residual moisture is determined in a simple but effective way: part of the surface is covered with polyethylene, glued around the perimeter with tape and left for 24 hours. If there is condensation under the film or darkening of the concrete surface, flooring work is prohibited.
Dust is removed using an industrial vacuum cleaner.
Padding
The leveled and dried surface is covered with a primer. Before priming, all loose particles are removed. It is recommended to use a primer for deep penetration concrete (Betonkontakt, one-component varnish or polymer primers Ceresit, Knauf). The primer is applied with a roller or spray, and a brush is used in the corners. Drying of the soil layer takes approximately 3-5 hours. If the primer turns white or bubbles appear, it means there is high humidity in the room. Accordingly, you will have to dry the room, after which you will continue to work.
Puttying
Existing cracks and chips are puttied. After puttying, rough spots are glued with fiberglass and sprinkled with quartz sand (fraction size about 0.4), which helps level the surface. You can use no more than 1-1.5 kg of sand per 1 square meter. m. For puttying, it is recommended to use putties specially designed for self-leveling floors.
Additional priming
This is done after the putty has dried. Then the surface is covered again with quartz sand. If the second puttying was not carried out, then the second primer is done immediately after the first layer has dried. The result should be a smooth and rough surface.
Finally, the dust and remaining sand are removed again.
Important note. High-strength concrete grades have weak adhesion (sticking, adhesion) to polymers. If there is such a foundation, the need for a new screed arises. Or it is possible to use another type of polymer, for example, based on epoxy resins.
Additional events
- Care should be taken to seal the doorway. Since the solution is liquid, it will flow into another room, so you need to come up with some kind of barrier, for example, nailing a bar.
- Remove the baseboards.
Installation of expansion joints
Create an expansion joint along the perimeter of the room.
To do this, damper tape is glued. Its task is to minimize the formation of deformations during temperature and linear expansion of the floor and wall screed.
After the self-leveling floor has hardened, the tape is cut out and the resulting gap is sealed with sealant.
Only after completing all the above-described measures to prepare the base can you begin to apply the self-leveling floor.
Surface preparation
This is the most important stage in the installation of self-leveling floors. The fact is that failure to comply with surface preparation requirements and violation of technological regulations lead to destruction and deformation of the coating. The preparation activity primarily depends on what material the base is made of:
Wooden base. The wooden surface must be dry, free of grease and oil. It is recommended to roughen the surface by sanding or sanding, after which there is no need for priming and the surface is ready for installation.
Concrete floor or cement-sand screed. These are porous bases that have high absorbency, so they should be primed. Betonokontakt is perfect for this. There may be cracks and expansion or temperature shrinkage seams in the base, which are sealed before applying the primer and leveling layer. The seams are filled with sealant. The cracks are sealed with a primer and glued with fiberglass, after which they are sprinkled with quartz sand, the excess of which is removed after a day.
Old concrete. The top layer should be removed, the surface should be sanded, and then factors that will interfere with good adhesion of the polymer to concrete should be eliminated: cracks should be widened and filled, potholes and chips should be repaired, and then the surface should be cleaned of dust, preferably using an industrial vacuum cleaner. In addition, using a grinding machine or sandblasting remains an effective way to process old concrete.
Pouring self-leveling floor
After priming is completed, it is necessary to soak the base for at least 24 hours so that it is finally ready for the manufacture of a self-leveling floor.
Tool
The technology for installing self-leveling floors requires the use of special tools:
- a needle roller to remove air bubbles from the liquid base layer;
- a squeegee is a stationary knife with a long handle, with the help of which the base layer is distributed and leveled;
- mixer for mixing the base material;
- Soles for self-leveling floors are indispensable for walking on a liquid base.
How to calculate the mixture consumption for a self-leveling floor?
Dry (levelers, self-leveling) mixtures for floors are divided into two types:
- for the base layer (fill thickness 1 cm) *depends on the mixture
- for the finishing layer (fill thickness up to 5 mm) *depends on the mixture
Popular dry mixes for self-leveling floors: “Starateli”, “Osnovit”, “Maxit”, “Polyrem”, “Semin”, “Deitermann”, “Henkel Bautechnik”, “Ceresit”, “Knauf”, “KS”, “Atlas” ", "Polymin".
The mixtures are sold in paper bags from 15 to 30 kg. The consumption of the mixture depends on the area of the room and the thickness of the self-leveling floor. The latter depends on its evenness and slope (calculated with a water or laser level). It is leveling that may require an increase in the layer, and accordingly, the consumption of material.
The dosage is indicated by the manufacturer, usually 1.3-1.5 kg of mixture per 1 sq. m. m with a layer thickness of 1 mm. Approximately for a room of 14 sq. m will need 150 kg of mixture (taking into account the above parameters).
How to prepare a solution for self-leveling floor?
The filling material is prepared according to the instructions on the package. It is recommended to do mixing in another room to avoid contamination of the prepared base, on which you can only move in clean shoes.
The solution is mixed in a container (bucket, can, etc.). The mixture is poured into water and mixed; for this it is better to use a mixer (drill with an attachment).
The result should be a jelly-like liquid, without bubbles or lumps. An overly thin solution will not be strong enough, and a thick solution will not spread well.
After preparation, the solution must be used immediately before it hardens (you can keep it in the container for no more than half an hour).
The optimal temperature for applying the material is between +5 and +25° Celsius. At a lower temperature, the mixture thickens and spreads poorly; increasing the temperature significantly shortens the hardening time of the prepared mixture.
How to properly fill a self-leveling self-leveling floor with your own hands?
The decision to fill the floor yourself is made when there is a desire to test your abilities or save money that you will need to pay a specialist for the completed order.
Anyone who has at least basic knowledge can cope with the job. The main thing is less improvisation and more compliance with the requirements of the instructions.
Basic recommendations on how to make a self-leveling floor yourself have already been discussed. At the final stage of work, several useful tips will come in handy:
1. If the layer thickness is less than 1 cm, the prepared mixture must be poured onto the base and carefully distributed with a rule or squeegee.
If the thickness is more than 1 cm, it is recommended to install beacons for the self-leveling floor. These reference devices are installed on the work surface at regular intervals.
2. After finishing pouring the floor, it’s time for aesthetic measures, for which you will need a needle roller for self-leveling floors. By rolling it over a coating that has not yet hardened, you can prevent the formation of bubbles and further compact the mixture.
If expansion joints were installed in the base of the floor, they will need to be restored in the finishing layer. In order not to leave footprints on the drying surface, it is recommended to wear paint shoes - special soles with spikes.
3. During work, drafts in the room are not allowed. All windows and doors in the room must be closed so that drafts do not disturb the evenness and strength of the coating. After applying a thick layer, it is advisable to cover the surface with plastic film - this will ensure uniform drying.
4. You should not work on floors if you have not had any practice before. Theoretical knowledge does not guarantee a successful result. For the first time, you can be an assistant to a neighbor or friend.
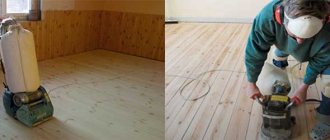
Surface grinding
If you couldn’t avoid mistakes when pouring the floor, you shouldn’t be upset: no one is immune from them. Sanding the self-leveling floor will help correct many visible defects.
You need to start it after marking the boundaries of the holes and bulges. If the self-leveling floor does not serve as the front surface, then the holes can be covered with the main mixture. After it has dried, you can begin to remove the bumps with a grinding machine.
How to choose an air conditioner for an apartment or house? - there is more useful information here.
It is not recommended to sand polymer floors to a depth of more than 2 mm: the applied layer may lose its strength.
In addition, the presence of reinforcement and other metal products in the processed plane is excluded. Otherwise, it will be impossible to complete the grinding process.
When sanding, a large amount of dust always arises. Because of this, you should not wet the floor with water: the sander will begin to slip, and wet chips will begin to accumulate on the working surfaces.
You will be interested in this article - Monolithic house: construction technology, pros and cons.
How to make self-leveling floors - pouring technology
Pouring a self-leveling floor The resulting liquid solution is poured onto the base in the form of strips, which are leveled using a squeegee.
The required thickness of 1 cm is obtained by using 10 liters of mixture per square meter. From this calculation it is not difficult to determine the number of liters that need to be filled with 1 square meter. base to obtain the required floor thickness.
Joining strips, if it is impossible to fill the entire base at once, is done approximately 30-40 minutes after the previous batch was poured.
After 10 minutes, but not more than 40 minutes, the filled surface should be rolled using a needle roller to remove air bubbles. The operation is performed in specially adapted shoes, with soles with spikes for moving through a liquid substance - these are the so-called flat feet.
How to make self-leveling floors
Cutting expansion joints
Construction of expansion joints
All mixtures from which self-leveling floors are made are non-shrinking. However, floor joints are a necessary element.
Seams are made where temperature-shrinkage joints pass in the concrete floor, at the joints of floors, along the perimeter of the room and in doorways.
Damper tape Cutting expansion joints is done using foam damper tape for the floor, which is glued directly to the concrete screed, then the liquid composition is poured.
If the concrete screed was made a year ago or more, the seams are made one after another in relation to the expansion joints in the concrete floor. The tape is cut using a knife after the liquid floor has hardened.
The seams obtained in this way are filled with sealant for self-leveling floors. Construction silicone sealant can be used.
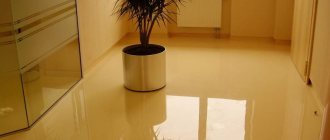
Decorative design
To decorate the floor, chips, flocks and sparkles are used, which are simply applied over a layer of liquid flooring. Rolling a surface with flocks or glitter with a needle roller creates a textured pattern over the entire thickness of the coating. When the polymerization of the floor is completely completed, it is varnished with wear-resistant polyurethane varnish in two or three layers. Applying varnish to the prepared floor is carried out with any convenient or available tool (brush, roller, spray).
The floor acquires an individual, unique look thanks to the application of various patterns and images on it. For this, acrylic or polymer paints are used. You can simply stick a pattern printed on a thick material onto the floor, which is then varnished. This technology is suitable for any type of floor.
Please note that after applying the self-leveling floor, for 2 days you need to create conditions of a certain constancy of temperature and humidity (close windows and doors, eliminate drafts) until the coating completely hardens.
The video shows how to pour self-leveling floors
Conclusion
Compliance with the sequence of all surface preparation operations, strict adherence to recommendations for preparing the mixture and pouring the floor is a guarantee that the resulting result will be pleasing to the eye and will last for many years.