Insulating the concrete floor of the first floor will not only make your home more comfortable, but also significantly save on heating costs. The explanation is quite simple: if heat saving is low, then more resources will be required to maintain optimal temperature conditions. Moreover, contact with a cold floor can cause many diseases, which is especially true if small children live in the house, so thermal insulation of a concrete floor should be taken seriously.
Insulation of the concrete floor of the first floor
- 8.1 Video - Insulation of the concrete floor of the first floor
Review of insulating materials
The problem of cold floors on the ground floor is typical for both private houses and urban high-rise buildings. To properly resolve the problem, you need to find out the reasons for this situation:
- for private houses the reason often lies in poor quality/absent thermal insulation of the base;
- in high-rise buildings, a cold floor is a consequence of an unheated basement.
In the first case, everything is quite simple - you need to get rid of the cracks in the floor. For this purpose, the base is checked, and all detected cracks are sealed with polyurethane foam. Next, the floor is insulated using one of the possible methods.
Foaming cracks in the floor
Note! The ventilation holes, which are located in the basement of the house, must under no circumstances be closed, otherwise the increased humidity will lead to rotting of the wooden floor elements (such as, for example, sheathing).
The ventilation hole cannot be removed or sealed tightly
And if everything is clear with private houses, then with city apartments everything is much more complicated. There are a number of possible insulation methods; let’s take a look at each of them.
Insulation with mineral wool. This material has excellent sound and thermal insulation properties, it is impervious to aggressive chemicals and high temperatures.
Minvata
Types of mineral wool by density
Thermal insulation with foam plastic. Among its advantages, it is worth noting low cost, good insulating properties and durability. The material is lightweight and can be laid not only on concrete, but also on tiles, wood, etc.
Styrofoam
| Brand of foam boards | PSB-S15 | PSB-S25 | PSB-S25F | PSB-S35 | PSB-S50 |
| Material density, kg/m3 | 10-11 | 15-16 | 16-17 | 25-27 | 35-37 |
| Compressive strength at 10% linear deformation, MPa, not less | 0,05 | 0,1 | 0,12 | 0,16 | 0,16 |
| Bending strength, MPa, not less | 0,07 | 0,18 | 0,2 | 0,25 | 0,3 |
| Thermal conductivity in dry condition at a temperature of 25 (+-5 degrees), W / (m * K), no more | 0,037 | 0,035 | 0,037 | 0,033 | 0,041 |
| Humidity of slabs, %, no more | 1 | 1 | 1 | 1 | 1 |
| Self-combustion time, sec, no more | 3 | 3 | 3 | 3 | 3 |
| Water absorption in 24 hours, %, no more | 1 | 1 | 1 | 1 | 1 |
| Service life, years (minimum-maximum) | 20-50 | 20-50 | 20-50 | 20-50 | 20-50 |
Thermal insulation with plasterboard or fiberboard.
Drywall
Using a "warm floor" system.
Electric heated floors
Insulation with expanded clay. Not the most reliable, but affordable option. It is characteristic that expanded clay can not only be used to fill the base, but also added to the concrete screed.
Insulation with expanded clay
| Material | URSA | ISOVER | IZOVOL | IZOBEL | ECO WOOL |
| Thermal conductivity, W/m*°С | 0,04 | 0,041 | 0,034 | 0,035 | 0,035 |
| Operating density, kg/m3 | 11 | 11 | 35 | 28 | 35 |
| Recommended layer thickness, mm | 200 | 200 | 150 | 150 | 150 |
| Cost of insulation, rub/1m3 | 1347,22 | 1470 | 1800 | 1270 | 1050 |
| Cost of insulation, rub/1m2 | 269,44 | 293,8 | 270 | 187,5 | 157,5 |
Why do you need to insulate the floor?
The systemic heat exchange of a house or apartment largely depends on the floors, since they are the place of large heat loss.
Concrete is durable and has excellent performance qualities, it is popular for flooring, but it has one serious drawback - the material is very cold. If it is installed in a residential area, then high-quality thermal insulation is required, otherwise any heating will not be effective.
A cold floor means uncomfortable indoor conditions and significant waste of energy for heating.
In addition, in the absence of insulation and waterproofing of the floor in a ground floor apartment, located, as a rule, above an unheated basement, dampness may form, and as a result, mold on the walls.
All this can be avoided with a high-quality insulating structure.
The job of insulating a floor is not impossible. If you have the necessary materials and tools, any owner can handle it independently.
Material selection criteria
When choosing insulation, you should pay attention to the main parameters.
- The material should not have any visible defects, as they may interfere with installation.
- Preference should be given to insulation with minimal thermal conductivity, i.e. the ability to transfer thermal energy from heated places to cold ones. The lower this indicator, the warmer the house will be.
- The shape and dimensions of the material must correspond to specific conditions. Of course, if mineral wool is used, it can always be compressed or bent, but rigid insulation can cause certain difficulties in the case of non-standard sizes.
The shape and dimensions of the material must correspond to specific conditions - Moisture absorption is another important parameter. The first floor is located very close to the ground, therefore, the humidity on it is constantly increased. And if the foundation is poorly waterproofed, then capillary suction of moisture will occur, which, having penetrated into the insulation, will increase heat loss. In this case, you need either effective waterproofing or insulation with minimal moisture absorption.
- The density of the material should also be taken into account. So, if there is a basement, then the installation will be carried out on the floor between it (the basement) and the finishing level. As a result, the load on the structure will increase, which in some cases is unacceptable. Therefore, the material with the lowest density is selected or accurate calculations are made. Although there are exceptions - concrete floors installed directly on the ground.
SNiP 21-01-97. FIRE SAFETY OF BUILDINGS AND STRUCTURES
SNiP 21-01-97
Let's consider in what situations it is advisable to use each of the options, and also read the installation instructions.
| Name of materials | Advantages | Flaws | Application area |
| 1. Wood (sawdust) | cheap, environmentally friendly | rots, ignites | Old wooden houses |
| 2. Expanded clay | does not burn | Ineffective, use of lifting mechanisms, labor-intensive installation, heavy weight | Floors, attics, layered masonry |
| 3. Foam plastics (penoizol, extruded polystyrene foam, expanded polystyrene foam) | rigid, easy to install | for all foams: limited heat resistance and flammability; smoldering begins at 80 C; not environmentally friendly - release of cumulative toxins, poor vapor permeability - does not “breathe”, formation of condensation, mold. Foamed polystyrene foam has water absorption up to 900% and a short service life. | Walls, roofs, floors |
| 4.1 ISOROC mineral wool (IzoLANt, IzoVent, IzoRuf V) | non-flammable base, low thermal conductivity | shrinks, clumps, fibers break and turn into dust, settles when moistened | layered masonry, ventilated facade, roof |
| 4.2 Mineral wool ROCKWOOL (LightButts, KiwittyButts, RoofButts V) | non-flammable base, low thermal conductivity | shrinks up to 20%, after moisturizing up to 25% | Non-loaded structures, middle layer in layered. masonry, roofing |
| 4.3. Minplate (P125, P75, PPZh-200) | non-flammable base, rigidity, ease of installation | binders and water-repellent components burn out already at 250 C; poor vapor permeability - does not “breathe”; formation of condensation, mold; humidification by 1% leads to a deterioration in thermal conductivity by 8%; large shrinkage, which leads to the formation of “cold bridges” in the seams of the insulation | layered masonry, roof, facade for plaster |
Basic structural diagrams of the 1st floor floor
Let's consider the design of the floor of the 1st floor above the underground or unheated basement.
Scheme of a wooden floor on the first floor without waterproofing
The basic layout of the first floor floor is as follows. The subfloor is laid along the supporting beams that rest on the foundation. The subfloor is necessary in order to lay insulation on it. The insulation is placed in the space between the beams. A vapor barrier is laid on top of the insulation. It is imperative to create an air gap between the vapor barrier and the boardwalk to evaporate condensation that may form on the vapor barrier from the room side. It can be organized by nailing bars 2-3 cm high. A plank flooring is placed on top on which the finishing floor is laid.
Scheme of the floor structure of the 1st floor above the basement
The supporting structure of the floor is beams. The pitch of the beams is usually 60-80 cm. You can choose the pitch so that it would be convenient to lay insulation between the beams. Then the step will be equal to the width of the insulation plus the thickness of the timber.
In the places where the beams are attached to the stone structures, between them there should be a waterproofing layer made of, for example, roofing felt or bitumen mastic. It is necessary to make a gap between the beam and the foundation wall for ventilation; the beam should not be adjacent to the wall.
There must be a gap between the vapor barrier and the flooring for ventilation
Rough floor. To secure the subfloor, smaller blocks, “skull bars,” are attached to the beams. Subfloor boards are laid over them. Here you can use a board with a thickness of 15-50 mm of low grade.
insulated floor construction
Wooden floor of the 1st floor with waterproofing
Sometimes waterproofing is included in the floor design. It is appropriate if the basement is very damp and there is a high groundwater level. Then there is a need to protect the insulation from below. To do this, waterproofing is installed under the insulation. This waterproofing must be made of a water-repellent but vapor-permeable membrane. In order to avoid annoying mistakes, it is better to call the top film simply vapor barrier (even if the manufacturer calls the film itself a membrane), and the bottom one – waterproofing. But here, ideally, a membrane should really be used - a vapor-permeable, waterproof one.
An example of the use of incorrect waterproofing
This video shows a very clear example of how water can form in the insulation. This video is quite common on YouTube under different names. Very often it is called “incorrect vapor barrier”. The vapor barrier itself is not visible in the video. Perhaps the authors of this design used the bottom film as some kind of vapor barrier.
But the point is that the bottom film was supposed to be waterproofing, waterproof on one side, but vapor-permeable on the other.
Insulation with mineral wool
This method is optimal for city apartments in which the finishing coating is made of wood. The algorithm of actions should be as follows.
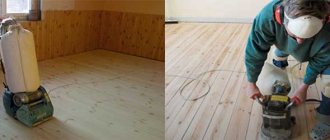
Stage 1: First, the old flooring is removed to leave a bare concrete base. If the coating is still good, then it is removed carefully, after numbering the boards (this is necessary to maintain order when re-laying). Next, all debris is removed, the working surface is cleaned of dust and dirt.
If the screed is fairly smooth and without cracks, then it is enough to clean it with a vacuum cleaner.
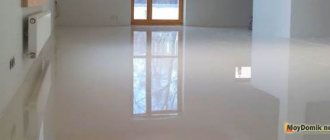
Stage 2. In most apartments and houses, the floors are uneven, so it is recommended to level them, which will not only ensure comfort, but will also greatly simplify further work. Often a screed is used for leveling, although there are other, cheaper methods.
An example of leveling a floor with a self-leveling mixture
An example of leveling a floor with plywood
Note! As already noted, a cold floor can be a consequence of the presence of cracks and cracks in the base. Therefore, if any are found, they are carefully sealed.
Stage 3. After leveling, a vapor barrier material is laid, which can serve as an ordinary polyethylene film. The vapor barrier is laid with an overlap of 15-20 cm and extends onto the walls to the height of the future insulating layer along with the logs.
Floor waterproofing
Stage 4. Next, logs are installed on the floor. It is advisable to do this in increments of at least 90 cm, since the smaller it is, the more even the load distribution will be. More specific step sizes are determined by the width of the mineral wool slabs and the area of the room.
Note! The logs should be installed at the same pitch and securely fixed in the appropriate places.
Stage 5. After installing the logs, mineral wool is laid. To do this, it is cut according to the dimensions of the grooves and installed between the guides.
Installation of mineral wool on logs
Note! The material should fit as tightly as possible to the guides, the presence of any gaps is excluded. This is quite simple to do: the insulation should be cut into strips, the width of which will exceed the pitch between the joists.
If the ceiling height is sufficient, mineral wool can be laid in two layers. But the second layer must be laid so that the joints of the first are in the center of the slabs of the second layer. Note that builders who are not conscientious often neglect this, since such installation requires a lot of time. But this is the only way to prevent the leakage of thermal energy.
An example of the correct multi-layer laying of mineral wool slabs
Waterproofing is installed on top of the insulation.
Stage 6. The insulation procedure is completed by laying the finished floor. First, a durable material is attached to the previously installed joists, which is necessary to distribute the entire load during operation. Drywall, chipboard or plywood can be used as such material. Next, the flooring is laid (in our case, marked boards) and the room is cleaned.
Chipboard flooring
Laying floorboards on an insulated floor
The main options for insulating the floor of the first floor of a private house
Now let’s learn more about how floor insulation is carried out in a private house.
Floor insulation on the ground
This approach is often practiced if the house is built on a strip foundation. The insulation can be expanded clay (on its own or in combination with another material), rigid insulating boards (extruded polystyrene foam) or blocks of premium mineral wool, specially designed for such purposes (this is specified in the passport characteristics of mineral wool). All insulation in this scheme has one thing in common - they are covered with a reinforced screed on top.
It might look something like this:
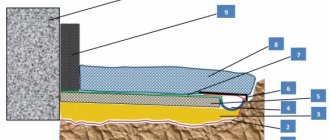
Approximate scheme of floor insulation on the ground
The soil (item 1) is thoroughly compacted, and its surface is leveled to the maximum.
Sand is poured on top (item 2), layer by layer, also with careful compaction. The thickness of the backfill is usually at least 100 mm (compacted).
Next, an optional but highly recommended layer of covered geotextile is shown (item 3). It will be a big plus for the stability of the entire created “pie” and will serve to separate the sand and gravel (crushed stone) layer, which will improve the drainage capabilities of this structure.
Above, a layer of crushed stone or coarse gravel (pos. 4) is poured, also with tamping, on which the so-called “concrete preparation” is performed (pos. 5). This is a poured layer of lean concrete (grade strength M50 is sufficient). On this basis, it is much easier to carry out further work, which will directly affect the insulation.
After the concrete preparation, a layer of waterproofing is laid (item 6) - the insulation must be protected from moisture from the ground. Rolled bitumen waterproofing can be used for these purposes - it will fit perfectly on a fairly strong concrete base.
Then thermal insulation material of the required thickness is laid (item 7). The calculation of thickness is discussed separately - a link has already been given above. Possible combinations of insulation materials are also discussed there, so that thermal insulation becomes complete.
Next, the insulation is covered with another layer of vapor-permeable waterproofing material (item 8), which can be a polyethylene film, but very dense, at least 200 microns thick. The canvases must be laid with an overlap of 150÷200 mm and sealed along the seam lines with moisture-resistant tape. The waterproofing should extend onto the walls to a height above the surface of the future floor. The purpose of this layer is to prevent water from leaking out of the concrete solution when pouring the screed, that is, to create optimal conditions for the hardening and maturation of concrete.
A reinforcing mesh is laid on top of the waterproofing, the cross-section of the rods and the cell sizes of which depend on the expected degree of load on the floors. But these are general construction issues that only indirectly relate to the insulation problems under consideration. The mesh must be lifted from the waterproofing layer so that it is approximately in the middle of the thickness of the screed.
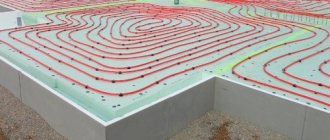
Next, the beacons are set and the screed is poured. Its thickness is usually at least 70 mm. If desired, pipes or a “warm floor” heating cable can be spliced into the same screed.
In the screed poured over the insulated floor, nothing prevents the placement of the heating circuits of the “warm floor” system
After hardening, maturing and gaining brand strength, the resulting screed will serve as a universal base for any finishing floor covering.
You may be interested in information about what jute is for a log house
Insulated floor on the floor slab
This scheme is rarely used in a private home, but, nevertheless, it should be mentioned. Moreover, it is very similar to the previous one, but much simpler. If only because there is already a rigid, reliable foundation that does not require additional modifications.
Scheme of floor insulation on a floor slab
What are the features here?
The base is already ready - this is the floor slab (item 1) above the cold underground, usually hollow. It must be primed with a deep penetration compound, and it would still be a good idea to provide a layer of waterproofing on it (item 2). Coating insulation or even thick polyethylene film is quite sufficient here.
Next, the selected insulation material of the required thickness is laid (the calculation is the same as for a floor on the ground).
The next layer is again waterproofing (item 4), which will protect the insulation from moisture penetration from above and ensure an optimal water-cement ratio when the screed hardens.
Well, above there is a reinforced screed (item 5), in which pipes or a “warm floor” heating cable can also be located. And the entire structure is crowned with the selected finishing floor covering (item 6).
Insulation of floors using joists or floor beams
But this option occurs, perhaps, more often than all others. And first of all, because such a scheme is practically the only possible one if the house rests on a pile or columnar foundation. But even for a strip foundation with a high base it is quite applicable. “Heavy” materials such as cement, sand, gravel are not used here - wood or materials based on it become the main one. Well, and a plus, of course, is the insulation itself.
The schematic diagram can be represented as follows:
Wooden floor insulation scheme
Skull blocks (item 2) or support boards are placed on the floor beams or joists (item 1). The lights will serve as the basis for installing the subfloor (item 3). For this flooring, both low-grade boards and sheet materials such as plywood or OSB can be used. The flooring can be solid, but more often the boards are mounted with a vacuum - both for reasons of economy and for better ventilation of the insulation.
Waterproofing - wind protection (item 4) is laid on the subfloor. It is important that this layer should not interfere with the free escape of water vapor, so that moisture does not linger in the insulation. Sometimes, when the boards are arranged frequently or when rigid polystyrene foam boards are used as thermal insulation, this layer is not laid at all - there is no need to fear direct water ingress from below, and the wind impact with a well-equipped base is unlikely to be so great that it can cause damage insulation.
Even a layer of thermal insulation of the required thickness is laid (item 5). The illustration shows installation in one layer, but usually this is not enough - at least two are required. But this is for the better - the slabs or mats of the upper layer cover the joints of the lower one, and there are practically no cold bridges left.
Next is a mandatory condition: a layer of reliable vapor barrier (item 6). The humidity level indoors during the cold season is always significantly higher than outside. And so that water vapor, looking for any loophole to escape outside, does not penetrate into the insulation, it is necessary to install a reliable hermetically sealed (without exaggeration) barrier.
And finally, a plank or plywood (OSB) floor covering is laid on top (item 7). In the diagram, again, a simplification has been made, but in reality it is recommended to leave a ventilation gap of about 20÷30 mm between the vapor barrier membrane and the flooring. This is easy to do by installing additional counter batten slats along the joists - they will additionally press the membrane and provide the required clearance.
It is clear that the thickness of the insulation with such a scheme must be calculated in advance, since in this case it also directly affects the choice of the cross-section of lumber for beams and joists. You will have to carry out a not particularly complex thermal calculation.
How to calculate the thickness of insulation of a wooden floor on joists?
You will be introduced to the algorithm for carrying out such calculations in a special article on the portal - “Insulation of a wooden floor - calculating the thickness . It also contains a convenient calculation calculator.
One more nuance. To protect the insulation from mice getting into it, you can also use a metal mesh. It is mounted directly on the subfloor boards under the waterproofing layer. The edges of the mesh are raised onto the wall 100÷150 mm above the thickness of the insulation. After laying the insulation, the mesh is folded onto its surface. After this, the insulation on top is completely covered with the same mesh - it is attached to the joists with staples. Perhaps such measures may seem unnecessary to some, but it really helps if you don’t leave any loopholes for the mice.
Insulation of wooden floors on joists
This section of the article provides step-by-step illustrated instructions for insulating floors with mineral wool.
The most important thing in insulating a wooden floor raised above the ground by 300 - 500 mm is the choice of the optimal material and its high-quality, according to all the rules, installation
The number of vents in the base is calculated depending on the area of the underground space.
The first thing you need to check when deciding to insulate such a floor is the presence of ventilation in the underground space. If there are no vents in the basement of the foundation, then they need to be equipped. Lack of ventilation with such floor insulation will lead to the appearance of dampness in the underground space, rotting of wooden structural elements, and their infection by fungus.
You might be interested in information on how to choose pipes for a water floor
The total area of all vents must be at least 1/400 of the floor area of the first floor, but not less than 0.85 m². The area of one vent is usually around 0.05 m². that is, it is easy to calculate the required number and then think about their uniform placement on the base. In this case, the outer vents should be located no further than 0.9 m from the corners of the foundation. and another important condition is the symmetry of their placement, that is, the vent on one wall must correspond to a similar one on the opposite one. Thus, their number is usually even.
It is recommended to immediately protect these ventilation windows from the penetration of various living creatures with special grilles with a fine mesh.
However, we again delved into general construction issues - let’s return to floor insulation.
So, insulation of an old wooden floor (if we are not talking about installing a new one during construction) can be done in several ways:
- Using old plank flooring as a subfloor. This option is possible if the boards are in good condition, that is, they do not show signs of rotting and are not moistened on the inside. In addition, it must be taken into account that the floors will rise by approximately 250 mm. If the ceilings in the room are high enough, then insulation using the old coating, without dismantling it, seems possible. But, to be honest, they rarely resort to this route.
- The second option involves dismantling the plank covering and laying insulation under it. In this case, the removed floorboards, if they are in satisfactory condition, can then be returned to their place. If the boards are intended to be reused, then when dismantling, it is recommended to number them.
Naturally, if a new floor is being built, then they start from scratch, that is, with the installation of the subfloor - and then in order.
Below we will consider an insulation option in which the old floor is dismantled. Moreover, if insulation is carried out in an old house, an inspection of the underground space, as well as the reliability of the floor beams, will never be superfluous.
For work you will need the following materials:
- Insulation material. In this case it is mineral wool. As practice shows, and calculations confirm, in private houses in most regions of Russia it is recommended to lay this insulation with a thickness of at least 150, or even 200 mm. this usually involves a minimum of two layers.
- Boards or plywood for installing the subfloor. A board 10 mm thick and 150 mm wide will be quite sufficient.
- Beam for counter-battens with a cross-section, for example, 30×50 mm. The larger size should correspond to the thickness of the joist or floor beam.
- Waterproofing vapor-permeable membrane.
- Vapor barrier material.
- Self-tapping screws and staples for the stapler.
| Illustration | Brief description of the operations performed |
| So, having dismantled the boardwalk, you can see the floor beams and evaluate the possibilities of further work. If the floor beams are in good condition, then the first thing to do is cover them with an antiseptic solution on all sides and let the coating dry well. | |
| Next, you can choose one of two options - use self-tapping screws to fix the cranial bars on which the subfloor boards will be laid using self-tapping screws, or fasten the boards to the bottom of the floor beams. Each option has its drawbacks. When fixing the cranial elements, the space for installing insulation will decrease. | |
| Securing boards from the bottom of floor beams, in principle, has no disadvantages, except for the labor-intensive nature of the work. If the height from the ground to the beams is small, then installation will have to be done while lying on your back. The subfloor is only needed to support the insulation material, so it is not necessary to make it continuous or lay planks too often. The distance between them can be even 200÷250 mm. And the boards can be used even without edged ones. But they require antiseptic treatment no less. | |
| Another option for arranging a subfloor is to attach transverse boards to the beams in increments of 700÷800 mm, and then lay a longitudinal plank covering on them. Moreover, gaps of 10÷15 mm can also be left between the longitudinal boards. Gaps are necessary for proper ventilation of the insulation. | |
| In some cases, OSB plywood sheets 10 mm thick are used for the subfloor. However, a gap must be left between the sheets every 500 mm for ventilation. Therefore, you will have to prepare pieces of plywood 500÷600 mm long and a width equal to the distance between the centers of adjacent floor beams (joists). As a rule, it is 600 mm - according to the traditional size of mineral wool insulation. | |
| The next step is to lay a vapor-permeable waterproofing and wind protection on the subfloor. It is laid to protect the mineral wool from water ingress (which is extremely unlikely in such conditions), as well as from wind, which will penetrate into the underground through ventilation ducts. The membrane sheets should go around the floor beams. They overlap each other by 100÷150 mm. It is not necessary to tape these overlaps with tape; there is no need for tightness. | |
| It is necessary to focus on securing the membrane to the walls. The material should be on them 50÷70 mm higher than the thickness of the insulation. On wooden walls, the membrane is secured with staples, and on surfaces made of other materials - with double-sided construction tape. It is still recommended to isolate the insulation from possible contact with the walls. | |
| Next, the insulation material is laid. It is important to observe several nuances here. The slabs are most often laid in two layers, and the top one must overlap the joints of the lower insulation. The standard width of insulation slabs is 600 mm, and it must be laid spaced against the floor beams, so the optimal width between the beams in the clear is approximately 550÷570 mm (just along the axes - 600 mm, and due to the thickness of the beam, the clearance is slightly reduced) . However, it is not always possible to follow this step, so the slabs often have to be “replenished” with additional fragments. Their joints must also be covered with entire slabs of the top layer. | |
| A vapor barrier material is laid on top of the insulation and secured with staples to the floor beams. This layer is necessary to protect the insulation from the penetration of various fumes from the premises. The canvases are also laid with an overlap of 100÷150 mm (on the membranes the minimum width of such an overlap is often even marked in dotted lines). But here the requirements for sealing are strict: the canvases must be glued together along the overlap line with moisture-resistant tape. | |
| Then, if you plan to create a ventilation gap between the board covering and the vapor barrier (and this is highly recommended), then slats 25÷30 mm thick are attached to the ends of the beams on top of the vapor barrier sheet. Some craftsmen refuse this design element and consider it optional. But it is better not to neglect such ventilation - condensation will not accumulate on the vapor barrier membrane. |
The insulation is complete - and you can install a board covering or a plywood or OSB flooring on top. But these are questions beyond the scope of our consideration.
* * * * * * * *
Now, having at hand several options for floor insulation schemes with various materials, it will be possible to choose the most suitable method for a particular case. By adhering to the recommendations received and strictly following the technology, it is quite possible to independently thermally insulate the floors in your own home. At the same time, not only saving a decent amount for the family budget, but also gaining confidence that the work was done conscientiously.
In conclusion, we invite you to watch an interesting video. In it, a completely amateur craftsman independently insulates the floors of his house under construction. Honestly, there is a lot to learn. Fireproof stove tiles you will find the answer in the link.
Foam insulation
Thermal insulation of a concrete floor with this material can be done in one of two ways:
- installation of foam plastic under a wooden floor;
- installation from the basement.
First, the basement is examined for communications that may prevent the installation of thermal insulation sheets. If there are no such communications, then you can begin installing the slabs from the basement side.
Stage 1. First, the required insulation area is determined. To do this, use a long tape measure to measure the distance between the load-bearing walls.
Stage 2. Next, the perimeter of the room on the 1st floor is marked on the ceiling of the basement (a tapping cord will be required). On each side you need to step back about 50 cm beyond the line.
Applying glue to foam plastic
Bonding foam boards
Stage 3. Then you can begin directly gluing the foam sheets, for which you will need:
- comb 10 mm;
- special dowels;
- glue-cement.
Note! Work can begin from any angle; if necessary, the sheets are cut. As a result, the gaps between them should remain, although minimal.
Stage 4. The foam is puttied and covered with waterproofing mastic, which prevents moisture absorption.
An example of foam putty. The same is done on the ceiling.
As for installation under a wooden floor, the procedure is practically no different from that described above (using mineral wool), and the only difference is the minor gaps mentioned above. Upon completion of the installation work, the gaps between the insulation and the joists are filled with polyurethane foam to form a continuous monolithic layer.
Insulation of the first floor floor with foam plastic
Insulation with roll materials
Basalt wool is the most common floor insulation in private homes. Produced in rolls, mats or slabs. The first two types are inexpensive and loose, designed for thermal insulation of wooden floors. The slabs are denser, stronger, but more expensive. Used under concrete screed.
Algorithm for laying rolled materials:
- Waterproofing - films, membranes - is spread over the boards or panels of the subfloor.
- Insulation 10-20 cm thick is laid between the logs without gaps and without excessive compaction, the layers should overlap each other.
- A vapor barrier is placed on top, which will not prevent the evaporation of moisture from the heat insulator if it gets wet.
- Counter slats are installed along the joists to create space for ventilation.
- The insulation is completed by a finishing coating with an additional layer of sound insulation.
Insulation with rolled mineral wool
If foil varieties are used, turn the metal surface towards the room. Heat rays should be reflected into the room.
Using plasterboard or fiberboard
Another option for insulating a concrete floor is to install plasterboard sheets. Below is the sequence of actions.
Stage 1. First, the old floor covering is removed, the bare base is thoroughly cleaned of dirt and dust.
Stage 2. If the surface is uneven, then the protrusions are smoothed and the recesses are filled with putty.
Stage 3. After this, a vapor barrier layer is laid with mandatory access to the walls to the height of the planned insulating layer.
Stage 4. The first layer of thermal insulation material is laid; the thickness of the sheets in this case should be 1.2 cm.
The photo shows laying drywall on a concrete screed
Stage 5. Drywall is treated with adhesive mastic, after which the second layer of material is laid. It is important that the joints of the sheets in layers No. 1 and No. 2 do not coincide.
Stage 6. As soon as the adhesive mastic has dried, the surface is primed and puttied. Then the floor covering is laid.
Note! In order to compensate for moisture/temperature expansion of the material, an edge strip is placed between the ends and the surface of the walls.
Video - The principle of laying drywall on the floor
If fiberboard sheets are used for insulation, the procedure will be even simpler.
Stage 1. The floor covering and baseboards are dismantled.
Stage 2. Sheets of insulation (grade PT-100 or M-20) are nailed to the pre-installed joists.
Stage 3. The fiberboard is covered with a floor covering - roofing felt or carpet. For fixation, it is advisable to use Bustilat glue.
Stage 4. Operation can begin after the glue has dried (usually this takes a maximum of 24 hours).
Covering the floor with fiberboard sheets (self-tapping option for fastening the sheets)
Insulation of the concrete base
It remains relevant to insulate the floor on the ground floor of a panel house or a house with concrete floors. The thermal insulation technology in this case will be significantly different compared to the previous option.
Instead of wooden logs, a cement-sand floor screed is used here, and denser types of insulation are used.
If you need to level, raise and insulate the base at the same time, you can use expanded clay
- Unevenness on the base must be filled with fine sand. If you do not do this, the insulation may become deformed during loading. You can also use expanded clay for this. It simultaneously performs 3 functions: leveling, thermal insulation and filling to the desired height.
- A damper tape is attached around the perimeter of the room using self-adhesive tape or self-tapping screws to maintain the temperature gap and increase sound insulation.
- A waterproofing film is laid on the floor, overlapping the walls and each other. The seams are sealed with tape.
- For concrete insulation, it is best to use extruded polystyrene foam, due to its high density and good thermal insulation characteristics. You can also use dense types of mineral wool and foam.
- The insulation sheets are laid tightly to each other. It is not necessary to attach them to the base.
- To obtain a flat surface, beacon profiles are installed. They are leveled and fixed with mortar and screws.
- The screed solution is mixed with the addition of fiber fiber and plasticizer.
- Then the solution is spread over the surface with a reserve and leveled using the beacon rule.
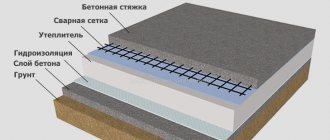
Correct screed cake with insulation on the ground and on a concrete slab
Warm floor
Installation of metal-plastic pipes in a screed
To make the room even warmer, owners of private houses are increasingly installing water heated floors from a boiler. Residents of the southern regions can completely abandon the usual heating radiators and heat the house only using the floor.
To do this, metal-plastic or polypropylene pipes are attached to the mounting grid on top of the insulation using a snake or spiral. They are connected to the boiler through a manifold assembly.
If you live in an apartment building, you can use electric floor heating. It can be installed either under the screed or directly into the tile adhesive during its installation.
"Warm floor"
If there is not enough space in the room to lay thermal insulation material, then you can resort to an alternative option - installing electric heating. “Warm floor” involves laying a heating cable, for which you should follow the steps below.
Stage 1. First, the old floor covering is completely dismantled.
Stage 2. Penofol is laid on the concrete.
Laying penofol
Stage 3. In accordance with the manufacturer’s recommendations, the heating cable is laid. The cable is connected to thermostats.
Electric heated floor. Scheme
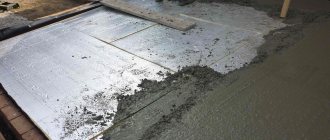
Stage 4. The floor is filled with a layer of concrete mortar 3-5 cm thick.
Filling the heating cable with solution
Stage 5. Once the concrete has hardened, the floor covering is laid on it.
Note! “Warm floor” provides the most favorable microclimate for the human body in the home, since both over-drying and overheating of the air are completely eliminated. The room will warm up evenly, therefore, convection currents will not form.
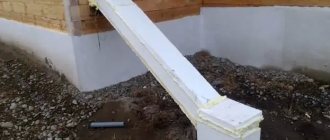
Insulation of floors on the ground
Many residents of private houses build floors on the ground during construction. This is a popular solution for buildings without basements, which is attractive due to its simple DIY installation technology and low construction cost.
The insulation of floors on the 1st floor on the ground must be done at the construction stage, and the required thickness of the insulation, the need for heating, etc. must be calculated in advance. The required thickness of the thermal insulation layer is determined by calculation according to SNiP 23-02-2003, but it is not recommended to make it less than 5 cm.
Floor installation on the ground
Instructions on how to insulate the floor on the 1st floor along the ground are as follows:
- Remove fertile and soft layers of soil.
- Make a cushion of sand and coarse gravel, and carefully compact it in layers. There should be a layer of 10 cm of sand on top of the crushed stone.
- To prepare the base, you can first pour 8-12 cm of reinforced concrete slab, but this is not necessary.
- Lay the extruded polystyrene foam on the sand. It is best suited for this as it absorbs almost no moisture and will remain highly effective even in humid conditions.
Note! The density of the insulation used must be more than 35 kg/m3. When using materials with high moisture absorption capacity, be sure to protect them on both sides with a layer of waterproofing.
- Lay damper tape around the perimeter of the walls. In no case should the base of the floor be rigidly connected to the structure of the house, but should act as a separate element. This will enable him to change his position when the house inevitably shrinks.
- Then, hermetically and overlapping the walls, lay a layer of waterproofing made from several layers of polyethylene foam or a vapor barrier membrane.
- After this, you need to make a screed with reinforcement, more than 5 cm thick. If necessary, at this stage you can install a heating system.
The photo shows the installation of a heated floor on the ground before building a house
- After pouring the screed, at least a month later it will be possible to lay the topcoat.
Use of expanded clay
Let’s say right away that this method is the least effective of all those given above, but you can also resort to it. One of the few disadvantages is that the screed will take quite a long time to dry - about 1 month. Obviously, filling with expanded clay can only be done where the height of the ceilings makes it possible to raise the floor by 15-20 cm.
This is also true in multi-storey panel-type buildings, in which the floors can hardly be considered warm, especially in winter.
Stage 1. The old coating is dismantled, the concrete slab is cleaned of dirt and debris.
Stage 2. Next, a layer of waterproofing is laid - in other words, a polyethylene film is laid down. It is necessary to ensure that the latter extends onto the walls to the height of the future insulating layer.
Stage 3. Dry backfill of thermal insulation material is made on top of the waterproofing. In order to ensure uniform backfilling and maintain a uniform level, beacons (wooden slats) are placed. The first beacon is installed 3 cm from the wall, the rest - parallel (the step depends on the length of the rule with which the level will be set).
Expanded clay backfill
Expanded clay is backfilled from the far wall towards the front door.
Stage 4. The surface of the insulation is treated with “cement laitance”, which will ensure more effective adhesion of the granules to each other. Preparing such “milk” is not difficult: clean water is mixed with cement in a ratio of 4:1.
Expanded clay filled with cement laitance
Note! Experienced builders recommend insulating the floor with multi-fraction expanded clay. So, for a city apartment you need to mix granules with a diameter of 5 mm or 10 mm with expanded clay sand.
A day after the insulation is leveled and secured with mortar, the surface is covered with a concrete screed.
Floor screed with expanded clay
Materials to choose from
There are two types of coverings in apartment buildings: wooden and concrete. Depending on this, the appropriate type of insulation is selected.
Bases for warm floor coverings come in liquid, bulk, and also in the form of blocks and rolls. They can be used together with each other or separately.
Liquid
The insulation can be a cement mixture filled with expanded clay, polystyrene foam or other materials. Currently, polymer penoizol is widely used.
However, in order to work with it, special equipment is needed.
Bulk
Insulation materials in this group include expanded clay, foam chips, and sawdust. They are suitable for insulating floors in apartments with an unheated basement.
Expanded clay is strong and durable, has low thermal conductivity. But, having chosen it as insulation, you need to take care of high-quality waterproofing, since its granules absorb moisture well.
Block
They come in the form of slabs and mats of mineral wool, polystyrene foam, and basalt fiber.
Polystyrene foam has low thermal conductivity, costs little and is environmentally friendly. But it is fragile, and when heated strongly, it melts, releasing harmful fumes.
A more modern version of polystyrene foam is expanded polystyrene. It has better density and does not burn. Sheets of such insulation are convenient because they can be used to install a heated floor, install a plank floor, fill a screed, and so on.
The most environmentally friendly material among blocks is vermiculite, which is obtained by processing mineral products.
However, it is by no means cheap and in order to save money, you can use its analogue, granulated vermiculite.
Rolled
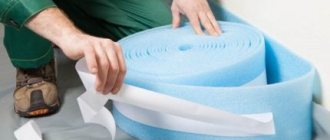
Insulation materials are made in the form of rolls from polystyrene, cork, mineral wool and foil bases. When the thickness of roll-type insulation is not enough, they are laid in two layers or used together with blocks.
Mineral wool, being a cheap insulation material, guarantees low heat transfer. But, you need to take into account that over time it can become denser, causing its properties to decrease. In addition, during installation, mineral wool crumbles and forms dust that is harmful to health, so it requires the use of a respirator and special clothing when working with it.
Using Spray Polyurethane Foam
We’ll talk about this insulation technology separately, because it requires the participation of professionals - you can’t do it on your own, especially without the appropriate equipment. The material is laid in the form of foam having a cellular structure; the foam expands after application and forms a seamless monolithic mass. For application, a special machine is used - in it the liquid polymer is mixed with carbon dioxide at high pressure.
Stage 1. The concrete base is prepared - the old coating is dismantled, debris is removed (it can worsen the adhesion of the foam). It is characteristic that the floor does not need any leveling in this case.
Stage 2. Next, wooden logs are installed (they can be made from timber or 40 mm boards) in increments of 0.7-1 m. To fix the logs, dowels, screws or corners can be used.
PPU floor insulation
Stage 3. To improve adhesion, the concrete base is moistened. Foam is applied between the joists, but it should be taken into account that in the future it will increase in volume.
Stage 4. The foam hardens for about 24 hours, after which the floorboard or any other floor covering is laid.
Floor insulation with polyurethane foam
Note! Do not leave polyurethane uncoated for more than two to three days, as it may deteriorate when exposed to sunlight.
How best to insulate the wooden floor of the first floor
Wooden floors are no longer suitable in modern multi-storey buildings, but they are often found in old buildings and in the private sector.
Wood itself is a warm material, but it tends to dry out over time, resulting in the formation of cracks in the floors through which drafts enter the apartment or house.
Such floors require insulation work:
- To do this, it is necessary to lift the existing old covering. If it is in good condition, it can be installed back after the insulation process.
- After removing the boards, the logs are inspected and, if necessary, replaced with new ones. Then they are treated with antiseptic antifungal agents and given time to dry.
- Insulation is laid or poured onto the base of the floor.
If the logs are high enough, you can arrange two layers of insulation, the bottom of which will be bulk, and the top will be made of foam plastic or mineral wool slabs. - The next step is to cover the insulation with a vapor barrier film, and lay a floorboard on top.
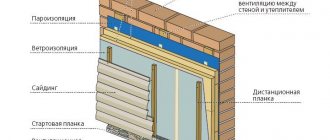
When building a house, it is better to insulate wooden floors immediately, following all technological rules. The diagram clearly shows the layers of insulated wooden floor, going in the following sequence:
- House foundation.
- Floor beams (joists).
- Timber for subfloor.
- Vapor barrier.
- Rough floor.
- Insulation.
- On top of it is a waterproofing film.
- Batten.