Selecting a drainage system by material
Task No. 1: correctly select and calculate drains. And the question of choice is decided not so much by the owner’s personal preferences as by other, more objective indicators:
- ➠ Climate in the region (maximum possible precipitation)
- ➠ Configuration, roof dimensions and slope angle
- ➠ Number of floors of the house, its age and endurance of the supporting system.
The choice of material is often dictated by expediency. Thus, gutters made of copper or titanium-zinc are not subject to corrosion and are resistant to aggressive environments, but are expensive.
Copper drain (photo No. 2)
Most often, steel is used to make metal drains:
- galvanized (recently less common - it is susceptible to corrosion and short-lived),
- covered with a protective polymer layer.
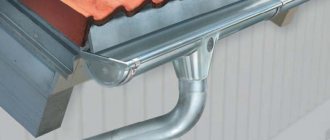
Steel gutter. (photo No. 3)
This system is durable, reliable, and suitable for multi-story buildings. But it has a number of nuances:
- Metal should not be used in coastal areas where there is a lot of salt in the air, as well as in areas with developed industry - the active substances will dissolve in water, react with the metal and shorten the service life of gutters.
- You should abandon the metal system if you have an old house, a weak supporting structure, foundation or rafter system.
- Metal gutters have low noise insulation. When it rains they will hum.
A popular alternative is plastic gutters.
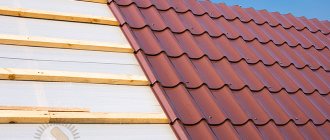
Plastic drainage system. (photo No. 4)
They are not subject to corrosion and are resistant to aggressive environmental influences. Light in weight and easy to install - even an inexperienced homeowner can install a plastic drainage system. They are not suitable except for multi-storey buildings.
Some features of polymer systems
Compared to metal drainage structures, polymer systems are attractive due to their cost-effective installation and simplified assembly.
Meanwhile, plastic has the properties of changing structure under conditions of fluctuations in ambient temperature. Therefore, for anyone who decides to make a drain for the roof of a private house with their own hands, these properties of the material should be kept in mind and an installation technique that compensates for thermal expansion should be used.
Compensation for thermal expansion/contraction is achieved, for example, by incomplete insertion of the smooth ends of the pipes into the socket parts. Also, loose tightening of the rim of the fastening clamps releases the axial displacement of the parts as a result of thermal expansion.
It is advisable to limit the use of glue when installing drainpipes; use it only on one part of the connections. Installation of socket connections should be carried out in the socket position with the “up” direction.
The design of the mounting element, which provides compensation for thermal expansion. Used in the assembly of gutters. Similar design solutions are used on other parts
Almost all manufacturers of modern drainage systems have taken into account the properties of plastic and produce shaped parts (expansion elements) adapted to temperature changes. The body of such parts indicates the temperature scale according to which they are mounted in the system.
The influence of temperature may cause deformation of the plastic. Therefore, it is necessary to comply with installation standards and the distance between fasteners. Compliance with the rules is a guarantee of installing a high-quality roof drainage system.
In this material you can familiarize yourself with all the advantages and disadvantages of plastic and metal gutters.
Selection of drains by parameters
The throughput of drains is determined by the diameter of the pipes and gutters. These parameters are usually indicated in the labeling. For example, there may be markings 100/75, 125/90, 150/110.
Different manufacturers have different parameters for drainage systems.
To connect them you cannot do without adapters. But in this case, the risk of leaks increases. Therefore, it is better that all elements are manufactured by one company. !
Do not try to connect elements of gutters from different manufacturers - they will not fit together.
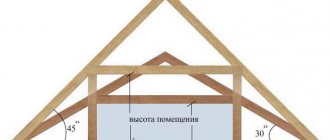
To accurately calculate the required dimensions of gutters, you need to know the surface area of the roof slope.
Scheme 1. Calculation of the effective roof area.
If the roof is flat (slope angle less than 10 degrees), its entire area will be effective:
E1 = A x C
To select the sizes of pipes and gutters, use the table below.
Selecting the diameter of the gutter and pipe. (diagram No. 2)
The choice of location and quantity of drains is influenced by the length of the roof overhang. If it is less than 10 m, one drain is installed. If more than 10 m - two.
The number of drains depends on the length of the roof overhang. (diagram No. 3)
Drain from sewer pipes
To make a standard drainage system yourself, plastic sewer pipes are often used. They have a number of undoubted advantages:
- affordable price;
- a wide range of pipes and adapters, as well as all kinds of fastening mechanisms;
- light weight, which facilitates transportation and installation;
- possibility of self-cutting;
- durability.
Since such pipes come in different colors, you need to figure out which ones are recommended to be used for arranging a drainage system:
- White. This type of pipe is used only indoors, when pipes of a different color do not fit into the interior. They are not suitable for external installation.
- Gray. These pipes are stronger, but do not withstand loads and are not intended for use in cold weather. Suitable only for regions with warm winters.
White and gray pipes are not suitable for external installation
- Brown or red pipes. They are recommended for external drainage, as they tolerate low temperatures and water pressure well. They cannot withstand prolonged exposure to sunlight and become fragile over time.
Brown pipes are most suitable for drainage
How to make a drain with your own hands
Before purchasing pipes, a diagram of the entire system is drawn up, including all parts of the structure and their quantity:
- roof gutters (length is calculated based on the perimeter);
- drain pipes - one per 10 m gutter;
- brackets - 17 pieces per 10 m;
- bends - according to the number of drains;
- funnels - according to the number of drains;
- plugs;
- corners (the number depends on the type of roof);
- connecting elements for gutters, they need 1 less;
- knees - depending on the complexity of the scheme;
- transition couplings;
- outlet for rainwater inlet or markings.
The easiest way to install a drainage system is from plastic pipes
The cross-section of the pipes is selected based on the area of the roof slope. You can use the following scale:
- slope area up to 50 sq. m - pipe diameter 8 cm;
- up to 125 sq. m - 9 cm;
- more than 125 sq. m - 10 cm.
The remaining elements are purchased based on the diameter of the pipes from which the gutters are made.
As already noted, before purchasing materials and installing a drain, it is necessary to draw a detailed diagram, which should indicate:
- roof perimeter;
- length and number of gutters;
- mounting points for brackets, joints and funnels;
- location of drains.
Based on the perimeter of the roof, the pipe footage for future gutters is determined. Since it is sawn in half and two pieces are made from one piece, the required length of the pipes will be equal to half the perimeter of the roof. Next, the number of drainage risers is calculated. To do this, a plan is drawn on which all elements are marked. The distance between them cannot exceed 5 m. After determining the number of gutters, their length is calculated, for which the distance from the eaves overhang to the ground is measured. This will be the estimated height of the drainage riser. This figure is multiplied by the number of parts and the required pipe length is obtained. Next in the project are the tees connecting the gutters and risers. If the risers deviate at an angle, ready-made adapters are purchased. A special universal joint sealant is also required.
Tools for work
To work you need:
- wood screws;
- screwdriver;
- grinder, jigsaw;
- hacksaw for metal;
- screwdriver;
- construction cord;
- level and tape measure;
You will also need scaffolding.
For more information about installing a drainage system yourself, read our article - Installing a drainage system with your own hands.
What does the drainage system consist of?
Before moving on to the installation description, let's take a closer look at the drainage system.
Elements of the drainage system. (diagram No. 4)
The drainage system is:
- gutter - to collect rainwater and melting snow from the roof;
- pipe - to drain water from the gutters into the sewer;
- funnels - so that water from the gutters flows into the pipes;
- plugs - to close the blind ends of the gutters;
- bends - to lay pipes along the protrusions of the building;
- brackets - to secure gutters;
- clamps - to secure pipes.
Corner elements, couplings, protective nets, etc. may also be useful. The kit may differ from one manufacturer to another.
For example, the adjustable gutter angle in gutters from Alta-Profile is an element with which you can connect gutters at different angles (from 125 to 145 degrees). It is in demand in houses with a complex roof configuration and allows owners to avoid difficulties with selecting or manufacturing different corner elements.
Roof drain care
No matter how well the drainage system is installed, it needs regular maintenance.
- Here we tell you how to install corrugated sheeting on the roof and what you should categorically avoid.
- This publication will introduce you to the technology of roof insulation from the inside.
Over time, gutters may begin to leak. To eliminate minor leaks, there are special rubber rings with titanium, but if the damage is large, you will have to change part of the system.
How to fix gutters?
The material and design features of a particular system from a particular manufacturer determine its installation technology. For example, plastic gutters can be installed using adhesive or glueless methods (using sealing rubber bands).
Let's look at how to attach gutters to the roof using a glueless method.
To work you will need:
- building level,
- screws,
- screwdriver,
- drill,
- cord or rope,
- universal bimetallic crown for cutting holes,
- hacksaw for metal.
There are two ways to install the Alta-Profile drainage system:
- ➠ Horizontal: the system is first assembled at the bottom, and then transferred to the façade and inserted into pre-fixed brackets. This is convenient to do on small houses.
- ➠ Vertical method - from top to bottom. The drainage system is assembled step by step on the building. This method is used more often. Let's look at it in more detail.
Description and types of components for the system
Before choosing a drain, experts recommend studying all its working elements and components that ensure the functioning of the system and its correct installation.
The drain represents a system of working elements, among which the following can be distinguished:
- Drainpipes. They come in different diameters (100-240 mm) and lengths. They are installed mainly on the corners of the building.
- Gutters (trays). Mounted around the entire perimeter of the roof. They perform the function of collecting melt or rain water. Their length ranges from 1000-3000 mm.
- Funnel. Designed to redirect water from trays to pipes. Its size depends on the diameter of the drainpipe.
- Gutter angle. Connects gutters located at the corners of the building into a single system.
- Knee. May have different designs. Used for fastening watercourse pipes along the walls of the structure.
- Clamps. They perform the function of attaching drainpipes to the wall surface. The strength of the entire system depends on which clamp is used.
- Brackets. Used to attach drainage to the edge of the roof. The pitch of their location ranges from 500 to 700 mm. What are the different lengths of brackets:
- long - from 200 to 350 mm. It looks like hooks with a long strip that is attached to the wall surface;
- short – equipped with a short bar. They are characterized by high strength;
- universal - their size can be adjusted.
Each drainage and fastening element performs its specific function, which determines the strength of the installation of the system as a whole.
Installation instructions for the drainage system
Step by step we will look at how to install gutters.
Stage 1. Attaching the brackets
Gutter brackets. (photo No. 5)
We can use metal and plastic brackets. The choice is determined by what the gutter is attached to.
Metal brackets
- if the gutters are attached to the rafters.
How to install them? First, we install the outer elements 15 cm from the end. A gap of at least 2 cm must be provided between the front board and the bracket.
We stretch the cord between the installed brackets. Along it, at a distance of 60 cm from each other, we fix all the other brackets. Important: there should be a slight slope towards the drain. It is optimal if it is 3-4 mm per 1 linear meter.
!
Optimal gutter slope: 3-4 mm per 1 linear meter. This ensures free movement of water towards the drain.
Plastic brackets
can be used if the gutter is attached to the front board. But first we check that it is installed vertically, evenly, without bending. In the same way, you need to double-check the brackets that will be attached to it. The quality of the entire system depends on this.
Like metal ones, we first fix the plastic brackets approximately 15 cm from the end of the gutter. We stretch the twine, along which, using self-tapping screws, we mount all other brackets in increments of 60 cm. It is also important to provide a slope for the natural movement of water towards the pipe.
Stage 2. Installation of gutters
Installation of a gutter. (photo No. 6)
We insert the gutter into the brackets one by one. In this case, you need to press until it clicks.
Stage 3. Attaching the funnel
Funnel fastening. (photo No. 7)
The hole for the funnel must be cut in a solid gutter (installation of a funnel in a fragment of the gutter is not allowed).
The funnel is installed in the right place. We mark its dimensions with a pencil. Then we cut the corresponding hole in the gutter. For this it is convenient to use a bimetallic crown. You need to work at low speeds.
Remove burrs from the edge. We hook the edge to the rear edge of the gutter and place it behind the front edge. A characteristic click will be heard.
The place where the funnel is installed must be strengthened on both sides with brackets.
Stage 4. Installation of metal mesh
The mesh is installed in the hole of the funnel. This is an optional, optional step.
Stage 5. Installation of gutter couplings
When the temperature changes, the plastic elements expand and contract. Therefore, they should not be connected too tightly. On the reverse side of the Alta-Profile coupling there is a special restriction for this purpose with the inscription “Stop”.
We hook the edge of the coupling to the rear edge of the gutter. Then we bring the front edge behind the edge in front. A characteristic click will be heard.
To give the system strength, we install additional brackets on both sides of the coupling.
Stage 6. Installation of the gutter corner
We install the brackets as close to the corners as possible. We insert the edge of one gutter into the corner element, then the second until it clicks.
!
If the angle is greater than 90 degrees, the following solution can be applied. We make a hole in one of the gutters. We insert the second gutter at the desired angle, and close the end with a plug.
An alternative option is to use an adjustable chute angle. The method of application is similar to how we used the universal 90 degree angle. First we insert the gutter, then we adjust the required angle and insert the second gutter until it clicks, but no further than the limiting mark with the inscription “Stop”.
Stage 7. Attaching the plug
Attaching the plug. (photo No. 8)
Inside the plug there are special antennae that firmly fix it to the gutter. With their help we secure the plug.
Stage 8. Installation of the pipe elbow
Pipe elbow. (photo No. 9)
We install the pipe elbows in the direction of the drain, so that the slope angle differs from the vertical position.
Stage 9. Pipe installation
Pipe installation. (photo No. 10)
We insert the upper edge of the pipe into the socket of the elbow. We fix the pipe to the wall using clamps, which we place 180 cm (or less) from each other.
To ensure that the pipes are positioned vertically, you need to make sure that the brackets that hold the gutters are also installed vertically, without deviation.
Only in the lower part can the pipe deviate slightly from the vertical, but in the direction opposite to the wall of the house.
Stage 10. Installation of clamps
We install the upper clamp under the drainpipe elbow.
To do this, we bend part of the clamp and thus open it. Insert the pipe until it clicks and fix it. We snap the clamp and secure it with a self-tapping screw.
Stage 11. Installation of the pipe coupling
To connect two pipes along the length, we use a coupling.
Stage 12. Installation of drain
We install the drain at the bottom of the pipe. We fix it with self-tapping screws.
The work is completed. Now you know how to install a plastic drain. The metal drainage system is installed in a similar way, but with some nuances.
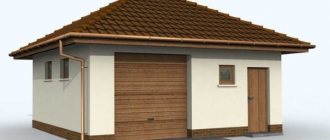
Do-it-yourself roof drainage: DIY production and basic installation elements
It is impossible to do without drainage systems attached to the roof of the house if you do not want rain streams, flowing from the height of the roof, splashing onto the walls and washing away the foundation. You can assemble a roof drain with your own hands by purchasing ready-made systems from well-known companies, or you can make it yourself, for example, from a galvanized sheet or even from plastic sewer pipes.
DIY roof drain
By purchasing professionally manufactured and structurally thought-out kits, you can select all the necessary elements for them - from small fasteners to complex angles and connections.
If you decide to make your own gutters, you will have to try and think carefully about what the elements of this system will be made of and how functional they will be.
What are drainage systems made of?
Plastic drainage systems are very popular.
The most popular materials for the manufacture of drains at present are special polymers that can easily withstand low and high temperatures, as well as their sudden changes. Such systems are produced by companies specialized in the development of plastic products for the construction and exterior design of buildings. Kits of professionally manufactured systems are quite expensive, and they are mainly installed on the roofs of respectable mansions and less often in ordinary houses in the private sector, although they are capable of transforming any structure.
Galvanized steel gutters are a kind of “classic of the genre”
Since time immemorial, drainage systems have been made of galvanized metal. Such elements are usually ordered from tinsmiths or purchased in specialized stores. Metal gutters are more affordable and therefore are used more often. Despite the low price compared to other systems, and perhaps not as aesthetically pleasing, galvanized gutters have their positive aspects, in which they are even superior to similar sets made of plastic or metal alloys. The main disadvantage of galvanized systems is the divergence of connecting seams due to temperature changes. However, here a lot depends on the skill of the tinsmith who makes them.
Galvanized drainage systems can have a protective and decorative polymer coating
Steel gutters can be coated with a layer of highly resistant polymer paint. This significantly improves their decorative characteristics and provides additional protection against corrosion.
Almost “eternal” gutters made of zinc-titanium alloy
Gutter systems are also made from a metal alloy called zinc-titanium, which is also coated with polymer paints at the final stage of production. The content of pure zinc in the alloy reaches 98 - 99% - a guarantee of corrosion resistance, the addition of titanium is a condition for the strength of products, and very small inclusions of aluminum and copper give this material high ductility during processing.
Such drainage systems look just as aesthetically pleasing as plastic ones, but are more reliable because they better withstand the influence of the external environment. Their external disadvantages, if the coating is of poor quality, include possible peeling of the polymer coating, therefore, having settled on this option, it is better to purchase kits from a trusted manufacturer that enjoys a strong reputation.
All of the listed materials are well suited for gutters - they are easy to process, install and look neat, blending organically with the exterior of the building and becoming both a necessary functional detail of the building and an important addition to its design.
Basic elements of a drainage system
If gutters are purchased in a store, you don’t have to think about how and what to make one of the elements of the system from - the manufacturer has already thought through all the nuances of the roof design. Having measured and specified all the parameters in your own home, you can buy all the necessary parts.
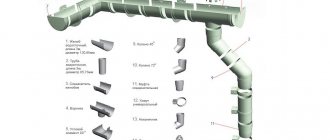
Despite the variety of options for drainage systems, they all have approximately a common structure and consist of similar structural parts:
Approximate general diagram of the drainage system
1. The gutter is the main part of the drain, which collects water flowing from the roof slopes. Typically, gutters are made up to 4 meters long.
2. Hook-brackets on which the gutter is laid. Plastic brackets are usually used for systems also made of polymers.
3. Gutter edge cap for right and left sides.
4. Funnels installed along the edges of gutters.
5. Central funnel, fixed with glue or using grooves and seals (5a).
6. Connecting piece (coupling) for the gutter. It can also be mounted with glue or with a clever groove connection using sealing gaskets (6a).
7. Universal connecting angle of 90º external and internal (7a).
8. Drain pipe with coupling
9. A screw clamp that tightens the coupling connection of pipes and other elements.
10. A tee providing a connection between two drainpipes.
11. Transition coupling - used when it is necessary to connect pipes of different diameters.
12 and 13. Bends (elbows) for connecting drainpipes. Typically have an angle of .60 ÷ 70º - different manufacturers may apply their own standards. It is clear that in one system there must be elements with the same angle values.
14. Terminal outlet with an angle of 45º - for directing wastewater into the storm water inlet. This detail is also called a mark.
15. Hook-bracket made of metal.
In addition to the presented elements, for some drainage systems, instead of brackets, the kit includes a curtain rod, which is an additional holder for the brackets or even performs their function itself.
The relative position of the roof edge, the eaves strip and the drainage gutter
Before going to the store, you need to draw up a drawing of the edge of the roof with all the turns and protrusions, while measuring the corners. A drawing with detailed drainage parameters should be provided to a specialist, who should help select all the necessary elements for a complete set.
Video: example of installation of a finished GAMRAT drainage system
Prices for drainage systems
Drainage systems
Independent production of drainage elements
1. If you are installing a system made of galvanized metal, then, in order to save money, you can make gutters yourself, since sheets of material are much cheaper than ready-made elements.
You can make a semicircular or square gutter from galvanized steel, but the semicircular shape is still considered traditional.
A semi-cylinder shaped gutter is considered classic.
It is easy to shape a thin sheet of metal using a pipe of the required diameter, making special bends at the edges so that they are securely held on the mounting brackets.
If you can make a gutter for the drain, then making brackets will also not be difficult. Their semicircle should have a slightly larger radius, since the gutter should easily fit and be secured in the bracket.
Gutters and box shapes are often used
It is easy to make a box-shaped gutter from galvanized metal. Its shape is drawn from a wooden block of the required size. One of the sides is made a little larger and bent to the side so that the flowing water gets to the right place. Then, its edges are bent in a special way.
The box gutter can also be made independently, based on the specified dimensions
2. If you need to make a drain only on a straight section of the roof, then the gutter can also be made from plastic sewer pipes. Such gutters will cost almost nothing in terms of price, since one pipe produces two gutters at once.
- The pipe at the beginning and end is fixed on two boards using self-tapping screws; in its upper part, exactly opposite the lower fixation points, one more self-tapping screw is not completely screwed in. A thin rope is pulled over their protruding parts, and a straight line is marked along it. Using this marking, the pipe is cut from start to finish using a grinder.
- The pipe is then turned over and the process is repeated. Thus, we get two halves, which will serve as gutters. When assembling, individual parts can be screwed together from the inside. Using sewer pipes, you can also take corner parts from the same system, also sawing them lengthwise.
Video: making gutters from a plastic sewer pipe
Of course, homemade parts will not have such a spectacular appearance as professionally made ones, but you can save a decent amount on this.
3. If desired, you can select other components to assemble the entire complex, since currently you can find many suitable materials that will serve as blanks. The only parts that you still have to order or buy are funnels. It is quite difficult to make them yourself without any experience in tin work.
Installation of a drainage system
Installation of the drainage system is carried out in different ways, depending on the chosen fasteners and the installation period.
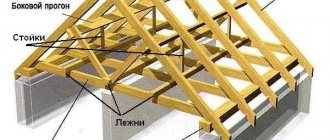
Ideally, installation of the drainage system should be carried out before laying the roofing.
It is considered optimal to install it on the outer crossbar or rafter of a pitched roof before laying and securing the roofing.
The location of the brackets, the eaves strip and the gutter itself
The presented diagram clearly shows how the brackets are secured and covered with a cornice strip. In this case, it acts as a kind of shield for the soffit, protecting it from direct moisture.
In other cases, the eaves strip is made from a board, and if the brackets are not secured before laying the roof, then they are attached to it.
Sometimes gutter mounts are attached to the bottom of the slope directly onto the roof, but this is not entirely the right option.
Wherever the brackets for the gutters are attached, their location must be calculated in such a way that water flowing from the roof in a large stream falls into this channel and does not spill beyond it.
This parameter depends on how much the edge of the roof protrudes. If it extends to a sufficiently large distance, sometimes it makes sense to use a fastening option installed on the roof itself.
Video: example of calculation and installation of a house drainage system
So, having purchased or manufactured a suitable drainage system, you can begin its installation.
1. The first step is the process of installing the gutter holder brackets.
They are fixed at a distance of 550 - 600 mm from each other, with a slight slope towards the drain. The brackets must be fixed in such a way that the roof overhang is 1/3 of the size of the semicircle on the gutter, and 2/3 of the gutter will “catch” water from the roof.
Position of the roof slope above the gutter
If the brackets are fixed on a wooden cornice strip, then in order to clearly see the slope and the fastening line, carry out the following steps:
— First, install a bracket that will support the highest edge of the gutter, taking into account all the rules and recommendations.
— The next step is to secure the last bracket in the row. It is fixed with a slope of 4-5 mm per linear meter. An incorrectly designed and installed system will not work efficiently, and over time it will inevitably develop leaks.
— Next, a thin string is stretched between the two brackets, and the installation base line is marked along it. Then the locations of the remaining brackets are marked on it.
— Then, the brackets are fixed in the marked places. This will ensure that the required overall slope of the gutter is met.
- The gutter is laid and assembled, and a plug is installed on its raised edge.
Installing a cap at the top end of the gutter
- If a funnel is to be installed at the end and in the middle of the gutter, and it is necessary to make a hole for it corresponding to the size of the funnel, then it is installed on the gutter and fixed.
An approximate diagram of the installation of a funnel with a mesh catcher for large debris
- An additional middle funnel is installed if the length of the side of the house exceeds 12 meters. If it is shorter, then it is enough to install this element only at the end of the gutter, in its lower part.
- The gutter is fixed by sliding a groove on its edge onto the protrusion of the bracket.
- If a ready-made drainage system is installed, then the individual parts of the gutter are fastened together with special connecting parts, which provide for precise mating and appropriate sealing. If the system is made independently, then the gutters are laid overlapping and twisted with self-tapping screws. In this case, it is also useful to provide a thin sealing gasket, for example, from a rubber strip.
- When the sewer channel is laid and funnels are installed in it, sewer pipes and elbow bends are mounted to them, which are tightened at the joints with clamps. Drainpipes are secured to the wall with clamps. Using bends will allow you to position the pipes along the wall so that the clamp posts do not protrude too much.
Approximate diagram of fastening a drainpipe along the wall of a house
- If water from the roof goes into the ground, then the drain pipe attached to the wall should end 300 - 350 mm from the ground surface.
- If a storm sewer is installed around the house to collect and drain rain or melt water, then a pipe from the roof is sometimes connected directly to it, or an edge of a drain pipe is placed with a mark directly above the storm inlet opening or drainage tray.
Find out how to drain water from the foundation of a house using various systems from our new article.
Something that many people forget about or simply don’t know. It is highly advisable to install a protective mesh on the gutters, which will not allow large debris and fallen leaves to accumulate at the bottom. In ready-made systems, it is usually provided in the form of a strip that is attached to the edges of the gutter.
A mesh that prevents clogging of drainage channels with fallen leaves
For a homemade system, you can purchase mesh by the meter and place it in the gutter, rolling it into a roll, which is held together with special plastic clamps.
You can make such a “filter” yourself by rolling the mesh into a tube along the diameter of the drain
Video: an important element of the drainage system - a mesh to protect against large debris
Whatever drainage system is installed on the roof of the house, it needs periodic monitoring and regular preventative cleaning. Even if a mesh is installed on the gutter, it needs to be washed sometimes, since in addition to large fragments from the roof, a large amount of dust and dirt gets into the drains, and the soaked fallen leaves that fall on the mesh are not always blown away by the wind. If the drain system is clogged, all the water that accumulates in it, along with dirt, will one day end up on the walls of the house.
When starting to install a finished system or make a drain yourself, you need to correctly calculate all the parameters and slopes, make a drawing and, of course, evaluate your strength in completing this work. If you are not sure that it will be done with the proper quality, it is better to seek help from specialists.
Installation of a metal drainage system
We will not go through the entire algorithm step by step. It is the same as for plastic systems. Let's look at just a few features.
To cut a funnel in the gutter, use metal scissors. Sawing with a grinder can damage the protective layer - as a result, rust will appear and the service life of the gutters will be reduced.
For metal drainage systems we use only metal brackets. The slope of the gutters should be the same as for the plastic system - 4 mm per 1 linear meter. The distance between the brackets and the end edges of the gutters should also be about 15 cm. The installation step of the brackets is 60 cm. At all joints, the system must be reinforced with additional brackets.
Types of roof drains
Depending on the material, the entire mass of gutters is divided into metal and plastic. Occasionally you can find ceramic and even stone plums, but these are somewhat exotic and are not used often.
Metal plums, in turn, are divided into:
- galvanized – the most widely used;
- zinc titanium - almost not subject to corrosion, very durable, but easily deformed;
- aluminum – highly susceptible to mechanical damage;
- copper ones are beautiful, but quite expensive;
- lead - very resistant, but are now rarely used.
Of all the metal gutters, the best today are considered to be galvanized with a polymer coating, which protects the metal from corrosion, has high frost resistance, is not afraid of ultraviolet radiation and, thus, significantly increases the service life of the system.
Depending on the installation area, drains are divided into external and internal. Internal drains are used to drain precipitation from flat roofs of multi-story buildings. Small houses with pitched roofs are equipped with external gutters.
Based on the type of connection of individual elements, roof drains are divided into systems with rubber seals and adhesive ones.
Rules for installing a drainage system
Plastic drainage system. (photo No. 11)
In order for the drainage system to serve for a long time and efficiently, you must strictly follow the installation rules. Let's focus on a few of them.
1. Select the correct slope of the gutter.
➠ How should it be? 3-5 mm per 1 m of gutter.
If the slope is less or the brackets are not installed level, the system will become clogged and its efficiency will be significantly reduced.
If it is larger, the gutters will be too far away from the edge of the roof and water will not get into them.
2. Select the correct step for installing the brackets.
➠ How should it be? Installation of a plastic drainage system requires that the installation step of the brackets does not exceed 50 cm. For metal drains - 60 cm.
If the distance is greater, the system may become deformed or break due to significant precipitation.
3. Select the correct position of the gutters of the drainage system.
➠ How should it be? Mentally draw a line that continues the roof slope - it should be 2-2.5 cm above the edge of the gutter.
Otherwise, snow sliding from the roof can damage the gutters. Or during heavy rainfall the water will overflow over it.
!
We check the position of the gutters relative to the roof: so that water gets into the gutter, but snow coming off the roofs does not.
4. Carefully check the coupling connection.
➠ How should it be? During installation, efforts must be made to make the system airtight.
If you do not pay attention to this, leaks may occur.
Installation sequence
Everything is ready, you can proceed to installation work. The drain is a gravity-flow system, so it is important to correctly position the gutters at a certain angle. Its value is 3–5 mm per meter of length of the gutter structure. For understanding, let’s denote that one end of a tray 1 m long should be 3–5 mm lower than the other. For example, the length of the roof slope is 10 m, one edge of the gutter structure relative to the other should be 3–5 cm lower.
Gutter slope options
Based on this, marks are made at the corners of the slope, where the locations of the two outer brackets are determined. Self-tapping screws are screwed into the front board or nails are driven in, between which a strong cord is pulled. This will be the hook installation line.
How to do it correctly to accurately determine the installation locations of the two outer hooks.
- The first top one is installed from the bottom edge of the roofing material at a distance of 4–5 cm.
- The exact distance is measured from the nail driven into the designated point to the edge of the roofing material.
- The resulting size is transferred to the other edge of the slope with the addition of a slope based on the length of the overhang.
Experienced craftsmen do not always use nails or screws to install the cord. They immediately attach the brackets, avoiding unnecessary operations. If both outer brackets are screwed to the supporting base, you can proceed to installing other hooks. It is important to install the latter so that they are oriented relative to the cord with the same parts as the first two installed devices .
There is one more point that must be taken into account when installing brackets. The result should be such that the edges of the roofing material overlap the gutter by a maximum of one third of its width. It is this arrangement that can guarantee that the flowing water will accurately enter the tray without overflowing.
So, the brackets are installed exactly level, you can remove the cord and proceed to laying the gutters.
Installation of the grooved structure
In principle, you can start laying gutters from any side. It is recommended to start from the location of the downspouts. At this point, connections will be made between two systems: horizontal and vertical. The element connecting them is a funnel. Therefore, first the gutter is adjusted to the funnel and the place where the hole will be made in the tray is determined.
It is done with a hacksaw for metal. You just need to make an angle cut on both sides, taking into account the distance between the cuts, equal to the diameter of the pipe. It is recommended to process the cut edges to avoid any unevenness or burrs.
Sawing the hole for the funnel and installing it
A plug is placed on the outer gutter. This can be done on an already installed structure. But it’s more convenient to do this before installation. The edge of the grooved part is inserted into the groove of the plug, where a rubber cuff is located inside, ensuring the tightness of the joint. Now the gutters can be laid alternately with the edges of each joint overlapping. The overlap size is 5–10 cm. Many manufacturers of plastic trays today offer connecting elements, which are gutters 25 cm long complete with rubber cuffs, like plugs. By inserting two gutters from different sides of the connecting device, you get a sealed joint.
Exactly the same designs are made for funnels. Using them, there is no need to cut holes in the gutters. The latter are simply connected by a funnel to each other. Simple and convenient.
Regarding the attachment of gutters to brackets. There are different fastening technologies. Two types are most often used:
- clamps with throwing the element through the gutter; previously they used ordinary wire;
- The clamps that hold the edges of the gutters together are flexible and hook-like.
Installation of drainage risers
The process can be described as follows: the risers are strictly aligned vertically and attached to the wall of the house with clamps. First, clamps are installed. From the center of the funnel pipe, you need to lower a vertical line along the wall with a plumb line. It is better to beat it on the wall surface. It is optimal to install fasteners of this type at the junction of two pipes, a pipe and a drain.
The process of attaching drain risers using clamps
The first clamp is attached to the wall at a distance of 30–50 cm from the ground, taking into account the distance from the drain to the ground and the size of the drain pipe itself. Fastening is done with self-tapping screws into plastic dowels, so holes are made in the wall at the installation points, into which the latter are driven with a hammer.
Please note that the clamp should be located below any joint at a distance of approximately 10 cm.
Before installing gutters, it is recommended to prepare them, that is, connect them into one riser if the height of the building is small. In any case, the two pipes must be joined on the ground, and only then raised in tandem for installation.
The riser assembly itself involves installing pipes into clamps and connecting them together using sealant or special connecting pipe elements with rubber cuffs (double-sided couplings). In the first case, this is a socket connection, which is often used when assembling a sewerage system.
The process of installing couplings
If the riser is located far from the wall, then it is connected to the funnel with two bends (elbows). Therefore, first, bends are installed on the funnel up to the wall, on which a vertical line is then drawn with its exact passage through the center of the section of the lower bend.
Sometimes two elbows do not connect to each other with pipes. The reason is the wide overhang of the roof. Between them you need to install a piece of pipe, which is cut from the pipe element of the riser. The distance between the branch pipes is measured, and 3–4 cm on each side is added to the obtained value. The allowances are the joining edges for fitting into the bends. Important - you need to correctly connect both outlets through the cut pipe to each other . First, the pipe section is put on the upper branch, that is, the elbow pipe should be inside it. Then the second elbow pipe is put on the second free end of the pipe section. The first one should be inside the second one. Both joints are treated with sealant.
Device for transition from gutter to drain riser
Video instructions for DIY installation
Gutter system options
When arranging a residential building, you can use different types of roof drainage systems. The complexes are classified according to the material of manufacture, type of construction, mounting and installation options.
Organized drains: description and standards
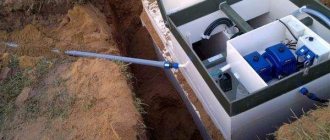
One of the options for organizing a drainage system is organized drains, which are a collection of gutters, pipes and other elements. They are connected into a whole system, which is attached to the walls outside the building using brackets. Water, passing through gutters and pipes, enters a storm sewer or well, designed to further remove moisture outside the site.
Organized drains in private houses are usually located outside the building
SNiP allows the installation of organized drains on flat or pitched roofs of any type. The set of norms and rules also assumes the following features of the arrangement of organized systems:
- for each section of the roof where expansion joints or walls are present, at least two funnels must be installed to ensure prompt drainage of water;
- Gutter risers cannot be installed in the thickness of external walls. Heating of drainage elements is carried out taking into account safety requirements;
- the bowls of the funnels should be firmly fixed to the wall using metal clamps;
- the distance between the external pipes of the drainage system must be at least 24 m, and the cross-sectional area is determined at the rate of 1.5 cm 2 for each square meter of roof area.
An organized version of water drainage systems can be of several types. The most popular way to organize gutters is to install drain gutters. The products are semicircular elements that are connected together to form a line of the required length. The gutters can be connected using special glue or couplings. In the first case, the parts are securely fastened, but the structure is non-separable. Couplings are more practical and provide the required rigidity of the drainage channel.
The gutters have a smooth inner surface along which the water flows as quickly as possible, without encountering any obstacles along the way.
For flat roofs, a storm funnel is often used, which has a round shape. Water enters the funnel opening, passes through the pipes and flows into the sewer. Depending on the roof area, the amount of precipitation in the region and other factors, the number of funnels that need to be installed on the roof is determined. In this case, you can organize two options for the drainage system. The traditional one involves gravity flow of water through pipes, while with gravity-vacuum, precipitation passes through a system with a siphon. In this case, a small number of funnels are installed on the roof.
In traditional systems, the flow speed is determined only by the angle of inclination of the gutter; in more complex gravity-vacuum systems, when the level of precipitation is high, the siphon is turned on and significantly increases the intensity of drainage
A roof drip line is a strip that is fixed to the gable or eaves of a building and protects the facade of the house from moisture. The principle of operation of the drip is that water from the roof falls onto the plate and then into the gutter. The sediment then goes through the drainage system and ends up in the sewer system.
When installed correctly, the drip line protects the rafters and the entire roof overhang from getting wet.
Unorganized drainage
An unorganized type of drain is just a roof with the correct slope, which allows moisture to flow down freely without affecting the facade of the building. In this case, water falls in close proximity to the foundation, which increases the risk of rotting of the foundation. This drainage option is suitable for pitched roofs with a slope towards the courtyard.
In the absence of a set of gutters, water can fall on the surface of the walls and on the foundation, and in winter form large icicles
Unorganized drainage is not suitable for residential buildings, as it does not provide effective water drainage. When creating this option on other buildings, the features of SNiP should be taken into account:
- unorganized drains are allowed on buildings no higher than 5 floors;
- annual precipitation in the region should not exceed 300 mm/year;
- on the side of the building where the roof slope faces, there should not be balconies, buildings, or a road or pedestrian road;
- The size of the roofing canopy should not be less than 60 cm.
An unorganized type of drain is suitable for outbuildings, as it cannot provide good protection for residential buildings.
Rules for installing gutters
It boils down to this:
- The gutters need to be hung at a slight angle of 3 to 7 degrees, then the water will drain by gravity.
- When fastening, a bracket is placed on one side of the slope closer to the eaves of the roof, and on the other side the fixation is made lower to form a slope. A thread is pulled between these brackets and auxiliary brackets are mounted every 50 cm.
- The gutters need to be laid with an overlap so that the edge of the top is on top of the edge of the bottom tray. This will avoid leaks. For reliability, all joints are sealed with silicone sealant.
- According to the standards, hang vertical drains at a distance of 12 m from each other. If the length of the facade is from 12 to 24 m, then you will have to attach 2 risers.
- The pipes are fastened to the wall of the house using clamps with self-tapping screws through plastic dowels. The fastener pitch for low buildings is 1.8 m, for multi-story buildings it is reduced to 1.5 m. Compliance with the vertical is checked with a plumb line.
- Pipes with trays are connected with funnels. At the bottom of the riser you need to drain at 45 degrees. The distance from the drain to the ground or blind area of the house is at least 25 cm.
The correct method of connecting parts of pipes is socket, when a pipe of a smaller diameter is inserted into a larger one. The joints are sealed.
In what cases is a drain installed during finishing work ↑
There are several possible situations when such installation is necessary:
- The installation of gutters on the roof directly to the front board can be provided for by the project itself, if air flows for ventilation of the internal space enter through the cladding of the eaves from perforated soffits. This method of ventilation is the most affordable both in terms of design and cost. However, it is not possible to ensure sufficient air flow. Therefore, to increase ventilation efficiency, drainage gutters are attached to wind boards on the roof.
Note:
It would be appropriate to remind you what a frontal plate is. This is the name given to the longitudinal shield that covers the end part of the rafters or that part of the sheathing that protrudes above the front part of the attic or attic.
- Roof gutters are forced to be attached to the eaves of the finished roof also in the case of purchasing an unfinished house, when the installation of gutters was not foreseen by the former owner in advance.
- The use of anti-condensation waterproofing film has its own characteristics. According to the technology, the waterproofing is installed on the overhang of the eaves, and this becomes possible only when the roof gutters are attached directly to the wind board.
- The most common reason is perhaps replacing a physically outdated old system that is unable to properly handle its functions.
Materials for gutters
Gutter systems are exposed to temperature changes, high humidity, ultraviolet rays and other negative factors. Therefore, for the manufacture of gutters, funnels and other parts, practical materials are used to ensure the durability and strength of the products. Several types of raw materials, which are used to create gutters, meet these requirements.
Metal gutters, which used to be the only possible solution, now have quite worthy competitors
Features of plastic gutters
Of all the materials that serve as the basis for the production of gutters, plastic is the most inexpensive. Such systems are available in various colors, have an aesthetic appearance and are easy to install. Plastic products are characterized by low weight, which allows them not to load the roof. Therefore, such gutters and pipes can be attached to different roof options.
Plastic gutter is well suited for soft roofs
Working with plastic gutter elements is quite easy. The parts are connected to each other with glue or special couplings. Plastic systems have the following advantages:
- smooth surface allowing rapid drainage of water;
- lower cost than metal gutters;
- low noise level (up to 27 dB);
- possibility of operation in the temperature range from -40 to +50 °C;
- easy replacement of individual elements;
- not susceptible to corrosion and rotting.
A negative feature of cheap plastic gutters is their low level of strength. Such characteristics are characteristic of low-quality products, so you need to choose only rigid and durable gutters, pipes and other elements.
Metal gutters
Metal roof gutters are characterized by high strength and durability. The technical characteristics of the equipment depend on what metal served as the basis for the drain. Copper options are the most durable, while gutters made of roofing steel with an anti-corrosion coating are more available. There are also lightweight aluminum gutters, as well as products made from zinc and titanium.
Metal gutters are more expensive than plastic ones, but they are stronger and more durable
The main advantage of metal gutters compared to structures made from other materials is their durability. The service life of metal gutters significantly exceeds the period of use of plastic elements. Other advantages of metal drainage systems are expressed in the following:
- resistance to mechanical stress, climatic conditions, temperature changes;
- various options for fastening gutters;
- protection against corrosion: copper products are not subject to rust at all, and other options have a special anti-corrosion coating;
- Possibility of painting in any color with special paints for metal.
The disadvantages of metal gutters and funnels are high cost and more complex installation. The most practical are copper structures, which have a service life of more than 100 years. In other cases, it is important to purchase systems that have a dense and thick anti-corrosion coating, as well as high technical characteristics.
Galvanized roof drain
Galvanized systems for draining water from the roof are lightweight and practical. They combine light weight, a service life of several decades and simple installation.
Galvanized systems have all the advantages of metal gutters, but they do not have a very attractive appearance and fail faster.
Wear-resistant galvanized pipes are installed quickly using clamps and other simple fastening devices. The advantages of galvanized gutters also include the following:
- resistance to deformation, temperature changes, humidity;
- Frost resistance down to -60 °C and UV resistance;
- fire resistance when exposed to direct flame;
- light weight, eliminating significant load on the roof;
- low cost with good technical characteristics.
The negative features of galvanized systems are expressed in the low degree of sound insulation. Therefore, it is important to consider the technology of fastening elements to the roof and facade.
Installation principles
Regardless of the material, cost or type of drain, the main criterion for effective operation is high-quality installation in compliance with all safety requirements. There are 2 factors due to which the drainage system functions: tightness and slope towards the drainage funnel. When installing drains, professional craftsmen adhere to the following rules:
- The greater the weight of the drains, the more reliable the rafter frame should be at the installation sites. Heavy models made of copper, aluminum or steel are mounted on rafter legs, and lightweight models made of plastic are mounted directly on the eaves board.
- A waterproofing layer is laid between the gutter and the roof rafters. Some craftsmen use plastic films and roofing felt for this, while others recommend treating the contact areas with bitumen-based mastic.
- The installation of spillways is carried out along all roof overhangs. The gutter is fixed in such a way that a slope of 3-5 degrees is formed towards the water inlet funnel, and a plug is put on the opposite side.
- The gutter is installed on special brackets so that it protrudes half the width from under the roof overhang. This arrangement allows for efficient collection of water and protects the gutter from collapse due to snow melting.
Important! Roof gutters need regular maintenance. A properly designed and correctly installed system is inspected only once a season, after the end of autumn leaf fall and showers, but before the onset of stable frosts. At this time, gutters and pipes should be cleared of debris and leaves, check the tightness of the seams and eliminate leaks.