How to make a strip foundation yourself - photo instructions.
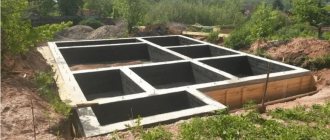
The strip foundation is more popular than others, since the technology for its construction is simple, unlike the installation of piles. To fill a strip, you need less concrete than for a slab, and the strength will be higher than that of a columnar base. There are strip prefabricated and monolithic foundations, but the joints in a block structure will be its weak points. The height, width and length of the tape depend on the type of soil and the weight of the house, so before starting construction we recommend calculating the loads and developing a diagram.
Strip foundation step by step instructions.
Step-by-step instructions for pouring.
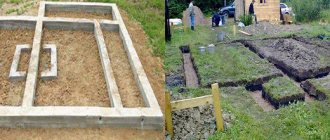
1. Before the main work, it is necessary to mark the site, remove the top layer of soil and dig a trench. The excavated soil should not fall to the bottom, since its density is less than compacted soil. The faster everything is ready, the less water will get into the trench, so buy materials in advance.
2. The bottom of the trench is compacted and geotextiles are placed in it. Then a 10-30 cm layer of sand is poured, on soft soils it is mixed with crushed stone and thoroughly compacted with special equipment or shovels. To make the work easier, you need to moisten the sand with water in advance; if you pour liquid into the trench, excess moisture will damage the future foundation.
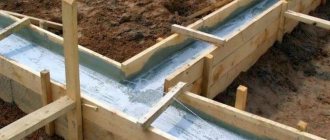
3. Wooden formwork is installed 5-7 cm above the foundation. Before pouring, a thick plastic film is placed in it so that the liquid from the concrete does not leak into the ground, and it is secured.
DIY strip foundation step by step instructions.
4. On problematic soils or under a heavy building, it is necessary to pour a concrete preparation (a layer of mixture grade M50-M100 10 cm thick). Then wait 3-5 days depending on the temperature to continue.
5. Communications and drainage fail. It is better to isolate the joints with boxes so as not to damage them during further work.
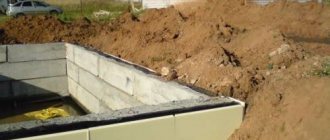
6. The lower part is hydro- and thermally insulated.
7. Reinforce the structure according to the diagram. The reinforced frame must be installed for a shallow strip foundation, since it is located above the freezing level, and therefore is susceptible to frost heaving of the soil.
8. You need to pour the solution in layers of 20 cm and vibrate to increase the density. According to the technology, no more than 5-6 hours are allowed for work, otherwise the structure will delaminate.
9. Concrete gains strength in 28 days; during the first week the surface is constantly wetted, since cement loses its adhesive ability if there is not enough water. After concreting, further work begins in 6-7 days. Before this, it is necessary to waterproof the walls.
Interest in strip foundation
Firstly, as already mentioned, the costly component of the work is attractive. Unlike a slab, a strip base requires much less concrete and reinforcement. Considering that these materials are expensive, saving a significant part of finances always dominates among the advantages of installing a strip foundation.
Secondly, it is possible, in parallel with the foundation work, to determine the location lines of the external and internal walls. Make markings for the basement.
Thirdly, there are no special obstacles to constructing a strip foundation with your own hands. There is no need to hire a professional team here.
You can do everything on your own if you carefully study the work technology and have the minimum skills that will tell you how to mix concrete correctly, what components to add to the mixture and in what proportions.
Clarifications to the instructions for different buildings.
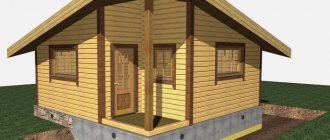
Despite the general technology, the design and degree of arrangement of the foundation depend on the load on it and the type of soil. The “bathhouse” section provides general recommendations for buildings of no more than 37 m2 made of lightweight materials.
If insulation is necessary, the strip recessed foundation is replaced with a base up to 1 m high; the costs for earthworks and concrete are lower, but this will have to be compensated for with insulation materials. The choice is based on accurate calculations.
It is important to concrete a strip foundation in one day, so it is better to order a ready-made solution if you need a large volume, rather than mix it yourself. The grade must be at least M200 for one-story wooden or frame houses on normal soil, and at least M300 for two-story buildings made of brick and concrete.
To evenly distribute concrete over the formwork, choose a high plasticity class (P-3, P-4), and in no case dilute the mixture with water, excess moisture reduces the density of the structure. Determine in advance several points for unloading concrete in order to distribute it evenly throughout the formwork.
If you want a house with a basement, it is better to connect the concrete preparation with the tape with a common reinforcement frame and make good insulation. It is recommended to plaster the walls inside. When building a strip foundation with your own hands, it is worth reading about radon protection measures. In people living in an area of high radiation for 10-20 years, the incidence of lung cancer increases by 10-16%.
Do-it-yourself recessed strip foundation step-by-step instructions.
A small building is usually placed on a shallow strip foundation. Its design allows you to save on concrete, and with the help of insulation and drainage, the effects of frost heaving and ground water level are reduced. It is enough to arrange only a sand cushion. But you still need to reinforce it, otherwise it will quickly crack. The bathhouse is always humid and hot, which is why it is necessary to insulate the base from moisture, although this is not necessary in other small structures. The width of the strip base is 25-65 cm, depending on the soil and the weight of the structure, the depth is from 50 cm.
Do-it-yourself strip shallow foundation step-by-step instructions.
It is convenient to prepare the mixture yourself, since a small volume of concrete is needed. The pressure on the structure is usually minimal, but the fence must withstand the wind, so be sure to follow the following rules:
- trench depth - from 50 cm;
- the width of the trench is 20 cm greater than the foundation itself;
- minimum base width - 15 cm;
- diameter of longitudinal reinforcement - from 8 mm, transverse - from 6;
- concrete grade - M200.
DIY columnar strip foundation step by step instructions.
Reinforcement
The technology for pouring strip foundations on heaving soils requires mandatory reinforcement. The reinforcement scheme is developed when designing a house, depending on the individual characteristics of the structure (number of floors and weight of the building, building area, depth of the foundation for the house, etc.).
View of the finished reinforcement cage for the “tape”
To arrange the reinforcement frame, corrugated steel reinforcement is used. But recently, composite materials have become increasingly popular. Fiberglass reinforcement is not inferior to steel in its strength characteristics. At the same time, it has much less weight (which greatly facilitates the work) and is not subject to corrosion.
The rules for installing a reinforcement frame recommend connecting all its elements together using steel wire. It is not recommended to use welding to connect reinforcement. In places where welds are made, the structure of the metal is disrupted, so such joints quickly collapse under the influence of corrosion. At the same time, the strength and load-bearing characteristics of the foundation structure are significantly reduced.
Recommendations and main mistakes.
Despite all the instructions, foundations crack due to negligence or ignorance of the rules and savings on materials. With the necessary knowledge, you can make a strip foundation yourself, but do not break the rules, they are all based on calculations and experience. Let's see what common mistakes lead to and how to avoid them.
1. Ignoring the soil.
Before construction, it is better to order a geological examination if you cannot accurately determine the type of soil. Sometimes several types are combined on a couple of acres, which causes uneven settlement of the house. In areas with a high content of peat, sapropel or silt, it is impossible to build a strip foundation without completely replacing the soil under the foundation.
2. Lack of sand and gravel cushion.
This option is only possible on rocky soils. If you pour the strip base directly onto loam or clay soil with a high groundwater level, the concrete will not withstand constant contact with water. Also, soil is more difficult to level perfectly than sand, so the pad provides minimal drainage and a level surface.
Do-it-yourself shallow strip foundation step-by-step instructions.
3. Weak or incorrect formwork.
A common mistake made by those who decide to build a strip foundation with their own hands. During the concreting process, the formwork will expand or break; it is better to save money and nerves on the mixture and build it correctly. Before pouring the structure, check its strength. Do not allow gaps larger than 2 mm between the boards and install reliable supports.
It is difficult to remove ill-conceived formwork, and there will be uneven spots on the concrete that will have to be primed. To prevent the mixture from sticking, you need to make the inner surface of the formwork as smooth as possible. To do this, cover the tree with lime milk, a hydrophobic solution or a special film. The structure is fastened with self-tapping screws.
4. Lack of drainage.
When you start building a house, natural water flow no longer works; on problematic soils with high groundwater levels you will have to make artificial drainage, otherwise one day the basement will fill with water. The house is surrounded by pipes laid in geotextiles, then they are covered with sand and expanded clay.
5. Weak reinforcement.
Reinforcement in reinforced concrete works in tension; if the design is designed correctly, the concrete will not crack. Familiarize yourself with the diameter standards for each type of fitting and install it securely. You cannot heat the rods to bend them, this weakens the structure.
6. Lack of insulation.
They are insulated with polystyrene foam, this reduces heating bills by 10-20%. They are insulated from moisture with polyethylene film, roofing felt and other methods. Places for supplying communications are covered with hydrophobic solutions.
7. Low grade of concrete.
Brand M150 is not suitable for the construction of strip foundations, and M200 cannot be used on soft soils. It is better to order material from trusted manufacturers, since there are often cases of non-compliance with the declared class or too much water in the mixture. During work, make a sample in a wooden box of 10-15 square meters. see, so if they sold you the wrong brand, you can prove it.
8. Violation of concrete hardening conditions.
The optimal average daily temperature for curing is +15-20 °C. If it is higher, the mixture will dry out, so the surface is constantly moistened. When work is carried out at temperatures below +10, the hardening process slows down, and at 0 degrees it stops. To ensure that concrete gains strength in winter, special salts are used or the formwork is insulated.
If you are thinking about how to pour a concrete foundation without experience, first contact a professional or read literature on the topic. This article provides general guidance only and raises questions that you will need to clarify. It is better to start experiments with small structures, and entrust the foundation of the house to professional builders. All deviations from the rules must be justified, and if there are no explanations for the decisions, follow the step-by-step instructions.
How to install a strip foundation with your own hands.
The foundation determines the performance characteristics and service life of the house, so the selection and installation of the structure must be approached with great responsibility. A strip foundation is a strong and reliable foundation for buildings with heavy floors and simple architecture.
Strip foundation step by step instructions.
The strip foundation device consists of a strip that takes the load of the entire room. It does not require careful soil preparation and is suitable for liquefied, garden, forest or clay soil. Widely used in non-uniform soil.
The main advantage of a strip foundation is that it is suitable for building a house with a basement or ground floor. Laying is easier, but requires more cost and time than other types of foundation.
What is a strip foundation and what does it look like?
A strip foundation is a support located under the external and internal load-bearing walls of the house . It is a somewhat thickened section of walls, immersed in the ground to a certain depth.
The first versions of the ribbon design were created many centuries ago and consisted of stone, and later brickwork.
Modern types of tape are assembled from individual elements (foundation blocks) or cast from concrete directly on the site.
Monolithic tapes are the most durable and reliable, and have the highest technical characteristics.
The durability of monolithic belts is 2-3 times longer than the service life of prefabricated types . They are highly popular and are recognized as the main type of foundation construction for buildings of any type.
IMPORTANT!
Tape bases are significantly ahead of any other options in certain qualities, and sometimes in their combination. In addition, they are superior to alternative options in terms of efficiency. The consumption of building materials for tape is much lower than for slab or pile-grillage foundations, and the possibilities are much higher.
Types of strip foundation.
- A shallow strip foundation is suitable for soil with moderate heaving and for soil that does not freeze below 1.5 meters. This is a profitable construction option, since the construction of the structure does not require a deep pit, which will save money and work time.
- A buried foundation is used to build houses with heavy walls and concrete floors, with a large basement or underground garage. For this type of construction, it is important to correctly calculate the depth. To do this, determine the level of soil freezing and subtract 30 centimeters from the indicator.
Strip foundation step by step photo instructions.
Both designs are suitable for building a wooden house. A shallow strip foundation is a more affordable and simpler option, which, thanks to easy installation, can be installed with your own hands. Shallow strip foundations are often used for light-weight buildings: country houses and small country cottages, bathhouses and gazebos.
Recessed and shallow strip foundations come in the form of a monolithic concrete structure or prefabricated reinforced concrete blocks. Experts recommend using the first option, as it is very durable and reliable with a service life of 100-150 years. Next, step-by-step instructions will tell you how to properly install the foundation with your own hands.
Preparatory work: soil study and marking.
First of all, marking and calculation of the strip foundation is carried out. To calculate the required dimensions, volumes of materials and fittings, use a special online calculator. Such a calculator is easy to find on the Internet.
In addition, you can seek help from professional builders or consultants in a store that sells the necessary materials. Then they move on to marking.
DIY strip foundation step by step instructions.
To do the marking yourself, first remove debris from the land. Then you need to mark the internal and external boundaries of the structure using pegs, rope, reinforcement rods or other available items. For more accurate markings, laser levels are used.
How to achieve even markings:
- Establish the axis of the future structure;
- Use a plumb line to determine the first angle from which to pull the rope perpendicular to the other two angles;
- Use a square to mark the last fourth corner;
- Check the evenness of the corners and stretch the rope between them;
- Make the internal markings according to the same principle with an indentation of 40 centimeters from the outside. By the way, you can first mark the internal boundaries, and then the external ones. The sequence doesn't matter much
Before installation, be sure to study the soil characteristics, the degree of soil freezing and surface differences. You need to dig a pit from the lowest point. For the construction of a small house, bathhouse or gazebo, the depth of the trench is about 40 centimeters. You can dig a small pit with your own hands using a regular shovel. An excavator will save effort and time, but even in this case, you will have to use a shovel for final leveling.
Material selection and trench preparation
When arranging the foundation, you must strictly observe all stages of work and their order. First, choose the material to fill. It directly depends on the type of soil on which the house is built. When constructing a building on excessively and heavily heaving soils, only monolithic reinforced concrete is used. On medium and slightly heaving bases, monolithic concrete can be used. A strip foundation on soils with strong heaving should be a rigid frame of intersecting strips that can withstand strong soil pressure.
Foundation marking scheme using the Egyptian triangle
First, the foundation is marked in accordance with the construction plans. Professional builders use geodetic tools for marking, such as theodolite, stakes, etc. Those who build a building with their own hands can make markings using a rope right triangle.- First, using pegs and a rope stretched between them, mark the line of the central facade (from the street side).
- Using a plumb line, the points of the corners of the building are marked, from which, using a right-angled rope triangle, perpendicular lines of the side walls are established.
- The correctness of the breakdown is checked by pulling diagonal cords between opposite corners.
- Excavation work is carried out according to the prepared markings, tripling the trench for the foundation in accordance with the design parameters.
- The next steps after excavating the soil are compacting the bottom of the trench using manual or mechanical devices and installing a cushion under the foundation.
Compacting the base is especially important when building on heaving soils. It reduces soil heaving and increases the bearing capacity of the foundation. If a house is built on peat and loess soils, then to enhance the load-bearing capacity, a monolithic pad of concrete or reinforced concrete is placed at the bottom of the foundation. On strong foundations (sandy, sandy loam soils), a bed of coarse sand or fine gravel will be sufficient. It is filled in parts, the layers are leveled and compacted with a manual or mechanical tamper.
Main works.
Sand pillow.
A sand cushion with gravel in a layer about 15 centimeters high is placed in the finished pit. To increase density, a layer of sand and gravel is watered and compacted. Then a durable waterproofing film or geotextile is laid on the sand cushion.
Strip foundation step by step instructions.
For formwork of shallow foundations, available materials are used: boards, plywood, bars and slate. The frame is knocked down on the inside, and the nails are bent on the outside. Due to this, the surface will become smooth, and it will be easier to remove the formwork later. Always check the vertical position while working! To arrange a small base or basement, make a frame at least 30 centimeters high from the ground.
The formwork must not be left unfilled in winter! Therefore, it is better to carry out work in the warm season.
Strip foundation for a house step by step instructions.
Waterproofing.
To enhance waterproofing, roofing felt is placed at the bottom of the pit. More efficient modern materials can also be used. For example, penetron. This mixture is characterized by increased resistance to moisture; it will prevent the formation of mold and mildew on the concrete foundation. To make the mixture, simply add Penetron to the concrete when pouring the foundation according to the instructions.
DIY strip foundation step by step instructions.
Reinforcement.
Reinforcement of the strip foundation is carried out using bricks and reinforced mesh. Bricks are placed at the bottom of the trench, and steel reinforcement for the strip foundation is installed on top. To make a mesh, reinforcement rods are tied with special wire so that the cells are square with a side of about 40 centimeters. Reinforcement of the strip foundation is done with a distance of 50 mm from the edges of the pit.
The reinforcement bundle cannot be made with a welding machine, as corrosion will occur at the welding points!
Do-it-yourself reinforcement of a strip foundation, step-by-step instructions.
Ventilation and communications.
Then they begin to arrange communications in the wooden house. To do this, special holes are made for communication pipes that will bring the water supply and sewage system to the house. For the arrangement, plastic or asbestos-cement pipes are used, which are tied to fittings. To prevent the pipes from filling with concrete mortar during pouring, pour sand into it.
Step-by-step instructions for reinforcing a strip foundation.
Ventilation and communications
To ensure ventilation and supply of communications to the house, holes are required in the foundation. To ensure ventilation, pieces of plastic or asbestos-cement pipes cut to size above ground level are tied with wire to the installed fittings, one on each side (if the house is small). To avoid filling the pipes with solution, they are filled with sand.
Holes for the output of communications are also made using pipes, but they are located in pre-planned places below ground level, taking into account the depth of soil freezing. With shallow foundations, communications are carried out under the foundation.
Pouring concrete: how to make a concrete mixture yourself.
The concrete mixture is poured into the formwork gradually in layers 15-20 centimeters thick. The layers must be identical in composition! Then the concrete is compacted using a deep vibrator or wooden tamper. Tamping will help avoid empty spaces, which will increase the strength and reliability of the structure.
You can buy ready-mixed concrete or make the solution yourself. Mix cement, sand and crushed stone in a ratio of 1:3:5. Then the mass is diluted with water in the amount of 60% of the cement. In cold weather, warm water is poured, and in hot weather, cold water is poured. This will speed up hardening.
DIY strip foundation step by step instructions.
Also, be sure to add Penetron if you decide to use this waterproofing product. At sub-zero temperatures, frost-resistant substances are added to the mixture at the rate of 1.5% by weight of cement. At temperatures down to -10 degrees, table salt is suitable; in severe frosts, calcium chloride is used. But, as already noted, it is better to pour concrete in the warm season.
The poured concrete is covered with film. After 4-6 days, the formwork is removed, the foundation is covered with sand or clay and covered again with film. It is advisable to leave the film for 2-4 weeks, because in the first month after pouring the foundation gains 99% strength.
If you do not want to prepare the concrete mixture yourself, the solution can be purchased ready-made. It is extremely important to choose the right concrete, since the quality of the composition affects the strength, reliability and durability of the future foundation and structure.
Strip foundation step by step instructions.
How to choose the right concrete.
First of all, pay attention to the brand of the product. It shows the ability of concrete to withstand certain loads.
Construction of special facilities (bank vault, etc.)
Also, pay attention to other indicators. Marking in the form of the letter W indicates the level of water permeability of concrete. It varies between 2-12. The higher the coefficient, the more resistant the material is to moisture. This indicator is taken into account if groundwater is present on the site. The letter F characterizes resistance to cold and low temperatures. It shows how much freezing and defrosting concrete will withstand.
DIY slab foundation step by step instructions.
Is it necessary to insulate the foundation?
The step-by-step instructions for installing a strip foundation are over, but experts recommend insulating the structure after installation along the external and internal perimeter. But you can limit yourself to insulating only the external foundation. Thermal insulation protects concrete from freezing and cracking. After insulation, the foundation is less susceptible to temperature changes and the negative effects of moisture.
You can also insulate the foundation yourself. The step-by-step instructions offer three main methods:
- From the outside and inside, fill the foundation with expanded clay at least 0.5 meters thick;
- Place foamed polystyrene foam on the outside in a layer 5-10 centimeters thick. Choose medium-density polystyrene foam, fasten it with plastic dowels and a hammer;
- After hardening, the finished foundation is treated on the sides with sprayed polyurethane foam. This product evenly covers the surface and protects the structure from moisture, but it gradually dissolves under the influence of ultraviolet radiation.
Installing a foundation with your own hands is a labor-intensive process that may contain errors in calculations and installation. Violation of construction technologies will lead to serious design problems in a few years. To avoid this, contact professionals!
Strip foundation step by step instructions.
Design and types of strip foundations.
Do-it-yourself strip foundation step-by-step video instructions.
The strip base is a reinforced concrete strip of a certain thickness and height, which is installed along the perimeter of the future building, as well as under all internal walls (Fig. 1). The poured foundation is made from a concrete mixture of grade B22.5, for mixing which M200 cement, coarse sand and gravel are used in a ratio of 1: 2: 2.5, respectively. To give the structure the required strength and reliability, reinforcement is made along the entire perimeter with steel rods with a diameter of 8-12 mm (Fig. 2).
When planning to build a private house with your own hands, you need to take a responsible approach to choosing the type of strip foundation.
The following parameters are taken into account:
- expected loads on the future foundation;
- soil characteristics at the construction site;
- groundwater level;
- freezing depth.
DIY strip foundation step by step instructions.
According to the type of connection between concrete and soil, strip foundations are divided into:
The first type is used in the construction of one-story buildings on stable soils. Shallow foundations are an ideal solution in terms of price and quality when building a log house. The main feature of such foundations is that they are located much above the soil freezing level. The advantages of shallow foundations include their low cost and ease of excavation work. The disadvantage is that it cannot be used on many soils and for the construction of two-story buildings.
Deep foundations are considered stronger and more reliable, since they are not subject to seasonal swelling. However, filling them requires more time, effort and money. Such foundations are perfect for the construction of large brick houses.
When choosing the depth of the strip foundation, take into account the nature of the soil at the construction site. On heaving soil, it is recommended to use a pile-strip foundation.
Pile-strip foundations , in addition to reinforced concrete strips, are additionally equipped with screw, bored or driven piles. This design makes it possible to improve the mechanical properties of the base and increase its adhesion to the ground. This type is the optimal solution for private construction on heaving soil.
Step-by-step instructions for installing a strip foundation
To ensure the maximum service life of the structure, it is not enough to pour the strip foundation into the formwork. It is necessary to rest it on non-heaving soil, remove moisture, and compensate for the forces of frost heaving. For this purpose, a cushion, drainage, hydro and thermal insulation are made, respectively. In order to do all operations correctly, you must follow the technology below:
Preparation
Soil samples before construction
In order for the strip foundation to last for a long time, it is necessary to order surveys from a specialized company. This will reveal the possibility of strata movement, soil composition and the depth of groundwater. Only in this case can the foundation of the house be done correctly. Survey data is necessary to calculate the cross-section of the reinforcement, the number of chords and the cross-section of the tape.
Marking
At this stage, it is necessary to remove the fertile layer from the entire building area (usually 0.4 - 0.6 m), and mark:
- cords on pegs along each wall;
- scheme with lime mortar on the ground.
Marking trenches for strip foundations.
The stakes are mounted slightly further than the axes of the walls so that the cords do not sag when removing soil with a shovel. In projects of rectangular and square cottages, the diagonals must coincide, within 2 cm. If there are pilasters, porches or verandas, the geometry of each architectural element is additionally controlled.
For heavy equipment (pumps, emergency generators), heating devices (boilers, stoves weighing more than 0.4 tons), independent foundations not connected to the tape are marked. The distance between reinforced concrete structures should be more than 10 cm; after pouring concrete, it is covered with non-combustible material (crushed stone or sand).
We recommend reading: How to correctly mark a strip foundation.
Excavation
Depending on the depth of the tape, different heaving forces act on it:
- tangents - they try to move the structure sideways or push it tangentially upward;
- pushing out - only for MZLF that does not reach layers that do not swell in winter.
Therefore, in addition to the sand cushion under the sole of the tape, it is necessary to provide the side backfill of the foundation with non-metallic material (sand, crushed stone, ASG mixture).
Digging a trench for a strip foundation. In the future, the fertile soil layer inside the foundation must be removed.
To compensate for heaving forces and create normal operating conditions for the underground floor, the walls of which in 60% of cases are strip foundations, the outer surface of the concrete structure is insulated with XPS polystyrene foam sheets over a waterproofing layer. The layer of heat insulation is continued in a horizontal plane along the bottom of the trench for 0.6 - 0.8 m, spreading sheets of the same material.
To do hydro-thermal insulation correctly, builders need access to these surfaces located below ground level. This requires increasing the width of each trench around the perimeter of the house by 0.8 - 1 m. Installing a strip foundation with your own hands will take four times longer than using special equipment. For a shallow MZLF belt, work can be done manually; for depths below the freezing mark, it is better to use an excavator.
At the last stage, it is necessary to level the bottom of all trenches to the same level. However, the excavation work does not end there, since the tape must be protected from moisture in another way.
Read more: How to dig a trench under the foundation correctly.
Drainage
Most manufacturers of expanded polystyrene have technological maps for insulated MZLF and deep-lying tapes. They provide step-by-step instructions for arranging drainage:
- along the outer perimeter of the trench expanded at the previous stage, a depression is created 30 cm below the bottom of the tape;
- a general slope of the system is created in one direction (3 - 4 degrees for gravity movement of wastewater);
- at the collection site, a sealed container with a neck extending to the surface is buried in the ground;
- the bottom of the recess is filled with crushed stone; if the soil is silty, it is necessary to lay geotextiles (a margin of 30 cm on each side for subsequent wrapping of the pipe), compacting the cushion with a vibrator or tamper is necessary;
- Drainage pipes (smooth or corrugated, with slotted or round perforations) are laid on the cushion, they are run into the wells, leaving free space into which, if clogged, a hose can be lowered to purge the system with high pressure;
- inspection wells made of corrugated or smooth pipes with plugs on top are installed in the corners;
- the mini-trench is filled with crushed stone to the level of the bottom of the trench.
Foundation wall drainage diagram
To make drains correctly, all the above conditions must be met. This will allow you to keep the reinforced concrete structures of the house buried in the ground dry. The drains should be located under the planned blind area so that the runoff from it does not flow into the drainage, but into the surface storm drain, which will relieve the reservoir from overflowing.
It is worth noting that drainage is not always provided for; if you are in doubt about whether or not to do underground drainage, then only soil geology can tell for sure which is worth ordering.
We recommend reading: Installation of wall foundation drainage.
Sand substrate
To make a proper foundation pad, it is necessary to compact 15–20 cm of sand and the same amount of crushed stone in layers. Only in combination with drainage and tape insulation will the structure ensure a century-long life of the house without destruction. At the time of compaction, the non-metallic material must be wetted for better shrinkage.
Recommendations for waterproofing the sole of the tape are untenable:
- crushed stone and sand have drainage properties, that is, water can only seep through them downwards;
- There is no capillary rise from lower levels in these materials.
In the event of a sudden increase in groundwater level, roofing material will not protect concrete, since it is not associated with the lateral waterproofing of the structure. Moisture from the concrete does not go down during vibratory ramming, the cement laitance rises to the top, and large fractions go down. Therefore, it is better to make normal hydro- and thermal insulation of the base of the house after stripping the structure.
Formwork
The formwork must be securely fastened with braces and tied with wire through holes drilled in the panels.
Step-by-step instructions for installing classic removable formwork are as follows:
- manufacturing - panels are made from plywood, edged boards, chipboard or OSB (height from the bottom of the trench to the ground level + 40 - 50 cm of the base);
- installation - the boards are fastened with jumpers for a stable geometry when expanded from the inside with concrete, they are fixed from the outside with inclined bars resting on pegs;
- holes - in the basement part, pipes of a suitable diameter for ventilation ducts are passed through the shields; similar sleeves are installed underground for introducing utility systems (if floors are planned on the ground, ventilation ducts are not needed);
- processing - to facilitate stripping and improve the quality of the side surfaces of the concrete strip, the inside of the boards is sheathed with roofing felt or PVC film.
It is not recommended to pour concrete along the upper edge of the formwork; it is better that the level is 2–5 cm below it. This will prevent splashing during vibration compaction of the mixture and will allow the surface to be better leveled. Marking the horizon with a marker or cord on the inner surface of the boards will allow you to control the filling of the form with concrete.
Don’t forget to put plastic inserts into the formwork for ventilation and communications.
The technology of permanent formwork is somewhat different from the previous version:
- instead of lumber, polystyrene blocks are used (assembly is similar to the construction set);
- there are no external supports, plastic ties are mounted from the inside;
- Thanks to the corrugated surface of polystyrene and internal ties, the insulation reliably adheres to the concrete.
Fixed formwork is always narrower than classic formwork, which makes it difficult to place an in-depth vibrator. When pouring MZLF, the formwork is filled with concrete at a time. If the depth of the foundation is below the freezing mark, 40–60 cm of formwork in height is assembled, concrete is poured, and compacted. Then the formwork is increased to the same height, and the operations are repeated.
We recommend reading: Installation of formwork for strip foundations.
Reinforcement
Scheme of reinforcing the corner of a strip foundation.
To make an armored belt for the base of a house without errors, it is necessary to make a calculation (section, number of longitudinal bars, jumper spacing), and take into account the nuances:
- rods are prohibited from joining in corners, T-junctions, one rod is bent at a right angle (50 reinforcement diameters minimum), the second is attached to it on a straight section of the adjacent wall;
- It is not recommended that the diameter of longitudinal bars of periodic cross-section (corrugated) be less than 12 mm, distribution clamps or jumpers less than 6 mm (smooth reinforcement);
- 4–6 pieces of longitudinal rods are usually laid. in each frame (2-3 below, 2-3 above);
- in junctions and corners, the spacing of the jumpers is reduced threefold (20 cm instead of 60 cm);
- overlap is recommended 40 - 60 cm with double ligation with wire.
Scheme of reinforcing the corners of a strip foundation with U-shaped clamps.
Knowing the volume of formwork for ordering concrete, you can roughly estimate the consumption of reinforcement - 80 kg per cubic meter of mortar. It is prohibited to touch the armored belt to the formwork panels; there should be at least 2 cm from the metal elements to them, preferably 5 cm.
When using clamps (a closed element bent from a rod that follows the shape of the formwork), the installation productivity of the armored belt increases.
We recommend reading: How to properly reinforce a strip foundation.
Fill
The basic rules for professional pouring of a strip base are:
- filling the formwork in one day with breaks within 1 - 2 hours (the beginning of setting depending on the weather);
- moving the mixer around the perimeter, rather than dispersing liquid concrete from one place over all walls (the mixture loses its properties);
- the horizontal of the upper plane of the tape is below the sides of the formwork panels, and do not interfere with them;
- it is prohibited to throw the solution from a height (maximum 2 m from the bottom of the trench);
- It is necessary to compact the concrete mixture with a vibrator.
Pouring concrete into formwork.
To fill the formwork efficiently, it is necessary to move the mixer several times around the building spot to fill the height of 60 cm. Then go through all areas with a deep vibrator, repeat the operations until the design mark is reached. The norm for a vibrating tool is a compaction depth equal to 1.25 times the length of the tip.
We recommend reading: How to properly pour a strip foundation, in any weather.
Curing
To avoid wasting the construction budget at the foundation pit stage, the developer must know how long the concrete sits in the formwork and how to care for it. The main troubles that can happen with a reinforced concrete structure are:
- damage – chemical or mechanical;
- drying until completely hydrated - brittle structure, broken internal connections, possibly in the heat;
- cracking from temperature changes - important in late summer and autumn;
- shells on the surface - shrinkage due to the lack of plasticizers.
After pouring, the foundation is watered for a week and covered with film on top to prevent moisture evaporation.
Until the concrete has reached 2/3 of its design strength (can be recognized by its grade), it cannot be stripped and must be protected from the specified influences. To do this, the building spot or the perimeter of the base is covered with PVC film, burlap or tarpaulin, and after 8 hours watering begins. The tape covered with loose materials retains moisture longer; it is recommended to sprinkle it with sand, sawdust, cover it with burlap and moisten these materials.
Marking the site and digging a trench.
Before proceeding directly to pouring the base, it is necessary to properly prepare the work site. It is cleared of trees, roots, bushes, large stones and other obstacles. Then, according to the existing house plan, markings for the foundation are applied to the site using stakes and a cord. The marking of the work area should be done carefully, since even small deviations from the plan can lead to distortion of the future structure, additional costs and other unpleasant moments.
If the work site is level, then there should be no difficulties with marking. If you have difficult terrain, it is advisable to have a laser level on hand. Be careful when marking corners, they must be strictly straight.
Once the markings are completed, you can begin excavation work. Digging a trench is done manually or with the help of heavy equipment. It all depends on your budget.
When choosing the width of the tape, you should take into account the type of future structure and soil characteristics. Thus, for the construction of a bathhouse or utility building on solid ground, the minimum permissible foundation width is 25 cm, and for silty or sandy soil - 50 cm. For the construction of one-story houses, it is necessary to pour a strip foundation with a width of at least 40 cm for hard soil and more than 80 cm for silty soils.
If you plan to make a shallow foundation, then the depth of the trench should be about 60 cm. The depth of a deep foundation is selected 25-35 cm more for the depth of soil freezing. At the same time, it is allowed to build a foundation of less depth under internal walls and partitions.
After the trench is dug, its bottom and walls are checked for horizontal and vertical evenness using a building level. Next, a gravel or sand cushion is installed at the bottom of the pit and carefully compacted.
The recommended thickness of this ball is 15-20 cm. A ball of waterproofing material (thick polyethylene film, roofing felt, etc.) is placed on top of the pillow. This helps protect the foundation from groundwater and reduce the loss of moisture from the concrete during setting.
Formwork for strip foundations.
Strip foundation formwork step by step instructions.
The formwork for a strip foundation (photo above) can be assembled from boards more than 4 cm thick, as well as from wooden, metal panels or polystyrene foam boards. Which formwork option to choose depends only on you. To fasten the boards together, wooden beams with a cross-section of 5 cm are used. Screws or nails must be screwed in from the inside of the structure so that the heads are recessed into the wood.
To give the formwork the required rigidity, the walls from the outside are additionally fixed with supports, and between themselves - with vertical jumpers in increments of 50-100 cm (Fig. 3). To prevent concrete from penetrating through the cracks between the boards, the inside of the formwork is covered with a layer of waterproofing material. The formwork should be 0.3-0.4 m above ground level. The above-ground part will be the base of the house. When assembling the formwork, you need to immediately cut holes in the boards and lay drain pipes, since this will be difficult to do after pouring the concrete.
Installation of formwork
For formwork, you can use both edged boards and plywood sheets. If you staple a plastic film to the inside of the finished formwork with a stapler, the materials will remain clean and after removing the formwork they can be used for lathing under the roof. Therefore, there is no need to buy material specifically for formwork.
DIY formwork diagram for a strip foundation.
It is convenient to assemble the formwork with your own hands directly on the site using screws and a screwdriver (or drill). If you assemble it with nails and a hammer, then dismantling such formwork will be much more difficult. It is necessary to screw in screws or drive nails only from the inside of the formwork, so that it can be easily removed when the foundation dries.
The formwork should be made higher than the planned height, and the pouring level should be marked with a stretched cord or fishing line. When making a foundation for a house, it is worth placing spacers around the formwork along the entire perimeter, both on the outside and on the inside, in increments of at least 1 m, so that the weight of the concrete does not damage the formwork with its weight.
Reinforcement and pouring of concrete.
Installation of formwork for strip foundation step by step instructions.
Reinforcement of a strip foundation is a mandatory procedure, the correct implementation of which determines the strength characteristics of the entire structure. Metal rods 8-12 mm thick are used as reinforcement. They are cut into pieces of the required length and laid along and across the foundation. If the depth of the base is more than 40 cm, then the rods must also be mounted vertically (Fig. 4).
It is not recommended to use welding to connect reinforcement, because such connections are hotbeds of corrosion.
The rods are attached to the formwork and connected to each other with steel wire. It is not recommended to use a welded connection, as this will eventually lead to corrosion of the metal and deterioration of the mechanical properties of the base. After the reinforcement is finished, you can begin mixing and pouring the concrete solution. To remove bubbles from it, use a vibrating machine or compact the poured mixture with a wooden block. The top layer of the mixture is leveled with a rule or trowel.
10-15 days after completion of the work, the wooden formwork is dismantled, after which the outer walls of the foundation are treated with liquid or film waterproofing. This will protect the foundation from the destructive effects of groundwater. At the last stage of the work, backfilling is carried out using sand.
Features of a do-it-yourself pile-strip foundation.
Do-it-yourself pile strip foundation step-by-step instructions.
Pile-strip foundation is one of the types of strip foundation. It consists of a continuous shallow grillage. on which the walls of the building rest during operation, and piles installed in the ground below the freezing depth (Fig. 5). This design allows not only to reduce the cost of building a foundation, but also to increase its adhesion to the ground.
Below is a step-by-step instruction for a do-it-yourself pile-strip foundation:
- Site preparation. As in the case of a strip-type reinforced concrete foundation, the construction site is cleared of debris, leveled and marked.
- Land works. A trench is dug under the tape up to 50 cm deep. The bottom of the trench is filled with gravel or sand and compacted. Then, holes for piles are drilled in the corners of the future structure, at the junctions of the walls and every 200 cm. The depth of the wells should be 30-40 cm greater than the freezing depth. The cross-section of the holes is chosen so that the piles fit into them without much effort.
- Installation of piles. Metal or asbestos-cement pipes are installed in the prepared wells, after which they are reinforced and concrete mixture is poured into them.
- Formwork design, reinforcement and concrete pouring . This stage is performed in almost the same way as for the strip base. The only difference is that the reinforcement of the piles is necessarily connected to the reinforcement of the grillage.
The operational characteristics of the entire building depend on how correctly the strip or pile-strip foundation is erected. Therefore, it is necessary to carefully prepare for the upcoming work by studying the installation technology and understanding all the nuances that you may encounter when performing the task.
Recommendation: A good large review article, from it you will learn about step-by-step instructions for a strip foundation. In reality, many moments will arise that cannot be foreseen in advance; as a result, you will make many mistakes and lose your money. To avoid making mistakes and losing money, you need to study all the technology very carefully and be sure to talk to professionals. Only after this can you think whether you can build a strip foundation with your own hands or not?
DIY strip foundation: stages of work and step-by-step instructions
The strip foundation can be called the most popular in the construction of private houses, as it has fully justified itself over many decades of operation. It is quite simple to set up and does not require particularly complex devices or special equipment.
DIY strip foundation
Of course, in order for the structure to be reliable and durable, you can only partially make a strip foundation with your own hands, that is, carry out the basic work of digging a trench, installing formwork, installing and tying reinforcement bars, waterproofing and insulation. But it can be easier and more reliable to order the production and pouring of concrete from companies that specialize in this work.
To find out why strip foundations are so popular in construction, you need to consider all of its positive and, of course, existing negative qualities.
Advantages and disadvantages of strip foundations
A strip foundation is a monolithic strip of concrete mortar on which all the load-bearing walls of the building are erected.
Strip foundation - a reliable basis for the construction of building walls
This type of base is used in the following cases:
- For the construction of private houses and outbuildings from materials with significant mass, such as stone, concrete, brick, cinder blocks and other materials.
- In cases where the general construction plan assumes an underground garage, ground floor or basement.
- For the construction of houses with heavy floors or attics.
- In regions where predominantly heterogeneous soil prevails.
It should be noted that installing a strip foundation is suitable for almost all types of soil, with the possible exception of subsidence and peat bogs - this must be taken into account when choosing the type of foundation for building your own house.
To know what can be expected from a strip foundation during operation, you need to have information about the advantages and disadvantages of this design.
Advantages:
- A strip foundation can withstand heavy loads, no less than a monolithic foundation.
- It is distinguished by the comparative simplicity of preparatory measures, which can be completely carried out independently.
- A strip foundation always has a long service life, of course, if it is constructed correctly and the required degrees of structural protection are provided (waterproofing and insulation).
- An advantage can be considered the variety of specific types of strip foundations, from which you can choose the one that is most suitable in terms of technological and financial capabilities.
- A tape base will cost much less than a monolithic one, although it is practically not inferior to it in strength.
- This design allows for better thermal insulation of floors in the house, creating a multi-layer insulating “cushion”.
Flaws:
- Strip foundations are not suitable for installation in some soils.
- According to construction technology, the entire thickness of the foundation must be poured in one go, and it is very difficult to prepare such an amount of concrete yourself. In this regard, there is a need to turn to construction manufacturing companies that have special equipment and machinery.
- The work, even in preparation for pouring concrete, is quite labor-intensive and will take a lot of time. It will be difficult to do without helpers.
As can be seen from the presented qualities of the strip foundation, the positive ones have a significant advantage over the negative ones.
Types of strip foundations
There are several types of strip foundations, which differ according to some criteria, and the first of them is the depth of its occurrence.
There are several types of strip foundations
- For example, for massive houses built from heavy building materials, a buried foundation is required, which must be built to a depth of 250 ÷ 300 mm below the freezing level of the soil in the region where the building is constructed.
- Another type of strip foundation is a shallow foundation. It is used for light frame buildings, and its total depth does not exceed 550 ÷ 600 mm.
The diagram shows several main types of strip foundations.
Strip foundations are divided not only into two types, but also into several types:
- The monolithic type of foundation is the most used for various buildings. It is erected from concrete mortar and with mandatory reinforcement. This foundation attracts with its simplicity of design and ease of construction, along with its inherent durability and strength.
- Prefabricated foundations are used less frequently for the construction of private houses. This type of base is assembled from ready-made concrete blocks, which are manufactured in factories. They are delivered to the construction site and installed in a prepared trench using heavy equipment.
The blocks are installed back to back, and the gaps between them are filled with concrete mortar and completely sealed on the outside with waterproofing material.
This type of foundation is not suitable for unstable soils, since rupture and deformation of the entire foundation, and therefore the building standing on it, can occur at the joints.
In addition, you will have to pay a fairly large sum for the delivery and installation of blocks to their permanent location (using loading and unloading and lifting equipment). However, in fairness it must be said that the blocks themselves will cost less than the entire complex of necessary materials for pouring a monolithic foundation belt, and will also save builders from many difficult construction works. For example, you won’t have to knock down and install formwork, or lay and tie reinforcement mesh.
A prefabricated or block foundation is well suited for two- or three-story houses built from concrete slabs or bricks. If you have the financial opportunity and the type of soil is suitable for installing blocks, then this type of foundation will be a good choice for building a large cottage.
Materials for arranging a strip foundation
If you still decide to build a building on a strip monolithic foundation, you need to purchase all the necessary materials for its construction.
For this you will need:
- Ruberoid or dense polyethylene film - for waterproofing the formwork.
- A board 15 ÷ 20 mm thick and a block 20 × 30 mm - for installing formwork.
- Steel wire - for tying reinforcement and tightening, if necessary, formwork boards.
- Reinforcement with a diameter of 10 ÷ 15 mm - for installing a reinforcing belt.
- Nails or self-tapping screws - for installing formwork.
- Sand and crushed stone - for preliminary filling of “pillows”.
- If the concrete is still mixed independently, then it will need cement of at least M400, sand and medium-fraction crushed stone or gravel. The solution is made from these materials, taken in proportions 1: 2: 4.
Sequence of work to create a strip foundation
To be confident in choosing a foundation, it is necessary to carry out some preparatory activities.
Any pouring work is preceded by large-scale preparatory measures
Foundation calculation
It is imperative to find out the type of soil on the site for building a house and the depth of its freezing in a particular region, as well as the depth of groundwater passage. To clarify all these features, you need to contact a design and construction organization that will conduct a geodetic study, make the necessary calculations and create an accurate foundation design, based on the analysis obtained as a result of research.
If you start drawing up a project yourself, you may not take into account some nuances that will subsequently lead to the destruction of the walls of the house. This is especially true for buildings with several floors.
If you plan to build a small building, such as, for example, a country house, garage, barn, chicken coop or bathhouse, then you can try to calculate the foundation yourself, taking into account the recommendations of SNiP II-B.1-62. And it’s even easier to use a special table that allows you to accurately determine the required depth of the strip foundation without making special calculations, depending on the type of house and soil characteristics:
| Type of building | Ground load in kN/sq.m | Depth of strip foundation (mm) depending on the type of soil | |||||
| Rocky soil, opoka | Dense clay, loam that molds in the hand | Packed dry sand, sandy loam | Soft sand, sandy loam, silt soil | Very soft sand, sandy loam, silty soil | peat bog | ||
| Barn, bathhouse, outbuildings. the buildings | 20 | 200 | 300 | 400 | 450 | 650 | A different type of foundation is needed |
| One-story country house with attic | 30 | 300 | 350 | 600 | 650 | 850 | A different type of foundation is needed |
| Two-story cottage | 50 | 500 | 600 | Requires specialist calculations | Requires specialist calculations | Requires specialist calculations | A different type of foundation is needed |
| Two or three story mansion | 70 | 650 | 850 | Requires specialist calculations | Requires specialist calculations | Requires specialist calculations | A different type of foundation is needed |
| The table shows the average load force on the ground of buildings of various types | |||||||
| In each specific case, an individual calculation is definitely welcome | |||||||
| For reference: 1 kg = 9.81 N; 1 kN = 101.9 kg; 10 kN = 1019 kg | |||||||
| The table is based on data from the British National Building Regulations 2010. | |||||||
Site marking
When the necessary calculations of the foundation have been made, the architectural plan of the building has been drawn up and, accordingly, the location of the load-bearing walls has been determined, markings are made on the site chosen for construction.
The most important issue is the correct marking of the foundation on the ground
- Before marking, the future site must be cleared of foreign objects and debris, and the top fertile layer of soil approximately 120 ÷ 150 mm thick must be removed. Organic residues can lead to biological decomposition processes, which is undesirable for basements.
- On the prepared site, preliminary marking of the corners of the future structure is carried out by driving in pegs.
Next, the evenness of the arrangement is carefully checked and the distance between them is specified. The pegs are rearranged as needed. A strong cord is pulled over them, with the help of which it will be easier to control the straightness of the corners and determine the correct direction of the foundation strip.
- Sometimes pre-made wooden parts - rectangles - are used to mark the corners. First, place one rectangle at the desired point and secure it.
One of the methods for marking
Next, two cords are tied to it at a distance of the width of the trench under the foundation, they are stretched to the next place where the second corner is installed, and then the stretched cords are tied to it.
In this way, all four corners of the house are marked, and if load-bearing walls are also provided inside the building, then they are marked.
Be sure to achieve straightness of all angles, parallelism and perpendicularity of the main lines
- After all the angles have been set, it is necessary to check the length of the diagonals of the designated rectangle or square. If they are equal, then all angles are set correctly.
- Next, along the cord, you can sprinkle dry lime powder - it will visually show the direction, and perhaps reveal some errors.
- When marking the outline of the foundation and the internal walls of the house is completed, you need to mark the foundation for the porch, veranda or terrace in the same way.
If you plan to install a brick stove or fireplace in your house, then it makes sense to immediately take care of the foundation for this structure. However, the tape for the house and the stove under the stove should not be rigidly connected to each other.
After the marking has been carried out, you can begin fairly large-scale excavation work.
Digging a trench
The trench must correspond exactly to the markings
- Along the marked lines, trenches are dug to a depth specified in the calculations of specialists, and which will depend on the type of building being erected on the foundation.
The calculated depth of the foundation strip is also strictly maintained.
- Digging a pit should begin from the bottom corner of the foundation - this will help maintain the same depth of the trench throughout its entire length.
- When digging soil, you should try to keep the walls of the trench level and vertical. If the soil suddenly begins to crumble, then temporary supports are installed in weak spots.
- During the work process, measurements are periodically taken of the depth and slope of the bottom of the trench being dug. If the foundation is installed on a slope, then it is important that the trench has the same depth along the entire perimeter of its structure.
Preparing the pit bottom
- At the bottom of the finished trench, it is necessary to arrange a sand cushion, which should have a thickness of at least 150 ÷ 200 mm in a well-compacted form. It will help to properly redistribute the loads created by the mass of the structure onto the finished foundation. This technique is especially important if construction is taking place on unstable, heaving soils.
Sand cushion under the foundation strip
It is recommended to backfill in three 50 mm increments, and each layer should be compacted well, wetting the sand with water.
- Next, it is recommended to make a roofing felt flooring over the sand cushion, which will protect the sand cushion from erosion and will not allow cement laitance from the concrete to be absorbed when pouring the solution into the pit.
A layer of roofing felt at the bottom of the trench
In addition, roofing felt will become a waterproofing of the underground part of the foundation. The material is not only covered at the bottom, but also rolled onto the walls of the trench by 150 ÷ 200 mm.
Installation of formwork
Formwork is installed in the prepared trench. It can be knocked down from boards, which will be dismantled after the solution hardens, or it can be made permanent, thereby insulating the foundation at the same time.
Board formwork for strip foundations
- If it is decided to install the formwork from boards, then panels are knocked down from them and installed vertically at the bottom of the trench. The formwork should rise above the ground to the height to which it is planned to raise the basement of the house, but usually no less than 350 ÷ 400 mm.
Fastening the shields together.
— The shields are fastened together by crossbars, and on the outer sides they are supported by scraps of timber. Sometimes, in order for the plank walls not to diverge when pouring concrete under pressure, it is necessary to additionally twist them with steel wire.
— If it is planned to make holes in the foundation for communications, then a piece of pipe is installed as a spacer between the panels, inside the formwork.
— When installing a wooden structure, you need to periodically check its levelness - this is done using a building level, otherwise the foundation may turn out crooked and will have to be leveled after it is ready.
Polyethylene film on the inner walls of the formwork
— It is recommended to lay, in addition to roofing felt, dense polyethylene in the finished formwork, which will cover the surface of the boards from the inside of the structure. The film is fixed on the end sides of wooden panels.
- The permanent foundation consists of blocks of polystyrene foam, which are installed on top of each other and are held in place by the jagged cutouts present on the edges of the blocks and their corresponding grooves. Expanded polystyrene in such formwork can have different thicknesses and serves as a good insulation material for the structure. Such blocks are produced in different widths, so they can be selected for any foundation.
Permanent formwork made from polystyrene foam blocks
The blocks do not require spacers or additional fastenings - they themselves are fully designed to reliably hold the concrete poured into them.
- Another formwork option that can be called combined. It consists of installed board panels, and inside the formwork, insulation, approximately 30 mm thick, is pressed against them - this can be expanded polystyrene or penoizol.
Sometimes there is a need to immediately install a layer of insulation
. The material will not only insulate the foundation, but will also not allow cement laitance to leak out through the gaps between the boards or moisture from the poured concrete to evaporate prematurely, which means that the process of maturation and strength gain will take place optimally.
Installation of reinforcement grid
The next step is to install a reinforcement grid into the formwork. It is made from a metal rod having a diameter of 8 ÷ 15 mm. The rods are cut into sections equal to the length of the walls, and they intersect at their corners. It is not recommended to fasten the rods by welding, since this will cause them to lose their mutual mobility and, when the structure shrinks, this can destroy the foundation. Therefore, they are twisted with steel wire.
The reinforcement bars are not welded, but tied with wire
If insulation material is installed inside the formwork, then it is desirable that the perpendicular sections of the reinforcement fit into the insulation - this way it will be securely fastened to the edges of the formwork.
An example of linking perpendicular reinforcement bars
An accurate calculation of the reinforcing belt is carried out by foundation designers taking into account numerous criteria - the type and total mass of the building, soil stability, seismic characteristics of the region, and other quantities.
Pouring the foundation
It is recommended to fill the foundation with concrete in one step, but this can only be done if the required amount of mortar is ordered ready-made.
Ideally, the entire foundation strip should be poured in one go.
If this option is not possible for one reason or another (for example, the absence of a corresponding company or completely unacceptable prices), then the concrete is poured in layers. But even in this case, you cannot do without mechanizing the process, which means you will definitely need a concrete mixer.
- When ordering the finished material, the concrete solution is mixed at stationary production units in the required proportion, and delivered in special vehicles equipped with a concrete mixer and feed mechanisms.
Pouring the foundation with the supply of ready-made mortar from a cement truck
- Next, a special chute is installed through which the mortar flows into the prepared formwork. It must be distributed using a shovel along the entire length of the structure until it is filled to the intended top.
— The surface of the concrete is leveled and left to set, mature and gain strength.
— The hardening time for such a structure is about four weeks in the warm season. Some work, for example, stripping and preparing for further operations, but without a significant load on the tape, can begin after 16 ÷ 20 days.
It is not recommended to pour a foundation in winter, but if this is a necessary measure, then both the composition of the concrete solution and the completion time of the poured structure will be completely different. This is described in more detail in the corresponding article on our portal - “at what temperature can a foundation be poured? ”
- In this case, the work will be carried out independently, they are carried out in the following sequence:
— First of all, the solution for pouring is prepared. As mentioned above, it will require cement and sand in proportions of 1: 2 or 1: 2.5, as well as 4 parts of crushed stone. The mixture is poured with water and kneaded.
When preparing the solution yourself, sometimes you have to resort to layer-by-layer pouring of the foundation tape
— If all the materials are mixed in a concrete mixer, then they are placed in the same proportions and a solution is prepared, which is then immediately poured into the formwork. Using such an installation, the work will certainly go much faster, and with the support of good assistants, the work can often be completed in one day.
- If the solution is mixed manually, then you will have to act in stages. So, the first layer of concrete solution is poured into formwork 150 ÷ 200 mm thick and compacted well with a wooden block. The entire formwork along the entire length along the perimeter must be filled with a completely uniform layer of equal thickness.
The next day, the same procedure is carried out, and so on until the formwork is filled to the top.
— It is recommended to cover the poured foundation with burlap, and if concrete work is carried out in the summer heat, then it is covered with plastic film so that rapid evaporation of moisture does not occur and the concrete hardens evenly.
A foundation made in layers matures faster than one poured at once. However, its strength is significantly lower, and there is a possibility of damage to the structure in winter during severe frosts if moisture suddenly appears between the layers. Therefore, it is necessary to apply a waterproofing coating to the foundation poured in this way, and it is also advisable to insulate it.
Prices for popular models of concrete mixers
Concrete mixers
Useful tips for pouring strip foundations
In order for the work to be of high quality, you need to listen to the recommendations of experienced builders.
- To mix the solution, you need to use materials that are free of soil and clay - gravel, sand and water.
- The proportions of the solution may vary, but crushed stones or gravel should always be taken 1.5 ÷ 2 times more than sand.
- Water in the solution should be approximately 50% of the mass of cement (not to be confused with volume!)
- If you have to use wet sand to prepare concrete, this must be taken into account when adding water to the concrete mixer so as not to make the solution too liquid.
- When mixing and pouring the foundation in cold weather, it is recommended to mix the solution with heated water - this will speed up the setting and hardening of the concrete.
- If the solution is too thick, then after pouring the solution into the foundation, tamping or frequent piercing with a metal rod is necessary. This process is carried out to remove the air remaining in the solution, otherwise so-called sinks may form inside the foundation.
- In addition, the formwork with the newly poured mortar is tapped with a wooden hammer - this process also helps the air to escape to the surface of the mortar.
- Removal of formwork is carried out no earlier than 5 ÷ 7 days after pouring the solution, and further large-scale actions can be carried out only after a month.
- Insulation and waterproofing of the foundation will be mandatory, as already mentioned, when pouring it layer by layer. However, it is better to make it a rule that these technological operations should be carried out in any case. This will dramatically increase the strength and durability of the foundation and, naturally, the entire structure. How to carry out waterproofing and insulation of the foundation - read in the publications of our portal.
It should be noted that a strip foundation is the optimal basis for many buildings, and its implementation is much easier than a monolithic slab. And at the end of the article - a video example of the correct arrangement of a strip foundation: