In this article we will look at the basic methods of creating a perfectly flat floor in an apartment. Preparatory and key stages are presented. I will explain which materials are most effective.
If you need to renovate your apartment with high quality and in a modern way, then you cannot do without replacing the flooring. In terms of price it is more profitable. And the appearance of the new coating is quite attractive.
Have questions ? Call!
Don't start renovating until you read this.
What floor to install in an apartment Warm floor in an apartment: a modern choice How to change floors in Khrushchev, Stalin, Brezhnevka
A perfectly flat floor - why is it needed?
Even in a new building, there are differences in the floors. They can reach 10 cm. Today, panel slabs are laid so that the ceiling between floors with its smooth surface is directed towards the ceiling, and its lumpy surface towards the floor. And on this side, without screeds, you can only lay linoleum. The parquet will be constantly deformed.
Thus, we fill the floor according to two main reasons:
- Laying flooring.
- Construction of a floor with water or electric heating.
- Other floor insulation.
For your information
To get a perfectly even coating, we use cement filling. This operation is also called screeding. It is necessary before laying the topcoat. In this regard, many owners have a question about how to properly fill the floors in the apartment. This technology is not anything overly complicated. The main thing is to perform all operations correctly and step by step.
Rating of the best building mixtures for floor screed
| Photo | Name | Rating | Price | |
| #1 | Holcim M300 | ⭐ 100 / 10027 — votes | Find out the price | |
| #2 | Weber Vetonit 6000 | ⭐ 99 / 1009 — votes | Find out the price | |
| #3 | Bolars | ⭐ 98 / 100 | Find out the price | |
| #4 | Paladium Palafloor-307 | ⭐ 96 / 1003 — votes | Find out the price | |
| #5 | Vilis M-300 | ⭐ 96 / 100 | Find out the price | |
| #6 | Rusean M-300 | ⭐ 95 / 1001 - voice | Find out the price | |
| #7 | NOVAMIX M-300 | ⭐ 95 / 1002 — votes | Find out the price | |
| #8 | Stone Flower M-300 | ⭐ 95 / 100 | Find out the price | |
| #9 | Titan M300 | ⭐ 93 / 1002 — votes | Find out the price | |
| #10 | Axton | ⭐ 93 / 1003 — votes | Find out the price | |
| #11 | KNAUF Tribon | ⭐ 92 / 1003 — votes | Find out the price | |
| #12 | Ceresit CN 173 | ⭐ 92 / 1008 — votes | Find out the price | |
| #13 | Eunice Horizon | ⭐ 91 / 1007 — votes | Find out the price | |
| #14 | Perfecta (fibre layer) | ⭐ 90 / 1004 — votes | Find out the price |
Which floor screeds would you choose and which ones would you recommend?
Take the survey
Mortars for perfect pouring - building mixtures or concrete? Choice
In modern conditions, pouring a floor screed with your own hands is quite feasible. And there is a large assortment of various Russian and foreign levelers on sale. These are innovative tools.
Their main specificity is that they are poured without much work with beacons and guides.
We breed them competently, using strict technology. They are affected by gravity and tension. And they are evenly distributed over the entire working surface. Cover all uneven areas and bumps. This is the easiest way to fill the floors to obtain an even, seamless and shiny finish.
There is also a classic - the use of cement compositions. They cost less. But the filling technology is more complicated. What to choose and how to fill the floors in the premises, each owner decides for himself, based on his budget, goals and scope of work.
Step by step guide to pouring a floor
To improve the thermal insulation properties of the floor, it is recommended to add perlite or expanded clay to the concrete solution. If possible, buy, rent, or otherwise obtain a concrete mixer. Without it, it will take much longer to prepare the required amount of solution.
concrete mixer
The weight and volume of the ingredients used will be given below. They are given as an example to make the proportions clear. Focus on the specifics of your particular case and select the required number of components taking into account the floor area and the required thickness of the concrete layer, which will vary for different climatic zones.
To begin, pour a couple of buckets of perlite into a concrete mixer and add about 10 liters of water. Mix the resulting mass thoroughly. After adding water, there will be a significant decrease in the volume of perlite. Add about half a bucket of cement and continue mixing. Next you need to add half a bucket of water and mix everything thoroughly again.
After obtaining a homogeneous mixture, add a bucket of sand and about 2 liters of water to the concrete mixer container. Continue kneading until you obtain a loose mass. Take a 10-minute break and then continue kneading until you get a plastic solution.
As for cement, in the case of pouring the floor, it is best to use material of the M500 grade, or M400.
Filling should begin from the corner opposite to the doorway. Try to work so that several marked areas are filled in 1-2 steps.
In accordance with technology requirements, the concrete solution should not be in close contact with the surface of walls and various protruding structures. To insulate them, use damper tape.
Use damper tape to insulate them.
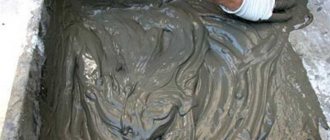
Fill the marked areas with the solution. As a rule, a 10-centimeter layer thickness is maintained. The solution must be leveled with a shovel. To remove excess air and provide additional compaction, the mortar should be treated in a special way. It is best to do this with a deep vibrator designed for such an operation.
deep vibrator
The tool is immersed in the layer of solution and kept there until the so-called surface appears. "milk". Its appearance indicates that the solution is already sufficiently compacted and the vibrator can be moved to another place.
Next, the solution must be leveled using the rule. Place the tool on the guides and pull it with light movements in your direction, alternating movements to the left and right. This way you will get rid of excess concrete.
Next, the solution must be leveled using the rule
After you are finished leveling the mortar, remove the guides and completely fill the voids that appear with fresh mortar.
The concrete needs to be regularly moistened with clean water for several days. It should also be covered with plastic wrap. This material gains the required strength in 1-1.5 months.
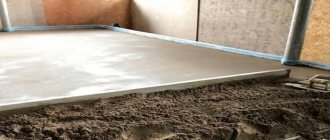
Quite rarely, when pouring a floor yourself, you can immediately obtain a completely flat base, without sagging or other defects. If you are laying tiles, then there is no need to achieve perfect evenness. But if you plan to use linoleum, parquet and other similar materials for finishing, the evenness of the base will be of paramount importance.
The easiest way to eliminate defects is to use self-leveling mixtures. They are easy to use and allow you to obtain mirror-smooth surfaces.
The easiest way to eliminate defects is to use self-leveling mixtures
The solution is prepared in accordance with the instructions on the package, poured onto the floor and evenly distributed over its surface using a special brush. To remove excess air, the fill is rolled with a needle roller. On average, such mixtures dry for 1 week; see the packaging for the specific time. Wait until it dries completely and you can use the floor for its intended purpose.
Good luck!
Preparation steps before making a poured floor
For preparatory and main work we use the following arsenal:
- Reiki. They are necessary for beacons.
- Metal brush.
- Container for working personnel.
- Roller for priming.
- Sidewalk scraper.
- A small brush for applying primer to hard-to-reach or small areas.
- Putty knife.
- Needle type roller.
- Drill with a nozzle for mixing the solution.
- Primer.
You can fill the floors in your apartment correctly if you act strictly step by step. And the stages of work are as follows:
- Surface preparation. Removing old coating, cleaning from dust and dirt.
- Padding.
- Waterproofing.
- Thermal insulation.
- Checking horizontality.
Next comes the screed itself. Then we wait for the surface to dry and lay the base coating.
Have questions ? Call!
Preparing the base - leveling and waterproofing
It is necessary to fill the floors in the apartment step by step. This is the most important condition for obtaining the proper result.
The first step is preparing the base. We remove the old coating. We carry out a thorough cleaning. We eliminate dust and dirt. We use a vacuum cleaner. Degrease the surface with a simple soap mixture.
If you need to fill the floor in a room that does not have a threshold, we create one. For this we use slats. This prevents the leveling agent from leaking into adjacent rooms.
Important
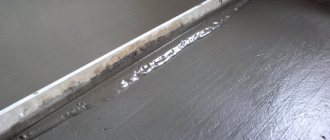
Before the pouring process, it is important to remove outdated baseboards. And we must glue the wall-floor joints. There is a good tool for this - damper tape.
Next, the floor in the room is covered with a primer. Thanks to it, the floor adheres better to the base. Apply at least two layers of primer. Apply the second layer only after the first layer has completely dried. Priming continues while it is still absorbed by the base.
.
The primer enhances the strength of the surface and its adhesion to future materials.
When we work with classics (concrete-sand composition), we use a universal primer. In rooms of modest size, we apply it with a brush. In large rooms - a roller.
Before starting other work, the primer dries for about two hours.
The main work starts one day after this operation.
At this stage the level. We walk around the room with him. And we make horizontal marks on the walls. We will rely on them during the pouring process.
Concrete floor reinforcement
How to fill the floor in an apartment with a reinforced screed? This issue is especially relevant when working on the ground. His solution is the use of reinforcement. We use one of these options:
- Special steel mesh.
- Fibrin. It is fibrous plastic or metal. We add it to the working solution.
At the reinforcement stage, we install wiring and install heating technologies.
Nuances of floor structure reinforcement
We reinforce the concrete floor in the house so that the structure receives powerful protection from mechanical stress and strong vibrations. This also significantly increases the service life of the floor.
Motives for floor reinforcement:
- Laying a floating screed according to the project.
- Construction of a floor on the ground.
- Compliance with certain building regulations in underfloor heating technologies.
- The floor is used for industrial purposes and is subject to enormous loads.
- The height of the concrete layer exceeds 5 cm.
If the floor structures are subject to serious loads, we give preference to metal reinforcement.
The rod diameter is affected by operating conditions and loads. Usually it is 0.6 - 1.2 cm. Cell parameters: 1 x 1 x 2 x 2 cm.
To fasten the mesh we use welding or binding wire. We often use ready-made meshes in our work. They are based on VR-1 wire and d 2-6 mm. The cell parameters are in the range 5 x 5 - 2 x 2 cm.
When reinforcing using this method, we fill the floor in the apartment in stages and follow the following order:
- The position of the mesh is in the very thickness of the concrete. This way the steel is protected from corrosion.
- Thoroughly clean the base from debris and dirt.
- Repairing cracks (if any). Their dust removal. Padding.
- Priming the base in 2-3 cycles.
- Waterproofing and sound insulation are installed.
- Marking is made and a level is applied.
- The mesh is placed on stands. This is how the material ends up in the thick of the concrete. We keep the overlap in one cell.
- Connecting butt sections using tying wire.
- Beacons are attached to the reinforcing layer. This cannot be done without metal U-like profiles.
- The train is placed between the lighthouses. It is leveled by the rule.
- After the concrete has cured, the guides are removed. The existing voids are filled with the mixture.
- A protective film is spread over the screed. Lasts 5-7 days.
For your information
We use fiber material for surfaces located in alkaline environments, where temperature parameters do not exceed 200 degrees.
You might be interested
What floor to install in an apartment Warm floor in an apartment: a modern choice How to change floors in Khrushchev, Stalin, Brezhnevka
Mixtures for floor screed: composition
All screed mixtures can be divided into three groups according to their composition:
- Cement. Solutions of this group are ideal for any work. In this group the filler is sand. For quick drying and greater strength, plasticizers are added to the solution, which determine which screed to take: if they are large (>0.6 mm) then for rough leveling, if medium-sized (~ 0.6 mm) then for finishing, and if the smallest ones - then you need to take self-leveling compounds.
Example of cement-based mixtures - Plaster. Gypsum-based solutions are great in cases where you need to slightly level the wall. Such solutions are distinguished by their plasticity, lack of shrinkage, and quick drying. Well suited due to its hypoallergenic properties. Gypsum offers good heat-storing properties. True, there is one “but” - such material does not withstand moisture and quickly deteriorates from it.
Example of gypsum mixtures - Dry screeds. They are made on the basis of expanded clay or polystyrene. They combine well with any base, do not cause subsidence, and most importantly, you can work with such screeds immediately after applying them, which is why they are used for rough leveling.
Example of dry mixtures
Expert opinion: Afanasyev E.V.
Chief editor of the Stroyday.ru project. Engineer.
Already know how to properly make a floor screed? I have already prepared detailed instructions for screeding the floor, I advise you to read it!
Creation of formwork. Working with Guides
We lay the concrete floor in parts - cards. These are rectangular areas. Their parameters are determined by two factors:
- Total surface area.
- Possibility of filling the composition in one working cycle.
We place formwork along the perimeter of these areas to mark the finished floor. It is created from a 5 x 10 cm board. We pre-drill holes in the boards for reinforcing pins with a distance of 50 cm. We apply the formwork lines to the seam pattern.
We fill the floor in a new house along the guides. We can use them as:
- metal profiles,
- steel corners 5 x 5 x 0.3 cm,
- profile pipe 4 x 2 x 0.2 cm.
We mount the guides by welding to reinforcement posts with a diameter of 1.2 cm. To control the evenness, we use an optical level.
All areas where the surface is adjacent to the load-bearing components are covered with Izolon with a density of 4 mm. This is a damper tape based on polyethylene foam.
So we fill the floor in parts. Just before filling, we treat all profiles with engine oil. And we moisten the rough base with water.
Have questions ? Call!
Laying waterproofing
How to fill the floor in an apartment yourself if there are significant gaps in the base? The areas where walls meet floors are considered particularly vulnerable. Areas near communications are also considered weak. Here we lay waterproofing.
To do this, we use the following types of water protection:
- Films and rolls. These are the most common types. These are polymer membranes consisting of many layers. They also have thermal insulating properties.
- Liquid. These are great pore filling products. It turns out a thin water-repellent film
- Mastics. These are adhesive plaster mixtures. Their bases are polymers, resins, liquid rubber. The mastic forms a powerful waterproof layer.
- Powders. They use plasticizers and binders. They need to be diluted with water according to the instructions.
Surface level and placement of beacons
Many owners are interested in how to fill the floor in an apartment efficiently and evenly? To do this, be sure to determine the level of the screed and install beacons (special slats).
Using a level, check the evenness of the base. We indicate the level of the intended coverage on the walls.
From plastered areas, remove the plaster 0.25 cm above this line. Using these notations we identify the highest point of the surface. This is a guarantee of proper filling.
Here the working algorithm is:
- We measure 1 m up the wall, counting from the door threshold. We draw a line.
- We draw a line around the perimeter of the room. We maintain its parallelism using a level.
- The second parallel is drawn at a distance of 1 m under the control symbol.
- We drive nails into the corners of the room on the bottom line and stretch the wire.
Thanks to the marks on the load-bearing components, it is easier to place beacons in a new apartment. The distances between beacons correspond to the length of the rule. We apply the rule to level the mixture.
The final result depends on the placement of the slats. After all the work, the slats are removed. They leave recesses that can easily be filled with the same solution that was used for the screed.
With guidelines it is much easier to fill the screed. And so we get the necessary flat surface. We install beacons even for work on a small area.
Bedding question
Before you make the working composition and pour it onto the required area, you need to make a bedding. This is the so-called pillow. It consists of three layers.
- The initial one is gravel. Density: 5 -10 cm. Water it with water and tamp it down. To control the thickness of the layer, be sure to drive pegs directly into the soil. We put them by level. Having slept and compacted this layer, we take them out.
- The second one is sandy. Density -10 cm. We also adjust the thickness with pegs. We water the sand and compact it using a vibrating plate.
- Shchebnevy. Thickness – 10 cm. We carefully level it and make it denser. There should be no sharp edges on the surface. Suitable crushed stone has a fraction of 4-5 cm. After compaction, sprinkle it a little with sand and tamp it again.
Horizontal level adjustable
Video guide for installing beacons
Bulk materials
Gravel is poured onto the supporting base first. Since each layer must have its own thickness, it is recommended to drive several stakes with numerical marks into the soil. Water can be used to compact the material. The thickness of the gravel layer should not exceed 5-10 cm. It is also important to evenly level the material.
Pouring the floor in a private house
Sand is poured in next. The thickness of this layer is also about 10 cm. Again, everything is watered generously for better compaction. If the level pegs were not long enough, you can hammer in new ones.
The last thing to fill is crushed stone. The particle size should be no more than 40 by 50 mm. The rules for compacting the material are the same as for sand and gravel. Ideally, the surface should be smooth and perfectly level. It is necessary to monitor the horizontal level at this stage using a regular or laser level.
Crushed stone is poured last
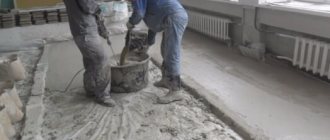
Creation of the working staff
This composition is not difficult to create. We dilute it in water strictly according to the instructions. Mix using a drill with a special attachment. This way we get a homogeneous composition.
A simple recipe for preparing a sand-cement mixture is as follows:
- 4 shares of perlite are used. Pour 2 parts of water on them.
- Add water and cement one part at a time to the solution. Mix.
- Add two parts of sand and 10 parts of water.
- Mix the mixture until it reaches a plastic consistency.
This option is good for use in a new private home. It is also often used on the lower floors of buildings with many floors. In an apartment it is also justified if a small layer of fill is created.
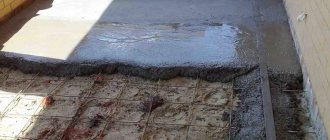
Pouring process
How to fill the surface of an existing base more efficiently? If all measures for leveling have already been provided, then the process should be completed in one day. This is the key to uniform composition.
Filling begins from the far corner of the room. To level the layer, apply the rule. We evenly distribute the material within the boundaries of the fixed beacons.
Using a needle roller, remove air from the mixture. This way we exclude the occurrence of internal voids in it. Then we level the screed completely. We repeat the operations until the base is completely filled.
If you have some misunderstandings, you can watch a video of how to pour a floor screed with your own hands.
Voting: the best floor screeds
Which floor screeds would you choose and which ones would you recommend?
Holcim M300
39.13% ( 27 )
Weber Vetonit 6000
13.04% ( 9 )
Bolars
0.00% ( 0 )
Paladium Palafloor-307
4.35% ( 3 )
Vilis M-300
0.00% ( 0 )
Rusean M-300
1.45% ( 1 )
NOVAMIX M-300
2.90% ( 2 )
Stone Flower M-300
0.00% ( 0 )
Titan M300
2.90% ( 2 )
Axton
4.35% ( 3 )
KNAUF Tribon
4.35% ( 3 )
Ceresit CN 173
11.59% ( 8 )
Eunice Horizon
10.14% ( 7 )
Floor work
How to pour concrete floors and when should it be done? It is important to know one specific thing here - bedding is not required.
First we study the floor slab. If there are cracks or chips on it, we fill them with a repair compound.
When working with wooden floors, we also repair them if necessary.
We provide any overlap with waterproofing - thick (200-300 microns) polyethylene film.
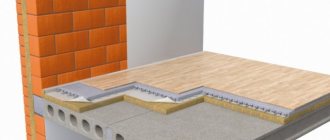
Next we arrange thermal insulation. Suitable for these purposes: basalt wool. expanded polystyrene or polyurethane foam.
We put up beacons, fill the composition with a density of 10 cm. Further actions are identical to those for working with a floor on the ground. If there are any incomprehensible moments, you can watch a video of how floors in an apartment are poured over the ceilings.
Floors
44 votes
+
Vote for!
—
Vote against!
Due to their strength, durability, unpretentiousness and versatility, concrete floors are popular not only in rooms where large loads are expected on the floor surface, but also in private housing construction. For example, concrete floors in the kitchen, bathroom and toilet are a must. And in bedrooms, hallways, living rooms and other rooms, concrete pouring began to be used with the advent of the “warm floor” system, which solved the important problem that such a floor is very cold. Even in private houses, where previously only wooden floors were installed on joists, concrete began to be poured everywhere. And here questions began to arise about how to pour a concrete floor on the ground and what are the features of pouring on floors. In this article, we will reveal the general filling technology and outline some nuances and differences.
- Technology for laying concrete floors
- How to make a concrete floor on the ground correctly
- Conditions under which laying a concrete floor on the ground is possible
- Marking the level of a finished concrete floor: “zero” mark
- Foundation preparation work
- Formation of bedding from gravel, sand and crushed stone
- Laying waterproofing and thermal insulation
- Concrete floor reinforcement
- Installation of “beacons” and formation of “maps”
- Preparation of mortar for pouring a concrete floor
- Pouring a concrete floor, leveling the mortar
- Leveling screed for concrete floor
- How to properly pour a concrete floor over ceilings
- Pouring a concrete floor: video - example
Technology for laying concrete floors
Concrete floors can be installed on various surfaces: directly on the ground, on a floor slab, on an old concrete surface, even on an old wooden floor. Concrete is a simple, undemanding material, accessible to everyone, and, importantly, relatively cheap.
In order for the floor to ultimately be strong and durable, all technological conditions and stages of work must be fulfilled. When pouring concrete on different surfaces, there are distinctive features, but there are also general rules for all cases.
Concrete floors - pouring technology and stages of work:
- Waterproofing the base.
- Thermal insulation.
- Reinforcement.
- Installation of guides (“beacons”).
- Pouring a rough concrete floor.
- Grinding the surface of a concrete floor.
- Filling the leveling screed.
Depending on the design features of the premises, some stages of work may be added. For example, when laying a concrete floor on the ground, bedding should be done on the base.
To protect the concrete screed from cracking, expansion joints are cut into it, of which there are three types:
- Insulating expansion joints are made in places where the concrete floor comes into contact with other structural elements of the building: walls, columns, protrusions, etc. This is necessary so that vibrations are not transmitted from the floor to other structures. Otherwise, there may be a distortion or partial destruction of the foundation.
- Construction joints are made in places where the concrete hardens unevenly, i.e. in the event that the filling did not take place in one go, but with breaks that lasted more than 4 hours.
- Shrinkage seams are performed to relieve stress due to uneven shrinkage and drying.
Expansion joints must be cut before random cracks appear, but the concrete must already have gained the necessary strength. The depth of the joints should be 1/3 of the thickness of the concrete layer. Subsequently, the seams are filled with special sealants.
Considering the labor-intensive and dusty work of laying out a concrete floor, many hire construction crews to carry it out. For concrete floors, the price depends, first of all, on the labor intensity of the work ordered and the thickness of the layer. The cheapest option would be a regular cement-sand screed. Covering with reinforcement will cost a little more. The cost of a concrete floor is influenced by the type of reinforcing mesh: if it is a regular road mesh, it will be cheaper, and if it is a frame welded from reinforcement, then it will be more expensive. The most expensive option is a concrete floor with a reinforced top layer; it will cost 30–40% more than a regular floor of the same thickness.
With minimal construction skills, knowing how to use a tool, and inviting one or two partners, you can easily pour a concrete floor with your own hands. It is enough to make calculations, stock up on the necessary tools, materials and study the technology so that everyone performs their functions and the matter goes smoothly. Then the price for pouring a concrete floor will depend only on the material that will be used and its quantity.
How to make a concrete floor on the ground correctly
Laying out a floor directly on the ground always involves a number of questions: what to use for the bedding, and what layer to use, how to waterproof it, and at what stage to insulate it, and so on. The concrete floor on the ground is a “layered cake”, which we will discuss below.
Pouring a concrete floor: “pie” diagram
Conditions under which laying a concrete floor on the ground is possible
Before moving directly to the technological process of arranging a concrete floor, I would like to note that not all soils can be used to pour a concrete floor. Firstly, the groundwater level should be no higher than 4 - 5 m in order to prevent the floor from flooding and moisture being sucked through the capillaries. Secondly, the soil should not be mobile, otherwise the concrete floor can quickly collapse, damaging the foundation. Thirdly, the house in which such a floor is planned must be habitable and heated in winter, since the soil freezes in winter, and with it the floor, which will put additional pressure on the foundation, deforming it. Well, the last limitation is that the soil must be dry.
Marking the level of a finished concrete floor: “zero” mark
We begin all work on arranging the floor only after all the walls have been completely erected and the building has been covered with a roof. This way we will be protected from the surprises of nature.
The first step is to outline the level of the finished floor , i.e. the mark to which we will fill the floor. Since we do not plan to create a threshold, we will focus on the bottom of the doorway so that the floor is level and the same in all rooms.
We apply the “zero” level as follows: from the lowest point of the doorway we set aside exactly 1 m. We apply a mark to the wall, then transfer the mark to all the walls in the room, draw a line, the horizontal of which is constantly controlled using a level.
After the line has been drawn, we set aside 1 m downwards from this line along the entire perimeter of the room. We draw a line. This will be the finished floor level. For convenience, we hammer nails along the lines in the corners of the room and tighten the cord. This will make it easier to navigate.
Foundation preparation work
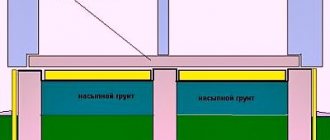
We remove all construction waste from the premises. Then we remove the top layer of soil and take it out for garden or landscape needs. To what depth should the soil be removed? The concrete floor on the ground is a multi-layer cake, about 30 - 35 cm thick. Focusing on the “zero” mark, we are trying to remove the soil to a depth of 35 cm.
Be sure to compact the surface of the soil. It is better to do this using a special vibrating plate or vibrating machine, but if you don’t have such equipment in your arsenal, you can make do with improvised means. We will need a log to which we will attach handles, and we will nail a flat board underneath. Using this log together, we compact the soil to such an extent that no traces of footsteps remain on its surface.
Important! In the case of high strip foundations, there are situations when the distance from the “zero” mark to the ground is more than 35 cm. In this case, we remove the top fertile layer, and instead pour sand and tamp it thoroughly.
Measures for additional waterproofing of the floor may include the installation of a clay bedding. Then clay is poured on top of the soil and thoroughly compacted. In the future, it will prevent moisture from penetrating into the floor.
Formation of bedding from gravel, sand and crushed stone
Before making a concrete floor on the ground, it is necessary to fill it.
The first layer is gravel (5 - 10 cm). Add water and compact. To make it easier to control the thickness of the layer, we drive pegs of the required length into the soil, set them level, and after backfilling and compacting, remove them.
The second layer is sand (10 cm). We control the thickness and level with the same pegs. We spill the layer with water and compact it with a vibrating plate or a log with a board. For this backfill, you can use ravine sand with impurities.
The third layer is crushed stone (10 cm). Carefully level and compact. Our task is to make sure that there are no sharp edges of crushed stone on the surface. If there are any, you need to smooth them out by unrolling the stones or removing them. Crushed stone with a fraction of 40 - 50 mm should be used. After compaction, the crushed stone can be lightly sprinkled with sand or crushed stone chips and compacted again.
Important! Don't forget to control the horizontal using a level.
It should be noted that backfilling can be done only from two layers: sand and crushed stone. Also, to simplify control over the thickness of the layers, their level can be applied to the foundation walls.
Laying waterproofing and thermal insulation
If the crushed stone layer is compacted tightly and there are no sharp corners, then the waterproofing material can be laid directly on it. To do this, you can use modern roll materials and membranes, roofing felt in several layers, or simply polyethylene film with a density of at least 200 microns. We spread the material over the entire area of the room, bring the edges to the “zero” mark on the walls and secure it there, for example, with tape. If the canvas is not enough to cover the entire area, then the joints must be made with an overlap of 20 cm and taped with adhesive tape.
On top of the waterproofing, you can perform thermal insulation using the following materials: expanded clay, perlite, extruded polystyrene foam, expanded polystyrene (foam), stone basalt wool (of appropriate density), polyurethane foam.
Consider the option of laying extruded polystyrene foam slabs. They are laid out in a checkerboard pattern, close to each other, the joints are glued using a special adhesive tape.
Important! There are cases when it is not possible to perform hydro- and thermal insulation directly on the bedding. Then a layer of so-called “skinny” concrete (liquid consistency) up to 40 mm thick is poured on top of the bedding. When it hardens, you can perform the above procedures on top. “Skinny” concrete firmly binds the crushed stone layer together and is a stronger base that will not be able to break through or damage waterproofing materials.
Concrete floor reinforcement
The technology for pouring a concrete floor necessarily includes reinforcement in order to maximize the strength of the floor. A reinforced floor can withstand heavy loads, which are evenly distributed over the surface.
As a reinforcing material, you can use metal and plastic meshes with various cells, as well as a frame made of reinforcement . Most often, welded reinforcing mesh with dimensions of 5x100x100 mm is used. Less commonly, for floors that will bear heavy loads, a frame welded in place from reinforcing rod 8–18 mm thick is used. In this case, more thorough vibration compaction of the concrete mixture will be required.
The reinforcing mesh or frame cannot be laid directly on the base, as it will not perform its functions and will even be redundant. It must be raised by 1/3 of the thickness of the future concrete pour. Therefore, we install the mesh or frame on stands 2–3 cm high, which are called “chairs.”
Installation of “beacons” and formation of “maps”
Installing guides, or “beacons” as they are also called, allows you to pour the concrete mixture as smoothly as possible, at the same level.
As guides, you can use round pipes or a metal square profile, as well as wooden blocks; if their surface is smooth enough, you can lay special “beacons” made of aluminum.
We divide the room into segments 1.5 - 2 m wide.
We install the guides on the “buns” made of concrete mortar. By pressing them or adding mixtures, we control the location of the “beacons” so that their upper edge is strictly along the “zero” line. We lubricate the guides with special oil; in extreme cases, you can use oil to make them easier to remove in the future.
Important! We control the strictly horizontal position of the guides using a level and level. It will be possible to pour the floor with concrete after the “buns” have hardened enough so that when you press the “beacon” they will not press through.
The division of a room into “maps” is carried out if its area is large enough and it is not possible to fill it with concrete in one step. Then the room is divided into square or rectangular “cards”, the size of which is dictated by the productivity of the construction team.
We mark the area into sections. We knock down the frame formwork from freshly sawn wood or laminated plywood. Naturally, the height of the formwork must be strictly set to zero.
Preparation of mortar for pouring a concrete floor
In order for the concrete floor to have the best possible thermal insulation properties, expanded sand or perlite should be added to the solution. And in order to have time to pour and mix the solution efficiently, you need to purchase or rent a concrete mixer.
The secret to preparing the solution is:
- Pour 2 buckets of perlite into a concrete mixer.
- Add 10 liters of water and mix. After adding water, the volume of perlite should decrease noticeably.
- When the sand is well mixed with water, add 5 liters of cement and continue kneading.
- Add 5 liters of water and continue kneading.
- When the mixture becomes homogeneous, add 10 liters of sand and 2 liters of water. Knead until the mixture becomes loose.
- We pause in the kneading for 10 minutes, and under no circumstances add water.
- After 10 minutes, continue kneading until the solution becomes plastic.
To fill the floor, it is best to use cement M400 and M500.
Pouring a concrete floor, leveling the mortar
We begin to fill the floor from the corner opposite to the door, trying to fill several “cards” in one or two steps.
Since the concrete should not fit tightly against the walls and protruding structures of the building, we isolate them by laying a damper tape along them.
Pour the resulting solution into a “card” in a 10 cm layer and level it with a shovel. We perform piercing movements to remove excess air and compact the solution. If possible, you can use a deep vibrator, which is immersed in concrete, and when concrete “milk” appears on the surface, it is transferred to another place.
We level the solution using the rule. We install it on the guides and pull it towards ourselves with light movements left and right. This way, excess concrete is removed and distributed into the voids of other “cards”.
After completing the leveling of the solution along the guides, remove them and fill the free space with fresh solution.
In the following days, constantly moisten the surface with water; you can additionally cover the concrete with film. We allow the concrete to gain maximum strength characteristics within 4 to 5 weeks.
Leveling screed for concrete floor
When pouring a concrete floor, it is rarely possible to make the surface perfectly flat; most often there are minor flaws and sagging. If you plan to lay ceramic tiles, then perfect evenness is not needed, so you can start work right away. But if you want to make a floor from laminate or linoleum, then the surface must be perfectly flat.
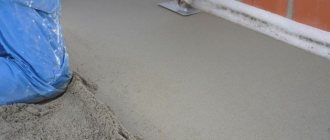
Self-leveling mixtures allow you to make the floor surface mirror-smooth.
According to the instructions on the package, prepare a solution of self-leveling mixture, pour it onto the floor and level it with a special brush. Then roll with a needle roller to remove air bubbles from the solution. Leave to dry for at least 1 week. After which the concrete floor is ready for use.
How to properly pour a concrete floor over ceilings
The peculiarity of pouring a concrete floor over floors is that there is no need to backfill.
We check the concrete floor slab to see if there are cracks, cracks or chips on it. If we find it, we seal it with repair mortar. The wooden floor should also be durable, without large gaps.
It is mandatory to waterproof the ceiling by laying polyethylene film with a density of 200 - 300 microns.
We lay thermal insulation on top. This can be polystyrene foam, extruded polystyrene foam boards, basalt wool boards or sprayed polyurethane foam.
We install the beacons and fill the solution with a thickness of 100 mm. We perform all other operations in the same way as in arranging a floor on the ground. If you don’t understand something in the pouring instructions, perhaps watching a video demonstrating a concrete floor will help you.
Pouring a concrete floor is quite possible to do on your own, the main thing is not to skimp on materials and follow the technological process. Then the floor can last for decades without requiring major repairs.
Pouring a concrete floor: video - example
Choosing a filling composition
The choice of screeding agent is a very important issue. And when deciding how and what to fill the floor in a new apartment, consider the following factors:
- The cement-sand composition sets within an hour. After which it is problematic to level it. Here you need to work in a duet. One creates a mixture. The second one is to fill it and level it.
- Ready-made formulations have a more liquid consistency. They spread out, aligning horizontally. This results in a smoother surface.
- Concrete finally hardens in 4 weeks. And the composition in a couple of days.
After filling and leveling, protect the surface from the following influences:
- temperature jumps,
- ultraviolet,
- air flows.
We cover it with film. This prevents the appearance of cracks in it.
To find out whether the screed is ready, we can use a special support component. If the screed has hardened thoroughly, remove the guide rails. We fill the voids with the composition.
We grind the concrete floor. After this operation, the floor covering can be installed on the base.
Floors filled with leveling mixtures can be loaded within 6-12 hours.
The type of flooring planned dictates certain conditions. After installing the screed, some defects and sagging can be ignored if ceramic tiles are laid.
Advice
If you are planning laminate, parquet or linoleum, we use mixtures with a self-leveling effect. This way the surface will be perfectly smooth with a mirror reflection.
We prepare the mixtures strictly according to the instructions, pour them onto the floor. For leveling we use a special brush.
Then we treat the surface using a needle roller. This is a measure to eliminate air bubbles.
But even though the base is considered ready, I do not recommend placing furniture on it. This can be done in 5-7 days.
Working with wooden floors
When you need to remove wooden floors in a house and install concrete surfaces, you need to follow the following algorithm:
- Dismantling old floors.
- Leveling the site.
- Making a pillow.
- Installation of insulation.
- Creating the composition and filling.
How to remove wooden floors and then pour screed, we consider in detail according to the indicated stages.
- We dismantle old floors using a crowbar. We follow safety precautions.
- Clean the surface of debris. Level the soil with a shovel.
- Making a pillow. We use crushed stone with a fraction of 2-4 cm. We form a layer of 5 cm. We compact it.
To compensate for the thermal expansion of the entire screed, we equip the perimeter of the room with foam sheets. Polystyrene foam is also a permanent formwork here. The thickness of one sheet is 20-50 cm.
The crushed stone layer is covered with a sand layer with a density of 10 cm.
- We organize insulation using extruded polystyrene foam with a thickness of at least 5 cm. Sheet parameters: 120 x 60 cm.
When laying, their locks are fastened, creating a monolithic surface. This material is moisture resistant, so we do not waterproof it.
Sheets are laid using a level. Add sand in the required areas. Again, check the evenness of the sheet positions.
- We work in two cycles. We put up formwork from boards. The composition elements and their proportions are as follows:
- cement: 1 share,
- sand: 2 shares,
— granite screening: 3 shares.
If all the elements are dry, the granite screenings are sent first into the concrete mixer, followed by sand, and cement last. Mix everything thoroughly. Then add water.
If the sand is wet, pour water into the bucket to fill half its volume. Next comes cement. Mix it thoroughly. Add sand, then sifting. Finally, add water to obtain the mixture of the required consistency.
The mixture is neither liquid nor very thick.
Apply the resulting composition and level it using the rule. The density of the screed is 4-5 cm.
After pouring, the composition needs two days to harden.
Then we prepare the second half of the room. Operations are identical
We align the fresh screed in density with the previous screed
After complete pouring, the concrete hardens for 2 days. Then you get this result:
For your information
The screed will be completely strengthened in a month. During this period, we water it twice a day from a watering can. On the created base you can install warm floors or floor coverings.
Traditional screed mortars
Before the advent of dry construction mixtures on the market, floor screed was usually made with cement-sand mortar. The process began with the purchase of the required amount of cement and sand, labor-intensive mixing of ingredients in the required proportions, and pouring the floor according to the beacons. Budget option, hard work, fairly durable floor and not very high quality surface. No matter how you level the cement-sand mixture, sagging and unevenness will still remain. In addition, the finished screed always shrinks, which results in the formation of small cracks. No laminate will want to lie flat on such a floor.
Another option, more expensive: ready-mixed concrete, ordered at the factory and delivered by concrete mixer truck. The process is greatly simplified; the mixture is ready and delivered directly to the work site. Self-leveling concrete floors are traditionally considered an excellent base for any coating; they have high strength and low thermal conductivity. The disadvantage of this method is its high cost; renting a machine for transporting concrete and a concrete pump for supplying it is a rather expensive undertaking. In addition, concrete screeds require the mandatory installation of a finishing layer; without it, their operation is only possible in open areas and in utility rooms.
Nuances of self-leveling floor
Self-leveling floor - also known as liquid floor - is a special composition. It is created on the basis of polymer elements. Before it hardens, it is a very liquid product. It is very easy to pour directly onto the prepared base. The liquid is quickly and without our intervention evenly distributed throughout the entire base, covering any defects.
There are these types of self-leveling floors:
- Cement-acrylic.
- Polyurethane.
- Epoxy.
The cement-acrylic type is usually used in industrial facilities.
The advantages of this type:
- Powerful resistance to moisture and wear.
- Acceptable price.
- No preparatory operations are required before pouring.
- Service life – 30 years.
- The presence of cracks does not affect the integrity of the surface in any way.
Minuses:
- Huge labor costs.
- The coating has no elasticity.
Polyurethane types
We use them more in residential premises. Their advantages:
- Powerful resistance to moisture.
- Good elasticity.
- Solid resistance to heavy loads and wear.
- Fast hardening.
- Service life – 40 years.
- Antimicrobial action.
Minuses:
- Dangerous odor before complete hardening - risk of poisoning.
- A significant expense is a huge financial outlay.
Epoxy look
It allows you to achieve masterpiece design results. Its advantages:
- Resistance to mechanical damage.
- Easy to clean.
- Transparency. You can arrange a composition under such a floor, then fill everything with the composition. Details on how to fill such a liquid floor in this video:
A must read
What floor to install in an apartment Warm floor in an apartment: a modern choice How to change floors in Khrushchev, Stalin, Brezhnevka