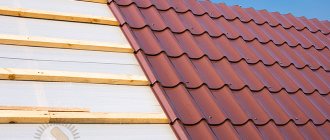
Metal tiles are in increasing demand. This material meets almost all consumer needs. It is aesthetic, durable; with its help you can clad the roof in any style - the variety of profiles and shades allows you to implement any design solutions. Metal tiles are resistant to the destructive effects of moisture and ultraviolet radiation; they are used in any climatic conditions. Easy installation is an additional advantage of the material; Installing metal tiles will not take much time. In this article we will look at how to properly lay metal tiles.
Stage 1. Selecting a tool for installing (laying) metal tiles
The first thing you need to know is what tools you will need to properly install metal tiles.
- A screwdriver is useful for screwing in self-tapping screws. Attention: choose a screwdriver with a power of no more than 1800 rpm, otherwise you risk “overtightening” the screws and deforming the metal tiles and EPDM seal.
- Cutting shears - needed for cutting metal. With their help, you can evenly cut sheets of metal tiles. The polymer and zinc layers will not be damaged. Attention: using a grinder for cutting metal is strictly prohibited! It burns out the polymer and zinc coating. A metal base without corrosion protection will quickly rust.
- Special attachment for the drill - “cricket” . It is also useful for cutting roofing material.
- Knife for cutting insulation.
- Staple gun. Needed to fix vapor and waterproofing on rafters.
Stage 2. Selecting related products for proper installation of metal tiles
Don't forget about related products for installation work.
- Roofing screws are fasteners equipped with a washer with an EPDM gasket and made of zinc-coated steel.
- Sealing materials are needed to isolate the most vulnerable places from moisture - the joints and junctions of roof elements. They can be produced in the form of tapes or in liquid form.
- Repair enamel aerosol. It will be useful if you need to restore the polymer coating (if it was damaged during installation or transportation of the material).
- Double-sided connecting tape. It is used to hermetically seal the joints of steam and waterproofing sheets. Otherwise, the vapor and waterproofing will not be able to perform its functions - it will allow moisture to pass through.
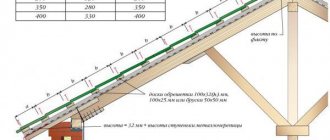
Cold roof structure
Cold roof scheme.
Such a product consists of the following layers:
- On the side of the living rooms, first of all, a layer of vapor barrier is placed. In this case, condensation will leave the room, but will not get inside.
- Rafter system and longitudinal purlins.
- Waterproofing material.
- Counter grille, which is installed parallel to the mounted rafters. The slats will press the waterproofing material and further secure it.
- The sheathing of a cold roof can be made of bars, the cross-section of which in most cases is 50x50 mm. Installation of this element is carried out in increments of 30-40 cm along the slopes. The step will depend on what kind of metal tile you plan to use. The slope of the roof is also important. For such a design, the optimal slope is 14° or more. If the slope is made smaller, the snow load will bend the joints and allow moisture to enter the space under the roof.
- Metal tiles.
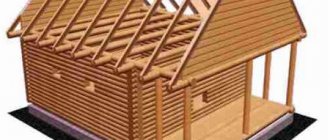
The technology for installing a cold metal roof with your own hands is not particularly complicated.
If you prepare all the necessary elements and follow the recommendations, you can make a reliable structure that will serve for a long period of time.
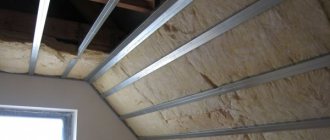
Stage 3. Installation of thermal insulation
The topic of the article is the features of installing metal tiles, so we will not focus on the installation of the rafter system. Let's assume that it is ready and it's time to install the “roofing pie”.
You can start by installing thermal insulation. According to statistics, approximately 25% of heat escapes through the roof. In other words, if the roof is not insulated, you heat the street. To avoid this, install insulation.
The roof can be made “warm” or “cold”. The slopes of a “warm” roof are insulated, and the floor of the attic is insulated for a “cold” roof. We consider the features of installing metal tiles using the example of a “warm” roof - it is more complex.
| "Warm" roof | "Cold" roof |
Thermal insulation slabs or mats are mounted between the rafters.
Stage 4. Protecting insulation from moisture
In order for thermal insulation to properly perform its functions, it must be dry. Getting wet by just 5% will halve the performance properties of the insulation.
To protect thermal insulation from moisture, vapor and waterproofing films and membranes will be required.
Vapor barrier
Protects thermal insulation from evaporation from the living space.
Laying sequence
The vapor barrier is installed horizontally on the roof slope, starting from the bottom.
Fixation
To fix the vapor barrier, it is attached to the bottom edge of the rafters using a staple gun.
Waterproofing
Provides protection of thermal insulation from condensation. Presented as:
- membranes (they are mounted without sagging, close to the thermal insulation);
- films (during installation, a sag of 20 mm is left).
Laying sequence
Waterproofing is mounted on the outside of the insulation, along the upper edge of the rafters.
Installation of waterproofing begins with the valley (if there is one) - the internal corner that is formed at the junction of the slopes. This roofing element requires careful sealing, since it often comes into contact with precipitation.
A roll of waterproofing is rolled out from the ridge to the eaves. The material should completely cover the valley area.
When the valley is waterproofed, they move on to the slopes. As in the case of vapor barrier, the roll is rolled out horizontally. First - along the cornice, then - higher (and so on - to the ridge).
Fixation
To fix the waterproofing sheets, you should install a counter-lattice made of wooden slats 50x50 or 32x50 mm.
Attention: do not forget about gluing the joints of the hydro- and vapor barrier sheets using double-sided connecting tape!
Stage 7. Arrangement of the valley
Construction of a valley on a metal tile roof
An additional board is attached to each valley. Installation in this case starts from the bottom and is carried out with an overlap of 25-30 cm. Below the level of the cornice, the bottom strip is cut off and flanging is made along it. A sealant is placed under each trim and ridge.
Endova
There is a gap between the axle and the sheets (at least 8-10 cm). Screws are screwed into the cut sheets one and a half centimeters from the stamping line. However, when fixing, the fasteners are made 25 cm from the axis of the valley. If everything was done correctly, then upon completion of the work the sheet at the fastening point will be in contact with the board where the valley is located.
The installation of the lower valley begins before the installation of the roofing material, since the water from it must drain into this additional element
Important! If mistakes were made, the fastening will be located in other places and, as a result, gaps will form on the surface through which the roof will leak.
To cover the cut sheets, decorative overlays are used, when installing which you need to remember some important points:
- installation must be done from bottom to top;
- There is no need to lay a sealant between the tiles and the lining;
- products overlap (minimum 10 cm);
- the self-tapping screws used to secure the linings must not damage the valley.
Valley protection
Often the beginning and end of the valleys are on the roof slope. Take, for example, the installation of a dormer window. Here a separate board is placed under the valley. For the window itself, a cutout is made in the sheet, and sealing material is laid along the walls. In this case, the eaves overhang is covered with a plank.
Then the valley strips, previously cut at the edges, are fixed. The released part should adhere extremely tightly to the tile sheet.
Prices for different types of tiles
Roof tiles
Video - Laying metal tiles
How to fasten metal tiles How to fasten metal tiles
Rules for fastening metal tile sheets with self-tapping screws Sheet laying diagram
Stage 6. Metal roofing: how to install roofing material and additional elements
When the heat, hydro, vapor barrier and sheathing are ready, you can install metal tiles and standard finishing elements. Let's consider which elements are installed before installing the roofing material, and which ones after.
Installation of additional elements (before installing metal tiles)
How to install curtain rods?
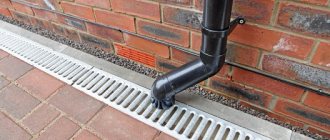
Cornice strips perform the following functions:
- Protects eaves overhangs from precipitation.
- Give the roof a finished and aesthetic appearance.
- The eaves strips are installed after the gutter holders and the gutter itself are installed.
- This element is laid on the sheathing; the overlap of one plank over another should be 50–100 mm.
- The laid planks are fixed to the sheathing using self-tapping screws every 300 mm.
Attention : the lower edge of the strip must cover the upper edge of the gutter.
How to install valley strips?
The valley is a structural element of the roof, which consists of lower and upper planks. The lower strip is installed before installing the metal tiles, the upper – after.
Detailed information about installing valley planks is in the article....
How to install junction strips?
The junction strips ensure tightness in the places where the metal tiles adhere to the walls and chimney pipes. Thanks to these elements, dust or precipitation does not enter the under-roof space.
Using the junction strips, the internal and external aprons are mounted. The internal apron is installed before installing the metal tiles, the external apron is installed after.
If you need detailed information about installing these elements, please follow the link....
Installation of metal tiles
The procedure for installing sheets of metal tiles on the sheathing
Depending on the length of the sheets and slopes, the sequence of laying the sheets varies.
Option 1. Sheets correspond to the length of the slopes
We recommend ordering sheets of metal tiles of the same length as the slopes. You don't have to waste time cutting material. There will also be less excess, which means less costs.
In this case, the sheets are laid in the following sequence:
- Installation begins with a sheet, which is indicated in the picture by number 1. It must be aligned along the line of the end and the cornice.
- The lower edge of the sheet should be 50 mm longer than the cornice.
- When the sheet is leveled, it is secured with one screw next to the ridge.
- The remaining sheets are laid in accordance with the numbering in the picture. In this case, they focus on the first sheet.
Attention:
- if metal tiles are mounted from right to left, sheet 2 is laid with an overlap on sheet 1;
- if from left to right, the edge of sheet 2 is placed under sheet 1.
- The laid sheets of roofing material are connected to each other. Please note: different metal tile profiles have different fastening methods.
- TRAMONTANA, MONTERROSA, MONTECRISTO. To connect one sheet to another, self-tapping screws can be screwed into: the end part of the step;
to the top (crest) of the wave where the metal tile sheets overlap.
- LAMONTERRA, LAMONTERRA X, MAXI, CASCADE, MAXICASCADE. Self-tapping screws are screwed only into the ridge of the side overlap.
- The sheets fastened together, which move freely along the sheathing, are aligned - they should be located parallel to the eaves line.
Option 2. Sheets are shorter than slopes
In this case, the sheets are laid in the following order:
- First, install sheets 1–4.
- The sheets are joined together.
- Secure with self-tapping screws.
- The resulting L-shaped fragment of the roof is leveled. The edges of the sheets must be parallel to the end.
Fixing metal tiles to sheathing
When the sheets are laid and leveled, it is necessary to secure the metal tiles with self-tapping screws. But for this you need to know the basic installation rules. Let's look at them below.
Which screws to choose?
Choose roofing screws. They are made of galvanized steel and are corrosion resistant. They have a washer with an EPDM gasket that allows you to distribute pressure and seal the mounting location.
What size should the self-tapping screws be for the main fastening of metal tiles?
The best option is 4.8x28 (35) mm.
| Roofing screw 4.8x28 mm | Roofing screw 4.8x35 mm |
How many screws should I use?
Recommended quantity: from 6 to 8 pcs. per 1 sq. m of metal tiles.
Which part of the metal tile should I screw the screws into?
At the base of the wave. This is the place where the metal tile is as close as possible to the sheathing.
At what angle should you screw in the screws?
Self-tapping screws are screwed in at an angle of 90 degrees.
If a self-tapping screw is screwed in at a different angle, what are the consequences?
The most common options:
- there will be a dent on the metal tile at the attachment point;
- the roof elements will not be firmly fixed.
How do you know until what point to screw in the screws?
The EPDM gasket should flatten approximately halfway and extend 1 mm from under the washer.
Attention : do not overtighten the screws, otherwise you will damage the EPDM gasket. It will not perform its function - to seal the attachment point. Water will be able to get into the threaded part of the connection and penetrate into the under-roof space.
Are the screws screwed in in a chaotic manner?
No. When installing the main fastening, a staggered order should be observed.
Do I need to screw screws into each deflection?
No, you can screw them through the wave. The mount will be quite strong.
How do you fix the bottom row of waves and the horizontal overlap of the LAMONTERRA, LAMONTERRA X, MAXI, CASCADE, MAXICASCADE profiles?
To fix the bottom row of waves and the horizontal overlap, self-tapping screws are screwed perpendicular to the sheathing into the “sole” through the wave.
Installation of additional elements (after installation of metal tiles)
When the roofing material is laid and fixed, it is necessary to install the end and ridge strips.
How to install end strips?
End strips are suitable for any metal tile profiles. Using these elements, you can make the ends of the roof more aesthetically pleasing - the edges of the roofing material will be covered with decorative strips.
What screws will you need:
- 4.8x70 (80) mm - for vertical fixation.
- 4.8x28 (35) mm - for lateral fixation.
Installation sequence:
- Installation begins from the cornice and gradually moves towards the ridge.
- The end strips are mounted one on top of the other. The overlap is 50 mm.
- The lower edge of the planks is aligned along one line.
- The laid planks are attached with self-tapping screws to the sheathing on the side and top sides.
- Self-tapping screws should be located at a distance of 500–600 mm from each other.
How to install segmental end strips?
If you have chosen a new metal tile profile (MONTERROSA, MONTECRISTO, TRAMONTANA), use segmented end strips to decorate the ends of the roof. These additional elements follow the contours of the profile.
They differ from conventional end strips:
- Appearance (they are not flat, but stepped).
- Installation method (they can be fixed from the side and top or from the side and end).
What screws will you need:
- 4.8x70 (80) mm - for fixing from above or at the end.
- 4.8x28 (35) mm - for fixing from the side.
The installation procedure is similar to that of standard end strips.
- Installation direction: bottom to top.
- When laying, make sure that the lower edges of the planks form a straight line.
- The planks are laid overlapping each other.
- The laid and leveled planks must be secured with self-tapping screws on the side, then on top (or in the end part of the profile).
How to install ridge strips?
Ridge strips provide ventilation and at the same time protect the under-roof space from rain, snow, and dust.
These additional elements are divided into two types:
- Round. To install such strips you will need plugs. The type of plugs depends on the type of roof; conical ones are used if the roof is hip or hip;
- simple ones are used for all types of roofs, except the two above.
The plugs are attached to the end of the plank using rivets or self-tapping screws.
| Skate bar round | Conical plug | Simple plug |
- Flat. In this case, plugs are not needed.
Skate bar flat
The installation procedure is the same for both types of planks:
- First, in the place where the slopes adjoin each other, install a seal or ridge ventilation tape.
The seal can be different:
- universal;
- figured (before installation, you need to clear the ventilation holes so that air can circulate freely).
- After this, the ridge strips are installed. Make sure that the overlap between them is 100 mm.
| Flat bar | Round bar |
- The laid planks are screwed with 4.8x70 (80) mm self-tapping screws to the sheathing. As in the case of metal tiles, self-tapping screws are not screwed into each wave, but after one.
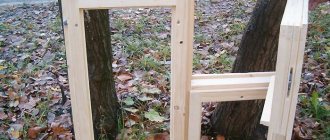
Preparatory work
Before you start covering the roof, you need to prepare for work , that is, select metal tiles, lay waterproofing, install sheathing and calculate the amount of material required for the roof.
It is recommended to choose metal tiles based on the following indicators:
- The thickness of the sheet, according to the standards, must be at least 0.5 mm.
- The index of galvanized coating must be at least 275 g per sq./m. It’s not bad at all if the tiles have an additional coating made of aluminum alloy.
- Pay attention to the type of polymer coating. For example, roofing tiles in the southern region are recommended with a polyvinyl chloride (PVC) coating, which is quite resistant to sunlight. For a sharply continental climate, it is better to choose sheets with a pural coating, which does not react to temperature changes. But plastisol and polyester can be called universal; tiles with these coatings can be used in any climatic zone .
What to prepare before laying metal tiles
- Scissors for cutting metal, manual and electric. It is not recommended to cut this roofing material with a grinder.
- For marking you will need a square, a marker and a tape measure.
- Roofing screws for metal tiles.
- Preferably a cordless screwdriver.
- A small wooden ladder that you will have to work on while laying the tiles.
- Strong rope for belaying and lifting sheets.
- Two long boards to accommodate the lifting of metal tiles.
- Soft shoes to avoid damaging the polymer coating.
During cutting with an abrasive wheel, a high temperature is generated, which burns not only the polymer, but also the galvanized coating. And this leads to corrosion of the metal middle of the sheet and to the slow destruction of the roof .
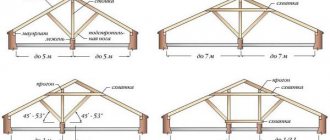
Determining the size and shape of the roof
Before laying metal tiles correctly , you need to take the dimensions of the entire roof and determine its shape. This will not be difficult to do if it has only two slopes. In this case, you will only need to check the symmetry of each diagonal slope, which should be the same size, and if they coincide, this is very good. If the indicators are different, then you will have to equalize them using lathing.
But with a complex geometric shape of the roof, calculations will be more difficult. For example, for a hipped, sloping or hip roof, each slope will have to be calculated separately.
Material calculation
To calculate the number of sheets per roof slope , you need to measure its width, if it is a single- or gable roof, and divide the resulting value by the width of the sheet, calculating from it the value of the overlap on the adjacent sheet. And if it is a complex roof, the width is measured from the valley to the eaves.
The results obtained are rounded up. The standard sheet is produced in widths of 1.17 - 1.2 m, but their working width is always the same and equal to 1.1 m, and everything else overlaps. For example, the width of the slope is 9 m, the calculation will be made as follows: 9: 1.1 = 8.18. This means that for such a slope you will need to prepare 9 sheets.
Then the number of sheets in one row is calculated. To do this, the roof slope is measured from the ridge to the eaves. The maximum length of a sheet is 8 m/p, but transportation and especially laying of sheets of such length is quite difficult. Therefore, the sheets are trimmed. But if you take long sheets and cut them in place, this can make it quite difficult to install the tiles. To prevent this situation from happening, the length of the sheets must be chosen optimally.
For example, the length of the slope is 6 m, add another 0.5 m here, this is the length of the overhang. The total length is 6.5 m, which means that this length can be covered with two sheets of 4 m each, with one sheet being intact and the other being trimmed by 250 mm. This means that there are two sheets in each row, and the result is 9 × 2 = 18 sheets need to be prepared for one slope.
When calculating materials for a metal tile roof, you should not forget that you need to take measurements of each slope separately, since they can be of different lengths even on a gable roof .