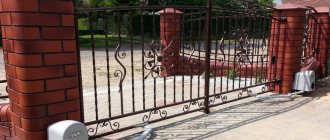
How to expand the exit from the yard? If for some reason it is difficult to leave or enter the gate leading to the courtyard of your summer cottage or private house, I can offer a simple way out of the situation. Let's look at how to make your own gate, which only superficially resembles an ordinary swing gate, but in fact can fold and unfold in one direction, fitting snugly against the wall or fence of your property.
Why are folding gates like this often needed? There are several strong arguments in favor:
1. It is not always possible to expand the opening and gate leaves. 2. With this option, we do not need a second supporting column. This already significantly increases the opening. 3. The gate opens in one direction and folds at the same time without blocking the roadway. 4. Folding gates are much more convenient to use.
Lift gate installation
Another name is panel boards. Their mechanism is simple.
Essential elements:
- frame;
- guide profiles;
- drive (lever-spring or counterweight system).
Operation control is carried out manually or using an electric drive and remote control.
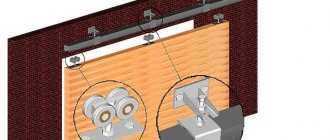
Lifting is carried out by levers that are fixed at the bottom of the sash, and with the help of rollers that move along two guides on top at the ends of the sash.
To open a gate with a simple drive, simply pull the handle at the bottom of the door.
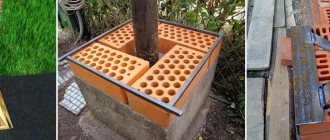
Counterweights for lifting
A more detailed photo of the unit where the cables from the gate counterweights come
So that the cables are the same and the gate does not warp when raising or lowering, I installed a counterweight not on the cables, but on the same block, which rolls freely along the cable, thereby ensuring uniform tension of the cable, i.e. My cable consists of one solid piece, the ends of which are attached to the bottom of the gate, and the load pulls the loop through the pulley.
As a result, the overhead garage doors are insulated and equipped with counterweights
I’m lifting it manually for now, but in the future I plan to install a drive with a remote control for the gate, of course I’ll do everything with my own hands.
This is what lifting gates look like, made with your own hands from the inside in cold weather.
30 mm insulation freezes, this thickness is apparently not enough for the Urals, most likely you will have to make another layer of 30 mm, the total will be 60 mm.
Exterior view UPD 06/06/2017
The garage is tiled, the gates are practically finished, they look like this, they haven’t gotten around to automating them yet.
As the garage was being used, we decided to install a door on the side of the gate; in winter, in order to go outside, we had to lift the gate, this is not very convenient and there is a loss of heat.
Raised position
Pros and cons of the design
The following is worth saying in favor of a garage door lifting mechanism:
- To lift, you do not need a lot of free space outside or inside the room. Space under the ceiling is used.
- The one-piece fabric will provide reliable protection against intruders.
- The sash must be insulated with various heat insulators (expanded polystyrene, polystyrene foam, mineral wool).
- Exterior decoration and decoration are allowed.
- The product can be equipped with automation.
- It is possible to install lifting sheets not only in single but also double garages.
Among the disadvantages:
- When open, the height of the opening decreases.
- Installation is recommended only in rectangular openings.
- Cannot be partially repaired. If damaged, the entire canvas will have to be replaced.
- The load on the gate must be strictly observed. Incorrect calculation when choosing a finished product or when making it yourself will lead to a reduction in its service life.
Craftsmen note that making a lifting mechanism at home is many times more difficult than swing gates. Errors in calculations and during assembly are unacceptable here. Therefore, without experience, you need to do this under the strict guidance of specialists or completely entrust the installation to them.
We make our own overhead gates
Such gates consist of several elements.
The gate frame, the lifting part, it is mounted in a steel frame, the return spring assembly (this mechanism is necessary to close the gate with your hands). The system also includes a sash movement device.
It is worth remembering that you do not need to make overhead garage doors from a single piece of wood. It has a large mass compared to profile sheets. Plus, during rains and high humidity, wood changes its size.
The frame can be made of metal or wooden beams. All this is adjusted to the parameters of the garage doorway.
Note!
Insulate the foundation with your own hands - a step-by-step description of the use of the best materials and technologies (90 photos)
- Do-it-yourself pergola on a summer cottage: step-by-step instructions with photos and descriptions
Laying laminate flooring with your own hands: a detailed description of how to lay laminate flooring. Laminate calculation, step-by-step description and installation secrets (105 photos and videos)
When using wood, it must be insulated. It is recommended to use materials that are less susceptible to combustion as insulation: expanded polystyrene or basalt wool.
The surface of the gate can be sheathed with galvanized steel sheets. This reduces the possibility of corrosion on the structure.
Types of overhead gates by opening type
Let's look at the main nuances of the functioning of each type.
Rotary
The lift-and-turn design is a simple mechanism. The solid sash will be lifted due to the operation of the drive (lever-hinged or counterweight system).
Essential elements:
- guides (fixed to the ceiling);
- sash;
- box;
- steel frame;
- engine.
When opened, the sash rises almost at a right angle, after which it moves to the ceiling.
Product advantages:
- Built-in door locking system, which increases the reliability and burglary resistance of the structure.
- Possibility of thermal insulation.
- Durable one-piece sash.
- Ease of opening and closing the room.
- Installation is simpler compared to other models.
Among the disadvantages:
- The large weight of the canvas requires the installation of a reinforced frame so that it can withstand such a load.
- Cannot be partially repaired. The damaged sash is replaced entirely.
- The ceiling height in the garage is reduced by 20–25 cm.
The recommended distance from the open gate to the car is at least 1.5 m.
Folding (sectional)
The canvas is assembled from several panels connected to each other by hinges. The standard section width is from 40 to 60 cm.
The sash will open simply by moving along the guide profiles under the ceiling. A mechanism with extension springs is responsible for the displacement.
The covering of such gates resembles sandwich panels. The outer part is made of galvanized steel with a polymer layer, the inside is thermal insulation 5-10 cm thick.
Among the advantages of up and down gates:
- They are subject to partial repair. The damaged section is replaced without dismantling the entire structure.
- Saving space inside and outside the garage.
- Suitable for installation in openings of various sizes.
- An additional element of room thermal insulation.
- Neat look.
Minuses:
- Craftsmen note that sectional sashes are not suitable for too frequent use, since the roller bearings wear out quickly.
- The degree of protection against burglary is average, closer to weak. Ready-made gates will be expensive. Making them yourself is quite difficult.
Rolled
The door consists of many thin slats (lamellas). Material - aluminum.
A drum is mounted under the ceiling, and guide profiles are fixed on the sides of the opening. The slats are connected to the drum with a special cable. When the drum is rotated, the web begins to fold into a roll and wrap around the drum.
You can control the operation of the gate manually or connect the automation and do it remotely using a remote control or telephone.
The roller shutter is compact and weighs little, but owners note low resistance to burglary, mechanical damage, and a short service life.
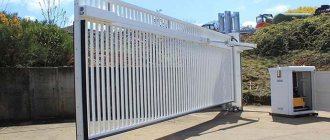
For a dacha or garage in the private sector, the optimal type of gate will be up-and-over gates. To save money, you can make them yourself. Factory-installed models are also affordable.
Design and operating diagram of folding garage doors
Lifting folding gates save space
A reliable supporting frame and a durable sheet are made to close the opening. The sash moves on guide rails or without them.
Design principle:
- the canvas is made whole, the doors work thanks to a system of hinges and levers;
- use a mechanical or electrical drive;
- a system of levers is placed at the bottom of the sashes, and rollers serve to move the leaf along the guide profile.
Most folding structures work flawlessly in heavy snow conditions.
Advantages and disadvantages
A reliable canvas rises to the garage ceiling, so the car drives directly to the gate. The structure is insulated inside and decorated outside. You don't need to get out of your car to open it; the gate is well suited for double garages.
The disadvantages include a reduction in the opening height, which is taken into account when drawing up the project. The mechanism can only withstand the design load; an increase beyond the norm reduces the service life.
Types by control method
Control can be mechanical or automatic.
Mechanical method
Manual control. The mechanism is attached to the outer wall of the garage. In standard models it has two buttons that are responsible for opening and closing. To put the car in the garage, you will need to get out of it.
It is recommended to install it in combination with automation, so that in the event of a failure or lack of electricity, you can always get inside the room.
Auto
The main condition for connection and full operation is the presence of constant electric current.
A special feature of the electric drive of lifting gates is that when closing, a lock is activated, so it will not be possible to open the gate manually from the outside or inside the room.
To remove the lock, you need to receive a signal from the remote control or press a button on the panel in the garage. If there is a power failure, this will not be possible.
There are several ways to solve this problem:
- Install an additional source of electricity. That is, if necessary, connect a backup battery. But this option is not suitable at low temperatures. It will be more reliable to use a generator.
- Order a manual unlocking mechanism as part of the automation kit. Not included in the standard package. You will have to pay separately.
- Combine the two previous methods. This way the gate will operate as efficiently and trouble-free as possible, regardless of the availability of electricity.
When installing sectional sashes, you can secure the automation using two different methods:
- On the ceiling. It is used for small-sized canvases, in garages designed for one passenger car. Fixed on the ceiling at a distance of 1–2 m from the opening. The cable is attached at the top of the sash using a lever, which creates traction. With the help of this cable the door opens.
- A complete set with a bulk drive is purchased for massive large gates. The engine is mounted on one side of the torsion shaft. For uninterrupted operation, you will need to install a reliable chain mechanism. The motor will forcefully drive the shaft and the gate will open or close.
Control is performed using two devices (to choose from): a remote control or a telephone.
From the remote control, key fob
In greatest demand. The control system is equipped with a special unit that receives a signal when you press a button on the remote control. The received signal activates the shutter.
The signal range reaches 10 m from the garage, so you can control it directly from the car.
To prevent the radio signal from being intercepted by intruders, it is recommended to encode it.
From a mobile phone
A special application is downloaded to your phone and works online. With its help you can remotely control the operation of the gate. Similar programs are installed to control the video surveillance system.
Drive selection
By design they are divided into two types.
Counterweight system
Rarely used for a private garage. Gates of bus and trolleybus garages and industrial hangars are equipped with this drive.
Suitable for canvases that are large in weight and size.
One end of the winch cable is attached to the bottom of the sash, then the cable is passed through a mechanical block located on the ceiling, closer to the opposite wall. A load (counterweight) is mounted to the other edge. When the gate opens, it lowers, and when closed, vice versa. Moreover, the mass of the counterweight should be greater than the sash itself.
The advantage of gates with such a drive is maximum security against burglary and unauthorized entry.
Articulated-lever (lever-spring)
The most common option in the private sector, garage cooperatives.
The mechanism consists of:
- springs;
- rollers;
- levers.
Metal profile guides are mounted under the ceiling in a horizontal position along the edges of the doorway. Springs and levers are fixed at the bottom. The rollers are placed in the upper corners of the canvas.
When installing, it is important to accurately regulate the tension of the springs, to observe the vertical and horizontal when fastening the guides.
The leads are mounted to the ceiling. When opening, a cable is used, which is placed on the profile under the ceiling.
When opening, the spring stretches, and the canvas on rollers moves along the guides.
The recommended distance from the ceiling to the doorway is 30 cm.
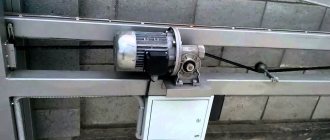
Gate bearings
Next, I filed down the head of the bolt so that it fits into the profile with the bearing.
I welded the bolts with bearings to the gate frame, inserted the bearing into the guide, the upper bearings and guides are not yet installed.
View from inside the garage.
To prevent the gate from falling down from the guide, I drilled a profile at the bottom and inserted a nail. I screwed the guide directly to the board.
A corner holds the guide on top
Then I sawed off the excess from the vertical guide, welded a bracket for the top roller to the gate frame on top, and already welded a bolt with a bearing to it. I also installed a horizontal guide, secured it to brackets to the ceiling, and inserted a bearing into it.
Side view of the same unit, only from the other side of the gate
Photo of mounting with a horizontal guide bracket
The bracket is made of profile pipe and fittings, welded to the guide
I adjusted the gate guides and covered them with corrugated sheets. The garage has not yet been insulated, only the frame is in place, everything is being done in parallel.
Materials for frame, cladding
To create a frame, it is recommended to use rectangular profile pipes 40*20 mm with a wall thickness of 2 mm.
For crossbars and longitudinal beams, pipes measuring 20*20 mm are sufficient, the wall thickness remains the same.
The material for the guides may well be a channel 20 cm wide.
To make a box where the drive will be placed, it is allowed to take a beam measuring 100 * 50 mm or a metal corner with a 50 mm shelf.
Ideal for cladding:
- Profiled sheeting. It is characterized by high strength and long service life. The sheets have a protective anti-corrosion coating. The raw materials are resistant to environmental influences. Wide selection of colors available. Convenient to cut into required pieces.
- Tree. Not so popular material due to susceptibility to rotting and damage by insects. Fire hazardous. Before installation, any wooden parts need protective treatment. The strength is several times lower than that of a profiled sheet. Pros: low price, beautiful view.
- Cink Steel. Suitable for gate trim. Coated with a protective anti-corrosion compound. When fastening, you need to be careful not to damage the protective layer, otherwise the material will begin to rust.
- Sandwich panels. The material is practical and washable. Installation is simple. It has excellent heat and sound insulation properties. Fireproof.
Most often, owners choose corrugated sheeting or sandwich panels for gate cladding.
For insulation, it is recommended to take slabs of expanded polystyrene, mineral wool or polystyrene foam.
Users are also interested in:
- How to make sliding gates
- What profile to make the gate from?
We build up-and-over gates with our own hands: drawings and sketches
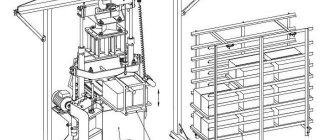
Diagram of an up-and-over garage door
The technology and manufacturing process of overhead gates is much simpler than that of the sectional type. Before manufacturing, as in the previous case, preparatory work should be carried out, including taking the dimensions of the opening, calculating the parameters of the gate and purchasing material.
After measuring the opening, a design drawing of the future gate should be drawn up. The diagram shows the main structural elements:
- protective cloth;
- vertical and horizontal guide;
- roller at the top and bottom of the web;
- bracket for attaching a vertical guide;
- spring and hinge mounting bracket.
If possible, you should calculate the interface points of the main structural elements, the number of necessary fasteners and their sizes. A detailed diagram of lifting and turning works with drawings of the main structural elements is shown in the photo above.
Choosing material
Profile steel pipe for the manufacture of a protective sash frame
For the manufacture of overhead gates, you can use various materials, the choice of which directly depends on the project and design parameters. And also, depending on the design, swing gates are equipped with a counterweight system or a spring swing-balancing system.
In our case, we will describe technology with a counterweight. To make the frame frame of the protective sash, you will need a metal pipe 40x20x1.5 mm. Transverse guides for the frame, a holder for rollers and a stopper will also be made from it. To cover the frame on the front side, a profiled metal sheet with a thickness of 0.7 mm will be used.
The material for horizontal and vertical guides can be used:
- steel corner - 25x25x1.2 mm. To form a U-shaped guide, two corners are spot welded.
- steel pipe - 50x50x1.6 mm. To create a U-shaped guide, you will need to cut the pipe in half.
The size of the wheels or rollers will depend on the width of the guide. In our case, the width of the guide is 50 mm. Therefore, polypropylene trolley wheels with a diameter of 50 mm and bolted fastening were chosen as the rollers. To suspend the load, a suspension roller, a steel cable with a cross-section of 4 mm, construction carabiners and steel wire will be used.
Material calculation and tool preparation
One profile pipe is enough to make two guides
To carry out calculations, as in the previous case, you will need to measure the parameters of the opening, lintel and wall. The detailed measurement diagram is shown above. After this, you can proceed to calculations and drawing up a detailed diagram.
If you have experience in construction, then you don’t need to work out a detailed diagram. It is enough to indicate the main interface points between the guides and the wall, the frame frame with the guides, etc.
As an example, when calculating the material for sectional doors, an opening of 2.5 × 3 m was used. For the same opening, let us calculate the material required for the construction of up and over doors:
- Frame frame - 2.5 * 2 + 3 * 2 + 3 = 14 m. You will need a steel pipe 40x20x2 mm 14 m long, including material for the crossbar. The material for spacers is calculated separately, but not more than 2 m.
- Vertical guide - 2.5 * 2 = 5 m. A steel pipe 50x50x1.6 mm 6 m long is required, including stock or a steel angle 25x25x1.2 12 m long.
- Horizontal guide - 2.5 * 2 + 3 = 8 m. You will need a steel pipe 50x50x1.6 m 5.5 m long, including stock and a steel angle 25x25x1.2 for a cross brace 3 m long. If everything is made from a steel angle, then the total length of the material will be at least 14 m.
To construct a counterweight, you need a steel cable with a cross-section of 4 mm and a length of about 10 m, 2 construction carabiners, 2 hanging rollers. The protective flap will move due to 4 wheels from the trolley, which will be fixed to double-sided studs welded to the frame.
The tools you will need are: a welding machine, a hammer drill, an electric drill, a screwdriver, an angle grinder, a file, a level and a tape measure.
How to make a lift-type garage door: step-by-step instructions
Below we will step by step analyze the creation of sashes covered with corrugated sheets. We will indicate the most important points during installation.
Tools, materials
To work you will need:
- Corrugated sheeting 0.7 mm thick for cladding.
- Profile pipe dimensions 20*40 mm, thickness 2 mm for the frame.
- Metal corner 40*40 mm, thickness 4 mm.
- 2 springs with a diameter of 30 mm.
- 2 rollers for bolting. The width depends on the size of the guides.
- Fastening elements: 30 cm anchor bolts, 10 cm self-tapping screws.
- Steel sheet 4 mm thick.
- Channel - 40*80 mm.
The tools should include:
- set of wrenches;
- screwdriver;
- electric drill;
- hammer;
- screwdriver;
- tape measure, level, marker or pencil;
- Bulgarian;
- welding machine.
It is recommended at the planning stage to develop a detailed drawing, a sketch of the future gate, take measurements, calculate the amount of materials, and draw up an estimate.
Preparing the opening
Before installation, it is worth considering that the garage door opening must meet the following requirements:
- Availability of sufficient free space for fastening guides.
- Evenness of the walls both vertically and horizontally.
- Correspondence of load-bearing capacity to future load from the gate.
A room built from concrete blocks or solid bricks is quite reliable and does not need reinforcement for fastening the guides. But structures assembled from hollow foam blocks, boards, gas blocks will need to be strengthened or simply abandon the gate with a lift and choose a different type.
To strengthen it, apply several layers of plaster to the walls or fix metal corners measuring 50*50 mm, 75*75 mm at the ends of the doorway.
If the garage will be heated, then before strengthening it is necessary to immediately provide for the laying of thermal insulation material.
Making a box
The main strength component of the future gate will be the box mounted in the opening, since it will bear the main load.
It can be made from timber or a metal corner. Let's consider the second option. It's more reliable.
The corner is taken reinforced, because its shelf width should be 1.5 times greater than the thickness of the sash.
The elements are mounted in the form of the letter U: two on the sides and one on top.
We fasten the corners with anchor bolts. It is recommended to recess the lower part at least 2-3 cm into the floor.
Frame assembly, installation of guides
The description for making the frame looks like this:
- The profile pipe is cut with a grinder to the required dimensions in accordance with the drawing.
- The finished parts are laid out on a flat table or any flat plane. The observance of right angles is checked.
- The joints are tacked by welding.
- The length of the diagonals is checked. If no deviations are found, then continuous welding of the joints is performed.
- To increase the rigidity of the frame, gussets can be welded in the corners.
- All seams are cleaned. The structure is coated with an anti-corrosion primer.
- A trial installation in the opening is being carried out. Compliance with the level is checked.
Now you need to start creating another frame that will be under the ceiling:
- Two guides are made for the rollers. The easiest way is to weld them from metal corners.
- They are attached to the support beams with bolts.
- Levers made from channel bars are also attached here to open and close the sash.
- The springs are fixed to the edges of the levers, to supports, and to moving brackets.
All connections are checked for compliance with the vertical and horizontal.
Trim, sash fixation
Work order:
- The finished frame is placed on a horizontal plane.
- Sheets of corrugated sheets are screwed to it using roofing screws with a rubber seal. The fastening pitch is from 15 to 20 cm.
- The handle for opening the blade is fixed with bolts.
- The sash is placed in the opening. The fastening of the spring arms is checked.
- The operation of the gate is checked. If the sash moves smoothly, then it is removed and the levers are secured with bolts.
- Spring tension is adjustable.
It is recommended to glue a rubber seal around the perimeter of the frame so that the canvas is completely sealed when closed.
With mechanical control, a locking device or lock is installed.
Gate insulation
For thermal insulation, foam or polystyrene boards are best suited. Mineral wool is also acceptable, but it shrinks over time.
Expanded polystyrene should be taken with a thickness of 4 cm, a density of 20 kg / cubic meter. m. First, measurements are taken and suitable pieces of material are cut.
The slabs are attached to the corrugated sheet from the inside of the room using liquid nails. A steel sheet is mounted on top with self-tapping screws and a drill.
Control system installation
To increase operating comfort, an automatic one with an electric drive is added to the manual opening method.
Before purchasing an automation, it is important to make sure that the selected drive model is suitable for the gate.
The standard kit includes:
- Control block;
- signal receiver;
- remote control.
A brief procedure for installing the automation:
- The sash is checked for gaps.
- The drive is assembled according to the manufacturer's instructions.
- A guide beam is fixed in the center of the ceiling.
- At the rear of the beam, brackets are attached to dowels.
- The drive is mounted.
- The lever is attached. One part of it is fixed to the sash, the second to the cable.
- Electrical wiring is being laid.
- A test run is in progress.
In order to extend their service life, rubber seals should be treated with silicone lubricant, especially in winter.
Advantages
Compared to other types of garage doors, overhead garage doors have a number of advantages:
- such doors can be additionally insulated using polystyrene foam;
- the design is used for single and double types of garages;
- possibility of installing an automatic opening system;
- the structure does not require additional space when opening - the canvas is placed in the space under the ceiling;
- different types of exterior decoration and decor can be used;
- the garage is reliably protected from burglars with an automatic gate;
- There is no noise when opening and closing the doors.
With such a large list of advantages, one significant drawback is noted - the complexity of installing the structure.
Common problems when installing overhead gates
First of all, the following problems may arise:
- The gate is jammed. There are several reasons: during installation, the rollers were assembled incorrectly, the rollers were installed, or they broke, or the protective coating was worn off. To avoid this, it is important to follow the gate manufacturer’s recommendations during installation and not to overload the mechanism.
- The canvas has fallen and will not rise. This is due to a faulty torsion spring. Only replacing it will solve the problem.
- The shutter moves very slowly. There may be several reasons. This could be deformation of the canvas or guide profiles, but most often it is over-tensioned torsion springs. The problem will be resolved after adjusting the tension.
- When moving, the canvas creaks a lot. Pay attention to whether any debris or foreign objects have gotten into the mechanism. This may also be a signal of wear on the rollers and hinges. To prevent this from happening, you need to periodically clean and lubricate all moving elements.
Damaged parts are replaced with new ones.
If you cannot fix the problem on your own, then you should contact a specialist.
DIY folding garage door construction
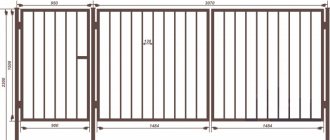
Gate drawing
During installation, provide free space for attaching guides and level the walls.
Sequencing:
- development of a drawing with dimensions;
- installation of support pillars to the walls;
- installation of a folding frame, fastening of canvases;
- cladding and insulation of gates.
The gate frame must withstand the force of the load. Walls made of concrete and brick do not need reinforcement, but foam concrete and aerated concrete are reinforced with a frame.
Drawing development
The standard drawing contains a sketch for the manufacture of a sash, where there are dimensions of the frame parts, opening, and filler. Includes a diagram for placing profiles on vertical walls and ceilings.
It is hoped that when a car passes, there will be at least 30 cm of free space on the sides. Ready-made standard projects that are suitable for specific conditions will make the task easier.
Installation of load-bearing pillars
The support must withstand the load and be firmly fixed to vertical surfaces on both sides. Installation is done after finishing work.
The assembled supporting structure is leveled in the opening, the supporting part is placed on the floor, and its horizontalness is checked. The lower ends are plumb. The frame is fixed with hardware that is selected according to the wall material.
Installation of a folding frame, hanging of sashes
Steel profile pipes are cut to fit the panels. They are laid out on a flat surface, the ground, to make a frame. The sections are fixed to each other with loops and connected so that there is no distortion.
For strength and rigidity, diagonal and transverse elements are provided, which are installed over the entire area of the folding frame.
Installation of sections will not take much time. They are placed alternately between the guide profiles. Then the roller supports are fixed at the ends, for which a bolted connection is used.
Often the fastening metal plates are already on the canvases; a small holder with a hinge is attached to them. During installation, the fittings for the right and left sides are distinguished; there are marks on the parts.
Sheathing and insulation of gates
To insulate gates, foam plastic is often used, because... it does not absorb moisture
The microclimate in the garage is maintained by heating and insulating the door leaf from the cold. For insulation use:
- mineral wool;
- polystyrene foam, polystyrene foam.
Mineral wool is rarely used, because it absorbs water. Its installation requires a double slatted frame with waterproofing. Polystyrene foam can be placed on the rail and glued directly to the prepared door leaf. Sheathed with sheet or profiled metal.
Photo gallery of vertical gates: finished products, drawings and diagrams
Below are examples of drawings of different lifting surfaces with dimensions, already assembled structures are shown
A properly installed gate lifting mechanism will provide excellent protection for your garage against burglary. The tightness of the lowered canvas eliminates the risk of unauthorized entry. And with a creative approach to finishing, the gate will fit perfectly into the design of the site.
Drawing of overhead garage doors
When preparing a drawing to suit your opening dimensions, you should use ready-made solutions, slightly adjusting them to your dimensions. Here is an example of drawings for making gates:
Drawing of lifting gates
Drawing of the frame, dimensions must be set to match your gate dimensions.
Frame drawing