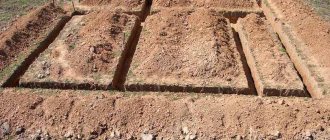
Almost all types of foundations during the construction of buildings require the organization and carrying out of excavation work. An exception is some types of pile supports in cases where a grillage raised above the ground is created.
Therefore, the development of soil for the construction of a foundation is the very first stage of construction work directly on site, and the reliability of the entire supporting structure largely depends on its correct implementation. How to dig a trench under the foundation is described below.
Depending on the type of foundation determined by the project, excavation work may include:
- digging a trench under a monolithic or prefabricated foundation strip;
- removal of fertile soil layer for pouring a reinforced concrete slab;
- development of a deep pit for buildings with basements;
- drilling or digging holes for the construction of columnar foundations.
In addition, soil development includes the planning of the building site and the organization of access roads.
Use of machinery or manual work
Using special earthmoving equipment to dig a trench under a shallow or columnar structure is most often impractical. In these cases, you can dig a trench under the strip foundation of a private house or pillars manually.
The same must be said about the construction of a bathhouse, veranda, extension to an existing building or other small buildings. However, we should not forget that long lead times lead, as a rule, to higher construction costs. And therefore, using a tractor will significantly reduce the construction time of the building.
You cannot do without renting an excavator for large volumes of excavations, frozen, rocky or heavily compacted soils, as well as for large trench depths of small width.
Equipment is also needed in cases where the development of a pit or trenches requires not only excavation of soil, but also loading it onto vehicles for subsequent removal.
A modern excavator will do such work quickly and efficiently, but manual work will be very labor-intensive and time-consuming. With the help of a tractor, the soil will be loaded into the body of the car or evenly leveled across the site. It is almost impossible to do such work in a short time by hand.
In addition, even with the use of earth-moving equipment, a fairly large amount of manual work will remain. These include leveling and compacting the bottom of a pit or trench, compacting and securing the walls, especially with crumbling soils, as well as backfilling work (more about it here) after the construction of the foundation structure.
Therefore, even before digging a foundation pit, it is necessary to calculate the amount of soil to be removed, the width and depth of the underground part, take into account the type of soil and the period of the year in which the work will be carried out. And based on this data, make a decision on how to develop the soil for a foundation pit, strip or columnar foundation.
You can do this yourself, invite a team of workers or rent an excavator. Sometimes it is quite difficult to take into account all the real factors and it is better to consult with a specialist who has real experience in performing such work on how best to do this.
Preparatory work
If the zero cycle work is properly organized, the excavation stage will cost the developer much less. For example, water reduction at a high groundwater level before excavation begins will eliminate the need to pump out wastewater during trenching, formwork installation, concreting and waterproofing reinforced concrete structures. Only qualified specialists can draw up a high-quality work plan. However, by following the recommendations given, you can build a house cheaper.
Positioning of the house on the site
To locate the cottage on the site correctly, you should take into account the requirements of the GPZU urban planning plan. The foundations should be 3 m from the boundaries of neighboring plots, the “red” lines (the axis of the roadway of the village) by 3 m or 5 m (driveway, street, respectively). Fire standards regulate the distances between houses in villages depending on wall materials:
| Material of enclosing structures | Wooden house | Brick building with wooden floors | Concrete, stone walls, reinforced concrete floors |
| "Framework", log house, SIP panels | 15 m | 10 m | 10 m |
| Stone, concrete box with ceiling beams | 10 m | 8 m | 8 m |
| Cottage made of stone, concrete with non-combustible ceilings | 10 m | 8 m | 6 m |
Due to the need for sanitary zones, SanPin standards prohibit the following from being located closer than the specified distance from the house:
- utility block, bathhouse - 8 m;
- building for livestock – 12 m;
- toilet with cesspool, shambo - 12 m;
- septic tank – 3 – 5 m depending on the design of the treatment plant.
In addition, it is necessary to take into account that if there are centralized life support systems in the cottage community for connecting the house, the wells will have to be dug out in an area closer to the roadway.
When connecting electricity by air, the pole is mounted in front of the house behind the fence. Parking lots and guest parking will also be located on the border of the site, so it is also necessary to leave free space for them.
Thus, it is easier to immediately integrate all significant objects into the site, so as not to pay fines to regulatory authorities, not to move buildings and communications, increasing the operating budget.
When developing trenches for a strip or column foundation, you must consider:
- if the project includes beam floors, it is not necessary to remove the fertile layer from the entire perimeter, but all living roots should be uprooted so that they do not grow into the house.
- It is forbidden to pour floors on the ground on top of the arable layer; black soil to a depth of 40 cm is completely removed, since the organic matter in it will rot, the screed will sag after a few months of operation, even under the underlying layer of sand and crushed stone.
Important! Geological surveys must be completed before planning the site, before digging trenches, since it is better to carry out radial, layer or ring drainage before starting excavation work, so it is necessary to know the real level of groundwater level.
Territory planning
The main task of leveling the landscape in a construction site is to reduce labor costs when digging trenches. To properly plan a site for a house, the following factors should be taken into account:
- on slopes it is prohibited to cut off individual elevated areas to fill holes, since a fresh embankment does not have the same design soil resistance as neighboring areas without thorough compaction;
- in case of significant differences in heights, a budget solution is terracing with gabions (mesh structures filled with natural stone);
- the excavated soil is not used in the future, so it is better to remove it from the site immediately.
For a house, the best location on the site with maximum illumination is usually chosen. The area of the residential zone is 15 – 50% depending on the size of the estate.
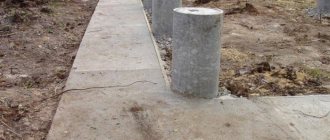
Marking
Scheme for marking the foundation using cast-offs.
The geometry of the load-bearing structure depends on the quality of the extension of the full-scale axes. To correctly mark the foundation, you need to perform the following sequence of operations:
- the first corner - must be spaced at the distances specified in the previous paragraph;
- front facade - the axis is usually perpendicular to the roadway or located at right angles to it;
- side walls - marked relative to the first axis using a triangle method with a 5 m hypotenuse, 4 m, 3 m legs, which allows you to accurately maintain 90 degrees;
- verification of diagonals - for rectangular foundations, the diagonals must completely coincide (accuracy up to 2 cm).
Cast-off for marking the foundation.
We recommend: Marking the strip foundation with your own hands.
A house with a complex configuration is marked in a similar way; additional cords are installed for walls adjacent to the facades at complex angles. Instead of pegs, it is recommended to use castoffs, which are two pegs fastened with a horizontal jumper 60–80 cm in length, depending on the width of the tape.
Advice! The cast-offs are carried 1 - 1.5 m beyond the outer perimeter of the trenches and are adjusted to the general horizontal level. The cords/strings should be 5 cm higher than the design base of the foundation. It is convenient to attach several cords to a wide horizontal bar; you can periodically remove them while digging trenches and put them back on without additional adjustments.
Manual trenching tool
Once the contours of the trench are outlined, you can begin excavation. To dig a foundation manually, you will need the following tool:
- bayonet and shovel shovels;
- spade and crowbar;
- wheelbarrow for removing excavated soil;
- mechanical or manual tamping.
In the case of sandy or other weak crumbling soils and the trench depth is more than one meter, it is necessary to prepare material to strengthen the walls. These can be boards or any strong shields.
To measure the depth of a dug trench, it is recommended to make a measuring rod. To do this, you need to make clearly visible marks at intervals of 10 cm on a flat wooden block and sign their values.
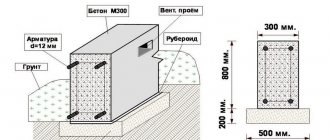
Features in determining the depth and width of the trench
The dimensions of the foundation strip are determined by engineering calculations and must be made in full accordance with design decisions. But the required depth and width of the trench is always greater than the cross-section of the foundation. This is due to the need to install an underlying crushed stone-sand cushion, install formwork, as well as perform waterproofing work after the concrete has hardened or the masonry has been completed.
Therefore, the depth of the trench is always 25-30 cm greater than the depth of the foundation strip. The width of the trench should be 60 cm greater than the width of the foundation on the side of the outer insulated surface and 30 cm on the inside to allow the installation of formwork panels. If the soil is not dense and crumbling is possible, it is necessary to provide for a slope of the walls, the angle of which is determined depending on the type of soil.
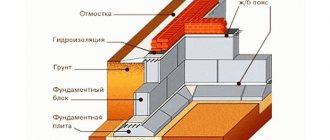
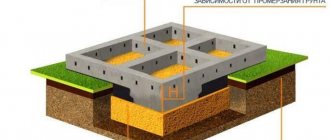
Foundation width and depth: what do you need to know?
Scheme of a monolithic reinforced concrete strip foundation.
Most foundations erected in low-rise construction belong to the strip class. The most common type of foundation is monolithic reinforced concrete strip foundations. The main parameters of such a foundation are: strip width and laying depth.
The width of the tape is determined in accordance with the width of the future walls. With the depth to which you need to dig the foundation, everything is far from so simple. Some developers rely on the experience of neighbors, i.e. The depth of the tape for the house on the neighboring plot is the same as the depth of the foundation laid in their own area. When there are no areas with buildings nearby, the depth of construction is determined on the advice of the construction workers. Quite often, in order to save concrete, a sand-gravel or gravel cushion is poured into a dug pit or trench.
As for the reinforcement, in the absence of a design, builders usually simply limit themselves to a few steel rods thrown to the bottom of the pit. The process of installing a strip base ultimately looks like this: a trench is dug, half filled with gravel, scraps of reinforcement are thrown onto the gravel, and the whole thing is filled with concrete. As a rule, the width of such tapes is 40-50 cm.
To understand what is wrong with the technology described above for constructing strip bases, you need to take a closer look at each point.
The laying depth and width of the tape are calculated during the design process of the house, and depend on the load on the base.
First of all, the laying depth and width of the tape are by no means determined at random. These parameters are calculated during the design process of the building and depend, first of all, on the load on the foundation and soil conditions. In the case of construction on solid soils, a tape of small width will be sufficient under the base of a concrete foundation. And vice versa, if the bearing capacity of the foundation is insufficient, even a fairly wide tape will not save the house from tilting and significant settlement.
A gravel or sand cushion is placed under the foundation to ensure uniform transfer of load from the belt to the soil. In the process of developing a trench manually or with an excavator, its bottom becomes uneven. For leveling, sand or gravel is used, which must be compacted during installation. If the sand and gravel are not compacted, then over time they will certainly settle and voids will appear under the foundation.
For the same reason, the cushion is rarely made thicker than 15 cm. In some cases, in order to replace weak soils under the foundation of a house, backfilling with sand and gravel mixture is performed. The thickness of such a pillow can reach 1 m or more. However, it is arranged only in cases of extreme and urgent need. Such a pillow is compacted in layers. For this purpose, vibrating platforms or vibrating rollers are used. If you poured 50 cm of sand and gravel mixture into a pit or trench at once, then even a massive roller will not be able to compact it efficiently and correctly. Therefore, do not expect that the front loader doing the dumping will be able to compact such a bed simply by driving over it a few times.
The strength and reliability of the foundation of a house depends on the reinforcement of the concrete base; the main thing is to correctly position the rods in the body of the concrete structure.
Its reliability and strength directly depend on how well the reinforcement of the concrete foundation under the house is done. The thing is that when the foundation is unevenly loaded or settles, tensile stresses appear in it. In any reinforced concrete structures, it is the reinforcement that is responsible for the perception of tensile loads. Concrete only works in compression
As a result, it turns out that if very strong concrete was used to construct the tape, but sufficient attention was not paid to the quality reinforcement of the foundation, then after the construction of the house, cracks may begin to appear. And foundation cracks, in turn, will certainly cause cracks to appear in the overlying structures
That is why it is very important not only to add reinforcement to the concrete, but also to select the correct diameter and correctly position the rods in the body of the concrete structure
Manual excavation procedure
If you decide to dig the foundation with your own hands, the earth from the trench should be removed layer by layer, with the length of each subsequent step being at least 2 meters. Storing soil along the edge of the trench should provide for a distance of at least half a meter from the edge. Otherwise, during the construction of the belt, the excavated soil will crumble back.
Since the excavated soil should not be used for backfill, the best option is to move it to the side.
When deciding where to put the land, the fertile layer can simply be distributed over the plot, and the rest will have to be taken out or used to fill access roads.
After completing the excavation, the bottom of the pit must be well compacted using a mechanical or manual tamper. Loose soil has a weak bearing capacity and can shrink. Checking the depth and width of the trench should be done using a measuring rod. This will ensure the required accuracy and simplify the work.
Options for sewerage depending on the type of foundation
The complexity and method of laying sewer pipes largely depends on the type of foundation.
Sewerage and columnar base
The simplest method is to install sewer pipes through a columnar or pile-type foundation. Such a foundation allows communications to be carried out both before the installation of pillars and after completion of the construction process. When carrying out work, it is important to ensure that the trench is located at the optimal distance from the pillars. In this case, there will be no weakening of the soil around the supports, which can lead to a decrease in their bearing capacity.
Sewerage in a columnar foundation
However, when laying sewer pipes under a columnar foundation, it is worth remembering that the underground space in this case is not heated. Therefore, sewer pipes need to be provided with reliable thermal insulation or additional heating must be provided with cable heating elements.
Sewerage through a strip foundation
It is better and easier to plan and lay sewer pipes before the process of pouring the concrete base strip. In this case, the method of laying communications depends on the type of strip foundation:
- With a shallow foundation, the pipes are laid below the freezing level of the soil, directly under the foundation. It is recommended to dig a trench before constructing the belt. Moreover, it is recommended to place the piece of pipe that will be located under the tape base in a sleeve, which is a piece of metal pipe.
- A deep strip foundation requires actions of a different nature. A hole is cut into the formwork into which an asbestos-cement or steel sleeve is inserted. It is fixed in the formwork and filled with concrete mortar. Communication pipes are subsequently inserted into this sleeve.
A strip foundation allows you to lay sewer pipes after the foundation has been poured. Carrying out this type of work requires a lot of effort and expense, but everything can be done with your own hands. The process can be carried out in two ways: a tunnel is made under the foundation and pipes are passed through it, or a hole is drilled in a concrete strip.
Sewerage in strip foundation
The first method is used if the foundation is thick. In this case, they dig a trench in the place where the sewer pipes are planned to be brought out. To make work easier, the inclined drilling method is used. The drill is driven under the foundation to a certain depth and at the desired angle.
The second method is done as follows:
- A mark is made on the foundation where the sewer pipe should pass. The hole must be large enough to allow the pipe protection sleeve to be inserted.
- Using a hammer drill, a hole is made in the concrete.
- Occurring reinforcement bars are drilled out using a drill.
- A sleeve is inserted into the prepared channel and the space around it is sealed with cement mortar.
- A sewer pipe is passed through the protective sleeve, and the gap between them is filled with foam. It serves as a good heat insulator.
Possible problems from soaking the bottom of the trench and pit
It is recommended to carry out excavation work as quickly as possible in good dry weather. Atmospheric precipitation often leads to the accumulation of water at the bottom of the trench. As a result, the soil may, when saturated with water, change its bearing capacity, as a result of which the stability of the foundation structure will be at risk.
It is possible that eliminating soaking will require removing another layer of soil to expose a dry surface. This will lead to additional consumption of materials for the installation of an underlying cushion of crushed stone and sand, and will also increase the overall volume of work. That is why many developers rent earthmoving equipment, which allows excavation work to be completed in one day.
Features of excavations in the winter season
The main difficulty associated with excavation work in the cold season is the freezing of the top layer and the requirement for quick completion so that the walls and bottom of the trench under the foundation do not have time to freeze in winter before the completion of the laying or pouring of the monolithic structure. In addition, it is necessary to provide for the removal of excavated soil for storage - much better and easier. In a few days it will freeze and it will be quite difficult to remove it.
In winter, it is better to dig the foundation for a house using excavation equipment. Only it can provide the necessary speed of work and the required quality of work.
You can see more details about how to properly dig a hole for a foundation in the attached video.
Digging the foundations yourself: main features of the work
If you decide to dig the foundation for a house yourself, remember and follow the following important requirements:
Scheme for correct foundation excavation.
- all work must be carried out only in accordance with a correctly drawn up project, developed specifically for your specific home and for construction on the site of your choice. Other people's advice and experience cannot replace the qualified work of an experienced design engineer;
- All work on digging a pit, installing a concrete base, performing backfill and further erection of walls must be carried out continuously. If you cannot afford to build a “box” of a house during one summer season, it is better to postpone construction;
- any foundation for a house must be protected from contact with moisture in the ground and from surface and ground water. For this purpose, high-quality waterproofing is arranged;
- When carrying out work by builders, it is necessary to ensure strict and strict adherence to the project, and not to agree to simplifications and design changes, even if such changes promise significant cost savings.
To mark the future foundation, pegs are used, between which a thread is pulled, then the excavation of the foundation begins.
The foundation for a house is the basis of your future home. If you decide to dig a pit yourself and carry out further work, remember that only you bear full responsibility for the future fate of the house.
If you decide to dig the foundation yourself, prepare the simplest tools for this:
- shovels;
- spades;
- thrombus agents;
- wheelbarrows for removing soil;
- pegs;
- roulette.