A pergola can decorate the territory of your site; grapes will curl beautifully along it. Thanks to the pergola, the vines can grow and create pleasant shade. Next you will learn how to make a pergola for grapes with your own hands, from scrap materials.
In essence, it consists of several wooden arches that are connected by wooden beams. When the outside of the structure is entwined with grapes, a semblance of a gazebo is created. Since grapes are vines, they are well suited for landscaping a pergola, as they themselves wrap around the structure. A green roof is being created.
Pergola for grapes: photo
What was it used for before?
Previously, people often used this method to hide from the sun, especially in hot countries. In the eighteenth and nineteenth centuries, such gazebos played the role of garden decorations. Now pergolas can be found in summer cottages and garden plots, as decorations for parks and squares; they are a beautiful addition to almost any composition.
If you don’t have a lot of space on your plot, then the ideal solution is to grow grapes upward. In this case, the plant will receive a sufficient amount of sunlight and heat, thanks to which the yield improves and the clusters ripen faster. Undoubtedly, it will be better for the grapes if natural ventilation is provided; it is necessary to reduce the likelihood of infection with various diseases. Due to this, the need to use chemicals to treat plants is reduced.
How to plant and form grapes correctly
It is necessary to plant grapes at a large distance from the pergola. Seedlings grown from cuttings take quite a long time to develop, so plan to plant them at a distance of approximately 80 cm from the structure, and the interval between bushes should be 2-3 m.
Only under such conditions is it possible to correctly form the vine and direct it towards the product itself. If you want vegetation to wrap around the gazebo in the first year, buy seedlings grown not from cuttings, but from buried vines (layers).
Forming grapes onto a pergola is significantly different from tying vines to other supports. This is due to the fact that in this case the main function of the grape bushes is to create shade, beauty and comfort. Fruiting is not excluded, but it is a secondary task. Although, as practice shows, many summer residents manage to get a harvest of high-quality berries from vines growing on a pergola.
Recommendations for grape formation:
- First of all, you need to understand that grapes are a living, plastic shrub. Therefore, you should not literally adhere to the rules of formation - approach this process creatively.
- The method of formation depends on the conditions in which the grapes are cultivated. If the variety is frost-resistant and you do not plan to cover the plant during the cold period, opt for a vertical cordon or a tall trunk with naturally hanging stems.
- If you are going to cover the vine, then standard-free and standard long-sleeved fan formations are allowed.
- If you choose table grapes, the plant's trunk should be low, and the stems should easily lay on the ground. Therefore, it is better to form bushes of table varieties (as they are not the most frost-resistant) using the standardless fan method. In this case, a horizontal cordon is also suitable. And to boast a decent harvest of table varieties, form powerful bushes with developed perennial wood. If you cut the shoots heavily, few tassels will form and mostly foliage will grow.
- To achieve an abundant harvest of juicy berries, any method of formation requires standard pruning.
Did you know? The heaviest bunch of grapes in the world was grown in Chile in 1984. Her weight was almost 9.4 kg.
d0412c3740dd6a8dd53e2150bdfcca7c.jpe
e26581cb1435ef6ebd58350fc285765c.jpe e2a33e10743afe78675987991cd809a2.jpe
So, it’s not for nothing that a practical structure with an elegant Italian name has gained mass popularity. Try to build a pergola for grapes on your site. The effort spent will pay off with a beautiful and comfortable design that will be an excellent addition to your country house.
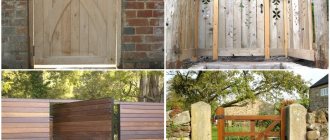
DIY pergolas for grapes made of wood
Perhaps this is the most popular type of such buildings for grapes. It is quite inexpensive and easy to use; a tree such as: 1) pine will do; 2) aspen; 3) spruce; or 4) oak.
Advantages of a wooden pergola for grapes.
The grapes look advantageous and natural against the background of the tree, and the tree also contributes to the correct formation of the vine. A wooden gazebo shrouded in grapes will look attractive on any site.
Disadvantages of a wooden pergola for grapes.
The downside of wood is its ability to rot. The grapes need to be watered and this can ruin the gazebo. But with the help of various solutions: 1) copper sulfate; 2) kerosene and resin can preserve the original appearance of the tree.
What needs to be done to make a wooden pergola for grapes last a long time.
In order for the wood to work for a long time and not deteriorate, before constructing the structure it must be completely dried, then treated with an antiseptic solution. To prevent deterioration of the material, it is recommended to carry out such treatments annually.
What will help with a high percentage of humidity.
Various varnishes and special paints help against rain and getting wet; they can also prevent damage to wood by pests and fungi. Before processing, you need to dilute the varnish or specialized oil with a dye to match the color of the pergola.
What is a canopy for grapes and what are they?
There are three most common types of awnings. These are oblique, arched and welded. You can also combine a canopy and a gazebo for grapes. The difference can be not only in manufacturing technology and appearance, but also in the materials used.
You can make a canopy for grapes from pipes. This welding option will be the most durable. But it should be taken into account that this metal canopy for grapes will be very heavy and will require concreting its lower supports.
And if a multi-storey building is being built on the site in parallel, then PB floor slabs will become an indispensable material in construction. The products are used as connecting elements of building structures in the formation of interfloor sections of prefabricated and precast-monolithic buildings. Designers pay primary attention to the safety margin of floors, which affect the stability of the structure.
After all, over time, the plant will grow, and the weight will periodically increase due to the appearance of fruits.
To make such a structure yourself, you will need special tools and certain skills. In addition, this canopy for grapes will be the most expensive in cost.
There is another type of canopy, they are called oblique. They are connected on one side to the building, gazebo, garage. This option will require less labor and money costs.
Instead of metal pipes or corners, you can use woven mesh. This will significantly reduce the price and simplify the design.
It will be much easier to work with a metal mesh, and the grapes will trail along it. But you need to take into account that a canopy built using mesh will not be durable. It may be damaged due to strong winds.
Helpful advice! If you want to build a slanting shed using metal mesh, then choose one with a galvanized coating. It will be more resistant to rain and will last longer.
Arched canopies look very beautiful. They are also the most common. Arched canopies are simple to manufacture. But for this you need to buy ready-made arcs, their price is high.
You can use a bent profile pipe. The foundation will need to be poured under the supports. The difficulty of growing grapes on this canopy is that the vines need to be planted along the top of the arch, because if the branches hang down, the effect will not be the same, and it will be difficult to collect the grapes.
If you choose this design, you will need to devote a lot of time to the correct growth of the plant. You can replace the iron on the sides with wood. The canopy will look even more beautiful.
You can greatly simplify and reduce the cost of the design using wire. This method of making a garden arch for grapes will be the fastest and cheapest.
A gazebo usually serves as a canopy for grape vines. In addition, an excellent recreation area may appear on your site. If you don’t have enough skills and time, then you can buy a ready-made frame.
The floor of the gazebo can be made of wood or concrete. But it must be raised above ground level. Be prepared to constantly monitor the condition of the gazebo, as the wood can gradually collapse under the influence of weather conditions.
Keep in mind that for the canopy you need to choose only those grape varieties that tolerate winter frosts well. Most often, the most unpretentious varieties are used, for example, Isabella or Lydia.
Made of metal
Metal garden structures are durable and strong. They can withstand heavy loads and are easy to use and maintain. Metal sheds are used by both amateurs and experienced gardeners who grow grapes for sale and wine production. The disadvantage of this design is the complexity of manufacturing and installation. Only those who have welding skills and special equipment can make a metal canopy on their own.
A budget and durable option is a canopy made of profile pipe and wire. It has a low cost and is easy to manufacture compared to other metal structures. Summer residents also install metal tile structures in the garden. The material weighs little, has an aesthetic and attractive appearance, is easy to cut and does not bend. Using metal tiles, they create original canopies that will decorate any summer cottage.
Made of wood
Wood is used to make simple and complex garden structures. It can be a traditional canopy in a classic style or a simple one in a minimalist style. A common option is a plank canopy made of wooden stakes and slats. The material has a pleasant natural texture and beautiful appearance, accessibility and ergonomics. The tree is laconic, will fit into spacious and compact garden areas, the production of such canopies does not require a welding machine.
However, wooden home sheds are less practical than metal ones. To protect against rotting and damage, wood is periodically treated with antiseptic agents, coated with paint and varnish. The material deteriorates from high humidity and temperature changes. Wood weighs more than metal and loses its appearance faster.
Attention! The ideal option for making a canopy is combined frame systems, where the supports are made of metal and the remaining elements are made of wood. Such designs are beautiful and reliable.
Arch-shaped tent
Arched canopies are a strong trellis with a curved roof. The structure is made from a profile pipe, wire, metal arcs and other materials. Arched canopies are popular and aesthetically pleasing; you can make them yourself or buy ready-made ones. A semicircular or curved roof protects the grapes from winds, rain and snow. The vines wrap around the arches, which looks very beautiful and complements the landscape design.
The disadvantage of brewing sheds is that gardeners have to guide the vine so that it always grows along the outer perimeter. If this is not done, the vines will tangle at the bottom of the arch, the canopy will lose its appearance, and ripe clusters will be difficult to find in the thickets.
Alcove
The grape arbor is made of frame metal or wooden structures. Green vines wrap around the gazebo, giving it an original appearance. The frame can be round, square, polygonal, depending on the personal preferences of the gardener. The roof can be solid or lattice, most often it is made of light wood. The gazebo will become your favorite place to relax or receive guests. It is installed on the western or southern side of the garden plot, since grapes do not develop well on the northern side.
Attention! The gazebo can be temporary - such structures are assembled and removed as needed - or permanent - an option with a solid foundation and support. Temporary gazebos are mobile and weigh little; As a rule, gardeners remove them for the winter. Capital ones are equipped with furniture, a fireplace or stove, and they serve as a place to relax.
DIY metal pergolas for grapes
Pergola for grapes: photo
Pergolas for grapes are not built from metal as often as from wood, but it is in demand. As a rule, metal is more difficult to assemble (you will need the help of a specialist) and more expensive to purchase. Despite this, metal structures are more durable and less vulnerable than wood.
You can use metal as the frame for the gazebo, or you can add metal elements to wood or other structures. Simple metal gazebos and structures can be easily assembled yourself.
What can be used as a metal pergola for grapes
Nowadays, profile pipes are often used to build metal pergolas for grapes. Since metal is flexible and soft, it can be bent or forged if desired and possible. Such home-made or purchased elements can be supplemented with a metal frame.
What to do to avoid rust.
To avoid the appearance of rust stains, it is recommended to treat the structure with a primer and paint over the entire surface. To make the structure feel like one with the vines, you can paint the metal in shades of green. To make the pergola more delicate and lighter, you can paint the frame of the structure white or light green.
Types of pergolas in the garden
Initially, pergolas consisted of several arches connected to each other. In the Roman Empire they were used to support grapevines.
On a note. Today, gardening structures of this type are used more for decorative decoration of the landscape, although some owners build them in accordance with their original purpose.
Depending on the purposes that the pergola will serve, there are different designs:
- as an extension to a house or terrace;
- as a summer gazebo;
- as a decorative design for the pedestrian zone of the site;
- instead of trellises, to support the vine.
The choice of pergola shape depends on its purpose - for a vine, a simple structure made of wood with a direct ceiling is suitable
According to the shape of the structure they are:
- rounded;
- fan-shaped;
- with kinks.
There are also types of pergolas depending on the building material:
- wooden;
- metal;
- plastic;
- stone.
Note. Often there is a combination of basic building materials when constructing such a garden and park structure - most often metal and wood. The first is usually used for supports, and the second for sheathing and ceilings.
Plastic as a material for a pergola.
Pergola for grapes: photo
This is the most budget-friendly and worst option for making pergolas. Despite this, plastic is most in demand due to its low price, ease of use and the ability to make a pergola of almost any shape.
In flower and garden stores you can purchase ready-made structures for grapes. Plastic does not always immediately fit perfectly into the design of the area, but when the grapes cover the structure it will be unnoticeable.
Materials
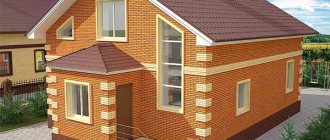
Of course, you can purchase a ready-made product. However, a pair of metal rods with a grape net stretched between them, even decorated with bushes of beautiful roses, is unlikely to provide the same pleasure that creating an original pergola from a variety of materials yourself can give:
- The rather simple design of the arch, shown in the photo, can be supplemented with unique forged elements, giving the entire structure a certain medieval look. Trembling rose bushes against the backdrop of a metal pergola will add grace to the structure. Such arches are quite easy to install; all work can be easily done with your own hands. You can use iron pergolas for climbing plants of various types, from climbing roses to exotic vines that evoke thoughts of exciting journeys to unknown lands.
- It is a little more difficult to make such canopies from stone. However, the durability of such a monumental structure is undoubtedly worth the effort. Historians claim that in ancient times the vines were supported by massive marble columns. Therefore, admirers of ancient traditions can make themselves a stone pergola and enjoy the breath of bygone times emanating from such an arch.
- Today they are trying to use plastic in almost all buildings under construction due to the unique qualities of the material. This trend also affected connoisseurs of country comfort. Despite the fact that the plastic pergola somewhat does not fit into the surrounding landscape, over time the leaves of grapes or other climbing vegetation will completely hide the unassuming structure. In addition, such arches are often made collapsible, which allows the structure to be dismantled and hidden in a shed when unnecessary.
- Natural wood blends perfectly with any environment and becomes a worthy decoration of landscape design. However, the need to pre-treat it with a proven antiseptic should be taken into account.
Elegant roses are the perfect complement to the pergola, and the use of climbing vegetation, as shown in the photo, will complete the look.
Separately, it is worth noting the possibility of combining the above materials. The combination of wood and stone or metal and plastic creates unique creations.
Stone pegrols.
The most durable, but labor-intensive structures can be made from stone. The process of building any structure made of stone is very complex and cannot be done without the help of a master. But beauty “for centuries” is undoubtedly worth it. The vines can be supported by stone columns that fit into your design. A stone pergola will always attract attention and pleasantly surprise your guests.
Pergola for grapes: photo
Assembling a metal pergola
A metal pergola is more durable, but you will need gas welding skills to make it. A pergola with an area of 3x3 meters will form a comfortable shaded place for country holidays. You need to start by purchasing profiled pipes with a cross section of 25x30 mm. Cut the following elements from these pipes:
- supports (three-meter, 8 pieces);
- top harness (same length, 4 pieces);
- internal ribs.
The frame is formed by three squares that fit inside each other. The length of the side of the outer square is 2.12 m, the middle one is 1.5 m, the inner one is 1.06 m. You will also need eight jumpers 1.06 m long.
Manufacturing procedure
Assembly begins with the manufacture of a frame (nested squares) that evenly cover the interior space of the pergola. Using a grinder, the ends of the pipes are cut at a 45-degree angle and then welded. The structure is reinforced with reinforcement bars. The base pipes are located at right angles - they need to be cut accordingly. The supports are fastened with short corners cut with a grinder at an angle of 45°.
The next stage is marking the area for the foundation of the building. The depth of the pits is 80 centimeters. The holes are compacted and filled with sand to a depth of 20 centimeters. Further procedure:
- Treat the supports with GF-21 primer, after removing rust (if any).
- Using thread markings, install the supports of the future square (accuracy is important here).
- Assemble the pergola roof (this will require three people).
- Add strength with corner lintels.
- Start planting plants around the pergola perimeter.
Pro Tip: “Water makes digging easier. Remove the sod, fill the holes with water, and then get to work. The soil will become pliable after 10-15 minutes.”
Do-it-yourself pergolas, what and how.
You can create a beautiful design in just a few days. If you chose something very simple as a sample, it may take less than twenty-four hours. There is no need to ask the grapes to cover the entire surface of the building right away; in just a year or a year and a half you will get a beautiful green gazebo.
Dimensions and basics.
A pergola is a permanent structure that cannot be installed. You should expect that such structures will not be dismantled for the winter, will not be carried into the house, and will not move at all. Moving a structure can cause fatal injury to grapes. It is important to plan everything before construction begins. We recommend choosing the location, material and grape variety right away.
Important characteristic. Grapes, like any plant, need care, so you need to choose a free place for the pergola. Access to shoots and fruits must be provided for their care. It is also important to choose a location so that the gazebo looks beautiful on your site.
Before going to the store to purchase materials, you need to calculate their required volume and what they will be. You should stick to a medium size; a pergola that is too small will not look beautiful and will be uncomfortable, and a structure that is too large will not be able to be completely covered with vines.
Attention! The structure itself, that is, the frame, should not be complex and with many details. In addition, the structure must withstand fairly large loads and be stable. For a beautiful appearance.
In order for pergolas to fit well into the landscape and not “stick out” from it, it is necessary to take into account the height and other parameters. On average, the optimal height is approximately two and a half hundred centimeters, and the gaps between the supports are about a meter. The length can be any, everything depends on you and the design of the structure.
Materials for making pergolas
Of course, an arch can be constructed from any available material, but there are the most common ones that are used most often.
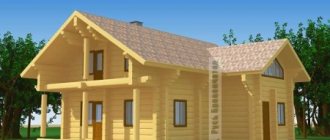
Wooden pergola
Grapes, and other plants, like this material the most, because it is related to them. Spruce, pine and oak boards are best, but others can be used. From this material you can make various designs, both light and heavier.
You can choose any shape of supports that you like best. Square posts are most in demand. If your garden is designed in a landscape style, then wooden pergolas will fit perfectly and embellish your garden. This design is usually made of 4 equal elements, and gratings are installed on top.
How to make a pergola for grapes?
Next, you will get acquainted with several simple options for wooden buildings.
Pergola similar to a gazebo.
Pergola for grapes: photo
To build a wooden gazebo you will need several components.
- Four posts of the height and color you need (when purchasing, remember that part of the post will be buried so as not to end up with a gazebo that is too low).
- The wood for the crossbars is the same color.
- A shovel to dig holes for the frame.
- Screwdriver.
- Nails and screws.
- Rope.
The process of building a pergola like a gazebo.
There are several stages.
- You need to make four holes in the ground for the posts. About half a meter deep and thirty centimeters in diameter.
- The next stage is fixing the pillars at equal distances between them. To bury the pillars you will need soil, it is better to prepare it in advance. Lower the posts into the holes and keep them strictly vertical. Next, bury it with earth and trample the soil on top for strength.
- Attach the crossbars connecting the side posts to the screws. To ensure maximum strength, wrap the twisting areas with rope.
- Build a roof from the remaining boards; they must also be secured with self-tapping screws and string.
- Make side bars so that the grapes have something to grow up on.
Arch type pergola
Pergola for grapes: photo
Arches are easy to build. You can make it like an arch rounded at the top, or with corners. To create an arch with your own hands you need several components.
- Six boards are about two hundred centimeters high.
- Boards for the top of the arch, straight or rounded.
- Waterproofing agent can be purchased at hardware stores.
- Bitumen and crushed stone.
- Concrete.
- Building tools.
- What you will use to secure the structure.
The process of building a pergola like a gazebo.
There are several stages.
- Preparation of pillars. The bottom is treated with bitumen and wrapped in waterproofing.
- Installation of pillars in pits one meter deep, provided that the soil is not hard, the depth can be increased.
- Place crushed stone in the hole and fill everything with concrete.
- Next, the remaining crossbars are fixed for the growth of the vine.
Pergola extending from the building.
This method can be used if there is no space for a separate gazebo. To create an arch with your own hands you need several components.
- A wooden beam measures five by fifteen centimeters, the length is determined by the number of meters between the support pillars.
- Wood for partitions on the roof.
- Bars for pillars.
- Bolts.
- Arch-like staples.
- Mix for concrete.
- Building tools.
- Materials for securing the structure.
The process of constructing a pergola extending from the building.
There are several stages.
- We fasten fifteen by five beams to the wall with bolts. Bolts should be every half meter.
- We install large beams (pillars) in prepared holes and fill them with concrete.
- In order for small boards to be better secured, they must be inserted into the cut grooves. To make the structure stable, you can secure it with longitudinal beams.
How to extend the life of a pergola
Unfortunately, like all country buildings, such awnings can only serve for a short time. The tendency for very rapid destruction especially concerns wooden products. However, by carefully following the recommended instructions, you have the opportunity to significantly extend the life of the pergola:
- Do not overload the light, openwork design with an excessive amount of decorative ornaments. Such an overkill will certainly disrupt the original style of the weightless structure.
- It must be remembered that roses, grapes and other climbing plants for a garden pergola require regular care. By timely pruning growing shoots, you can prevent your country decoration from turning into a shapeless bush.
- When installing a pergola yourself, do not forget to take into account the own weight of the grapes. The lack of required knowledge is compensated by the ability to use the recommendations of specialists.
- All necessary preventive work is carried out exclusively in winter, in the absence of greenery to mask the structural details. A wooden pergola is varnished or painted with mandatory antiseptic treatment. A stone canopy does not require special care.
- Excessive watering of grapes and roses can negatively affect the overall condition of the pergola structure for fruit-bearing plants and flowers. A special composition, regularly applied to the canopy parts, can protect the metal from rust and the wooden elements of the product from premature rotting.
Grape varieties and how to choose them.
There are a lot of varieties and not all are able to grow well. It is very important to choose the right type of grapes so that they not only decorate the plot, but also produce a high-quality harvest. It is important to remember that different varieties are designed for different climatic conditions.
The most popular and best table varieties for pergolas. The most popular and best varieties for pergolas: 1) Nadezhda AZOS; 2) delight; 3) stable chaff and others. These were table species.
The most popular and best wine varieties for pergolas.
And among the wine ones, the best ones are: 1) Kokysh; 2) Armenian; 3) Azerbaijani.
Pergola for grapes: photo
Garden arch (pergola) for grapes and roses, photos
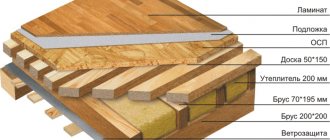
Making a pergola with your own hands is quite simple, however, at home it is more convenient to make a structure with a flat top, consisting of several wooden beams 50 * 100 mm. We will use 100*100 mm beams as pillars. We will also need concrete mortar.
First of all, we mark the area. A pergola for grapes does not necessarily have to look like a classic arch; it can be made in the shape of a gazebo. To do this, we make markings in the form of a square with a side of about 2000 mm.
In each corner we dig holes 600-1000 mm deep for the pillars, install the beams and level them. We fill the recesses with concrete, finally level the supports and leave them until the building mixture dries. To prevent the beams from sagging, they must be supported on both sides. Unlike a wooden pergola, garden metal arches are made, as a rule, from rods that are simply driven into the ground. The crossbars are welded across; you can additionally attach a flexible mesh to the base for better effect when bindweed grows.
After the concrete has dried, we attach two side beams on top with an overlap of 300 mm on each side, cut at the edges at an angle of 30-45° for beauty. On top of them, in the same way, we lay a row of transverse beams in increments of 200-300 mm. For better adhesion, we recommend cutting out grooves 30-35 mm wide and 40-50 mm deep in the parts first. Having laid the beams, we fix them with screws or nails. You can also nail thin slats to the sides of the structure, forming a neat mesh. Our beautiful pergola, a photo of which can be seen in the gallery, is ready, all that remains is to plant the flowers.
Planting and formation of grapevines
In order for the seedlings to develop and grow well, you need to plant them a little less than a meter away from the building. Bushes should not be closer than two and a half hundred centimeters. Such conditions are necessary for good growth of vines in the future. To quickly overgrow the frame, not cuttings are used, but seedlings grown from layering.
Tips for shaping grapevines correctly.
There are several of them.
- Grapes are quite plastic and they are living plants; we must not forget about this. To achieve a good result, you need to focus on your plant, and not just on advice from articles.
- The method of bringing the bush into shape also depends on the cultivation of the grapes. The vertical cordon is applicable when working with frost-resistant and tall varieties, as well as the tall bole.
- Standard fan and similar methods of forming grapes are used when the grapes are closed for the winter.
- Regular pruning is necessary in any case; without it, the grapes will not have a high-quality harvest and vines.
Features of pergolas attached to the house
Pergolas adjacent to the house are open summer terraces. One part of the beams rests on holders installed on the wall of the house, the second - on beams lying on support pillars. There are several ways to attach them to the wall. You can see the first one in the photo below: a support beam is nailed to the wall, and landing sockets are cut out. Additionally, the strength of the connection is ensured by the corners, which are secured on both sides.
One side of the beams rests on the pillars, the other on the wall of the building
The second method is to install special stops on the wall: steel plates of the appropriate shape.
Attaching beams to the wall
This is interesting: What does tree care include: how to properly care for fruit, deciduous and coniferous trees in the garden
The main construction steps are similar, but have some nuances:
- Mark the locations of the posts and install them. The pillars are installed at a certain distance from the house, equal to the width (depth) of the pergola terrace. The second part of the marking is made on the wall of the house - the second ends of the auxiliary beams are installed there. Either the support beam or plates are fixed there.
- Attach two boards or support beams on top to the exposed posts.
- Place auxiliary beams on them, one side of which is attached to a support on the wall.
All. The final result is shown in the picture below.
Schematic representation of an attached pergola from above
DIY pergola: support for plants and a place for comfortable rest
The word " pergola " has a dual Latin-Italian origin, hence several meanings: canopy, guide, extension. There is an opinion that this is an arched connection. But often there are structures with a flat top floor. In any case, this structure is intended to support plants, protect them from the sun and bring aesthetic pleasure to people. And a do-it-yourself pergola will also give you the opportunity to enjoy creating beauty.
A pergola is a structure that serves as support for plants and decorates the site.
Maiden grapes in landscape design
Vineyards in garden decoration are primarily used to create decorative fences. Many summer residents, gardeners and winegrowers specifically plant vines as cheap decorations for various fences.
Note! The structures must be extremely stable, because the vines have a lot of weight. It is best if the girl’s grapes are supported by an iron mesh, tightly stretched between two concrete pillars
The main thing is that it does not sag, otherwise it simply will not hold up, and the plant will collapse to the ground, the branches of which will be problematic to attach back to the trellis
It is best if the girl’s grapes are supported by an iron mesh, tightly stretched between two concrete pillars. The main thing is that it does not sag, otherwise it simply won’t hold up, and the plant will collapse to the ground, the branches of which will be difficult to attach back to the trellis.
But the metal mesh does not always have the proper aesthetic properties, and the girl’s grapes, although they differ in their growth rate, do not grow up to several meters in an instant. Therefore, it is quite acceptable to use a strong wooden fence or lattice, which is installed on strong beams. If it starts to sag, you can install supports, the result will be an object resembling ruins.
Important! Parts of wooden structures in contact with the ground must be treated and protected from moisture and rot. Metal and concrete pillars do not need such treatment
A wonderful idea for creating a landscape composition would be an arch decorated with a vine. However, you should be careful not to install a similar structure near other plants. This is because the girl’s grapes compete with neighbors who are planted at a distance of 7 m from them. And constant pruning to give shape will not help here.
Many designers use vines to decorate pergolas. This is a type of gazebo, but without a roof. It is replaced by a lattice fence made of vinyl, metal or wood. The grapes, entwining the roof structures, form a shady and cozy canopy, creating an atmosphere of mystery and comfort in the garden plot. The size of the pergola can be different, it all depends on the surrounding design and the gardener’s imagination.
Create beauty with your own hands
Maiden grapes are an unpretentious plant, but this feature depends on the variety and planting location. On the sunny side, the leaves of the vine are painted in a dark red, almost crimson color, and in the shade the plant will delight with a dark green, emerald color
If the inconsistent palette of grapes, so indispensable in landscape design, does not suit you, then you should pay attention to varieties that are resistant to sunlight. For example, the Boston ivy variety will constantly delight you with its emerald color
Do-it-yourself pergola: step-by-step instructions, photos
When faced with a choice: buy an arch for grapes or make it yourself, you need to familiarize yourself with the contents of the step-by-step instructions for a pergola with your own hands. Perhaps the steps required to create a structure with your own hands will seem simple, it will be possible to save money and bring to life your most unexpected ideas. The most commonly used material is wood. So, the stage of preparing a drawing of a wooden pergola with your own hands has been completed, let’s move on to the actual implementation.
To make a beautiful and high-quality pergola, you need to study the manufacturing instructions in detail.
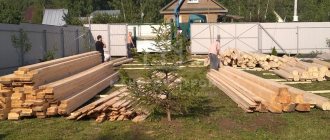
Purchase of materials: quality assessment, compliance with application conditions
We prepare the material according to the sketch. If possible, it is better not to limit yourself in terms of funds. It is recommended to choose hardwood: oak, alder. It is more durable, and this is important, since the pergola is being built in an open area and will be exposed to the sun and precipitation. A cheaper option is pine. It is less durable, but with proper care it will last a long time. It is much easier to work with such wood than with hardwood blanks.
The modern tendency to preserve naturalness (the presence of cracks and knots on wood products) is not entirely acceptable in this case, since during processing the varnish or other coating may not sufficiently penetrate into the cracks, and this will accelerate the aging of the material.
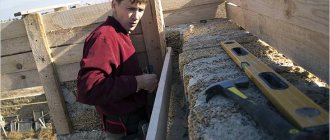
To make a wooden pergola with your own hands, you need dried wood, otherwise it will crack, warp, and the structure may fail. There are two ways to determine wood moisture content at home: visually and by weighing.
The first method is simply simple: if even the smallest drops appear during sawing, the wood is wet and you cannot work with it. The second method is troublesome, but reliable. A piece of wood must be weighed and placed in the oven, kept at a temperature of 100 ° C for 1 hour and weighed again. If the weight has decreased, it means the tree is wet. You need to repeat the steps until the weight before and after drying remains unchanged.
Pergola project with a flat top floor
Helpful advice! When determining the degree of humidity, a piece of wood must be cut from the middle of the workpiece, since the outer parts may be drier and will not give an objective result.
Prepared wooden materials need to be processed. This process pursues the following goals:
- impregnation to prevent aging - cracking;
- maintaining aesthetics;
- antiseptic effect;
- fire prevention.
Often there are processing tools that simultaneously perform several of the listed functions. It is better to process wood in blanks, since after installation the individual parts at the joints will be inaccessible.
The best wood for making a pergola is oak or alder.
Preparation of the instrument: required types, requirements for its condition
Having the necessary tools is a prerequisite for successfully making a wooden pergola with your own hands step by step. As practice shows, even treated wood needs to be brought to perfect condition. This stage of preparation will ensure accuracy during construction and aesthetic appearance of the finished building. If you plan to use unprepared material, you will need the following tools:
- machine for longitudinal and transverse sawing;
- Grinder;
- jigsaw;
- wood cutters;
- screwdriver
To create one pergola, buying such a tool will be difficult from a financial point of view, and even irrational. You can resort to renting - many will offer to use the woodworking equipment gathering dust on their shelves for a reasonable fee. It is worth making sure that the tool is in good working order and well sharpened.
In the process of creating the structure, you will need a wood sander
Helpful advice! When making a pergola for climbing plants with your own hands, it is recommended to use power tools. The process will take less time, the quality of cuts and connections will be much better.
If treated wood is used, hand tools can be used, but they must be perfectly sharpened. To use any type of tool safely and comfortably, you need a workbench. If one is not available, it is easy to make using second-grade wood or pallet boards. The workbench is convenient not only for processing wooden workpieces, but also for storing measuring tools (ruler, tape measure, levels, etc.).
Sequence of assembling a wooden pergola
How to make a pergola with your own hands? Step-by-step instructions will help you determine the sequence of actions and note the basic rules for their implementation.
Step 1 – marking the area. It is performed using a tape measure, the corner points are marked with pegs.
After sanding the wood, you need to cut the grooves to the required size.
Step 2 – installation of supports. Using a hand drill, depths of at least 50 cm are made with a support height of 2 m. Construction crushed stone is poured onto the bottom (layer thickness - 5 cm). Then a wooden support is placed, the edge of which is treated with bitumen and wrapped with waterproofing fabric, this edge is lowered into the ground. The support must be positioned in the center. Spacers made of large stones, broken bricks and other similar materials are placed in the free gaps. The space is then filled with concrete or covered with earth and sand. It is necessary to set the upper level of the supports by adjusting the thickness of the crushed stone layer before laying the spacers.
Helpful advice! The alignment of supports must be done extremely carefully, since any discrepancy in size will lead to misalignment and the impossibility of further installation without eliminating the problem.
Step 3 – securing the upper horizontal beams. It is better if a sample is made in the upper part of the supports for the beams - this is an additional check for the accuracy of the installation of the supports and gives the structure visual accuracy and lightness. The remaining parts are attached to the beams connecting the supports: arches or flat transverse boards, lathing, decorative elements. It is better to connect wooden elements not with nails, but with self-tapping screws. This will not require physical effort and will make it possible, if necessary, to disassemble the structure without damage.
To secure the upper beams you will need nails or screws
Step 4 – coating. Even if the protective or decorative coating is fully completed when preparing the wood, it should be renewed after installation, since even with the most careful installation and fixation in certain places it will still be damaged.
To imagine how to build a wooden pergola with your own hands, you need to prepare all the calculations and materials, tools and fasteners. Then the process will be clear and will not cause problems. Sketches with photos of wooden pergolas with your own hands will help you visualize the information proposed above.
Methods for connecting elements of metal structures
Metal pergolas differ from wooden ones in that they are more durable. The choice of material must be approached responsibly: it must have anti-corrosion properties. For metal pergolas use:
As a rule, metal structures are connected by welding
- round and profile pipes of various diameters;
- smooth and embossed reinforcement;
- rods;
- corner.
The choice depends on the load that the support will experience. The smaller the diameter of the material, the lighter and more elegant the design looks. If you are planning an arched model, you will need a device for bending pipes. The main type of connection of metal pergolas is welding. If you don’t have your own unit, you can rent an inverter welding machine that does not require high voltage. It is quite functional at home and has a moderate rent: the average price is 300-400 rubles per day.
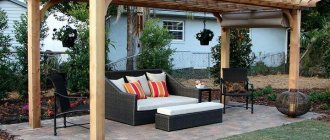
Do-it-yourself pergola: arrangement of a recreation area
Even if the main purpose of creating a pergola was to support climbing plants, then you should not leave the inside non-functional. With an area of 3–4 m² and a height of 1.5–2 m, you can place a swing or a bench - you will get a cozy shaded corner where you can read or just relax in privacy.
To arrange a pergola, you can use a bench, sofa or swing
If it was initially planned to use the pergola as a recreation area, then it is necessary to consider the furniture option. You can combine a metal frame with wooden garden furniture if it is decorated with forged parts and does not have a bulky appearance. If the area is small, it is better to use benches, rather than individual chairs, this will significantly increase the number of seats.
Wide sofas should be proportional to the size of the pergola, otherwise they will be visually squeezed in. If you plan to have upholstered furniture, you must take into account that it must be washed. Common polyurethane and PVC materials emit an unpleasant odor when heated. Bamboo furniture is suitable for open conditions, but it is expensive, so not everyone has the opportunity to buy it.
An excellent option for arranging a pergola for grapes made of wood with your own hands can be rattan furniture. It can be large-sized, medium-sized, some models have quite compact parameters. The furniture is not heavy, it is easy to care for, it is easy to rearrange and bring in if necessary.
A pergola can be a place for an outdoor dining area
It is best to shade the inner area of a pergola with a canopy of grapes. It has large leaves and a long vine. This perennial plant eventually covers the pergola completely, which is clearly demonstrated by photos of arches for grapes, which have become an excellent recreation area and decoration of the local area.
Helpful advice! When arranging a pergola as a resting place, you should not fill it with flowerpots, statues, souvenirs, etc. Contact with nature is a feature of staying in such an area.
A pergola can decorate and make attractive any, even the most unsightly, natural area adjacent to a residential building. A self-made pergola for grapes, clematis, roses, and various vines will not only become a decorative addition to your garden plot, but will also fill your stay here with positive emotions.
Guide to creating a trellis for grapes with your own hands
In order for grapes to grow and develop well, the vines need supports - trellises. These designs can easily be made with your own hands. Trellis are a pair of posts connected by horizontal ropes, to which the grapes cling with tendrils and develop favorably.
Stable trellises for grapes in the country also serve a decorative function. They disguise unsightly outbuildings well and create an attractive, neat look to the entire garden.
Choosing trellises
Single-plane (or vertical). This is the most affordable and easiest to manufacture type of support. Such trellises are ideal for young grapes, small and decorative varieties. A single-plane support is attractive not only because it is easy to manufacture and install, it has a number of undeniable advantages. She:
- inexpensive to manufacture;
- allows the berries to ripen more evenly;
- provides convenience when caring for grape bushes;
- makes it possible to grow other crops between the grape vines;
- provides air access to the leaf mass of the plant and good illumination.
From the name you can understand that the structure of a single-plane trellis consists of two support posts with a wire stretched between them at different levels. But this simple and very convenient structure cannot accommodate powerful, developed grape bushes with numerous shoots.
- Use a single-plane trellis if high yields are not critical for you, if you do not need super bushes, and if it is more interesting to grow a variety of small grape varieties.
A single-plane trellis is ideal for easy, affordable plant care. Beginner winegrowers who do not yet have a large farm should pay attention to it. This device makes it easy to hide the vineyard for the winter by creating a shelter.
Two-plane . This type of support is more suitable for more experienced gardeners with a large plot.
If you are ready to spend a little more money on material and arrangement of supporting structures, if your vineyard does not need winter shelter and is replete with vigorous varieties with powerful vines, choose two-plane trellises for grapes. They have a number of advantages:
- allow for more rational arrangement of vineyards, which ensures their good development;
- make the most of the received solar energy for the development of vines;
- create the most favorable conditions (optimal ventilation and ease of care) for obtaining an excellent harvest.
The structure itself is made of two vertically positioned single supports for each vineyard ridge. But know that arranging such a support will require more space in the vineyard, and you will not be able to grow other crops between the rows. A two-plane trellis can be:
- straight - has the form of planes running parallel to each other;
- V-shaped – the support planes are installed at an angle;
- Y-shaped - the upper part of the structure is located at 45-60° between the middle column, which consists of one plane.
Let's start production
Before making a trellis for grapes, you should prepare high-quality materials before the work process. You will need supports and crossbars.
Supports . You can use wooden poles or metal pipes. Metal is preferable, because we will be using trellises for years; wood may not withstand such a period of use. The diameter of the pipes should be 3-6 cm.
If you still want to get wooden trellises, opt for hard wood (chestnut, oak, ash). Carefully remove all bark and treat the lower parts of the posts with resin or diesel fuel.
The shape of the pipes (round, square) does not matter much, although many experienced gardeners prefer square supports (it is easier to secure them with metal corners during installation). The length of the support pillars should be about 2.5 m (assuming that 60-70 cm will go underground).
Crossbars . They are usually made of aluminum or copper wire (iron will begin to rust, and the rope may break), with a cross-section of about 2-4 mm. Experienced winegrowers advise using only copper wire (copper during operation will release beneficial substances that protect the vines from diseases).
The production of single- and simple two-plane trellises is identical. They are made using the same technology.
Step 1. Preparing the supports. We attach transverse beams or stiffeners to each post (you can use reinforcement, iron tubes with a diameter of 1.5-2 mm, or old corners).