The rafter system is the “skeleton” of any roofing structure. The reliability, quality and durability of the roof directly depends on the correctness of its manufacture and installation. If desired, you can handle the arrangement of the rafter system yourself. Want to know how? Check out the following guide!
DIY rafters
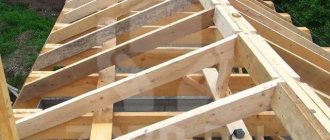
Elements of the roof truss system
Types of rafter systems
There are layered and hanging rafter systems. According to statistics, layered structures are most often used. When arranging such a system, the rafters rest against the mauerlat. The function of the central part is performed by a simple ridge run. To increase the strength of the system, supporting beams are installed.
Types of rafter systems
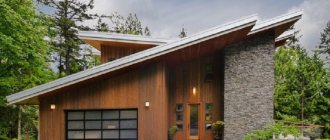
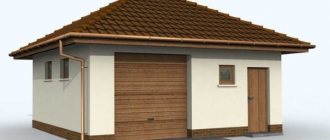
Construction of a gable roof rafter system
In the case of hanging rafters, the system design is equipped with additional racks that promote optimal load distribution over the entire area of the roof structure.
Types of rafters
The manufacture and installation of rafters of both types is carried out in a similar sequence, but taking into account the above-listed features and differences.
Video - Rafter system
Practical advice
It has already been mentioned that the bending strength of the rafters at the splice is always less than that of the whole element. If possible , try to place this node as close as possible to the ridge, Mauerlat or various spacers . Such precautions minimize the risks of mechanical destruction of the rafter leg. If this possibility is not available for one reason or another, then it is not recommended to place the stop under the splice at a distance of more than 15% of the leg length from either end.
The node is located on the Mauerlat
Never use black self-tapping screws for connections . This metal has two significant drawbacks. The first is that it quickly oxidizes and loses its original strength. Secondly, the manufacturing technology of such self-tapping screws involves hardening. When the permissible load is exceeded, hardened screws do not stretch, but burst. During the operation of the roof, the relative humidity of wooden structures changes, and the thickness of the boards fluctuates accordingly. And this can significantly increase the tensile force of the self-tapping screw; it will not withstand it and will crack.
Black screws should not be used
Do not overdo it with the amount of hardware . If there are too many of them, then the holes will significantly reduce the strength of the parts being connected, as a result you will get the opposite effect, the build-up will not be strengthened, but weakened.
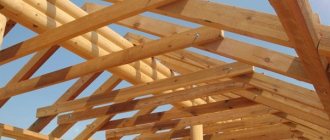
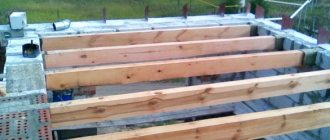
Rafter system design
Construction of the rafter system
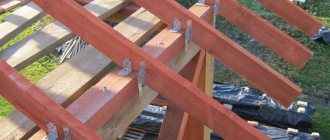
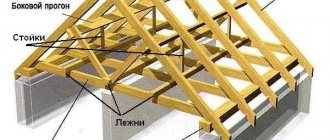
Any rafter system consists of the following main components:
- rafter legs. Mounted parallel to the slopes. Prevents deflection of the roof structure;
- run. It is a transverse beam installed longitudinally from above;
- beds and racks - support the purlins of the rafter structure;
- struts are components of a sub-rafter truss that provide additional stability to the rafters.
Rafter diagram
To calculate, use the rafter leg length calculator.
Determining the cross section of rafters
The rafters of roofs of varying steepness perform ambiguous work. The rafters of flat structures are affected mainly by a bending moment; on analogues of steep systems, a compressive force is added to it. Therefore, when calculating the cross-section of rafters, the slope of the slopes must be taken into account.
Calculations for structures with a slope of up to 30º
Only bending stress acts on the rafters of roofs of the specified steepness. They are calculated for the maximum bending moment with the application of all types of load. Moreover, temporary, i.e. climatic loads are used in calculations based on maximum values.
For rafters that have only supports under both of their own edges, the point of maximum bending will be in the very center of the rafter leg. If the rafter is laid on three supports and made up of two simple beams, then the moments of maximum bending will occur in the middle of both spans.
For a solid rafter on three supports, the maximum bend will be in the area of the central support, but since... there is a support under the bending section, then it will be directed upward, and not downward as in the previous cases.
For normal operation of the rafter legs in the system, two rules must be followed:
- The internal stress formed in the rafter during bending as a result of the load applied to it must be less than the calculated value of the bending resistance of the lumber.
- The deflection of the rafter leg must be less than the normalized deflection value, which is determined by the ratio L/200, i.e. the element is allowed to bend only one two-hundredth of its actual length.
Further calculations consist of sequential selection of the dimensions of the rafter leg, which will ultimately satisfy the specified conditions. There are two formulas for calculating the cross section. One of them is used to determine the height of a board or beam based on an arbitrarily specified thickness. The second formula is used to calculate the thickness at an arbitrarily specified height.
It is not necessary to use both formulas in calculations; it is enough to use only one. The result obtained as a result of the calculations is checked against the first and second limit states. If the calculated value is obtained with an impressive margin of safety, the arbitrary indicator entered into the formula can be reduced so as not to overpay for the material.
If the calculated value of the bending moment turns out to be greater than L/200, then the arbitrary value is increased. The selection is carried out in accordance with the standard sizes of commercially available lumber. This is how the cross section is selected until the optimal option is calculated and obtained.
Let's consider a simple example of calculations using the formula b = 6Wh². Suppose h = 15 cm, and W is the ratio M/Rben. We calculate the value of M using the formula g×L2/8, where g is the total load vertically directed on the rafter leg, and L is the span length equal to 4 m.
Rizg for softwood lumber is accepted in accordance with technical standards as 130 kg/cm2. Let's say we calculated the total load in advance, and it turned out to be equal to 345 kg/m. Then:
M = 345 kg/m × 16m2/8 = 690 kg/m
To convert to kg/cm, divide the result by 100, we get 0.690 kg/cm.
W = 0.690 kg/cm/130 kg/cm2 = 0.00531 cm
B = 6 × 0.00531 cm × 152 cm = 7.16 cm
We round the result up as expected and find that to install the rafters, taking into account the load given in the example, you will need a beam of 150x75 mm.
We check the result for both conditions and make sure that the material with the currently calculated cross-section is suitable for us. σ = 0.0036; f = 1.39
For rafter systems with a slope over 30º
Roof rafters with a slope of more than 30º are forced to resist not only bending, but also the force compressing them along their own axis. In this case, in addition to checking the bending resistance described above and the bending value, it is necessary to calculate the rafters based on internal stress.
Those. the actions are performed in a similar order, but there are slightly more verification calculations. In the same way, an arbitrary height or arbitrary thickness of the lumber is set, with its help the second section parameter is calculated, and then a check is carried out for compliance with the above three technical conditions, including compression resistance.
If it is necessary to increase the load-bearing capacity of the rafters, the arbitrary values entered into the formulas are increased. If the safety factor is large enough and the standard deflection significantly exceeds the calculated value, then it makes sense to perform the calculations again, reducing the height or thickness of the material.
A table that summarizes the generally accepted sizes of lumber produced by us will help you select the initial data for making calculations. It will help you select the cross-section and length of the rafter legs for initial calculations.
What are the rafters made of?
What to make rafters from
Attachment unit to the beam
Most often, rafters are made of coniferous wood. This is a relatively inexpensive, fairly durable and easy to process material.
If you make your own rafters, it is best to use timber with a section of 10x10 or 15x15 cm.
Also, when choosing wood, you need to pay attention to its moisture content. The maximum allowable rate is 20%. At higher values, the material will shrink, which will lead to disruption of the configuration of the entire roofing system.
Prices for various types of timber
timber
Video - Roof construction mistakes
Calculation of roof rafters
Before you start calculating the roof rafters, you need to clearly understand what types of loads and with what force they will act on the roof of our house throughout the year.
Factors that affect the roof are usually classified depending on intensity:
- Constant loads. This category combines loads that constantly act on the structure of a building. These include both the weight of the roof itself and waterproofing, heat and vapor barrier, sheathing, as well as other structural elements of gable or mansard roofs that create a constant weight value.
- Variable loads. This type combines all types of climatic influences, including precipitation, wind flows, etc.
- Special types of loads. This group takes into account climatic influences that are of high strength. This characteristic must be taken into account in seismically active zones and in areas where storm winds or hurricanes are possible.
Constant loads
The size of the rafters for the roof should begin to be calculated from the total weight of the roof “pie”. To get the final value, you need to calculate the weight per square meter of each of the materials used. In most cases, the roof will consist of the following components:
- interior finishing (in the case of an attic roof, the finishing material and fastening elements are taken into account);
- rafters (weight of a standard rafter measuring 150x50 mm, this parameter can be adjusted in the future);
- insulation;
- hydro-wind insulation (the weight of films and membranes is taken into account);
- lathing mounted from boards of small thickness (most often 25 mm).
- counter-lattice (often a block of 30x50, 40x50 or 50x50 mm);
- roof covering (the weight of a square meter of roofing can be found on the manufacturer’s website).
When proceeding to the addition of all calculated data, it is recommended to add another 10% to the result obtained, that is, multiply the final result by a constant factor of 1.1. This approach allows you to leave a margin of safety for the roof.
Snow loads
It is necessary to take into account snow loads, since in many regions the influence of precipitation in the form of snow is possible for a long time. To prevent owners from breaking the roof under the weight of snow, it is necessary to calculate the possible load in advance.
To increase the convenience of calculations, a formula was derived to substitute coefficients from building codes. The formula looks like this:
F = P*k,
where F is the value of the total snow load, P is the load per square meter, k is a correction factor depending on the slope of the roof slope.
The weight of snow on 1 square meter of roof must be determined directly at the construction site. Each region has an average precipitation intensity; data can be found from building codes SNiP 2.01.07-85*.
Wind loads
This type of load has a very high level of criticality because it can affect the roof with intense winds, regardless of the roof angle. Even a small angle of inclination makes it possible for the roof to fall off under the influence of aerodynamic loads. Too much slope can cause the entire roof to experience strong wind pressure on the surface.
To calculate the influence of wind force on the roof, there is also a special formula, in which there is a dependence on correction factors:
V = R*k,
where V is the wind load, R is an indicator selected based on the regional location of the house, k is an adjustment factor that depends on the height of the structure.
After summing up all the loads, the total load per 1 square meter of roof is obtained.
Preliminary calculations
Roof rafter system
We calculate the optimal length of the rafters. The standard length of factory-made products is 450 or 600 cm. If necessary, the length of the rafters can be changed.
To determine the optimal cross-section of timber you need to know the following:
- rafter length;
- element installation step;
- estimated indicators of future loads.
The required information is shown in the following table.
Table 1. Selection of rafter installation step depending on their length and cross-section
| Rafter length, m | Distance between rafters, cm | Rafter beam cross-section size, cm |
| Until 3 | 120 | 8x10 |
| Until 3 | 180 | 9x10 |
| Up to 4 | 100 | 8x16 |
| Up to 4 | 140 | 8x18 |
| Up to 4 | 180 | 9x18 |
| Until 6 | 100 | 8x20 |
| Until 6 | 140 | 10x20 |
The remaining elements of the roofing system should have the following sections:
- Mauerlat - 10x10 or 15x15 cm. It is also possible to install a Mauerlat from timber with a section of 10x15 cm;
- diagonal rafter legs and valleys - 10x20 cm;
- puffs – 5x15 cm;
- purlins – 10x10, 10x20 cm;
- struts - 10x10 or 15x15 cm;
- hemming boards – 2.5x10 cm;
- crossbars – 10x15 or 10x20 cm.
Calculation of the load on the rafters
Knowing the length and cross-section of the rafters, as well as the step of their installation, you can easily calculate the required number of elements, focusing on the length of the building wall.
Calculation of the rafter system
Additionally, the rafters must be calculated for deflection. That is, you need to find out how much the rafters can bend before they break. For example, when designing an attic roof structure, the calculation of the truss must be done so that the deflection is no more than 1/250 of the length of the section that is subject to pressure.
Calculation of the rafter system
Based on the above, if the length of the rafters is 500 cm, the maximum permissible deflection value will be 0.2 cm. The indicator seems insignificant, but if it is exceeded, the deflection of the roof will be visually noticeable, and this will not have the best effect on the reliability of the structure.
Shed roof rafters
If possible, when designing a house, it is advisable to ensure that the length of the rafters does not exceed 6 meters
To determine the length of the rafters, use the Pythagorean theorem
The calculation of the cross-section of the rafters depends on the roofing material
Video - Calculation of rafters with your own hands
Specifics of calculating the rafter frame
The rafter system determines the configuration and strength characteristics of a pitched roof, which performs a number of significant functions. This is a responsible enclosing structure and an important component of the architectural ensemble. Therefore, in the design and calculations of rafter legs, one should avoid flaws and try to eliminate shortcomings.
As a rule, in design developments several options are considered, from which the optimal solution is selected. Choosing the best option does not mean that you need to create a certain number of projects, perform precise calculations for each and ultimately choose the only one.
The very process of determining the length, installation slope, and cross-section of the rafters lies in the scrupulous selection of the shape of the structure and the dimensions of the material for its construction.
For example, in the formula for calculating the load-bearing capacity of a rafter leg, the cross-sectional parameters of the most suitable material are initially introduced. And if the result does not meet technical standards, then increase or decrease the size of the lumber until maximum compliance is achieved.
Inclination angle search method
Determining the slope angle of a pitched structure has architectural and technical aspects. In addition to the proportional configuration that best suits the style of the building, an impeccable solution should take into account:
- Snow load indicators. In areas with heavy rainfall, roofs with a slope of 45º or more are erected. Snow deposits do not linger on slopes of such steepness, due to which the total load on the roof, footings and the building as a whole is significantly reduced.
- Wind load characteristics. In areas with gusty strong winds, coastal, steppe and mountainous areas, low-slope, streamlined structures are built. The steepness of the slopes there usually does not exceed 30º. In addition, winds prevent the formation of snow deposits on roofs.
- Weight and type of roofing covering. The greater the weight and the smaller the roof elements, the steeper the rafter frame needs to be constructed. This is necessary in order to reduce the likelihood of leaks through connections and reduce the specific weight of the coating per unit of horizontal projection of the roof.
In order to choose the optimal angle of inclination of the rafters, the project must take into account all the listed requirements. The steepness of the future roof must correspond to the climatic conditions of the area chosen for construction and the technical data of the roofing covering.
True, property owners in northern windless areas should remember that as the angle of inclination of the rafter legs increases, the consumption of materials increases. The construction and arrangement of a roof with a slope of 60 - 65º will cost approximately one and a half times more than the construction of a structure with an angle of 45º.
In areas with frequent and strong winds, you should not reduce the slope too much in order to save money. Excessively sloping roofs are disadvantageous in architectural terms and do not always help reduce costs. In such cases, strengthening of the insulating layers is most often required, which, contrary to the expectations of the economist, leads to higher construction costs.
The slope of the rafters is expressed in degrees, as a percentage, or in the format of dimensionless units that reflect the ratio of half the meter of the span to the installation height of the ridge run. It is clear that the angle between the ceiling line and the slope line is delineated in degrees. Percentages are rarely used because they are difficult to perceive.
The most common method of indicating the angle of inclination of rafter legs, used by both designers of low-rise buildings and builders, is dimensionless units. They convey in fractions the ratio of the length of the covered span to the height of the roof. On site, the easiest way is to find the center of the future gable wall and install a vertical rail in it with a mark for the height of the ridge, rather than putting corners away from the edge of the slope.
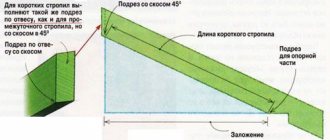
Calculation of the length of the rafter leg
The length of the rafters is determined after the angle of inclination of the system is selected. Both of these values cannot be considered exact values, because in the process of calculating the load, both the steepness and the subsequent length of the rafter leg may change slightly.
The main parameters that influence the calculation of the length of the rafters include the type of eaves overhang of the roof, according to which:
- The outer edge of the rafter legs is cut flush with the outer surface of the wall. In this situation, the rafters do not form a cornice overhang that protects the structure from precipitation. To protect the walls, a drain is installed, secured to a cornice board nailed to the end edge of the rafters.
- The rafters, cut flush with the wall, are extended with fillets to form a cornice overhang. The fillies are attached to the rafters with nails after the construction of the rafter frame.
- The rafters are initially cut taking into account the length of the eaves overhang. In the lower segment of the rafter legs, notches in the form of an angle are chosen. To form notches, step back from the lower edge of the rafters to the width of the eaves extension. Notches are needed to increase the supporting area of the rafter legs and to install support units.
At the stage of calculating the length of the rafter legs, it is necessary to consider options for attaching the roof frame to the mauerlat, to the bypasses or to the upper crown of the log house. If it is planned to install the rafters flush with the external contour of the house, then the calculation is carried out according to the length of the upper edge of the rafter, taking into account the size of the tooth if it is used to form the lower connecting node.
If the rafter legs are cut taking into account the eaves extension, then the length is calculated along the upper edge of the rafter along with the overhang. Note that the use of triangular notches significantly speeds up the pace of construction of the rafter frame, but weakens the elements of the system. Therefore, when calculating the load-bearing capacity of rafters with selected cutting angles, a coefficient of 0.8 is used.
The average width of the cornice extension is considered to be traditional 55 cm. However, the spread can be from 10 to 70 or more. The calculations use the projection of the cornice extension onto the horizontal plane.
There is a dependence on the strength characteristics of the material, on the basis of which the manufacturer recommends limit values. For example, slate manufacturers do not advise extending the roof beyond the contour of the walls to a distance of more than 10 cm, so that the snow mass accumulating along the eaves of the roof cannot damage the edge of the cornice.
It is not customary to equip steep roofs with wide overhangs; regardless of the material, the eaves are not made wider than 35 - 45 cm. But structures with a slope of up to 30º can be perfectly complemented by a wide eaves, which will serve as a kind of canopy in areas with excess sunlight. In the case of designing roofs with eaves extensions of 70 cm or more, they are strengthened with additional support posts.
How to calculate load-bearing capacity
In the construction of rafter frames, lumber made from softwood is used. The prepared timber or board must be at least second grade.
The rafter legs of pitched roofs work on the principle of compressed, curved and compressed-curved elements. Second-grade wood copes excellently with the tasks of resisting compression and bending. Only if the structural element will work in tension is the first grade required.
Rafter systems are made from boards or timber, they are selected with a margin of safety, focusing on the standard sizes of lumber produced in-line.
Calculations of the load-bearing capacity of rafter legs are carried out in two states, these are:
- Estimated. A condition in which a structure collapses as a result of an applied load. Calculations are carried out for the total load, which includes the weight of the roofing pie, wind load taking into account the number of floors of the building, and the mass of snow taking into account the roof slope.
- Regulatory. A condition in which the rafter system bends, but the system does not collapse. It is usually impossible to operate a roof in this condition, but after repair operations it is quite suitable for further use.
In a simplified calculation version, the second state is 70% of the first value. Those. To obtain standard indicators, the calculated values need to be multiplied by a factor of 0.7.
Loads depending on the climatic data of the construction region are determined from the maps attached to SP 20.13330.2011. Searching for standard values on maps is extremely simple - you need to find the place where your city, cottage community or other nearby settlement is located, and take readings about the calculated and standard values from the map.
Average information about snow and wind loads should be adjusted according to the architectural specifics of the house. For example, the value taken from the map must be distributed among the slopes in accordance with the wind rose compiled for the area. You can get a printout of it from your local weather service.
On the windward side of the building, the mass of snow will be much less, so the calculated figure is multiplied by 0.75. On the leeward side, snow deposits will accumulate, so they multiply here by 1.25. Most often, in order to unify the material for roof construction, the leeward part of the structure is constructed from a paired board, and the windward part is constructed with rafters from a single board.
If it is unclear which of the slopes will be on the leeward side and which on the contrary, then it is better to multiply both by 1.25. The margin of safety will not hurt at all, if it does not increase the cost of lumber too much.
The estimated snow weight indicated by the map is also adjusted depending on the steepness of the roof. From the slopes, installed at an angle of 60º, the snow will immediately slide off without the slightest delay. In calculations for such steep roofs, a correction factor is not used. However, at a lower slope, snow can already be retained, so for slopes of 50º an additive is used in the form of a coefficient of 0.33, and for 40º it is the same, but already 0.66.
Wind load is determined in a similar way using the corresponding map. The value is adjusted depending on the climatic specifics of the area and the height of the house.
To calculate the load-bearing capacity of the main elements of the designed rafter system, it is necessary to find the maximum load on them, summing up the temporary and permanent values. Nobody will strengthen the roofs before a snowy winter, although at the dacha it would be better to install vertical safety struts in the attic.
In addition to the mass of snow and the pressing force of the winds, calculations must take into account the weight of all elements of the roofing pie: the sheathing installed on top of the rafters, the roof itself, insulation, and inner sheathing, if used. The weight of vapor and waterproofing films with membranes is usually neglected.
Information on the weight of materials is indicated by the manufacturer in technical data sheets. Data on the mass of the block and board are taken as an approximation. Although the mass of the sheathing per meter of projection can be calculated, taking as a basis the fact that a cubic meter of lumber weighs on average 500 - 550 kg/m3, and a similar volume of OSB or plywood from 600 to 650 kg/m3.
The load values given in SNiPs are indicated in kg/m2. However, the rafter perceives and holds only the load that directly presses on this linear element. In order to calculate the load specifically on the rafters, the totality of the natural tabular values of the loads and the mass of the roofing pie are multiplied by the installation step of the rafter legs.
The load value reduced to linear parameters can be reduced or increased by changing the pitch - the distance between the rafters. By adjusting the load collection area, its optimal values are achieved for the sake of long service life of the pitched roof frame.
We turn wooden beams into rafters
We are making a template with which further work will be performed. The rafters have the same design, so the template will save you time and effort.
Use a template to mark and trim rafters
Use a template to mark and trim rafters
We connect two boards along one edge with a nail. The result should be a design that resembles scissors.
Making a template
Template outline
We place the free edges of the “scissors” on supports at the points of future placement of the rafters. This will allow you to determine the slope of the roof slope.
We take an extra pair of nails and fix the angle set between the boards. The template is ready. Additionally, secure it with a crossbar. To ensure that the set slope angle of the roof slope does not change under the influence of loads, fasten the crossbar with self-tapping screws.
Be extremely careful when creating the template. Even the slightest deviations can cause the entire structure to deteriorate.
Next, we make a new template for preparing mounting cuts on the system elements. Use plywood 0.5 cm thick. For reinforcement, use a 2.5 cm board. Select the dimensions of the cuts taking into account the cross-section of the rafters used.
Using ready-made templates, we make cuts and begin to assemble the truss.
Marking the opposite end of the rafters
Marking the opposite end of the rafters
Full size rafter template
Video - Gable roof rafter system
Butt splicing with plywood
Prices for different types of clamps
Clamps
One of the methods of splicing rafters helps to save boards and rationally use waste of various lumber. In this case, cuttings of sheet plywood one centimeter thick are used.
Step 1. Lay the rafter boards evenly on the site, close the ends, pay attention to the parallelism of the side edges. The boards should be extremely equal in thickness, the ends should be cut exactly at right angles.
The ends of the boards are closed
Step 2. Using a brush, generously coat the surface with PVA glue.
PVA glue is applied
Step 3. Place the prepared piece of plywood at the joint, press it firmly with clamps. While fixing, make sure that the plywood does not move from its original location.
Laying a piece of plywood
Clamps are used for fixation
Step 4. Using long, strong self-tapping screws in a checkerboard pattern, screw the plywood to the boards. The length of the screws should be 1–2 times shorter than the total thickness of the boards and plywood; their ends cannot protrude from the reverse side. Be sure to place large diameter washers under the screws. Before tightening the screws, drill holes in the rafters. Their diameter should be 2–3 mm less than the diameter of the threaded part of the hardware.
Drilling holes for self-tapping screws
Screws are tightened
Step 5. Turn the board over with the back side up, place it under the ends of the stand, they should not hang in the air. Carefully remove all installed clamps one by one.
The clamps are removed
Step 6. Spread the surfaces with glue and place the second piece of plywood on them. Clamp it again with clamps.
Surfaces are coated with glue
The workpiece is clamped with clamps
Step 7. Tighten the screws with great force.
Self-tapping screws are tightened with great force
Important. When tightening the screws, make sure that they are not positioned against each other. The displacement must be at least three centimeters.
Step 8: Remove the clamps. To strengthen the splice assembly, tighten it with through pins. They should be placed in the same way as with conventional butt splicing.
Through pins become clogged
Practical advice. The holes for the studs should be 0.5–1.0 mm smaller than the diameter of the stud. There are times when it is impossible to accurately select the diameter of a drill bit for wood. Then it is recommended to use a drill of a slightly smaller diameter, let the pin go in with a fairly large force.
During its hammering, the first few turns of the thread are crushed by strong blows of the hammer, which makes it very difficult to screw on the nut. To avoid problems, tighten the nuts before driving in the stud; now let the thread on the end jam, it is no longer needed. Before installing the rafters in place, check that the glue is dry. In good weather, it takes about 24 hours for it to completely harden.
The final touch is applying glue
Important. If, when splicing the rafters along the length of the boards, the nuts were tightened until the washer was sunk into the wood, then this cannot be done with plywood. Carefully control the pressing force, do not damage the plywood veneer.
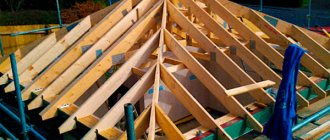
Farm assembly procedure
For convenience, you can build scaffolding.
The structure includes supporting legs and connecting components. The farm resembles a triangle. Carry out the work in the specified sequence, and the finished structure will be able to adequately withstand all incoming loads.
Installation of the ridge beam and the first rafters
Use the calculator to calculate the height of the ridge of the rafter system.
The farm can be made on the ground with further rise to the top, or directly on the roof. The first option is simpler and easier to implement.
Another rafter in place
Type of installed rafters
We assemble the truss in the following order. First, we cut the prepared material to the required size, join the bars at the top edges and fasten them with screws. To prevent cracks from appearing at the fastening points, we pre-drill holes in the bars with a diameter slightly smaller than the size of the fasteners.
Installation of rafters
Ridge beams
We also use a crossbar to connect the rafter legs. We fix it half a meter below the top point of fastening the elements. Crossbars will help increase the rigidity of the structure and eliminate the risk of deflection. We fasten the crossbars in recesses previously prepared in the rafters by cutting down.
If necessary, the rafters are cut at an angle if this is required by the features of the roofing structure being installed.
Options for purchasing material for rafters
There are three standard options for purchasing rafter boards; it is worth considering the pros and cons of each of them:
- Cubic meters of lumber. Buying wood in cubic meters is a completely acceptable way; to do this, you just need to order the required number of cubic meters of timber or boards from a specialized company. Next, they will still need to be cut and processed, only after that can construction begin. In this case, it is worth taking into account waste when processing wood, so it is better to take about 10 percent more than calculated according to the construction plan.
- Custom cut boards. The next option is to purchase ready-made rafters after cutting. Now many companies are engaged in cutting wood to order according to given parameters; builders will only have to assemble the rafter system on the roof. There will be practically no waste here, and the process of constructing the structure will go much faster.
- Ready-made roof trusses. This option is simpler than the first two. Such structures are easier to install on walls directly on the roof, which will reduce the time of assembling the entire structure to one or several days. This truss only needs to be installed and connected at the ridge. The amount of waste is minimal, but the price of this option is noticeably higher.
To make rafters yourself, it is enough to know their necessary parameters, such as angle of inclination, distance, cross-section, fastening method, and so on.
In order to calculate the required rafter size, carpentry tools are used. Modern special construction calculators carry out these calculations extremely quickly. A popular bookmaker has released an application, officially you can click on the link without registration and absolutely free.
Installation of a roof truss
Options for cutting rafters into beams
Measurements and marking of hip rafters
Installation of roof trusses is carried out in the following sequence:
- we install end trusses;
- we fix the central trusses.
When installing edge trusses, we adhere to the following important rules:
- we install the base of the triangle on the mauerlat or the upper frame in the case of arranging the roof of a wooden structure;
- first we make several holes in the base for its subsequent fastening to the log house;
- Be sure to check the straightness of the installation of the truss. To do this, we use a plumb line attached to the crossbar;
- We fix the base of the truss only after confirming the evenness of its installation;
- To ensure additional stability of the farm, we attach the jibs from the log house to the rafter leg. Select the length according to the situation, it is not of fundamental importance;
- Before tightening the jib with screws, we again make sure that its placement is straight.
Rafter system
Manufacturing of lower chords of roof trusses
Assembling a roof truss
Assembling a roof truss
Rafter trusses are installed in the design position
After completing the installation of the outer trusses, we proceed to fixing the central and subsequent structures, if their placement is provided for by the project. The optimal installation step for trusses is 100 cm.
To secure the central rafter triangle, we use temporary jibs. After the visor is installed, the jibs can be removed. Recommendations for fastening the central and other trusses are the same as in the case of the outer structures.
After installing all structural elements, we begin attaching the sheathing and further arranging the roofing system: moisture, heat and vapor insulation, as well as installation of the selected finishing coating.
House frame with rafters
Good luck!
Assembling a ridge truss
Installation of a ridge truss
Installation of rafters
Installation of rafters
Prices for various types of fasteners for rafters
Rafter fasteners
Video - DIY rafters. Shed roof
Material quality requirements
Roof design for calculating the number of wooden rafters
If wooden rafters are being calculated, then in addition to parameters such as length and cross-section, the quality of the building material must also be taken into account.
Do-it-yourself roof rafters are made from deciduous and coniferous wood.
The basic requirements for the material are set out in GOST 2695-83 and GOST 8486-86. Among them:
- Allows the presence of knots in an amount of no more than three per meter area, the size of the knots should not exceed 30 mm.
- Non-through cracks not exceeding ½ length are allowed;
- The moisture content of lumber should not be higher than 18% when measured with a moisture meter.
When purchasing the material from which it is planned to install rafter systems, the snip prescribes checking the quality document, which indicates:
- Manufacturer information;
- Standard number and product name;
- Product size, humidity and type of wood used;
- Number of individual elements in the package;
- Release date of this batch.
Since wood is a natural material, it requires pre-installation preparation. This preparation is planned at the stage when the rafter system is being designed - the construction specification provides for the implementation of protective and constructive measures.
Protective measures include:
- Treating wood with antiseptics to prevent premature decay;
- Treatment of wood with fire retardant impregnations to protect against fire;
- Treatment with bioprotective compounds to protect against insect pests
Constructive measures include:
- Installation of waterproofing gaskets at the point of contact between brick and wooden structures;
- Creation of a waterproofing layer under the roofing material and a vapor barrier layer on the side of the premises in front of the insulation layer;
- Ventilation equipment for under-roof space.
If all technology requirements are met, the rafter system of a wooden house will acquire higher strength qualities, and the roof structure will last a long time without requiring repairs.
Basic requirements for timber for the installation of a rafter system
In addition to the calculation of the rafters itself, you need to pay due attention to the choice of timber for arranging the system.
The material must be of good quality. The maximum permissible wood moisture level is 20%. The beams are pre-treated with a special solution that protects wooden structures from fire, rot, and damage by rodents and insects.
Map of snow loads in Russia.
The timber used to construct the rafter system will be subject to constant and periodic loads. By constant loads we need to understand the weight of the rafter structure, mounted sheathing, facing roofing material, thermal insulation and other materials. The values are calculated separately for each material used, and then the results are summarized.
Temporary loads can have different frequency and be long-term, short-term and rare. Special loads are also identified, for example, earthquakes.
By short-term we mean snow and wind loads, the weight of people performing work on the roof, etc. Long-term are any loads to which the structure is subjected for a certain period of time.
Step-by-step guide to calculating rafter cross-sections
When calculating rafters for any type of roof, you need to take into account the following parameters:
- Length of an individual leg. Installation pitch of rafter legs. All possible significant atmospheric loads for a particular region.
The values for calculation are taken from the tables. For example, the following indicators are relevant for Moscow and the region:
- The cross-section of wooden beams for constructing the Mauerlat is 10x10 cm, 15x10 cm, 15x15 cm. Diagonal valleys and rafter legs are made from wooden beams 20x10 cm. The cross-section of products for constructing purlins can be selected from 10x10 cm, 20x10 cm, 15x10 cm. The cross-section of wooden beams for installation puffs - 15x5 cm. Section of products for crossbars - 15x10 cm, 20x10 cm. Section of bars for racks - 10x10 cm, 15x15 cm. Section of products for arranging the filly, cornice, struts - 15x5 cm. To make the hem and frontal board - wooden board 2 ,2x10 cm.