Internal and external insulation
Before you start insulating the walls, you need to decide on the insulation method. Laying insulation outside or inside is an individual preference. Each method has its own advantages and disadvantages . The features of each insulation method must be studied at the time of building design.
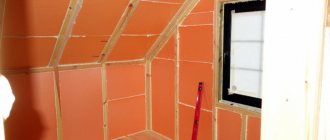
Insulation from the inside
Internal wall insulation is characterized by the following features:
- the cost of insulation from the inside is less than that of external insulation;
- season and weather do not affect the choice of time for work;
- there is no need to build additional scaffolding for insulation work.
Negative factors for internal insulation are:
- significant reduction in living space;
- the outer wall is insulated from heating from the room;
- the likelihood of fungus forming inside the wall increases, since the dew point is formed precisely in the inner part of the structure;
- when the heating is turned off, the walls quickly cool down due to the low inertia of the insulation;
- the junction of the ceiling with the external wall cannot be equipped with insulation, which leads to the formation of cold bridges.
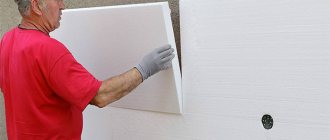
The method of insulating walls from the outside is more popular despite the fact that the cost of labor and materials for performing the work is significantly higher than the method of internal insulation.
Dew point
Insulation from outside
The advantage of insulating walls from the outside is:
- in winter and in cold weather, heat is retained in the wall for a long time;
- the design area of the room is preserved;
- external thermal insulation protects internal walls from dampness.
In addition, the external walls are additionally protected from weather conditions, which significantly increases the service life of the structure.
The main disadvantages of external thermal insulation of a structure are:
- restriction of work in accordance with weather conditions;
- increase in costs for materials used.
Which side of the wall to insulate with polystyrene foam?
It is advisable to insulate walls with expanded polystyrene from the outside, since the material does not allow air to pass through, which can lead to the formation of condensation inside the wall during internal insulation, and also inside the room the material can emit a specific odor.
Insulation of walls from the inside with polystyrene foam - stages of work
Internal insulation of wooden or brick walls can be carried out at any convenient time of the year. However, it is resorted to only if it is not possible to create a layer of insulation from the outside.
Work on insulating the walls inside the house with polystyrene foam begins with thorough cleaning of the old layer of finishing. If the surfaces have been affected by fungi, the problem areas are treated with specialized compounds.
After cleaning, the area needs to be leveled so that the insulation fits snugly. First you need to eliminate irregularities, crevices and cracks, then prime the surface.
Expanded polystyrene is fixed with a special glue, and for reliability it is additionally fixed with mushroom dowels.
Installation starts from bottom to top. However, the sheets are not arranged in a strict checkerboard pattern, as this may cause the joints to overlap. The seams are treated with putty or polyurethane foam. You can also use construction tape. Large cracks are sealed with thin strips of insulation.
Advantages and disadvantages of expanded polystyrene
The polystyrene foam material is a porous, air-containing raw material , used in most cases as a heat-insulating material.
In industry, the material can also be used as electrical insulating and packaging material.
The material has become widely used due to its quality indicators:
- low level of water absorption;
- low thermal conductivity;
- ease;
- biological stability;
- durability;
- compressive strength;
- not affected by temperatures;
- ease of installation;
- low price of material.
Comparison of insulation materials
Despite the impressive list of positive indicators, polystyrene foam has disadvantages that must be taken into account during installation:
- low sound insulation;
- instability to solvents and many chemicals;
- afraid of fire. When burned, it releases harmful toxic substances;
- poor resistance to ultraviolet radiation;
- easily susceptible to the influence of rodents and insects, which, by making holes in the material, provoke its destruction;
- low vapor permeability;
- fragility.
IMPORTANT!
Expanded polystyrene is sometimes compared in terms of characteristics and external indicators with another similar material - polystyrene foam.
However, the production technology of these materials is different : polystyrene foam is produced by extrusion, when the granules melt when combined into a single structure, polystyrene foam is produced by gluing granules with dry steam.
Specifications
Myths and misconceptions about polystyrene foam
Fire hazard
There are many misconceptions about the quality and characteristics of insulation. The material is considered to be highly flammable. But if the installation is carried out, taking into account the characteristics and properties of polystyrene foam, then ignition will be excluded. For this purpose, protective coatings from other building materials are used. The combustion temperature of polystyrene foam boards becomes 491 degrees. The indicator is 2 times higher than that of paper and wood.
The flammability of expanded polystyrene is lower than that of polystyrene foam
Durability
Many people are also concerned about the durability of the insulation. But under finishing, without external mechanical damage, the material does not deteriorate at all.
Environmental friendliness
Synthetic materials can be harmful to health. But polystyrene foam is absolutely safe. There are no toxic substances in it. Remaining or replaced material must be disposed of for further processing. Throwing it into ordinary trash cans is strictly prohibited.
Types of expanded polystyrene
Expanded polystyrene is classified according to the method of production of the material and the inclusion of various additives in it:
- pressed polystyrene foam . Produced by pressing;
- pressless polystyrene foam . Produced by removing moisture by drying and then foaming at high temperatures;
- extruded polystyrene. Not much different from pressless; an extruder is additionally used in production. The best and optimal option for thermal insulation of walls.
There are other types of polystyrene foam (extruded, autoclaved), but they are not used as insulation materials because they have different characteristics.
In addition to types of expanded polystyrene, there are also various types of insulation, such as:
- mineral wool;
- penofol;
- penoizol;
- penoplex;
- polyurethane foam.
Distinctive features of foam as a material
The insulation in question has a fairly low strength. When exposed to moisture and cold, the material can crumble into small balls. For this reason, it is not recommended to insulate the walls of a house with foam plastic from the outside without protective cladding. You can use this method indoors without fear.
Polystyrene foam as wall insulation has the following positive characteristics:
- low cost;
- accessibility, it can be easily purchased at almost any hardware store;
- light weight;
- ease of transportation;
- ease of installation;
- good thermal insulation performance;
- safety.
The disadvantages when used from the inside of the wall of a house practically do not appear, since the material is most afraid of moisture and freezing temperatures.
Wall pie when using insulation - polystyrene foam on the outside
A wall pie refers to layers of materials that are laid in a certain order, each of which performs its own functions to ensure a normal microclimate in the room.
When thermally insulating brick walls with polystyrene laid outside, the wall pie looks like this:
- interior plaster;
- outer wall;
- adhesive solution for gluing polystyrene foam;
- insulation (expanded polystyrene);
- adhesive solution for gluing the next layer;
- fiberglass mesh;
- adhesive composition;
- primer;
- finishing plaster.
NOTE!
When arranging a wall using polystyrene foam, it is necessary to lay the layers in strict sequence.
Internal and finishing plaster can be replaced with other finishing materials that are provided for in design solutions.
Wall cake "wet"
How to insulate houses with polystyrene foam?
To do everything correctly and efficiently, you should adhere to a certain technology for installing and decorating insulation. It may be difficult for a beginner to cope with a large number of stages and processes, but if you wish, you can do everything yourself.
If you don’t have the energy and time, hire a professional team of workers. This will entail additional costs, but you will definitely save your time.
Materials and tools required for work
You don’t have to buy expensive equipment to process and install EPP boards. It is enough to use the tools that you already have on the farm or you can borrow from people you know. An approximate list of what you will need:
- EPP plates of the required thickness;
- tape measure and pencil for marking;
- building level;
- stationery knife;
- drill or hammer drill for making holes for dowels;
- umbrella dowels;
- specialized adhesive solution;
- facing material.
If you have all the tools and materials, feel free to begin work.
Preliminary wall preparation
In order for the extruded polystyrene foam to fit tightly on the wall, it must be carefully prepared. The base must be smooth and clean, therefore the following measures are carried out:
- Remove all hanging structures.
- Check the strength of the walls, especially if you decide to use heavy panels for decoration.
- Cracks and depressions or holes from mechanical fasteners are sealed with rough cement mortar.
- If there are differences of more than 10 mm on the wall, the entire surface is leveled with a rough mortar and a reinforcing mesh must be used.
Primer
Those who are involved in repair work more than once know that it is almost impossible to do without a primer solution. Depending on the presence or absence of certain components, the composition performs the following functions:
- disinfects the surface;
- prevents the development of mold and fungus;
- increases the adhesion of the base and adhesive composition.
At first glance, the process can be missed, but in harsh climates it is impossible to do without it.
If extruded polystyrene foam is installed on a foundation, then it is better to use a water barrier in the form of bitumen mastic or a film version.
Styrofoam fastening
To fix this insulation, two options are used:
- Mechanical - dowel-umbrella.
- Special glue or cement mortar.
But professionals say that using two methods at once will increase the strength of the structure. Therefore, they follow this plan:
- installation of the starting bar - holds the entire structure;
- a small piece of fiberglass mesh is placed in the plank, which will then reinforce the plaster mortar;
- begin installation of insulation from the bottom corner of the building;
- an adhesive solution is applied to the EPP sheet along the perimeter and several blots in the center; it can be applied in a continuous layer;
- install the element into the starting bar and press it tightly to the base;
- make holes for the dowel;
- fix the plate with mechanical fasteners;
- the next insulation element is applied close to the previous one to avoid cold bridges;
- the second row is made with a shift so that the seams do not coincide - the structure will be more durable.
Preparation before plastering
Before you begin applying plaster, the extruded polystyrene foam boards must be firmly glued to the base. Therefore, the treated wall is left until the glue completely hardens. Then the EPP is prepared as follows:
- Pass over the slabs with a needle roller - this will increase adhesion to the plaster mortar.
- Treated with deep penetration soil.
- Allow the base to dry.
Installation of mesh on insulation
In this case, it is impossible to do without fiberglass mesh. The primer, of course, will increase adhesion, but the facade walls are subject to various mechanical loads and this may not be enough. That's why they work like this:
- prepare a plaster solution;
- apply the solution to extruded polystyrene foam in a thin layer;
- fiberglass mesh is laid directly on the solution in horizontal stripes;
- using a spatula, the mesh is embedded in the solution;
- in places where the mesh is visible, add a solution and smooth it further;
- the next layer of fiberglass is overlapped by 10 cm over the previous one;
- After treating the entire surface, the wall is left to dry completely.
Grinding
After the treated surface has dried, begin grinding. Using a grater with a mesh, remove excess roughness and possible unevenness. After removing all dust from the wall, apply finishing putty. There are two options here:
- perfectly smooth surface for painting;
- textured finish, where an ornament is created using a roller, stencils or improvised tools.
Issues of vapor barrier and waterproofing
An important requirement during the construction and improvement of a house is the correct implementation of all work to ensure ventilation and waterproofing, since it is the incorrect installation of these components that significantly reduces the performance of the structure.
When insulating walls with polystyrene, waterproofing is not needed . It should be taken into account that if there is a high passage of groundwater under the building, it is necessary to waterproof the basement and foundation.
Since polystyrene foam does not allow air and water to pass through, there is no need to lay a vapor barrier layer when insulating walls from the outside.
Wall insulation cake under siding
Penoplex and its use as insulation
What is penoplex
Workshop for the production of extruded polystyrene foam
- Dense synthetic insulation extruded polystyrene foam was developed in 1941 in the United States. The material is also known as penoplex (penoplex), technoNIKOL and stirex. But, nevertheless, it remains extruded polystyrene foam. The perimeter size of the slab is usually 1200x600 mm.
- The production of such insulation differs from the production of foam plastic by the production of granules, that is, if the foam granules are “steamed” until the mold is completely filled, then the foam plastic is produced by extrusion. Here, polystyrene granules are mixed at high temperature and pressure with the addition of a blowing agent, and then the mass is extruded into a mold from an extruder.
Comparative table of thermal conductivity of materials
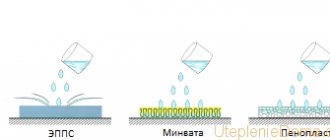
- Clogged cells with a diameter of 0.1-0.2 mm practically do not allow air and water to pass through (air absorption is 0.2%-0.4%). The material has a very high density - 35 kg/cm2-45 kg/cm2 and it is even used for insulation of runways, thickness varies from 3 mm to 100 mm.
Moreover, sheets from 20 mm and thicker are usually made with a chamfer around the perimeter. In the construction of buildings, it is used to insulate foundations, plinths, walls, roofs and floors, and it is also used to insulate loggias and balconies. .
Insulation of walls with penoplex
Scheme for insulating an external wall with Styrex
- Basically, insulation of walls with extruded polystyrene foam from the outside is carried out with the expectation that putty or plaster will be applied to the penoplex. For ventilated facades it is much more convenient (in terms of price) to use polystyrene foam or mineral wool. In our case, to install the sheets on the wall, you need a flat, smooth surface that has the potential for adhesion.
- If there is paint or lime on the wall, then they must be removed so that it does not fall off during the cohesion process along with the insulation. It is also undesirable to glue penoplex to various fur coats or poorly adhering plaster. In some cases, it is even necessary to plaster the wall again in order to level the surface for laying insulation.
Example of laying extruded polystyrene foam outside
- The extrusion panel is laid on glue and the most popular for this purpose is a universal adhesive for ceramic tiles, for example, CERESITCM-11. It is applied pointwise to the sheet (in the corners and in the center) and applied to the surface. Since the sheets have a chamfer around the perimeter, they fit one on top of the other without gaps, and if you need to add a piece of sheet, such a chamfer can be easily cut with a construction knife.
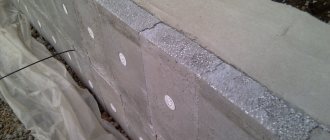
Mushroom dowels for foam plastics
- After gluing, the penoplex is additionally strengthened with dowel fungi and for this, two fasteners are usually used per sheet, placing them along the edges. Sometimes they make do with one fastener in the center of the panel, and sometimes they drive dowels into the joints, at the corners of the panels, and then each sheet is pressed with four mushrooms. The joints are also sealed with glue.
Make stands to support the ladder
Advice. If the penoplex is installed not from scaffolding or a cradle, but from a ladder, then the latter can damage the panels with its risers. To prevent this from happening, flat supports are screwed to the top of the vertical bars, increasing the support area and removing sharp corners - this is clearly visible in the photo above.
Insulation of walls with penoplex inside the house
- If extrusion insulation is installed indoors, that is, on the inside of the wall, then the principle of its installation does not change - the requirements remain the same as outside. Extruded polystyrene foam for internal wall insulation is used mainly for putty, with preliminary fastening of a fine plaster mesh, but this already applies to finishing work.
Penoplex is coated with glue
- Unfortunately, dowel mushrooms cannot always be used, for example, when insulating balconies and loggias with penoplex. The fact is that partitions, and even the parapet, are most often very thin and when installing a dowel, the drill can easily come out on the other side of the wall, and this promises you certain troubles from your neighbors, especially if they have undergone renovations. Therefore, the panels can simply be glued on like ceramic tiles, completely covering the back side of the sheet with mortar.
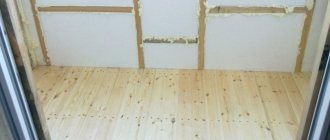
Floor insulation with penoplex
Thermal insulation for “warm floors”
- When installing “warm floors” (water or electric), the instructions provide for the presence of a thermal insulation layer under the coolant in order to create optimal conditions for heating the room. Very often in such cases, extruded polystyrene foam is used for this, covering it with thin foil polyethylene foam as a reflector. This method is very convenient, especially when the floor is located above the basement or it is the first floor of a house located in cold regions.
Laying extruded polystyrene foam on the floor
- It is very convenient to insulate the floor with extruded polystyrene foam on balconies and loggias, provided that there is a flat base for this. It’s just that the slabs, especially on balconies, are often broken and installation of penoplex will require preliminary pouring of a cement screed to level the surface. The panels are laid on the floor without any additional fixation, so that they can then be covered with laminated flooring or linoleum.
- Please note that to install a “floating floor” (without fixing the covering) you need even angles (90⁰) in the room, and this is extremely rare, especially on balconies. Therefore, the outer panels need to be fixed with some kind of spacers made from pieces of wood (this can be seen in the photo above) so that the ends of all the sheets match. After laying the penoplex, so that it does not spread along the joints, you can blow out the perimeter with polyurethane foam and remove the spacers - then the insulation will not move.
- By laying extruded polystyrene foam with your own hands, you can safely walk on the slabs with or without shoes - the material will not deform - its density is high enough even for a person with a lot of weight. Laminate over such insulation is laid without the use of a substrate, directly on the panel, and for linoleum, OSB is pre-laid.
Advice. In cases where the base (subfloor) is flat and you do not need powerful insulation, you can use 3-5 mm thick 1000x500 mm foam plastic, which is laid as a substrate. It can be laid under linoleum without using oriented strand board.
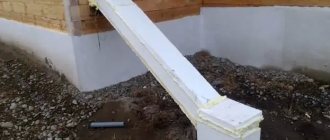
Insulation of the foundation with penoplex
The monolithic reinforced concrete foundation is combined with the base of the building and insulated
- Shallow foundations, which distinguish individual construction from large-scale construction, tend to freeze, especially in the northern regions of our country. Freezing also implies thawing, so such structures require insulation and waterproofing. In earlier times, mineral wool and polystyrene foam, which are very short-lived, were used for this purpose, and for moisture protection - bitumen and various cellophane films and roofing felt.
Foundation insulation with extruded polystyrene foam
- To install extruded polystyrene foam, the foundation is first treated with bitumen for waterproofing, and then, after drying (after about 10-12 days), they begin laying the technoplex. Mixtures containing acetone and gasoline, that is, with an aggressive environment, cannot be used as an adhesive composition. Bitumen-based adhesives or any universal tile adhesive are best suited for this.
- The extruded insulation itself is also a waterproofing agent, so it does not need to be protected with any films - it is enough to seal the joints, although they are chamfered, moisture will still penetrate through them. The minimum service life of such insulation in the most unfavorable conditions is 50 years, while similar structures made of mineral wool or foam plastic can withstand no more than 12-13 years.
Roof insulation with penoplex
Installation of extruded polystyrene foam under roofing material
- Stirex is very good for laying under roofing materials because it is sufficiently rigid and has excellent thermal insulation properties even with a small thickness. This material, unlike foam plastic, does not crumble when cutting and installing, and also holds its shape well, which allows you to walk on it with your feet when laying it. Roof insulation is usually carried out in attics, but heating the attic space causes snow to melt, so in such cases it is recommended to install anti-icing systems.
Insulation of the attic with extruded penoplex
- Also, extrusion insulation on the roof can be installed from below, installing it between the beams. In such cases, it is cut out 2-3 mm larger than the seat, and the sheet is held in place due to the spacer effect. The remaining gaps are filled with foam.
Insulation of ceilings under plasterboard with TechnoNIKOL
Advice. Penoplex insulation for installation of drywall, PVC/MDF panels, wooden lining (all facing materials that require lathing) can be done under profiles. The panel is simply pinned onto the brackets and only after that a frame made of wood or metal is installed. This method is acceptable for both ceilings and walls, but it is better to additionally fix the ceiling version with glue in a point-by-point manner.
Sealing cracks and preparing sheathing
Installing polystyrene foam on the sheathing is the most labor-intensive process among the insulation options. Most often, sheathing is done in the case of finishing siding.
Sealing cracks
If you plan to install siding on the wall of a house made of beams, you must first seal the seams properly, clean the surface of dust and debris, and seal the cracks with sealants, polyurethane foam, or a mixture of sawdust and PVA.
If the wall is concrete, brick or foam blocks, then the cracks in such houses are cleaned of sand, treated with a primer, then sealed as follows :
- if there is a small gap . Using a prepared mixture of cement and sand with the addition of PVA, seal the gap with a spatula;
- if the gap is medium in size . Make holes for dowels at a distance of 20 cm. Using screws and washers, pull the metal mesh over the gap and seal it, pressing it into the mesh with plaster. Next apply the finishing layer;
- for a large crack . Seal the gap with polyurethane foam, cut off any irregularities and seal it with two layers of plaster.
Large cracks can be repaired using anchors:
- knock down the plaster, seal the cracks with polyurethane foam;
- install a channel in the opening and attach a reinforcing mesh to it;
- you can use staples made of reinforcing mesh;
- apply plaster;
- putty.
Sealing cracks
When the wall is prepared for laying insulation, you can install the sheathing.
Preparing the sheathing
The sheathing for siding can be made from metal profiles and wooden beams . In humid climates, it is advisable to install metal slats.
Before you begin installing the sheathing, you should determine the location of the siding:
- with horizontal siding . The beam or metal profile is installed perpendicularly;
- with vertical siding . Frame boards or metal profiles are installed in a horizontal position.
The pitch of the sheathing is determined by the width of the polystyrene foam sheet: in width it should fit tightly between the sheathing slats and not form gaps.
The order of work is determined in steps:
- treat the wall with special mastic;
- frame boards are secured around the entire perimeter of the walls using galvanized screws and plastic dowels;
- if holes form between the timber and the wall, these gaps are sealed with pieces of polystyrene foam by gluing them to the wall.
When the sheathing is installed, then proceed to the installation of polystyrene foam panels.
CAREFULLY!
If the sheathing is made of wood, the boards must be pre-treated with antiseptic agents.
Lathing does not require special skills, but it should be noted that the choice of materials should be made based on climate conditions.
Lathing for siding
Wooden sheathing
Preparing the walls
Even taking into account the ease and simplicity of this work, it has many nuances and subtleties. For example, preparing a wall. This is the initial stage of work.
Here are some tips:
If your house is brick, then its walls should be plastered.
Next, the surface that has dried from the putty is primed and the finishing leveling is carried out with putty.
And provided that, simultaneously with insulation, repairs are also being carried out in the house, then the following conditions must be observed:
- Cleaning the work surface from previous material: paint, wallpaper, cork;
- Search for defects and irregularities in the wall;
- Elimination of these defects. This is where putty or plaster will come to the rescue again. And large cracks can be eliminated with polyurethane foam;
- Leveling the restored surface;
- The resulting smooth walls should be primed again: this will ensure reliable installation of the material.
- Laying waterproofing material. It will limit the access of moisture to the insulation. As a rule, polyethylene film can serve as such a waterproofing material, although the modern building materials market provides unlimited quantities of such material.
So, before starting installation, you need to make sure that the wall is dry, the thermal insulation layer has no cracks or joints, and the insulator has maximum moisture resistance.
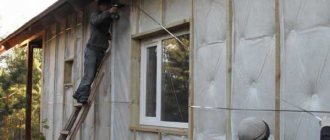
Technology of wall insulation with polystyrene from the outside
Before you begin insulating the wall with polystyrene foam, you should dismantle the gutters, decorative elements, clean and prime the wall. Next, insulate the sills and window slopes.
Now let's talk about the thickness of polystyrene foam.
NOTE!
When insulating walls with extruded polystyrene, sheets are used whose thickness ranges from 80 to 100 mm or more.
You can also use thinner sheets 30-40 mm thick if they are laid in two layers.
Let's start installing insulation on the walls with our own hands:
- a profile is installed at the bottom of the wall to hold polystyrene foam;
- the adhesive mixture is applied to the wall over the entire area in spots and onto the insulation sheet (amply on the center and edges of the sheet);
- tightly attach the sheet for gluing to the wall;
- Use dowels to secure the panel so that the dowel penetrates the wall at least 50 mm. The dowels are placed in the center of the panel and at the joints. It is recommended to use plastic nails;
- if gaps form (up to 2 cm), then they are sealed with polyurethane foam , if the gaps are larger, then they are first sealed with pieces of insulation, and then foamed. Excess foam is cut off;
- The heads of plastic nails are cleaned and puttied.
After installing the insulation, a reinforcing mesh is applied to the façade . You should cut strips of mesh at the corners and slopes and glue them with a spatula using an adhesive composition. An adhesive composition is applied to the mesh along the wall so that it penetrates 0.1 cm through the mesh onto the polystyrene foam. If an overlap occurs, separate strips of mesh are placed on it and additionally glued.
Sectional view of the device
Fastening slabs with dowels
Application of assembly adhesive
After the surface has completely dried, it is leveled with fine granulation sandpaper.
Next, the surface of the walls is covered with putty and a finishing decorative coating . External insulation with polystyrene foam, when installed correctly, will provide comfort and warmth in the house.
Installation of reinforcing mesh
Only after approximately 24 hours have passed can you begin sanding the polystyrene foam surface and then gluing the reinforcing mesh to the wall. Here is the sequence in this case:
- the adhesive composition is applied to the prepared insulation surface;
- mesh is glued;
- then another layer of glue is applied, closing the glass mesh between two layers of the applied composition.
It is better to start gluing the mesh to the wall from the corners, but you should not sound the alarm if the edges of the fragments overlap one another. Ideally, they should generally extend to about 2 thirds, which helps to better strengthen the mesh and perform its direct function.