Sometimes, for redevelopment in an apartment or private house, it is necessary to make a new door or window opening. Creating an opening in the load-bearing wall of an apartment brick building is not the easiest task. Things are easier with redevelopment in a private house, here everyone is their own boss.
What is a doorway? This is a hole in the wall intended for installing entrance units. The fixed fixed element in the inter-wall space is called a door frame. Often an arch is made as a decorative element of the interior.
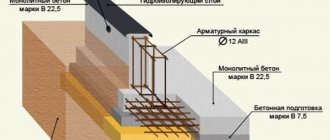
Construction of a doorway in a load-bearing brick wall
Before starting work, you must contact a specialist who will make a demonstration project with all calculations based on the client’s wishes. To implement the project, significant costs are required, which start from an amount of 30 thousand rubles. So when you get down to business, you need to consider a lot. Independent work on constructing a doorway will help the owner save money - it will cost approximately 15 thousand rubles .
Construction of a new opening
When constructing an interwall opening, it is recommended to take into account the following points:
- it must comply with building codes;
- It is advisable to place the hole in the central part of the supporting structure;
- it is necessary that the top part coincides with the cement seam of the masonry;
- the space between walls up to 0.9 m wide does not require reinforcement operations.
When creating an inter-wall space in a supporting wall, you need to properly create the reinforcement. When changing the structure of the walls, it is important to ensure the safety of the lives of other residents of the apartment building and the preservation of the structure of the building itself.
Why know the standards?
Replacing wooden windows with PVC structures is a large-scale process launched throughout the country. Advertising brochures of various companies often contain a schematic image of a window or balcony block with an indication of the price. And it is not at all a fact that the width or height shown in the diagram will at least approximately resemble the dimensions of the openings in your house. That is why the visit of a measurer is a prerequisite when ordering plastic windows. The fact is that brick and panel houses built at different times are characterized by significant variation within the limits of a single window opening standard.
Knowledge of GOST standards will also be required when building a private house. The height and width of window and door openings may differ slightly from state standards, but following these recommendations is the key to the safety and comfort of your future home.
Work order
First of all, you need to decide where to organize additional space for entry and exit. It all starts with markup . You need to decide on the width of the hole, and then begin to determine its future location with a pencil. You need to measure the distance from the outer wall and make a mark - from here we begin to draw the outline of the future interior space.
A thick wall structure is being cut on both sides, so markings will be necessary on the reverse side as well.
For their exact match, it is necessary to drill several holes according to the pencil markings (Fig. 1). And then on the other side connect all the holes with a pencil line.
Rice. 1
The above-described manipulations should be carried out using a building level, a triangle and a ruler.
Since we will create the space in the load-bearing wall of a brick house, it is necessary to take care of auxiliary partitions and lintels in advance (Fig. 2).
Rice. 2
Nuances of preparatory work
The newly constructed opening should not be visually distinguished along the façade from the existing openings. Therefore, it is extremely important not to make a mistake with its size.
To mark a future hole in the wall, it is better to use laser and construction levels in combination. They will help you choose the right upper and lower marks of a window or door in relation to already installed structures or equipped openings. Otherwise, windows located asymmetrically relative to each other can spoil the appearance of the building's facade.
Before starting finishing work, you should re-check the correctness of its dimensions in adjacent openings. In case of deviations, you will need to trim the brick or, on the contrary, reduce the height with a layer of mortar.
Removing a section of wall
Fig. 3
Before starting work, it is necessary to free the supporting wall structure from the layer of plaster along the drawn line so that the seams of the masonry are visible. However, it is necessary to remove the plaster with extreme caution, because most likely there is wiring located underneath it - damage can lead to the failure of the entire power supply system.
When the seams at the site of the future empty space are visible, you can begin to work. You need to start removing bricks from the very top. First, the top row of bricks is removed, which will be the width of the entire door space . A jumper is inserted here on which the structure will be supported.
Next, more holes are made above the jumper. It is necessary to install a beam into the resulting hole, which will act as a support. The support beam must be supported with a jack so that the structure does not collapse during operation. The beam and jack will support the weight of the entire wall structure (Fig. 3).
Channel lintel
Then all holes are lubricated with concrete solution. After the concrete mixture has dried, you can continue working on knocking out bricks.
The structure should be strengthened if the door space is more than one meter wide.
To protect the floor from falling bricks, it is necessary to make a flooring from boards. Bricks should be removed with diamond drills to minimize damage to the wall structure.
Violation of the technology for removing bricks can lead to weakening of the structure, its premature wear and deformation.
It should be noted that the space under the door must be 10-20 centimeters larger than the door or window frame. This gap can be filled with foam.
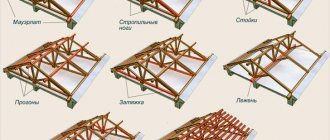
Homemade run
When designing window openings of non-standard sizes, the production of the lintel (its filling) is carried out at the location. To do this you will need to perform the following typical operations:
- first of all, the masonry surfaces on the sides of the window opening are cleaned of mortar residues;
- after this they are thoroughly primed;
- At the final stage of work, formwork is installed at the location of the lintel.
Formwork
Taking into account the significant weight of the workpiece being poured, fairly strong boards with a thickness of at least 20 mm are usually used as the “bottom” of the formwork. To securely fix them in the opening, it is recommended to use special supports supported on the lower edge of the window opening.
Reinforcement
Upon completion of these procedures, a thin layer of pre-prepared concrete mixture is poured into the formwork, after which a reinforcing mesh is immediately placed there. After this, you can continue pouring the lintel, followed by placing another reinforcing fill in the concrete. When dismantling the formwork, it should be taken into account that it is not always possible to dismantle its lower part.
Supports for formwork
When pouring the lintel yourself, you must carefully ensure that the concrete solution does not seep through the formwork boards and that the supports of the structure do not bend. If there is the slightest deformation of its lower part, you should stop pouring and start it again only after the already filled layer has “set.”
Lintel laying
When decorating window openings lined with facing bricks (the so-called facing brickwork), in order to preserve its decorative advantages, it is allowed to use channels (wide metal corners). In this case, the visible part of the purlin will be located only on the inside of the load-bearing wall.
Laying a figured window opening
At the same time, there should not be any noticeable traces of the presence of a lintel on its façade surface.
Strengthening the opening
Strengthening work takes the maximum amount of time, as it is carried out painstakingly. Organized empty space under a door or arch must be reinforced with channels . It is advisable to use a channel jumper with vertical posts. Channels are mounted on both sides, which are screwed into the previously installed wooden lintel using bolts (Fig. 4).
Rice. 4
If the space in the wall structure is large, then it is reinforced not only in the upper part, but also on the sides (Fig. 5).
Rice. 5
How the standards for window opening area have changed: from Stalinist buildings to modern new buildings
Many modern multi-storey buildings have window dimensions that are not at all the same as during, for example, the construction of “Stalin” buildings. Although many new apartment buildings are being built, there are still many buildings from the pre-revolutionary period.
In the first decades of the 20th century, solid houses with thick, massive walls were built; these structures will last for a very long time.
Those who want to install a metal-plastic window in an old house must take into account that standard openings have the following dimensions:
- a single-leaf window has a width of 85 cm, a height of 115 cm, or a width of 115 cm, a height of 190 cm;
- 2-leaf design - width 130 cm, height 220 cm, or width 115 cm, height 190 cm, or width 150 cm, height 190 cm;
- Previously, 3-hung windows were produced in one type - 210 cm wide and 240 cm high.
In addition to the dimensions of the opening, it is important to take into account the width of the window sill, because it also varies. The window sill in a brick house is slightly wider than in a panel house, therefore, more plastic will be required to finish the slopes during the installation of metal-plastic windows.
How to determine a load-bearing wall in a brick house?
The most basic way to determine the supporting wall is to familiarize yourself with the floor plan of the living space. Such a plan must be included in the registration certificate or house register. To understand diagrams and drawings, you need to have some drawing skills. Experience in construction would be helpful. Then you can easily distinguish a supporting wall from a regular partition.
Rice. 6
Typically, interior walls are no more than 18 centimeters thick. The smallest thickness of the supporting wall is 38 centimeters - a masonry of three bricks . Four-brick masonry is possible, which forms a wall 51 centimeters thick. Often the thickness of the walls in brick houses is 64 centimeters - five-brick masonry (Fig. 6).
If the plan could not be found, then you should use the general rules for determining load-bearing walls in a house:
- if the walls face the street, we can definitely say that they are supporting;
- walls shared with neighbors;
- wall thickness more than 380 mm, as mentioned earlier;
- walls facing the landing.
Cladding brick windows
Decorating windows with facing bricks is an excellent method of decorating window areas.
It emphasizes the contour, adds volume and highlights the windows on the façade of the building. Cladding a window with contrasting or relief brick allows you to almost completely change the facade. Facing brick gives the building a more neat and elegant look.
The surroundings of the windows must be carefully calculated and symmetrical in relation to the masonry of the main walls and the corners of the building. Original, beautiful windows will complete the look of the facade, provided that the cracks are carefully sealed using special masonry or using brick platbands.
The harmonious appearance of the facade directly depends on the size and shape of the windows, or more precisely, on how symmetrical they are relative to the corners of the building and the width of the partitions. It is necessary to comply with certain standards when constructing the walls of buildings, but in practice it is often possible to observe inconsistencies that it is advisable to eliminate before laying facing bricks.
Exterior finishing
After completing the work on forming the opening in the brick load-bearing wall, everything must be decorated decoratively (Fig. 7) . What is needed for this? First of all, you need to decide on the choice of finishing material. Whether it will be wood, plastic or decorative stone – it’s up to you. Next, you need to show a little imagination and create decorative elements in the formed space of the brick wall.
Rice. 7
For self-cladding, you should have basic knowledge in the field of finishing work, and you also need to have special tools.
If you need to decorate the space for a door without having one, then you should use additional boards. This will add elegance to your new room decor and add sophistication to the interior. You can create such a cladding yourself.
The opening made in the form of an arch looks beautiful. As a rule, arches come in round or pointed shapes. To decide on the shape of the arch for the client, check out the design catalogs. The most common today is the Byzantine and Greek style. In some cases, the arch can be made with lighting.
Standard window size for multi-apartment residential brick buildings
Exemplary parameters of window openings in multi-apartment brick, private, panel and other buildings depend on the type of sashes. The most common options for such houses are Khrushchev, Stalin, Brezhnev buildings and some others. For each type of building, the market offers a wide range of window sizes with slight variations (up to several centimeters).
At the beginning of the 20th century, the USSR authorities thoroughly began to reconstruct and build new residential complexes for the working class. The buildings of those times have survived to this day; they were then built thoroughly and reliably. Those who decide to install plastic windows in their homes should remember the nuances and familiarize themselves with the standards that were in effect during the construction of houses. The buildings were named according to the type and time of construction.
Khrushchev buildings
Typical buildings constructed in the period from the 50s to the 90s. The building materials for houses of this type are panel blocks or bricks. They are characterized by relatively low ceilings, compact apartment interiors and poor sound insulation. The roof is flat, without an attic. The height of buildings usually does not exceed 5 floors.
The standard window opening in Khrushchev buildings is always calculated by the width of the window sill.
Stalin's houses
“Stalin” buildings were erected between 1935 and 1960. They have a “monumental”, majestic appearance; it should be noted that they have large kitchens. As a rule, such structures were made of fire-resistant material (mainly brick). They have all household amenities (plumbing, garbage disposal, heating), they have their own standards for window openings.
Brezhnevka
The difference between them and Khrushchev-type housing is that the apartments in such buildings are much more spacious. They have high ceilings and all the amenities (hot water, gas), a garbage disposal and an elevator, a combined bathroom and balconies. Such houses have several series, built in a certain period of history. For each series, individual standards for window openings are provided.
Other buildings
Modern new buildings are designed according to new norms and standards using innovative construction methods. Such buildings were built in the late 90s. They can be of various designs, the number of floors up to 9 or higher, equipped with all the amenities necessary for everyday life. Their design is very different from those indicated above and includes 40 series, the standard sizes and window sizes for each of which are individual.