Door frame components
First of all, you should familiarize yourself with the structure of the interior door frame:
- hinge beam - this is the part on which the hinges are cut and the door is hung
- the false beam is the part that meets the door. The counter part of the lock crashes into it.
- lintel - upper “ceiling” beam
- threshold - lower part
Thus, in order to assemble the door frame, you need to correctly connect all its parts. But before you start, you need to decide on the dimensions and choose the appropriate material. Doors should look aesthetically pleasing and be easy to clean.
Features of installing a metal door
Installing an entrance door made of high-strength metal means creating reliable protection against sudden entry into your home.
To reliably protect a wooden building, install a metal entrance door
Installing a metal structure in a wooden house consists of several steps:
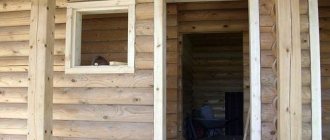
- Arrangement of the opening. If the opening was not provided during the construction of the house, then it is cut out in a blank wall with a chainsaw. When non-solid crowns are installed in its place, then apply markings and trim off the excess protrusions of the tree.
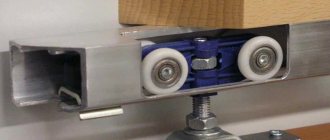
- Installation of the pigtail. Ridges are made on the sides of the opening, onto which carriages with a groove are subsequently placed. Then the cross bars are attached.
- Installation of frame and sash. If necessary, the metal box must be insulated. After it is inserted into the frame, level the structure and secure it with self-tapping screws. The number of fastening points must be such that the load is evenly distributed over the entire wall. After installing the box, hang the canvas on four loops.
- Sealing joints. It is performed with polyurethane foam.
- Decorating the opening. To make the opening look more attractive, it is decorated with overhead strips. They are attached not to the wall, but to a metal frame.
It is difficult to install a metal door alone due to its heavy weight. Therefore, it is recommended to call someone to help you. Strict adherence to the instructions and the presence of desire will allow you to cope with this not very easy job, even if you have no experience.
Choosing material
I don’t have a definite answer here, since the choice depends on your preferences and budget. I will give examples of the most common materials used for door frames.
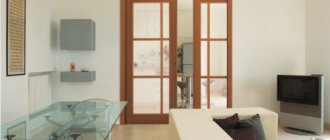
MDF doors
MDF is a wood fiber board. The doors are cheap, but they look good. The advantages include lightness and environmental friendliness. The disadvantages are reduced impact resistance, poor noise insulation and short service life.
Laminated solid wood
Glued board or "euro-timber".
These doors are not made of solid wood, but of parts glued together under high pressure. The joints on them are practically invisible. The doors are quite durable and cost a little more than MDF. Price and quality are acceptable.
Solid wooden doors
Doors are much more expensive than glued ones. Strong and durable. The disadvantage is incorrect processing by the manufacturer, as a result of which the wood is excessively saturated with moisture.
Doors made of chipboard and fibreboard
Wood-fiber or wood-pressed boards. These doors are very cheap as they are made from leftover material. The advantage of these doors is good mechanical strength and fairly good sound and sound insulation. The disadvantage is low moisture resistance, as well as the presence of a volatile substance in the glue, which has a detrimental effect on health. Another aspect is the complexity of installation, since the screws in such doors do not hold well.
In addition to those described, there are also plastic, glass, aluminum, and veneered ones. Doors with honeycomb filling, laminated, etc.
The choice of material is up to you, but it should be appropriate and practical.
Design Features
Products made from natural wood have always been considered one of the best. The same applies to door structures. Today, relatively inexpensive options are actively used, for example, from pine or its combination with MDF panels. More affluent buyers can afford solid wood, such as oak, mahogany or maple.
The main features of wooden doors are as follows:
- Appearance. Most models look expensive and very decorative, as they have an interesting natural shade and pattern. However, additional finishing can be used to add style and a rich look.
- Strength. Wood with high-quality processing is very impact-resistant and durable. Such doors are an excellent barrier for intruders.
- Naturalness . This is one of the most important factors, since the issue of natural and environmentally friendly materials today comes almost to the fore.
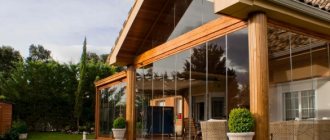
The main advantage of wooden entrance doors is their presentable appearance
Wooden doors are actively used not only as interior structures, but also as entrance structures.
Let's look at the principle of installing a wooden entrance door with your own hands. In order to perform the installation correctly, you should analyze each stage of the work in detail.
Proper sizing is the key to success!
The standard sizes of door leaves are
- height 2000 mm
- width 600 mm, 700 mm, 800 mm and 900 mm
All other sizes that go beyond the scope are usually custom-made items. (I mean single canvases, not swing ones)
You need to add 70 mm to the size of the door leaf - this is the standard width of the door frame. If the dimensions of the door frame are different, then the size will naturally change up or down. And we also add 6 mm - this is the technological gap between the leaf and the door frame.
Now you need to check how the door frame fits into the doorway. If it needs to be expanded, then we are not in a hurry to break everything at once. We soberly assess the situation - we may have to strengthen the opening with lintels. If you need to reduce the opening, then we fill it with bricks, or “sew on” bars - it all depends on the situation.
IT IS IMPORTANT TO KNOW:
To help you understand what size doorway is needed, look at the formula:
Door leaf size + door frame size + 6 mm tech. gap + 60 mm (30 mm on each side for mounting foam and wedges that will be needed when installing the box)
Usually the dimensions of doorways are controlled at the construction stage, but in older private houses (like mine) there are “hard” discrepancies.
The next important dimension is the gap from the floor to the door leaf. Before calculating it, you need to check the level of the floors for the width of the door “swing”.
You can do this in two ways:
- Using a hydraulic level
On the side walls of the opening we place marks at the same level. We measure the distance from each mark to the floor plane. The difference that you get when measuring should be added to the minimum height of the posts so that when opening the door does not rest on the floor. If you still “miss” this moment, then you can eliminate it only by trimming the door leaf, and this is still a “handjob” :(
2. Using a laser level
If you are the happy owner of a laser level, then everything becomes much simpler. We set the level and, using a construction square, determine the curvature of the floors. The obtained values are taken into account when setting sizes.
The minimum gap is 10 - 15 mm, depending on what kind of floor covering is planned. But it is better to immediately lay linoleum, or carpet, or laminate, and then carry out the installation.
See the table of correspondence between door blocks and openings.
And here is another table of typical door frame sizes
Assembling a door frame without a threshold
Let's look at assembling a door frame with your own hands using an MDF frame as an example. We will connect the upper parts at 45°, as this is the most aesthetic way.
1.First of all, you need to trim the parts of the box. This is done in order to eliminate irregularities or manufacturing defects.
IT IS IMPORTANT TO KNOW:
If you have to use hand tools, it is better to use a fine-toothed saw or a hacksaw. Start making cuts from the veneer side so that chips, if any, remain on the invisible side.
2. We “saw” the loop beam and the vestibule at 45°. It is best to do this with a miter saw, but if you don’t have one, you will have to work with a miter box. To avoid unevenness when cutting, the miter box must be secured. We use a hacksaw with a fine tooth.
3. Next we move on to the most difficult part - “sawing” the top of the box - the lintel. You need to clearly set the size and not miss the corners. You can use a tape measure, but there is an easier way. To do this, we apply the lintel to the top of the door and mark the marks “in place” with a sharp pencil. To maintain the technological gap, you can use packaging cardboard - its width is just 3 mm.
4. Mark the height of the loop and false beams. I told you how to find out the required height a little higher. This is the height of the door leaf + the top gap of 3 mm + the bottom gap. If the floors are level, then 10 mm is enough. When opening, the door leaf should not catch or rest against the floor. You should not create a very high gap - 10 - 15 mm is enough for normal air circulation. If the room is damp, then larger values are allowed.
IT IS IMPORTANT TO KNOW:
If there is a difference where the doors are installed and there is no way to correct it, then the height of the racks may be different. The highest point of the difference is taken as zero.
Next, we cut off the racks according to the marks.
IT IS IMPORTANT TO KNOW:
We constantly and meticulously check all the applied dimensions before washing down. If the box turns out to be smaller than the canvas, you will have to buy a new beam.
5. After all the components have been sawed down, we assemble the MDF door frame together, having previously drilled holes with a drill of a smaller diameter to prevent the frame from splitting. For connection we use 50 cm wood screws. It is more convenient to carry out work on the floor, placing cardboard or other material under the box.
IT IS IMPORTANT TO KNOW:
When you tighten the door frame, press its parts as tightly as possible, since the screws will stretch them.
Well, this is approximately the result you should get.
Step-by-step instructions for installing from scratch
Installing interior doors with your own hands will not take much time, just stock up on the necessary tools, purchase the necessary materials and you can get to work. Follow the detailed step-by-step instructions and you are guaranteed success.
This plan is valid for installing swing doors; sliding doors are mounted slightly differently, but in a similar way.
Step 1: prepare tools and material
To install an interior door you will need:
- Drill or hammer drill;
- 3 and 4 mm drills for wood;
- Drills 4 and 6 mm for concrete;
- Saw;
- Screwdriver;
- Wood screws;
- Level/plumb;
- Polyurethane foam;
- Roulette;
- Pencil.
In addition, a door block must be purchased in advance.
Step 2: determine action tactics
Installation of wooden doors is carried out according to the standard scheme shown in the photo.
- Door frame;
- Door leaf;
- Nail/screw;
- Polyurethane foam.
First, we assemble the box, then insert it into the opening and hang the door.
Step 3: assemble the box
There are 2 options for assembling the box under the canvas.
- Connecting parts at an angle of 450. Cutting the planks is a delicate job, but the result is worth it: the connection is reliable and visually almost invisible. For cutting, it is better to use an electric, well-sharpened tool; a hand saw often leaves nicks and chips.
- At a right angle of 900. This connection is less reliable, but simple to perform. To prepare the parts, it is necessary to remove part of the length from the side posts of the box and the lintel.
To understand whether the excess parts of the wood have been cut correctly, assemble the box on the floor like a mosaic: everything should fit together perfectly. Then we fix the planks with self-tapping screws on the side of the wall.
For the threshold, you also need to determine the place by attaching the canvas to the box assembled along the top. Step back 2.5 mm from it and make a risk. Attach the bottom bar - the threshold - to this mark.
Step 4: marking for hinges
At the stage of assembling the box, it is worth determining the places where the hinges are attached. To do this, measure 20-25 cm from the top and bottom on the side stand, attach loops and make marks with a knife or pencil. Screw the product with self-tapping screws, thereby determining the future location of the loop, which will facilitate its fastening. Now insert the canvas, measure the gaps to the side edges and make marks on the canvas. In the same way, make several fasteners so as not to lose their location later.
Remove the screws and the hinge; they will need to be fastened after installing the box in the opening.
The box is ready for installation. The author of the video demonstrates a more detailed process.
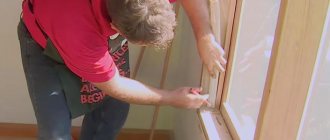
Step 5: Installing the Box
Now it’s time to install the doors yourself, and it begins with installing the assembled frame. To do this, you need to place the structure on the threshold and align the vertical. For verification, use a plumb line and level. To prevent the box from falling during verification, secure it with spacers or temporary wedges made from scraps of wood.
Now you can check the canvas: will it open or not. To do this, you need to insert it into the installed box, focusing on a flat wall. If opening does not occur or is not fully realized, it may be necessary to adjust the spacers and adjust the position of the rack and cross bars.
If you managed to install everything correctly and the canvas fits well into place, you can fasten the box . How to do it:
- Wedges are driven in on the sides of the upper cross member, then above where it is attached to the racks;
- Drive wedges along the entire height of the opening, constantly checking the evenness of the installation and the absence of displacements in any plane.
Step 6: secure fit
The delivered and verified box must be finally secured so that it can accept the canvas. There are 2 solutions:
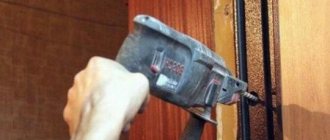
- Screw the box to the side walls with screws. This is a reliable method; a few wood screws or self-tapping screws are enough to implement it. Choose inconspicuous places for fastening, mainly using areas under door hinges and under the lock plate. They take a concrete block and make a hole for a screw. Now tighten the fastener so that its head does not remain above the plane of the wood. If this amount of fasteners is not enough, you can drill through holes in other places and also install self-tapping screws, the heads of which are covered with plugs to match the surface.
- The second method is to use hidden plates. The peculiarity of the method is that there is no need to drill the frame and wall.
After this, fill the space between the opening and the box with mounting foam to 2/3 of the total thickness. To prevent the structure from being squeezed out, install spacers inside the passage contour while the foam polymerizes.
Step 7: attach the hinges
When installing interior doors correctly, the hinges are attached only before directly hanging the door leaf. Screw the parts for the box to the previously marked places, repeat the steps for the canvas.
Assembling a door frame with a threshold
The easiest way to assemble. The fact is that the threshold is usually mounted at 90°.
The threshold is mounted on the entrance or “entrance” doors, separating the cold room from the living room. In addition, the threshold gives the door frame additional strength.
Preparing the doorway and checking the floor level are absolutely identical to assembling without a threshold, but further steps have their differences.
So, here are the step-by-step assembly instructions:
1. File the lintel to its original dimensions. The length of the lintel will be equal to the length of the door leaf + 6 mm for the gap. You need to make two such blanks - this will be the threshold. Do not forget to trim the workpieces, since the factory cut may not be even.
2. On loop and bevel beams, it is necessary to remove the thrust quarter.
To do this, we connect the end of the vertical post and the horizontal one and put a mark with a sharp pencil.
IT IS IMPORTANT TO KNOW:
The size must be transferred with maximum clarity so that there are no gaps. Repairing them in the future is not problematic, but it will ruin the aesthetic component of the doors.
We make a cut to a depth of a quarter with a hacksaw or jigsaw. Be extremely careful not to touch the work surface. It is not possible to fix the “jamb” on MDF doors.
Then, using a chisel or a utility knife, carefully remove it. We repeat the operations for all angles.
IT IS IMPORTANT TO KNOW:
If you use a chisel, then under no circumstances turn it over with its top sharpened side down. When carrying out work, the working part will crash into the material and all the work will go down the drain. The same rule applies when inserting loops.
3. Connect the box. We also drill holes and tighten them with self-tapping screws. The only difference is that galvanized screws are used for the threshold if it is the threshold of an entrance door. They are less affected.
Five tips for using wooden doors
Installing wooden doors with your own hands is, although important, but only part of the matter; further operation also requires compliance with certain rules.
Tip #1. Decor
The entire structure must be coated with one varnish or paint, since it will be very difficult to change the color of a wooden door if decorated separately. Of course, it is better to decorate entrance and interior doors with varnish so that the wood texture is visible.
It is cheaper to paint doors in outbuildings with regular oil or alkyd paint. Such compositions cost an order of magnitude cheaper than varnish, but last no worse. The only disadvantage of oil paint is that it takes up to 2 to 3 days to dry.
It is advisable to paint the door frame, platbands and door leaf in one go and with one coloring composition, while the varnish is applied in 3 - 4 layers, and the paint in 2 - 3 layers
Tip #2. Door restoration
How to restore a wooden door? The most difficult part of this process is removing the old paint. There are 3 main ways:
- Buy a special chemical remover. Removers act relatively quickly and give an acceptable result, but they are toxic and you need to work with such compositions outdoors;
- Cleaning doors with a grinding machine and emery gives excellent results, but the process itself is long, labor-intensive and very dusty;
- The best option would be to heat the old paint with a hair dryer and scrape it off with a metal spatula.
Cleaning solid wood using a hair dryer and a spatula is considered the least labor-intensive
Tip #3. Removing scratches
How to remove scratches on a wooden door? If the scratch is small, it can be polished with velvet sandpaper and re-varnished.
Deep damage is first cleared, then degreased and covered with a special tinting compound. The most difficult thing is to choose a putty that matches the doors; the composition is applied with a rubber spatula, and at the finish it is sanded, polished and varnished.
The most difficult thing in restoring doors is choosing the putty to match the color of the coating.
Tip #4. The doors are swollen
If the awnings are ordinary, not adjustable, and everything is in order with them, then the vertical post is smeared with chalk, after which the door is pressed against the door. Traces of chalk will remain on the deformed parts of the canvas. Next you need to remove the canvas and carefully clean the swollen sectors with a plane.
You can trim a swollen door leaf with a plane or sanding machine.
Tip #5. Problems with the lock
How to open a wooden door without a key? This question applies more to interior doors with light spring locks. Because to emergencyly open an entrance door with anti-vandal hinges, you will have to call a specialist.
If your handle has broken off or the mechanism of a light spring lock on an interior door has jammed, you can try to push the lock tongue inward using a knife or a plastic card. If the hinges are ordinary, then you can try to remove the fixing rods, but here you will need, at a minimum, pliers.
You can move the lock tongue on interior doors using a knife or plastic card
Door frame tenon connection
One of the ways to assemble door frames is a tenon joint. It's not as common as 45° and 90° assemblies, but it does exist.
The joining of parts occurs through tenon joints (see picture)
Usually the achieved rigidity is quite sufficient, but galvanized nails can be added to enhance the strength characteristics.