Knitting the reinforcement cage is an important stage in the construction of the foundation. The strength and service life of the future structure depend on the correct choice of foundation formation technology and the correct choice of reinforcement. You should choose the optimal method for connecting plastic reinforcement. Since when using composite materials, a welded connection of the structure is an unacceptable option , other strapping options are used.
When using composite rods, you need to know how and with what to properly connect the frame elements.
There are several ways:
- with a crochet hook using traditional crochet wire;
- using knitting guns;
- plastic clamps;
- plastic clips.
Using a hook
For knitting, a special heat-treated wire with a diameter of 0.8 to 1.2 millimeters is used , which is quite plastic and does not lose its properties, even with repeated bending and twisting.
The rods are fixed with wire using a special crochet hook. There is also a screw hook, which allows you to mechanize the process and reduce the overall labor intensity.
But the use of this method is not rational for large-scale work, for example for a slab foundation.
For composite rods,
it is recommended to use galvanized wire - it will reduce the likelihood of corrosion, which will have a positive effect on the service life of the foundation.
Advantages of using cordless guns for fixing reinforcement
The use of this modern construction tool provides:
- High performance. A worker with a battery gun at his disposal replaces a team of 5-6 professional knitters with crochet hooks.
- Making units with equal wire tension.
- Possibility of use in a wide temperature range – from -25°C to +40°C.
- The ability to use the tool in combination with extensions, thanks to which work below can be performed while standing almost straight, which significantly reduces the load on the operator’s back.
- Setting up a tool for a specific task.
For short-term use, you can rent a gun for tying reinforcement instead of buying it.
Plastic clamps
This method does not require special skills or special equipment, unlike wire tying, and also does not take much time and provides good fixation of the elements. Another advantage worth noting is the minimization of the use of corrosive materials.
The negative aspects include:
- restriction of further actions when pouring the foundation, since walking on the reinforcement connected by clamps is strictly prohibited;
- no guarantee of maintaining the integrity of the connection during pouring.
However, it is possible to knit the reinforcement with plastic ties with a metal core , which add the benefits of wire knitting.
Important! This method should not be used at subzero temperatures, which can cause cracking of clamps.
How to bring reinforcement 12 m long in a GAZelle car
Measuring fittings of the most popular brands (with a diameter of 10 mm) are sold in rods 11.7 m long, so long vehicles are used for their delivery. This is not always convenient. There may not be enough space for a truck to enter a narrow site with a sharp turn, or it may not be profitable for the developer to order and pay for the delivery of a long length to bring in a dozen poles.
Typically, in such cases, the reinforcement is cut into lengths of approximately 6 m. This is uneconomical and also increases the labor intensity of splicing reinforcement cages in the manufacture of foundations with long sides. In this regard, the experience of a portal user with the nickname newman1, who brought almost 12 meters of reinforcement to the site on a GAZelle, is interesting.
My know-how is that I buy reinforcement and, together with an assistant, bend the whip in half. As a result, the length of the doubled reinforcement is about 5 meters. We easily bent both the “ten” and the “twelfth”. Then the reinforcement is thrown into the body of the GAZelle with a small release overboard (less than 2 meters), which is allowed by the rules of cargo transportation.
The reinforcement is brought to the site, where it is bent into a long rod using a homemade sledgehammer with a metal handle on which a nut is welded. The thread on the nut prevents the whip from turning, and the reinforcement bends at any desired angle. As a modification, instead of a sledgehammer, you can use a crowbar, onto which a nut is also welded.
I knitted the reinforcement with wire. I thought about using clamps, but it doesn’t turn out very strong, and when welding the reinforcement, the structure of the metal changes.
For welding frames, meshes, etc. fittings with the marking “C” at the end are used (for example, A400C). The most popular brand of reinforcement (for example, marking - AIII (A400)) must be tied with wire, because At the welding site, the strength of the metal decreases.
In the forum topic you can learn all the features and nuances of tying reinforcement with a crochet hook, a cordless knitting gun and a screwdriver. We recommend reading articles about manual bending of reinforcement and homemade reinforcement benders, choosing a welding inverter and the basics of manual arc welding, as well as the secrets of cold forging. And from the video you will learn about all the features of the reinforcement of a shallow strip foundation.
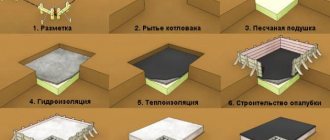
For strip foundation
Fiberglass is used to reinforce the strip foundations of individual small buildings.
The use of composite rods is explained by several reasons:
- minimizing corrosion;
- light weight of fiberglass;
- significant length of the rods, which allows you to get rid of joints on the horizontal load-bearing belt of the foundation, which are weak points when using metal reinforcement.
to completely get rid of the use of traditional metal reinforcement
when laying a strip foundation Quite heavy, since the composite rods are difficult to bend without cracking. There are special devices for bending, but for a single construction its use will not be profitable. Therefore, metal reinforcement with a diameter corresponding to the selected thickness of fiberglass is used in the corners. Find out how to choose the right fittings here.
An important condition when installing a composite frame is maintaining the correct geometry.
If reinforcement with metal rods is carried out at intervals of 10 to 20 cm, then
reinforcement with fiberglass is carried out at intervals of 20-23 cm. According to building codes, rods with a cross-section of at least 12 mm are used for such purposes. But for foundations that do not bear large loads, a rod diameter of 6-8 mm may be suitable. It is recommended to use bars with a periodic profile to ensure high strength.
When forming load-bearing belts from fiberglass, two diameters of rods are used: the longitudinal parts of the frame are assembled from the larger diameter reinforcement, and the vertical and transverse parts are assembled from the smaller ones.
Composite reinforcement is laid according to the same principles as metal reinforcement.
A frame with upper and lower chords is assembled, transverse rods are attached at equal intervals, but with a large step. Also, the top protective layer of concrete may not be 5 cm, but 2.5 cm.
An operation such as knitting a frame for a strip foundation is quite difficult to carry out alone, especially in the absence of experience. Performing this operation alone may have undesirable consequences. According to standards, reinforcement should be done by three people.
When using fiberglass reinforcement, you need to carefully approach the issue of connecting the rods. First of all, it is worth assessing the scale of the work - with a large volume of work, will it be advisable to manually tie the entire frame together? It is also worth considering some external factors, such as low temperatures, which preclude the use of clamps. The most universal way is to fix it with plastic clips.
Tools for tying reinforcement, technology for working with them
Nobody does the work manually. It's practically impossible. There are special tools for this purpose that speed up and simplify the process. Each tool has its own characteristics of use. The following devices are available for tying reinforcement:
- Hand hook.
- Knitting gun.
- Screwdriver.
- Ticks.
Each of the tools has its own pros and cons, we will consider them, as well as the technology for their use, and based on these data and the opinion of an expert (a reinforcement specialist with 10 years of experience), we will summarize and choose the best option for tying reinforcement.
How to crochet reinforcement correctly?
The peculiarity of the work is that it is done manually. At first, the process will be lengthy, as you need to get better at it. The hook is made of steel, and the handle is made of wood or plastic. The cost of such a hook is 1 thousand rubles.
There are even automatic hooks on sale, but reviews about them are mixed. Some note the short lifespan, others say that it is difficult to twist wire 2 mm or more thick.
There are several options for connecting knots when crocheting reinforcement. Let's look at the most popular ones.
Simple crochet rebar tie knot
The most common and simplest knot is performed as follows:
- To connect the rods to each other, you need to take a wire 15–20 cm long and bend it in half.
- The bent wire is bent again, but not completely, you should get a hook.
- We insert the wire under the reinforcement that needs to be tied.
- Next comes the hook itself. You need to insert it into the resulting loop and hook the free end of the wire.
- One revolution is made. It is important to hold the free end.
- Pulling the hook towards you, twist the wire until it comes off.
Step-by-step diagram for making a simple crocheted reinforcement knot.
Note! In order not to buy a crochet hook, you can make it yourself. You will need a piece of steel rod, and the handle can be made of plastic or wood. Having done it once, you can constantly use the knitting tool. See step-by-step instructions for making a hook with your own hands here.
"Dead Knot"
This unit is used for reinforcing structures consisting of reinforcement bars and clamps, such as beams and columns. Since it reliably fixes the reinforcement into the corner of the clamp, reinforcement specialists called it a “dead” knot. To quickly and efficiently perform such a knot, you need to practice a lot. Consider the instructions for executing the node:
- We take a wire 20–40 cm long, its size depends on the diameter of the reinforcement used, and bend it in half.
- We run the wire, loop forward, under the bottom of the reinforcement to the left of the clamp, leaving 2–4 cm to complete the knot.
- We bring the wire to the top of the clamp and bend it again under the bottom of the reinforcement.
- Insert the hook into the loop and hook the free end of the wire.
- We pull the hook towards ourselves and at the same time make several turns until we feel that the wire is clamped, or until the loop comes off.
Scheme of tying reinforcement with a “dead” knot using a hook.
It should be noted! In order for this knot to reliably fix the reinforcement into the corner of the clamp, the wire should be pressed as tightly as possible to the reinforcement and the corner of the clamp, otherwise the tie will turn out to be unreliable.
You can check the quality of the assembly by tugging the clamp with your hand; if it wobbles, it is done incorrectly or is not fully tightened. We tighten it or make an additional tie with a simple knot.
When performing reinforcement of complex structures, for example, semicircular beams, nodes can be combined. First, a “dead” knot is made, and then two simple crosswise ones, as in the photo below.
Special gun for mating
This is an ideal tool for tying reinforcement. It makes the process much faster and easier. It is most convenient to assemble a metal frame with it. The only caveat is that such a unit is not cheap. That's why it is used on large-scale construction projects. The minimum cost is 30 thousand rubles.
It looks like a regular drill. Only a roll of wire is inserted into it. To tie, you need to point the gun at the joint and pull the trigger. He will do the knitting himself in a matter of seconds. This is the simplest and most affordable option for tying reinforcement.
On a note! It takes 9 seconds to make 1 knot tied with a hook. If you take an automated hook, it will take 7 seconds. And tying with a gun takes only 1 second per 1 knot.
But this method also has its disadvantages:
- Not everywhere they can get to perform mating.
- Price.
- When you fix the reinforcement, you can no longer untie the knot with a crochet hook.
- You cannot knit large-diameter reinforcement.
Using a screwdriver with a hook
To speed up the process and make it automated, a modernized screwdriver is used. It is enough to insert a homemade hook into it. A slate nail is suitable for this purpose. It is clamped into the screwdriver and is ready to go.
The principle of its operation is no different from the previous version. The only difference is that the process is significantly accelerated. And if the screwdriver has a speed adjustment, then it is adjusted so that when the wire is stretched to maximum, it does not break.
Tying reinforcement with pliers
This method of knitting is good because it saves wire during the work, due to the fact that you can knit into one, and you don’t have to make loops, as for a crochet hook.
Of the minuses it should be noted:
- Requires more practice for speed knitting.
- The knitting speed is 2 times less than that of a hook.
- When knitting with 2 wires, the result is a rigid knot with a sharp end; you must wear special shoes, otherwise you can pierce your leg.
The video below shows what speed can be achieved with viscous pliers, but this requires a lot of practice. A professional fitter makes the tie in 3-4 seconds.