Home / Construction technologies
04/29/2019 Frame, Wooden houses
Frame technology is ideal for the construction of houses, summer houses and cottages. This is a relatively inexpensive and easy way to become the owner of your own country property. However, many inexperienced builders make many mistakes. This is especially true for the assembly of so-called warm corners. Let's consider the main options most often used in the construction of frame houses.
This method is most often used in the construction of frame country houses. An additional board is attached at the junction of the two walls on the inner corner side. It serves as a support and makes it easier to finish the room using drywall.
This technology for arranging the corners of a frame house is no less popular. Its essence is to install an additional rack to the inner corner. It is located between the wall studs and the bars. You can only insulate a house from the outside before covering the frame structure with sheets.
It is considered the warmest, but in practice it is not often found. In the USA it is practically not used. Finding builders who can build a frame house with warm Scandinavian angles is very difficult. However, this option is the best, as it almost completely eliminates the formation of cold bridges.
Types of angles
The design of the corner is determined by the technology of building a frame house. Let's look at the main types of angles and their features.
Californian or American
California corner is most often used in the construction of frame houses. It is considered the simplest. This method involves attaching an additional board to the end post on the inside, alternatively it can be replaced by a strip of OSB (oriented strand board). As a result, the protruding part of the third board forms a shelf, which will become a support for the layer of interior decoration. The main disadvantage of this type of docking is the cold bridge that can form in the area of the additional rack.
Closed
A closed corner requires the installation of an additional stand, which strengthens the connection. The insulation of the corner is carried out in parallel with the cladding of the external walls, since on the inside the corner is completely closed.
Scandinavian
The connection using the Scandinavian method is considered the warmest due to the absence of cold bridges. It got its name due to its distribution in northern European countries. The main disadvantage of this technique is its complexity; when erected independently, it is practically not used.
Monolithic
The monolithic method involves the use of a solid wooden beam. It is not so often used in the construction of residential buildings, since the resulting connection is “cold”. Over time, the array may crack, and difficulties may arise with the cladding of the facade due to the lack of shelves.
Varieties of a warm corner of a frame house
Warm corners in a frame house are arranged to prevent the appearance of cold bridges
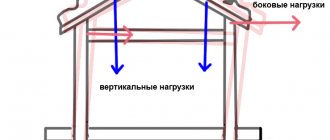
Angle - a node obtained when connecting walls. It carries a higher load than a wall. In addition, there is a higher likelihood of cold bridges appearing here, especially with the frame construction method.
On the Russian market, a common scheme is in which the angle is formed by a beam. However, this option is bad for two reasons. Firstly, this is the coldest element in the wall, which there is no way to insulate. Secondly, there are no shelves on the inside to which the trim could be attached. In a frame building this causes difficulty.
To prevent heat loss, several other design schemes are used during construction.
Californian
The American or Californian assembly scheme can serve as a standard for efficiency with sufficient reliability and optimal durability. There are several options for such a frame. In none of them is the timber used as a corner post. With rare exceptions, the remaining supports of the rack and frame are made only from dry planed boards.
The California scheme involves installing an additional rack or OSB fragment in an already installed corner. It is fixed from the inside and gives the corner greater rigidity. It also serves as a support for installing the internal cladding. The finishing is attached to the inside of the corner - the fasteners do not form a cold bridge with the outside of the corner.
The California corner is insulated along with the wall.
Closed
Various schemes for arranging warm corners
This option also involves the use of a board. An additional wooden stand is installed between the wall studs so that it forms a kind of shelf with the corner element. The shelf faces outwards and is therefore inaccessible from the inside.
When finishing the facade, the shelf is filled with insulation and sewn up. This design retains heat well, as it is additionally insulated.
The insulation of the corner post is carried out before the façade is faced.
Scandinavian
This option is used much less frequently, in regions with a truly harsh climate. More often it appears in buildings assembled according to the Canadian scheme. In this case, 2 corner posts are fixed so that the corner itself faces the inside of the building, and the wall posts are adjacent to its surface. The unit is reinforced with an additional rail.
The design provides high rigidity, but at the same time eliminates the appearance of cold bridges, since the unit is inaccessible from the inside. The resulting cavity with a supporting strip is filled with insulation and sewn up with finishing material along with the walls.
Structurally, this option is not possible everywhere, so it cannot be used “by default”.
Monolithic
It is not recommended to use monolithic corner beam
An option that is not recommended for use during construction. The corner element is a beam of square or rectangular cross-section. Installing it is a little easier than installing several boards. But this is where all its advantages end. Additional disadvantage: even well-dried timber is more prone to cracking than boards. Therefore, over time, the risk of cold bridges forming here is much higher.
The main requirement for the material is low humidity, no more than 19%. For construction, only dry edged boards with a cross section of 50*150, 50*200 mm are taken. For the Californian unit, you can take scraps of OSB board, since here the additional stand makes the structure rigid, but does not increase the load-bearing capacity.
Corner of two boards
This is the most inexpensive option. In this case, the corner posts are attached to each other in the form of a mirror image of the letter “L”. The corner on the inside of the room is insulated. To create a shelf for attaching the interior trim, a strip of OSB board is attached to the rack (its width must be at least 100 mm). The main disadvantage of this design is low rigidity.
California warm corner
The most popular way to assemble the outer corners of a frame house is the Californian warm corner. To complete, it requires only three boards measuring 150x40 mm, which makes this technology also quite economical. The result is a corner post that has high rigidity, has no open joints between elements, and also makes it possible to properly organize the insulation and finishing of adjacent walls, both outside and inside the house.
This is done as follows. The base of the rack is assembled from two boards, which are connected in the shape of the letter “L”. One of the sides of this structure is oriented outward of the future house, and the other is oriented inward. Next, a third board is mounted on the inside. As a result, its edge rests against the board oriented towards the outer corner, and the edge is adjacent to the one directed inside the housing.
As a result, all the joints are not end-to-end; there is room to lay thermal insulation material and attach the outer sheet cladding. In addition, on the inside of the corner there are two so-called shelves, which are subsequently used for installing drywall or OSB sheets for interior decoration.
Of four boards 3 (50x150 mm) and 1 (50x100 mm)
This method involves placing two 50x150 mm racks parallel to each other. Another 50x150 mm board is attached to the outer rack. The resulting internal corner is strengthened with a board measuring 50x100 mm. The resulting pocket between the last board and the exterior finish is filled with insulation. The structure is nailed together using nails with a pitch of no more than 60 mm.
Scandinavian warm corner
In our country, the Scandinavian warm corner is used quite rarely, although technically it is one of the simplest and most energy-efficient methods. Very popular in America and Scandinavian countries. To arrange one corner post using this method, you only need two 150x40 mm boards and one 50x50 mm block.
The main two boards are positioned in an “L” shape with both long sides facing the street. They are not physically fastened to each other in any way, since they are fused only by ribs. To make such a stand rigid and protected from the formation of cold bridges, a 50 mm block is used. It is installed inside at the junction of the main boards, and is attached, respectively, to both of them. The result is the required rigidity, and at the same time the only path for cold is blocked. A shelf is formed inside the house for mounting sheet cladding on adjacent walls.
In order for a Scandinavian corner to be truly warm, mineral wool insulation must be placed in its cavity. This complicates the insulation stage of a frame house a little, but has its advantages.
From four boards
In this case, the rack consists of four boards, fastened flat to one another. The inner side of such a connection is strengthened by another board, which not only plays the role of an amplifier, but also serves as a shelf for attaching the interior decoration.
This connection is highly rigid, but the corner may freeze. To prevent this, the middle of the three boards is replaced with separate blocks to break the cold circuit.
Methods for fixing vertical posts
When assembling the structure of a frame house, three methods are used to connect the racks and the lower frame:
- Using corners. The simplest method, which is usually used by novice builders. In addition, such a joint is used for installing corner supports . When fixing end-to-end, reinforced steel corners and durable screws are used for fastening.
- Partial cutting. A hole is made in the bottom trim beam for inserting a vertical post. The size of the cutting is about 30-50% of the total thickness of the bottom trim beam. This option is more difficult to implement, but more reliable - the joining reduces the movement of the frame and timber during drying.
- Connection with cutting. Prepare a recess to fit the cross-sectional dimensions of the vertical support. The method is used to fix the racks in the middle of the wall. The position of the supports is secured with jibs.
Insulation of corners and “warm floors”
The corner of the house is the area of greatest heat loss. To minimize them, the “warm corner” technology is used, which is formed from three or four frame posts. The resulting pocket between them is filled with insulation. The technology depends on the type of connection chosen.
If the Scandinavian or closed method is chosen during construction, it is necessary to insulate the corners before installing the external cladding.
Penoplex, mineral or ecowool can be used as insulation. Mineral wool has a shorter service life and may deteriorate over time.
Additionally, liquid thermal insulation compounds are used, which increase the fire-fighting properties of the structure.
Corner trim fasteners
To cover the warm corners of a frame house, nails 150 mm long are traditionally used. To form a reliable nodal fastening you need 3-4 nails. When they are driven in, 2 cm are removed from the edge of the board. In those places where increased rigidity and fastening strength are important, anchor bolts are used.
Dowels—wooden pins—also serve as connecting elements. Parts made of oak wood are especially durable. The optimal diameter of the pins is 20 mm. The inconvenience of their use lies in the preliminary preparation of the holes. They should be 10-20 mm longer than the length of the fastener .
Installation of corners in a frame house using a diagram and well-chosen materials allows you to preserve the integrity of the structure for many years and maintain a comfortable microclimate in the premises.
A corner in a brick house is freezing, what should I do?
What to do when a corner freezes in a brick house
When the corner of a wall becomes covered with moisture, ice or a layer of frost in a brick house, the situation needs to be resolved radically. First you need to make a diagnosis. Its main stages:
- Checks the outside of the house wall. It is this that is the source of the problem; you should not look for the cause inside the home. You should pay attention to the presence of cracks, voids, the quality of the brick and the masonry itself.
- If cracks are found, it is important to determine the scope of work to eliminate them. Sometimes the splits are small, but they can also form along the wall, horizontally, like cobwebs. Then you will need almost a major exterior renovation. If a brick house is worn out or in disrepair, then you cannot do without metal ties.
- When there are no cracks, it is necessary to examine the masonry itself and the brick. In the corner it fits completely differently. It is necessary to determine whether the firmware technology is followed. It is important to pay attention to the gaps between the bricks. There may not be enough solution between them. The building material itself, if it is of poor quality, may have many gaps, pores or cracks. Such a brick causes the corner to freeze.
After diagnosing and determining the cause, you should draw up a scope of work and determine the best way to solve the problem. As a rule, insulation is used on the outside. Experts do not recommend performing interior work.
The corners of the house are freezing - how to insulate them
The corners of the house are freezing - how to insulate them
The only correct solution to get rid of frozen corners in the house is to insulate it. Only thanks to it will the moisture or frost inside go away once and for all. Do not forget that before insulation it is necessary to inspect the wall for cracks and eliminate them in advance. The following solutions are suitable for this:
- Use of iron ties (conductors). They are especially relevant for large longitudinal cracks.
- If the house is private and not multi-story, then the wall may need to be rebuilt. The method is rarely used due to difficulties encountered during the work.
- Strengthening an internal or external wall (additional masonry)
- If the lower corner of a private house on the first floor freezes, then the problem may lie in the foundation. It will need to be reinforced: along the entire wall or part of it. This is labor-intensive and expensive work.
Insulation of walls in an apartment building
As a rule, further insulation is required. This method is used most often and is recommended by experts.
Scaffolding prices
Scaffolding
Why do corners freeze in a brick house?
Why does a corner freeze in a brick house?
A brick house differs from a panel house in the materials used in construction. Many believe that it is much more environmentally friendly and warmer, but this was not the case. It all depends on the quality of the brick and the work itself on laying it. Even in a brick house with thick walls, corners can freeze.
Causes:
- Insufficient number of masonry layers.
- Incorrect ligation of bricks in the corners.
- Poor quality material used.
- A high percentage of wear and tear of the entire house, including emergency condition.
Even if a brick house was built quite recently, it cannot be ruled out that cold and moisture will appear in its corners. The builders could have laid out the brick incorrectly and used insufficient quantities of it. The influence of climate should not be ignored either. If the region experiences low temperatures, then laying in one layer will clearly be insufficient. Then the corners will be the most vulnerable area.
Freezing of a corner in a brick house due to cracks
Damaged brick buildings, houses with a high percentage of wear and tear are the sector where problems always arise, including with corners. They freeze because of voids, crevices, cracks, and because of the cold coming from the roof. The situation here cannot be resolved by insulation alone. First, work is carried out to eliminate the same cracks or other defects.
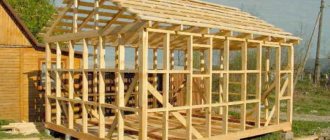
Mistakes when building a frame house
If you decide to build a frame house with your own hands, you should not make mistakes. We suggest you familiarize yourself with the most common of them.
Use of poor quality wood
Very often, insufficiently dried wood is used to build a frame house. This is a big mistake. When the tree dries out, it will change its shape. As a result, the house may lean, nails or screws will be partially turned out. Not only the house itself will suffer, but also the insulation and finishing materials.
Wood cannot be dried quickly. The drying process should take several days. If you do not comply with the requirements, the board or timber will burst or bend. Immediately after drying, the wood must be treated with special compounds to protect it from fire and rodents.
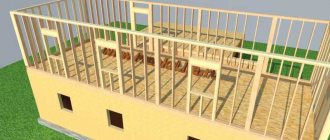
Insufficient frame reinforcement
The frame is the foundation of the house. It must be done to the highest possible quality. And special attention should be paid to vertical posts, since they weakly resist lateral loads. To solve the problem, it is enough to strengthen the frame with diagonal braces. This can be done in several ways: use spacers, sheathe the house with plywood or OSB sheets, or fill the sheathing with boards.
Struts can be made from above and below. One end of them should rest against a vertical post, the other end should rest against the strapping bars and be at an angle of 50-60 degrees to them.
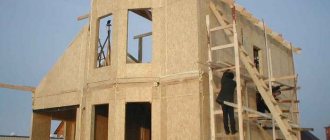
Most often, the frame is sheathed with plywood or OSB boards. Their thickness must be at least ten millimeters. It is important to properly secure the slabs to the frame; for this you can use self-tapping screws with a diameter of at least four centimeters.
You can also strengthen the body using sheathing made of boards, which are attached at a distance of 5-7 centimeters at a slight angle relative to each other.
Lack of vapor and waterproofing
The lack of hydro- and vapor barrier has a negative impact on the insulation. Moisture gets into it, causing deformation. After this, it ceases to perform its functions. Wood also suffers from moisture, it becomes damp, and we also begin to deform, plus various bugs appear in it.
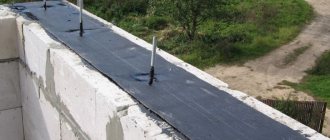
Lack of foundation waterproofing
The bottom frame beam must be protected from the foundation by a layer of waterproofing. Otherwise, it will be exposed to groundwater and will gradually begin to rot. After a few years it will have to be replaced, and this operation is expensive and complicated.
Failure to follow the step when installing vertical racks
The width of the insulation boards is 0.6 meters. Accordingly, the pitch between the frame posts should be 59-60 centimeters.
Insufficient fastening of vertical posts
It is not advisable to use only self-tapping screws when attaching frame posts. It is better to additionally drive in several nails on both sides at an angle to each other. In general, all joints must be worked out as efficiently as possible.
These are just some of the mistakes that are made when building houses using frame technology. To avoid them, contact a trusted company that has been operating in your city for a long time.
Before building any house, everyone wonders about the cost. A correctly drawn up estimate for a frame house will help answer this question as accurately as possible. The estimate includes two parts: construction work and installation of utilities. It is necessary to take into account not only the cost of materials, but also the costs of their transportation.
Having counted all expense items, we get the cost. Read about how much it costs to build a frame house here.
But before you take your first steps in building a frame house, find out about all its disadvantages. Read about the pros and cons of frame houses in this article. The article will dispel all the myths of frame houses.
Video about the construction of frame houses: design and components
Installation of the rafter system
Permanent address of the article
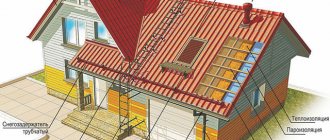
Insulating the roof of a frame house with your own hands
Very often, instead of the ceiling, and sometimes together with the ceiling, the roof of a frame house is also insulated with mineral wool. This is usually done in cases where the attic space is residential and heated.
The insulation technology is practically no different from the thermal insulation of the ceiling, with the exception that a waterproofing material must be stretched over the insulation to protect the insulation from the external aggressive environment.
This is how the thermal insulation layer of mineral wool on the roof of a frame house looks like in the diagram:
Here are a few features that will help make the DIY insulation process easier:
- It is more convenient to insulate the roof, as well as the ceiling, from the outside, because installing mineral wool from the inside is, firstly, inconvenient, and secondly, this material tends to fall on the head and face.
- After installing the rafter system, it is necessary to hem a vapor barrier layer from below, onto which, just as in the case of the ceiling, fill the inside with sheathing material, board or plywood.
- Now lay sheets of insulation on the outside, adhering to the same rules as when insulating other parts of a frame house.
- A waterproofing membrane is laid on top of the insulation, onto which the counter-lattice, sheathing and roofing material are already placed.
It is worth noting that the roof can also be insulated from the inside if it is fully assembled. But this is much more inconvenient, because you will have to come up with some kind of temporary fastenings, before stretching the vapor barrier material, so that the insulation does not fall out.
Why frame house construction is in fashion: advantages
- low weight of the structure, supporting structures have a relatively small mass;
- increased energy saving, fairly high thermal efficiency;
- environmental friendliness, since the house is built exclusively from high-quality wood and only finishing materials that are harmless to the human body are used. By the way, thanks to the fact that new building materials appear every day, it is possible to choose really high-quality materials;
- fire resistance and resistance to dynamic and seismic loads. This can be achieved using special products that are available in any specialized store;
- durability and reliability of the design;
- wide architectural possibilities. This allows architects to develop almost any design solution;
- quick installation of the frame. The construction of a frame house sometimes resembles a children's construction set, if you observe the actions of qualified builders from the outside. But for novice specialists this is a real test;
- interior/exterior decoration depends solely on the wishes of the owners/future owners of their property;
Installation of corner posts
First, install the side racks. In the simplest case, they are attached to the base using reinforced metal corners. The corners themselves are screwed to the boards with screws or nails. It is advisable to use galvanized corners - they are less susceptible to corrosion. Corner posts must be carefully checked for verticality with a plumb line. For their further stability in a vertical position, it is advisable to install temporary braces before the final fastening of the frame.
Fastening the racks with a metal corner
There is another way to attach the side posts - with a wooden dowel. A dowel is a small round block. It is hammered into pre-drilled holes when assembling the corner of the lower frame, so that the dowel protrudes above the plane of the frame by 8-10 cm. This additionally fastens the beams of the frame and serves as an element connecting the frame to the stand.
Fastening with dowel
A hole is also drilled in the rack beam to match the diameter of the dowel and to a depth of 8-10 mm greater than the length of the dowel release. Then the stand is put on the dowel and also secured with braces. This method is quite labor-intensive, but has a number of advantages:
- No metal fasteners subject to corrosion
- A more reliable connection than a threaded connection, which weakens over time due to drying of the wood
The connection of homogeneous materials contributes to greater ductility under lateral loads on the racks.
Do-it-yourself insulation of the ceiling of a frame house
Insulating the ceiling of a frame house is practically no different from other types of houses with wooden floors, and is one of the most critical aspects of thermal insulation of the entire house as a whole.
Now let's take a step-by-step look at how to properly insulate the ceiling of a frame house with mineral wool:
- It is better to carry out this procedure when the roof is not yet fully assembled, so that it does not interfere with the tight laying of the insulation on top of the ceiling.
- From inside the house, a vapor barrier material is stretched onto the ceiling beams, onto which a 25 mm thick board, plywood, or the same OSB sheets are placed. The pitch between adjacent boards is chosen based on how the ceiling will be finished, but most often it is about 40 cm between the axes of the boards.
- Now mineral wool is laid on top, all according to the same rules as everywhere else, without voids, tightly and overlapping the seams of the previous layer - at least 15-20 cm. An important point is that the insulation must be laid completely over the entire ceiling, including an overlap over the entire width of the walls.
- If the attic space is cold and is not used for permanent residence, there is no need to lay membrane films over the insulation. You can immediately cover them with boards or plywood to make it comfortable to walk on.
- When it is not possible to insulate the ceiling of a frame house from above, it is insulated from the inside of the room. The insulation, in this case, needs to be “tied up” so that it does not fall. And then sew on a vapor barrier material and board or plywood.
Since warm air tends to rise upward, if the ceiling or roof is not insulated correctly, the maximum amount of heat will escape from the house.