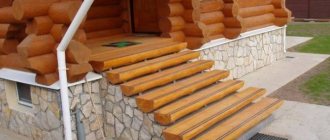
We make metal railings for the stairs with our own hands
When constructing enclosing structures for stairs, different materials and technologies can be used. If fencing is needed for a staircase in a private house, it all depends on the desires and financial capabilities of the owners. Metal structures are a popular solution, because they are highly durable and can elevate the interior.
More expensive design of metal railings.
The process of making fences from metal with your own hands is more difficult than from wood. This requires the appropriate tool and at least minimal skills in working with metal. But the result will be different for the better. Metal stair railings will last for decades, with minimal maintenance. And the appearance of such structures can be simply unique.
Metal railing designs can be made in the most exclusive variations.
Stages of installation of wooden enclosing structures
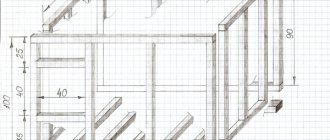
Before creating a railing with your own hands, you should apply markings in accordance with a previously prepared plan. Assembly should begin by installing the outer support pedestals (pillars). The handrails should be located at a height of about 90 cm. This parameter is most convenient for moving up the stairs. The gap between the supports should not be more than 120 cm. This distance depends on the type of enclosing structure and the weight of its components.
What materials can be used to make metal railings
Forged fences are considered the most valuable. In addition to the fact that forged elements have the strength and durability characteristic of metal structures, they also give the interior solidity and status. There is only one problem - the complexity of manufacturing. Only a professional can forge a full-fledged fence with his own hands, and finished products are quite expensive. But forged elements can complement other metal structures well - welded ones, for example.
Welded railings complemented by forged elements.
Steel railings are no less popular. They are durable and can withstand heavy loads. If you know how to use a welding machine and a grinder, you can build fence posts, patterned filling, and handrails from steel with your own hands. The appearance of stainless steel or painted black steel will suit a variety of interiors. When you manufacture steel fencing yourself, you have the opportunity to save money.
Stainless steel railings can be no less beautiful than forged ones.
Aluminum railings are prefabricated structures. Aluminum is softer than other metals; under significant loads it deforms. But for fencing a simple staircase for a home, it may be the most suitable option. Aluminum parts are much lighter than steel ones - transportation and assembly of fences made from them is not difficult to do with your own hands.
Aluminum railings do not require constant maintenance and are not subject to corrosion.
Features and installation rules
The vertical supports on which the handrail is mounted can be of various shapes and made of different materials. There are handrail-type stair railings made simultaneously from several materials. The features and rules for fastening balusters largely depend on what they are made of, the shape of the structure and its purpose.
To the balusters of a wooden staircase
The most difficult thing to install is wooden railings. The difficulty lies in the presence of many installation methods and the absence of a specific ready-made solution. This is explained by the individuality of each wooden structure. Depending on the type of staircase, railings on balusters are mounted using screws, dowels, ties, glue and even nails. Sometimes they are mounted directly onto balusters or stair posts, and in some cases, railings are required. It makes no sense to say that any of the listed methods is better or worse, since they are all considered correct. It all depends on the implementation option for each specific design concept.
The basis of wooden railings are balusters - vertical posts. They are installed on the outer edge of the steps, and this element will not necessarily be located on each of them. The spaces between the balusters are often filled with decorative details.
In the case of attaching balusters to each step of the stairs, they should be located at a distance of 150-200 millimeters from each other. At the same time, it is important to monitor the strength of fixation of the balusters on the stairs.
The basic rule for fastening this type of railing is to fix the balusters at least in two points: at the bottom - on the structural element of the staircase, at the top - on the handrail.
The general algorithm of work is as follows.
- Cutting railings to the required length. Usually, they are guided by one of the principles: the length of the handrail is equal to the distance between the support posts, the length of the span or the gap between the bends of the stairs. The joints are carefully processed, achieving a perfect fit of adjacent parts. If the structure is located on the street, the elements should be treated with protective impregnations, varnished or painted.
- Adjustment of balusters. To do this, the tops of the posts are filed at an angle corresponding to the steepness of the rise. For convenience, you can use twine, which will set the cutting line, or a laser level.
- Installing railings on balusters using the chosen method.
With an auxiliary bar (pillar)
To easily and securely fasten the handrail to the balusters without spoiling its appearance with protruding nails, use an auxiliary strip - a handrail.
A cross-section with a tenon is cut out in the shape of a groove, which is located on the inside of the handrail. The plank is attached to the balusters with nails or self-tapping screws, and a handrail covered with grooves and tenons is glued to it.
In some cases, to ensure greater reliability, the auxiliary strip is made of metal, and then a universal glue is used that connects metal and wood.
For prefabricated metal fencing
Prefabricated metal railings and fences are structures assembled from pipes of various diameters, shapes and decorations, which serve as balusters, racks and posts. You can attach the railings to metal balusters with special ends, which come in different types and sizes.
It is quite simple to fix them using clamping bolts, and greater reliability and durability can be ensured if you additionally weld all the seams.
If the handrail is not metal, but wooden or plastic, then additionally the joints can be coated with universal glue.
To a welded or forged stair railing
Fastening wooden railings to a forged or welded fence is carried out by making a cut to the size of the fence lintel. The railings and handrails are connected by self-tapping screws screwed through the hole on the top lintel.
The length of the fastener is selected taking into account the height of the handrail. The self-tapping screw must be at least 5 mm smaller.
The second way to secure a wooden handrail to a metal structure is to use all-purpose glue.
To make the structure as durable as possible, you can combine both methods of fastening.
To Wall
Railings and handrails are attached to the wall when the width of the stair steps is more than 120 cm. The wall handrail is made identical to the one placed on the balusters. Additional railings can be secured to the wall using brackets, which are selected depending on the shape of the profile.
Holes are made on the flat side of the device, which has a round or square shape. This side is attached to the wall with dowels or screws.
A handrail is installed on the second part of the bracket. This part may look like a ring or a flat area, depending on the shape of the upper element. The number of brackets depends on the length of the handrail; they are correctly installed at a distance of 40 to 60 cm.
Safety standards
When you decide to make metal fencing with your own hands, you need to pay attention to safety issues. There are standards for the following railing parameters:
- the optimal height is from 90 cm to 1 m;
- the load that the railing must withstand is 100 kg/m;
- the distance between the balusters is from 10 to 15 cm.
- handrail diameter, optimal value – 5 cm;
- the clearance between the wall handrail and the wall is at least 10 cm.
Basic parameters for railings.
In addition, the integrity of the handrail is important, as well as the absence of sharp corners and burrs, which can easily injure your hand. The shape of the handrail is usually chosen to be round; this option is the most convenient to use. In general, the recommended values determine not only the safety of the structure, but also the comfort of its use. For example, a railing of a specified height not only protects a person from falling, but also allows him to feel comfortable holding on to them when descending or ascending.
The handrails are also square for a stronger hand grip.
How to attach metal stair railings
Mounting options depend on the parameters of the ladder and its location. If the span runs along the wall, then the fences can be mounted on the wall. Actually, in this case, only the handrails remain from the railings. Do-it-yourself installations are easy, and eliminating much of the stair railing reduces overall costs.
Forged wall handrails.
In another case, fence posts are installed on the steps. This is the most common solution; it is suitable for almost any staircase structure. The posts to which the handrail is mounted are attached to the outer edges of the treads.
The most reliable is considered to be fastening to the ends of the steps. When installing metal railings with your own hands, this type of fastening, called a side fastening, is used, for example, when you do not want to narrow the useful area of the span. But you need to keep in mind that this method is expensive and time-consuming. In addition, if the staircase has several flights, then the distance between parallel flights should be at least 20 cm.
Railings with side fastening.
Railing fastening methods
The mounting option for balusters and handrails is chosen based on the type of structure and the material of its manufacture. However, there are generally accepted methods for fixing the main load-bearing elements, which allow you to securely fasten the elements and avoid loosening of the staircase complex.
Self-tapping screws or wood grouse
If we talk about the most common and simplest methods by which both balusters and railings are installed, then this is their installation using self-tapping screws or wood grouse. It is necessary to choose such bolts from stainless steel so that over time they do not rust and the railing does not become loose. It’s easy to assemble railings using this technology:
- a self-tapping screw or capercaillie is screwed into a support standing vertically at a slight angle so that its end extends beyond the end of the baluster;
- the part is installed in the correct position, and the bolt thread is screwed in all the way so as to recess the head;
- the recess is puttied or covered with wax.
The installation process is quite simple and allows you to make the railings yourself, without the involvement of craftsmen.
stiletto heels
Installation of railings using fasteners in the form of metal studs is carried out as follows:
- in the middle part of the lower end, using a drill, you need to make an eighty-centimeter hole with a diameter of approximately 12 cm;
- place a galvanized pin in the recess. Important: the hairpin should “peek out” by about 6 cm;
- fix the stud with construction glue;
- A pin is inserted into the previously made hole, seated in a baluster, and it is also filled with adhesive.
For spikes of different shapes
You can build a railing with your own hands, without using metal fasteners at all - using spikes and construction glue. To do this, it is necessary to cut a convex figure on the upper side of the baluster and an identically shaped hole on the surface of the handrail. Spikes can be made in any configuration: rectangular, oval, round, diamond-shaped. The main thing is to achieve perfect alignment of the tenon with the groove under it. The made template will help with this. The height of the spike must be at least 250 mm.
To keep the spike securely in the recess, the contact points are treated with glue.
Using dowels
The traditional way to attach balusters and handrails to staircase steps and railings is to use dowels. To fix the structure in this way, it is necessary to make identical holes in the racks and handrails, which must clearly coincide. The dowel will be inserted into them. And after the parts are perfectly connected, you can treat the joints with glue.
Aluminum option
Like most metals, aluminum has a number of important qualities that allow it to be used for the manufacture of stair railings. First of all, this:
- corrosion resistance;
- durability;
- strength;
- resistance to low and high temperatures, as well as temperature changes.
Aluminum railings with decorative elements.
It should be noted that aluminum is lightweight; it sets it apart from other metals. In many cases, softness can also be considered an advantage - aluminum parts can be easily given the desired shape.
The process of assembling and installing aluminum railings is not particularly difficult; everything is done using conventional fasteners. Even an untrained person can assemble and install stair railings from ready-made aluminum parts with his own hands.
Assembly diagram of aluminum handrails.
As for the appearance of aluminum fences, railings made of anodized aluminum are widely used today. This material is externally indistinguishable from stainless steel. Anodizing increases the wear resistance of aluminum and improves its appearance - you can give the material different shades: gold, silver, nickel and others.
Aluminum railings with a golden hue.
Cold bending technology can be used to decorate aluminum structures. In this way, you can create, for example, rounded elements to fill the space between racks.
Cold bending of metal
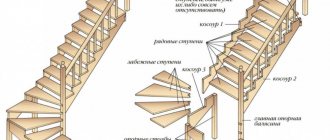
Attaching a handrail to the balusters of a wooden staircase
It turns out that wooden railings are the most difficult to make. This is because there are many different ways and techniques for working with wood and almost no ready-made solutions, since each staircase is individual and has its own characteristics. For example, attaching a handrail to balusters can be done using dowels, self-tapping screws, nails, bolts, special ties (zipbolts), and glue. In addition, you can “mount” the railing directly on the balusters and posts, but there are options with an additional strip, which is sometimes called a “rail rail.” And all of these are the “correct” ways to connect the posts to the handrail. We will talk about how to do this in this section.
Attaching the staircase handrail to support posts or balusters can be done in several ways
First of all, cut a piece of the handrail to the required length. This can be a fragment from one support pillar to another, a piece for the entire span - from the upper/lower pillar until the moment of turning. It all depends on the design of the staircase. If there are joints between two fragments, they must be processed well, achieving a perfect match. Then the handrails for the street must be coated with protective impregnations, and then painted/varnished. Afterwards you can deal with the issues of attaching the handrail to the stairs.
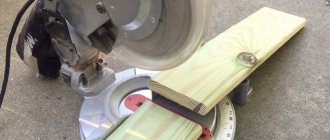
How to trim balusters for installing handrails
After installing the balusters on the steps, their tops are at different levels, and without trimming the handrail cannot be installed on them - it does not fit like that. To install the support handrail on the stairs, it is necessary to cut the upper part of the racks at a certain angle. This angle is determined by the steepness of the flight of stairs and does not need to be calculated. It is determined “on the spot”.
After the balusters are installed, they need to be trimmed
To find the cutting angle of the balusters, you can use a thread stretched between the support posts. We tie it at the same distance from the tops of the pillars, which are installed at the top and bottom of the span. Where, according to the plan, the lower border of the handrail will pass. Using this stretched thread, we draw a line with a pencil onto the tops of the posts. Instead of thread, you can use a laser level and you can also temporarily attach a guide (any flat strip).
This is how it should turn out - the staircase railings are ready for installing handrails
We got the line, now we saw off the tops of the columns on the stairs strictly along it. Next, you can continue attaching the handrail to balusters or posts.
Allow me one piece of advice: if for the subsequent installation of the railing you need to drill holes for dowels or studs, it is better to do this before trimming. This makes it easier to find the center, easier to hold the drill perpendicular. After the holes are made, you can take a saw/jigsaw and file along the intended markings of the rack.
Connecting balusters and railings with dowels and threaded rods
Let's consider one of the traditional methods: attaching the handrail using dowels or pins. For this type of connection, it is necessary to make matching holes in the handrail and staircase railing posts. If you install studs, you can screw them into the holes made in the center of the balusters and install the handrail in the position in which it should stand. After checking that everything is in place correctly, walk along the handrail, tapping each baluster with your fist. The protruding ends of the metal pins will leave a mark on the back of the handrail. Remove the handrail and mark the resulting marks with a marker/pencil for reliability. Now you can drill the holes. With this method of marking the handrail, there are almost no problems with its “fitting” into place.
For installation of dowels and threaded rods, holes are made 1-2 mm smaller in diameter
The second option for marking the handrail for installing pins and dowels is carried out before they are installed in the balusters. First of all, we put the cut piece of the handrail in place. Then, with a pencil, mark on both sides where the balusters are installed. Before making marks, check the distance between adjacent posts below and near the handrail. If they match, everything is fine, we put marks; if not, we adjust the position of the rack and only then make marks. Adjustments are needed to ensure that all the staircase supports are vertical. This will make the railing more secure.
For a reliable connection, the pin should stick out at least 2 cm
After all the balusters are marked, remove the handrail. On the reverse side are the marks we made. We draw diagonals between the pairs of lines that outline the baluster. We put a mark at the place where they intersect. Here you will need to drill a hole for a dowel or pin. We find the centers on the balusters in the same way (if there are no holes in them yet). As you understand, with this method of marking the handrail for the railing, problems can arise - the slightest inaccuracy and the handrail does not fit into the post. The good news is that the baluster can be moved within certain limits. As long as it is not fixed, there is a certain freedom, and this can be used when installing the railing. Just move it so that the tenon fits into the groove. In general, you know how to attach handrails to dowels.
To make the installation of the railing more reliable, in addition to dowels or studs, you can coat the connection with glue. This will make the structure more rigid and extend its service life without backlash.
With an auxiliary bar - support rail
Agree that the easiest way to install handrails on balusters is to use self-tapping screws or nails through them. What stops you from making such a decision? An overly unsightly result in the form of fastener caps that spoil the whole look. But there is a very similar method that guarantees a good appearance of the stair railings. An auxiliary bar is used, which is also called a bolster.
The auxiliary strip is cut to the shape of the groove
The auxiliary strip is cut with a tenon, which in mirror image repeats the shape of the groove in the lower part of the handrail. The flat side is placed on sawn balusters and fastened through (screws or nails - your choice). Don't forget to check the distances between adjacent posts.
We fix the balusters right through to the auxiliary strip
Then the upper part of the support is coated with glue and the handrail is “planted”. All. There are no traces of fasteners on the front of the handrail, everything is holding together. The only thing that needs to be taken into account is that the height of the handrail turns out to be slightly larger, since the thickness of the auxiliary plank is added (if the plank is wooden, this is at least 2-3 cm).
There is another way to attach the handrail to the support rail - with small nails or self-tapping screws from below, at an angle. But with this fastening, the caps are visible. They can be disguised using one of the known methods, but it will take a long time...
The easiest way is to screw it with self-tapping screws
As you know, over time, wooden railings become “loose” due to the fact that under load they wobble, the wood fibers become crushed, and play appears. To reduce the possibility of play, when fastening through a plank, two or more screws/nails can be used for each baluster. This will make the handrail mount more rigid.
Also, for greater reliability, the bar can be made of metal. Any thin metal will do. Be it steel or aluminum. But then it will be necessary to either cut the bar to fit the size of the recess in the handrail, or modify the groove so that the handrail fits well on the structure. And one more thing: if the plank is metal, you need to find a universal glue that glues wood and metal well. This handrail mount for stairs is simple, beautiful, and reliable. Suitable for those who decided to make a stair railing with their own hands for the first time.
For spikes of different shapes
It is possible to install a wooden handrail without metal fasteners: with spikes and glue. Spikes are cut at the top of the balusters. Under them, recesses of the same shape are formed in the handrail. Tenon/groove shape - any. It can be a rhombus, a rectangle, a circle, an oval. The main thing is that the tenon and groove match perfectly. This can be achieved by making a template and repeating it exactly on each fragment. The minimum tenon height is 2.5 cm, so the height of the handrail cannot be less than 4.5 cm.
Cut spikes on the tops of the balusters, and grooves for them in the handrail
After a tenon is formed on each baluster and a groove is cut in the corresponding place on the handrail, they are glued. When installing the handrail on the balusters, they can be shifted slightly to align the holes. You can use the installed handrail after the glue has dried (the time is on the package).
Prefabricated aluminum railings for concrete stairs
The parts from which aluminum railings are assembled can be purchased at a hardware store, and assembling it yourself will save some money. The following components will be needed:
- racks with a diameter of at least 4 cm;
- crossbars with a diameter of 16 mm;
- handrail, diameter – 5 cm;
- hinges for fixing the handrail;
- connecting parts and holders for crossbars;
- additional fasteners and accessories - anchors, glazing beads for racks, decorative plugs, filling, etc.
Elements of aluminum handrails.
The guardrails will be attached to the steps. To do this, markings are first made - it is necessary to determine the location of the racks on the stairs. It is recommended to place the racks in the middle of the steps with a distance of 35–50 mm from the edge. Then holes for anchors are drilled, depth - 10 cm.
Designations of rack fastening elements.
The resulting recess is first filled with a special adhesive. This is done in order to mix the glue with the dust remaining after drilling. The anchor is inserted, rotated and removed. The recess is again filled with glue and the anchor is inserted again.
Then the anchor needs to be drilled at the points above which the glazing beads will be located. This is done for mounting with self-tapping screws; the stand is also drilled in the appropriate places. Next, the stand is put on the anchor, but not secured - the height may need to be adjusted.
Rack mounting diagram.
A flange is put on it through the top of the rack; it serves as an additional fastening and should be located at the bottom. Hinges are attached to the upper ends of the posts. A handrail is mounted on them - it is placed on hinges, adjusted in height and fixed with self-tapping screws.
Advice!
If the staircase design includes several flights, then the handrails are connected to each other by rotating elements.
Do-it-yourself assembly and installation of aluminum railings.
Installation of balusters
Balusters in a flight of stairs
A row of balusters is located on one or two edges of the flight of stairs as protection, ensuring safety of movement along the steps. The racks can rest on steps, or they can rest on a bowstring.
One or two balusters can be installed on the steps. This way the balusters will rest on a horizontal surface. The posts will not need to be cut at an angle, so the preparation process for installation will take less time. However, balusters installed on steps reduce the width of the staircase.
Balusters installed on steps
If you install wooden posts on a string, you can save the usable width of the steps, but in this case, each baluster will need to be trimmed both at the top and bottom. Both angles of inclination will be equal, since they correspond to the inclination of the flight of stairs. This method is used when the bowstring is thick enough.
If metal or polyurethane foam stands are used for mounting on the bowstring, they need to be supported. The lower side should follow the angle of the ladder and lie on the bowstring. The top side is cut parallel to the floor surface. With the help of such steps you can install balusters on a string. However, wooden stairs usually use posts made of the same material, so they can be cut at the required angle.
Balusters installed on a string
There are three ways to attach balusters:
- On stiletto heels.
- On the dowels.
- Self-tapping screws.
Each of these methods is described in detail below, indicating the sequence of work.
On stiletto heels
Example of studs
For secure fastening, steel studs are used. They can be smooth or threaded.
If you use smooth fasteners, they are mounted as follows:
- A hole is drilled in the lower part of the racks strictly in the center. The depth of the hole is equal to half the length of the stud, and the diameter is 1 mm larger than the size of the fastener itself. To prevent the wood from cracking, first create a hole with a diameter of 0.5 cm and then enlarge it.
- The hole is filled with wood glue, and the end of the pin is treated with an adhesive mixture and sprinkled with sawdust. Then the pin is inserted into the rack. Excess glue is immediately removed, and the baluster itself is left for several hours for the glue to dry.
- After this, holes are made in the steps or in the bowstring. They are all located on the same line.
- The created holes are filled with glue and racks with studs are inserted into them.
To fasten balusters, studs can be used, which are used by screwing in; on one side they have a metric thread, and on the other they look like a screw.
For these studs, holes 0.5 mm larger than the thread itself are drilled in the end part of the balusters. Glue is poured into them and then the sharp end of the pins is screwed into the racks. To do this, you need to attach and lock several nuts onto the metric thread. Then screwing is carried out with a socket wrench. Next, the balusters are attached either to the edge of the steps or to the string.
Installation of racks on studs
There is another method of installation using studs using nuts glued into the string or step. Such studs are screwed into the rack in the same way as was written earlier. However, before installing the stand on the step, not only is a hole made for the stud, but the upper part is also expanded to the diameter of the nut. Depending on the depth of expansion, one or two nuts are recessed. They are placed flush with the wood and seated with glue. When it is completely dry and the nuts are securely seated in the step, the hole is filled with glue again and the pin is screwed into the baluster.
If the thickness of the step is small, you can drill a through hole in it and screw in a baluster with a pin, and screw a nut with a large washer on the back side.
Sometimes balusters for a flight of stairs are sold with pins already glued in, so the installation process is significantly speeded up.
On the dowels
Dowels
Since the main load is carried out on the pedestals, dowels can be used to fasten the balusters. This method is the most commonly used for wood structures.
Dowels are small cylindrical wooden spikes. They can be purchased in stores, or you can make them yourself. The price of such products is low, so they are very affordable. To complete all work, it is necessary to prepare dowels and wood glue. The length of the dowels is about 10-12 cm, and the diameter is 0.8-1.2 cm.
Installing racks on steps involves the following sequence of actions:
- Preparing all balusters. To do this, a hole is drilled from the bottom in the center of each step with a depth equal to half the length of the dowels and a diameter 0.5 mm larger than the fasteners.
- The holes in the racks are filled with glue and dowels are inserted into them. Excess glue is removed immediately. It takes about 2-3 hours to dry, so during this time you can start marking the steps themselves.
- When making markings, you should remember that all points for installing balusters must be on the same line. Otherwise, problems will arise when installing the railings. The distance from the edge of the flight of stairs to the place where the rack is attached should be sufficient to fit it on the step. However, it is worth remembering that making a large indentation significantly reduces the usable area of the stairs.
- In the places where the points are set on the steps, holes are drilled equal to half the length of the dowels and with a diameter 0.5 mm larger.
- Glue is poured into these holes. It also lubricates the end of the rack. It is then inserted into the hole. To prevent the baluster from tilting while the glue dries, it is fixed and aligned to the building level. It also takes 2-3 hours for the glue to dry.
Installation of balusters on dowels
If the installation of racks is carried out on a bowstring, the first stage of work should be trimming all balusters at the angle of the flight of stairs. To check the correctness of the cut, you need to place the stand against the bowstring and make sure that it is vertical and strictly level.
When installing racks on a string, it is possible to place them at a greater or lesser distance than the width of the steps. When drilling holes in the balusters and bowstrings themselves, it is worth remembering that they should not be made perpendicular to the cut, but strictly vertically. You also need to correctly calculate the depth of the holes.
After all the balusters are securely in place in the flight of stairs, you can begin preparing them for the installation of railings.
For self-tapping screws
The easiest way to fasten is to use self-tapping screws. This method can be done even by people who have no carpentry skills. In addition, there is no need to wait for the wood glue to dry before proceeding to the next stages of work. To install balusters, long self-tapping screws are used - 8-10 cm. It is desirable that they are made of stainless steel.
Installation of racks with self-tapping screws
Installation of balusters is carried out in the following way:
- At the point where the self-tapping screw is screwed in, a slightly smaller hole is drilled in the baluster. This is necessary in order to avoid cracking of the wood at the installation site and thereby avoid weakening the strength of the fasteners.
- In order for the self-tapping screw, driven into the material at an angle, to be completely recessed in the wood, a small recess of the diameter of the head and a small depth is made in place of the head.
- Then self-tapping screws are screwed into all balusters at an angle of 45°. At first, they are not driven in completely, but only so that their tip barely protrudes outward at the bottom of the rack.
- In order for all the balusters to be placed in one row, it is necessary to make markings. To do this, you can take a fishing line or a thin cord and stretch it along the flight of stairs.
- Then comes the installation of balusters. To do this, each rack is placed in its place and the self-tapping screw is screwed in completely, firmly fixing it to the step. The head of the self-tapping screw is completely recessed into the wood. It is very important at this moment to ensure that all balusters are installed level.
- Choppers selected by color are inserted into the recesses formed in place of the screwed screws. Then they are sanded flush with the surface of the baluster and varnished along with the entire structure. Another option for filling the hole is to use wood putty or wax.
- After placing all the balusters on the same line and level, they begin to install the railings.
How to weld a railing
Welded stair railing structures are the cheapest option. The raw material for the manufacture of fencing is rolled metal - tubes, angles, rods, fittings, etc.
In rolled metal there is a wide variety of parts for railings.
A common option for manufacturing metal fences is to create a solid frame. When making such a structure with your own hands, you need to take into account that the frame will be raised above the steps by 10 centimeters. Having decided on the height and distance between the posts, parts of the required sizes are cut using a power tool. Assembly begins with laying out the frame and minimal tackling. You should not weld tightly right away.
The next step is to reinforce the frame. Internal vertical jumpers are welded. After making sure that the resulting structure is not distorted, you can carry out the final welding of all its elements. To increase the strength characteristics of the frame, it is recommended to weld the seams on both sides.
Welding seams in railings.
The last step is to add 10cm posts to the bottom of the frame. The lower parts of these posts must be equipped with plates. To attach to the steps of the stairs, holes are drilled in the plates.
Welding stainless steel railings.
Features of making a wooden handrail
If the length of the stairs does not exceed 1.5 meters, you can use just one board to make a handrail with your own hands. To assemble handrails of greater length, a composite structure should be made from individual fragments. The cross-sectional size of the handrail must be equal to the cross-section of the baluster, but not less than 60 mm. The shape can be any, but the top part must be rounded. Turning is best done on a lathe. Spikes for fastening, if provided, are made simultaneously with the processing of the timber. All elements of the handrail must be carefully polished and free from roughness and unevenness.
Making a wooden handrail for stairs.
Finishing
The production of welded stair railings is completed by treating their surface. If stainless steel was used as the material, then you only need to clean the weld seams.
Sanded seam where the handrail bends.
Treatment of black steel and iron surfaces also includes the application of a primer and subsequent painting. This can be done after installing the railing on the stairs.
Advice!
But it is advisable to clean the welding seams before installation, since after installation some areas may become difficult to access.
Among modern technologies, polymer coatings should be noted. Their use makes the metal more resistant to wear and corrosion, and also increases the decorative value of the product.
Handrails with polymer coating.
Decorative caps for fasteners
To get beautiful railings, decorative caps for fasteners are used when installing them. Such covers and inserts give the structure a finished appearance.
Depending on the preferences of the owner and the appearance of the staircase, as well as the material and type of fastening of the fence, you can choose the following decorative elements:
- flange;
- tap;
- plug;
- cover;
- insert.
They can perform not only a decorative function, but also serve as a connection of structural elements.
The reliability of the structure and the safety of movement along the stairs depend on how well the railings are attached to the posts. Therefore, before proceeding with installation, it is necessary to carefully study all the rules and recommendations for its implementation.