Installation
Date of publication: 10/13/2015
2
65269
- What is the essence of construction
- First stage of construction: foundation
- Second stage of construction: walls
- Third stage of construction: roofing
- Fourth stage of construction: floors
- Fifth stage of construction: finishing
Over the past few years, the construction market has been flooded with so-called frame houses, which are erected weekly in huge numbers both by companies and with their own hands. The reason for such love for “frameworks” lies in the ease of construction and the pace of construction. The phased construction of a frame house allows you to assemble a full-fledged residential building in one season, which will look quite presentable, and have an attractive price and cost-effectiveness in maintenance. The technology is easy to understand and implement with your own hands.
DIY frame house
Frame house - step by step instructions
A frame house is a rigid system of support posts, horizontal and inclined connections, resting on a pile, pile-grillage, slab or shallow strip foundation. In the classic version, the space between the racks is filled with insulation. Most often - basalt wool. The outside and inside of the structure is sheathed with finishing materials.
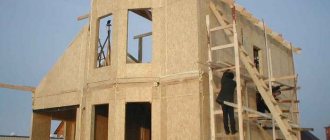
Another way to build a frame house is to install walls and ceilings from rigid SIP panels, consisting of two OSB boards and a layer of polystyrene foam between them. Systems are assembled in different ways. In the first case, the frame is installed element by element or in blocks, and in the second, large-sized panels are mounted like a constructor, observing the sequence. The easiest way to assemble a frame house with your own hands is step-by-step installation of the supporting system, insulation and finishing. In this case, construction lifting mechanisms and a large team of workers will not be needed. All operations can be performed independently or with the help of 1-2 friends.
Prices for cement and basic mixtures
Stages of frame construction
Wooden structures are subject to biological destruction and are not resistant to fire. To solve this problem, flame retardants and bioprotective compounds . It is most convenient to use a complex product that protects against fire, woodworms and rot. Treatment with impregnations is necessary at every stage of construction of a frame house.
Foundation structure
A frame house weighs much less than a timber or brick house, so a lightweight foundation is sufficient for it.
The most popular option is tape . To equip it, they dig a trench along the markings of the future house, install wooden formwork in it, fill it with concrete mortar, and compact the mixture. For compaction, hand tools or special vibrators are used.
| Foundation type | Shallow | Deeply buried |
| Trench depth | 400-600 mm | Below freezing depth |
| Height above ground level | 200-400 mm | 300-400 mm |
| pros | Budget, proven technology | Reliability, windproof base |
| Minuses | It is necessary to take into account the characteristics of the soil; there are restrictions on the height of the building | Difficult to do with your own hands, not recommended for sloped areas, requires access to a mixer with concrete |
In second place is the pile foundation - bored or screw . In the first case, the piles are driven into pre-drilled holes, in the second they are screwed in manually or using special equipment. A grillage in the form of a tape 200-400 mm thick and 200-300 mm high . It binds the piles into a single whole, increasing the strength of the structure. When arranging a pile foundation, it is important to take into account the characteristics of the soil and strictly follow the technology. Otherwise, the soil will swell and loosen the piles.
Useful: DIY sandwich panels
A slab foundation is an excellent option for those who decide to build a frame house with their own hands. A slab poured from concrete compensates for seasonal expansion of the soil. The recommended height is 250-500 mm. The most practical is an insulated Swedish plate (USP), consisting of several layers:
- compacted sand bedding;
- rigid foam 200 mm thick;
- reinforced concrete mixture;
- heated floor pipes;
- leveling screed.
USHP combines the foundation, monolithic floor and heating system. But such a foundation requires large financial investments.
One of the most affordable foundations is columnar . It consists of small posts installed on the ground or buried in it. A columnar foundation is easy to make with your own hands, but due to its low reliability, it is only suitable for domestic buildings.
Subfloor installation
There are two types of wooden subfloor:
- the supporting structure is used in combination with a strip or pile foundation ;
- the lattice structure is used in tandem with a slab or concrete screed.
In the first case, the horizontal level is maintained at the stage of arranging the base or grillage, in the second - at the stage of pouring the base.
The technology for laying the subfloor is reminiscent of the wall construction scheme . First, a load-bearing base is installed - joists and cross members. If necessary, the logs are overlapped. To strengthen the structure, additional spacers are used. At the same stage, engineering structures are laid: water supply, gas pipelines and sewerage.
Construction of the frame
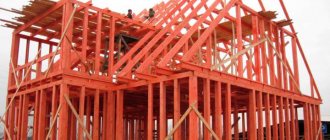
The frames of prefabricated houses can be metal or wood. If you do not have construction experience, it is better to order a ready-to-install factory kit. Otherwise, it is necessary to strictly follow the assembly technology . There are two options:
- assemble all elements at the installation site;
- gradually assemble the walls on a horizontal surface and install them in place.
The second method is more convenient and productive - especially for metal frames. To assemble the latter, a welding machine is used.
The construction of the frame takes place in several stages:
- Bottom harness. The size of its cross section depends on the type of foundation . The harness is placed above the ground level, thoroughly treated with antiseptics and waterproofed.
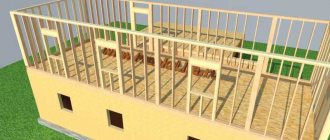
- Frame each wall. The pitch of the racks is 60 cm with plank cladding and 62.5 cm with panel cladding . The latter exactly corresponds to the standard dimensions of the OSB board. At the installation stage, temporary braces are often installed. The maximum load falls on the corners, so the most durable materials are used for their production.
- Top harness. The choice of material depends on the load that the structural element will bear. With high strength, the metal requires a lot of drilling and is expensive. It is more convenient to use wooden beams, single or double boards . Their thickness depends on the area of the house.
- Floor beams. When building a frame house, reinforced concrete floors are not used - they weigh too much. Boards measuring 50*200 mm or paired boards measuring 50*150 mm are best suited for this purpose . The pitch varies from 40 to 60 cm. Internal partitions. They can be plank (one- or two-layer), frame-sheathing with or without insulation. Dry lumber, plywood, chipboard, plasterboard, and OSB are suitable for the construction of partitions.
Useful: Chipboard finishing: technology and scope of application
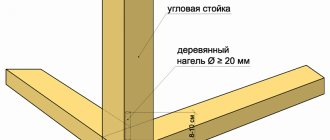
To connect wooden elements, several technologies are used: a joint at an angle of 90°, a joint with cutting at 45°, a half-wood joint, tongue-and-groove joints .
Roof arrangement
Erection of the roof is one of the most important stages in the construction of a frame house. You should determine in advance its type, type of rafter system, and cladding material. with a slope of no less than 28 and no more than 50 degrees is well suited for a frame structure .
For the rafter system you will need boards with a cross section of 50*150 or 50*200 mm - the dimensions depend on the design load and the insulation used. The standard pitch is 60 cm. Two boards are connected on the ground, the finished structure is lifted onto the roof and mounted on the top frame with an overhang of 35-70 cm. To ensure that the roof is level, the rafters are installed first on the gables, and then in the middle. The final stage is the installation of thinned or continuous sheathing, on top of which the roofing material is attached.
Insulation and frame covering
The finished frame is treated with antiseptics, dried well and sheathed with OSB boards. The resulting cells are filled with insulation - mineral wool or polystyrene foam . The thickness of the layer depends on the purpose of the house - for permanent residence, at least 15-20 cm is required. The wall cake looks like this:
- wind-waterproofing;
- external cladding made of OSB boards;
- insulation;
- vapor barrier;
- internal cladding made of gypsum plasterboard or OSB+gypsum plasterboard.
For exterior decoration, siding, wooden or fiber cement panels, plaster, and decorative brick are used.
Interior decoration
This is the final stage of building a frame house. Light walls do not shrink, so you can immediately begin finishing. It takes place in several stages:
- Final arrangement of the floor. First, a wooden base is mounted from boards with a cross-section of 50-150 mm - their ends are laid on support beams or on the foundation. The lower part of the logs is covered with waterproofing, followed by insulation, vapor barrier, boards or OSB. Flooring - linoleum, laminate or parquet.
- Ceiling lining. The sheathing is attached to the support beams, and vapor barrier and insulation . The layers are covered with plasterboard or other board material.
If you follow construction technology, a frame house will serve you for many years. The main thing is to choose the right project that meets the climatic conditions of the region and regulatory requirements.
Insulation and finishing of the house
Sheathing materials can be selected depending on the preferences of the home owner. You can use plywood, wood-tile materials.
In any case, the thermal insulation must be protected on both sides with a vapor barrier film.
The roof planes (slopes) also need to be insulated, otherwise, at low temperatures, there will be large heat losses.
External cladding is carried out using:
- Vinyl/metal siding;
- Wooden lining;
- "Block house";
- Often used internally:
- Lining;
- Plasterboard panels;
- Plywood.
If hidden electrical wiring is needed, then this should be taken care of before sheathing. The same applies to other elements, for example, if there is a gas boiler, you need to take care of constructing a chimney. Its internal location will require pipelines to be laid through horizontal floors and the roof surface.
The same applies to drainage and water supply.
Installation of interior partitions can be done using metal and wooden frames. Just as is usually done when installing standard gypsum walls.
We build a small country house ourselves
True, provided that you have time, help and a great desire. Before laying the foundation, you need to take care of the utility networks. Gas pipes are deepened by 1 m, and water pipes by 0.5 m. Therefore, after marking the site for the foundation, two trenches for communications should be dug. It is clear that building a beautiful country house with your own hands begins with the foundation. The frame structure is lightweight, so any type of foundation can be laid under it:
- reinforced concrete strip;
- pile-screw;
- columnar;
- slab.
Your financial capabilities will dictate what foundation will be laid for the garden house. But, as practice shows, expensive slab and strip foundations are a waste of money when building a small dacha, even with a second or attic floor. And their construction will take a lot of time - only hardening will take at least 28 days.
But screw piles or reinforced concrete columns will hold the load from the frame structure just as well. And such foundations will cost an order of magnitude less. In this case, after just a couple of days you can begin installing the wall frame.
Frame structure
The frame of the building is made of wooden beams measuring 150x150. The walls are mounted separately, and then installed on the base and connected with staples or nails. We'll look at the construction of the walls in more detail a little later.
More attention should be paid to the quality of building materials, including wooden beams. The wood must be of high quality, from hard wood (usually oak) and sufficiently dry.
Important! Before starting work, the wooden beam should lie down for several days to “get used” to the local climate. Depending on this, the timber may swell or, conversely, shrink.
It is also necessary to pay enough attention to the processing of the frame. All wooden elements must be coated with a product that prevents premature rotting, wood fire and the appearance of parasites.
Wall construction
When considering the construction of a frame house, special attention should be paid to the walls. The thickness of the wall, as a rule, is approximately 15 -20 cm. It depends on the thickness of the timber used, most often a timber measuring 150x150 is used. The structure of the walls in such a building is multi-layered. It consists of:
- The beam itself;
- Thermal insulation material. As a rule, mineral wool is used to insulate walls. It is convenient to place it in the spaces between the beams, and the characteristics of the material remain high. For residential premises it is necessary to use material with a thickness of at least 60 mm;
- OSB panel, at least 15 mm thick. It is needed for more reliable thermal insulation of the house. If this layer is missing from the wall pie, the building is not intended for life in the cold season. You should take care of the presence of this layer in advance. If, for example, the floor is easy to insulate even after the work is completed, then difficulties may arise with the walls;
- Horizontal sheathing on the outside of the house. It is intended for installation of external insulation of a building;
- Insulation. As a rule, polystyrene foam or mineral wool is used for this. The second option is more expensive, so polystyrene foam is often preferred;
- A layer of vapor barrier and wind protection. It is a polyethylene film that is mounted on top of the insulation. Often a thin sheathing is installed between them, forming a ventilation gap. It protects the insulation from dampness and moisture and prevents it from rotting;
- On the inside, after the insulation, a vapor barrier membrane is also installed;
- Next comes the finishing layer, most often drywall. At the request of the home owners, it is puttied and covered with any type of decorative finishing: from wallpaper to painting.
The construction of interior walls is much simpler. For them, in fact, there is no need to lay several layers of insulation, so everything is limited to sound insulation, one layer of thermal insulation, wooden beams (wall frame) and finishing materials.
Construction stores even sell special sandwich panels that serve as interior walls.
All you need to do is install them in the places specified in the project.
Features of frame technology
In frame houses, as well as in stone or monolithic ones, the walls are load-bearing enclosing structures, plus, they also provide thermal protection without the need for external insulation. Exceptions are frame houses with a plaster facade according to the SFTK system. In this case, another layer of thermal insulation of sufficient density (PSB, stone wool) is placed on top of the slab cladding of the supporting frame, followed by reinforcement and plastering.
The frame can also be metal (LSTK), but the most common are private houses with a wooden power frame, assembled using Canadian or Scandinavian technology, or from a mix of these “schools”. The internal walls of a frame house are often lightweight; sometimes, to increase heat capacity or improve sound insulation, partitions are made of bricks or blocks. But the best heat accumulator for a frame house, in the absence of stone walls, will be a monolithic foundation. Both pile foundations and columnar foundations are suitable, but lightweight frames are also installed on USP to:
- immediately receive a finished subfloor with already laid communications and a heating system, the surface of which does not require additional screed;
- save on this heating itself, due to the fact that the heated stove will slowly release heat into the house even after the boiler is turned off.
Frames are blamed for problems with air exchange, but in any modern house, where windows and doors are sealed and the emphasis is on minimizing heat loss, there must be a ventilation system. The difference is that in a frame house a closed vapor-tight circuit is created inside and simple ventilation or ventilation valves in window blocks will not be enough.
Many people position frame technology as the most cost-effective, allowing to reduce construction costs by almost half, compared to a house made of bricks or blocks. Real savings on construction are achieved through careful planning, having a project and independently performing, if not all, then at least part of the work. And it doesn’t make much difference what kind of material the walls are made of, the right wall of a frame house is not cheap, the cost for a finished square will be plus or minus the same.
EmerForumHouse Member
Personally, I somehow thought that when building from 0 to a finished object, with the same content in terms of comfort, both frame and aerated concrete/brick come out the same. The difference in price is only noticeable when comparing individual stages. The total is the same budget.
The real advantage of frames over other options is not the lower cost, but the high speed of construction and the relative simplicity of the technology.
vakhtinForumHouse Member
The beauty of a frame frame is that it can be built by one person with two hands...
