A shower provides free space and comfort in the bathroom. In recent years, it has been very fashionable to purchase shower cabins. Someone throws out the bathtub and replaces it with a fashionable device with a bunch of functions, someone equips themselves with a bathroom and installs a stall there right away.
But now a new feature has appeared - a shower stall without a tray on the floor. A sort of small room in the bathroom where you can go and wash yourself. Not a bulky cabin with a pallet that you need to step over, but a small room, like in foreign films. The best option for a standing room for washing.
As simple as everything is when assessed visually (it would seem that there are four walls, a drain and a watering can), everything is so complicated when it comes to installation. Before you make the difficult decision to install such a shower stall, you need to consider all the positive and negative aspects, evaluate the scale of the work and your bathroom.
Advantages and disadvantages of a shower on the floor
A modern solution is a stylish shower cabin without a tray on the floor.
Any new trend has its advantages, otherwise why was it created?
- Safety. An important parameter, since accidents often occur in the bathroom. Here you won’t have to step over the high side of the pallet. It simply doesn't exist. Very convenient for children and elderly people, most of whom have problems with their feet. And a healthy person can easily slip when leaving the cabin.
- Save time. When you buy a shower with a tray, you have to additionally purchase various accessories and components. In some models, for example, the tray comes separately. And if it is not available, you need to go shopping and look for it. Or order, which is also not fast. In this case, everything you need for installation can be found in any hardware store. The only components are identical walls and doors. Everything else is easy to pick up.
- Space saving. Not many bathrooms can boast of large footage. Having thrown out the bathtub, on the contrary, you want to save space, and not clutter it from floor to ceiling. Here, in addition to taking up minimal space, you can also visualize free space with the help of glass shower walls. The effect of transparency seems to enlarge the room and “lighten” the glass shower cabin without a tray.
- Easy transportation. It is easy to load thin walls and doors into the car, as well as a separate kit. That's all. There are no modules with unnecessary programs, no pallets, no roofs. If delivery is to your home, then it will not be difficult for the movers or the owner himself to bring everything to any floor. This saves money on delivery and additional inconvenience for workers.
- No tray or roof. It is very convenient for tall people, who, when entering the shower, hit the ceiling with their heads, or even rested against it when they washed. In addition, it is easier to wash the structure later due to the minimum of parts.
- Long lasting service. Tile is a fairly durable material and is difficult to break. While an acrylic tray can easily be damaged by, for example, a shampoo bottle that falls out of your hands. Yes, and additional shower stall options may gradually fail, which will lead to the repair of the module, and this is an extra waste of money.
- A unified bathroom style from which the shower can stand out. The floor tray may not match the color scheme, etc. At the same time, a cabin without a pallet can be easily installed in a room to match if its walls are transparent. Or tinted, which also will not stand out from the uniform design.
A shower cabin without a tray is a convenient and beautiful solution, but it also has its drawbacks.
Nothing can be ideal, and a shower cabin without a tray has its disadvantages:
- Serious preparation of the room before installing the shower. In order for the drainage system to work smoothly and the water to drain downhill, you need to prepare the floor in the room. Ideally, it needs to be “drowned” a few centimeters. This makes it difficult to install a cabin in an apartment - but everything is possible with special skills.
- Lacks all the convenient features found in tray booths. For example, the same hydromassage or sauna. But they can also be installed separately in the booth, if desired.
- To avoid sewer odor, you will need to install a siphon. And this is additional work.
- In old apartments, the tiles were not laid particularly evenly, so the floor will have to be redone so that water does not stagnate in puddles in curved areas and it is dry.
The same goes for the walls in the bathroom. Everything must be perfectly level initially or leveled before installation work. Otherwise, the cabin will not be airtight. If blockages form in the pipes, water can seep into the bathroom area and flood the apartment.
There are, of course, more advantages than disadvantages, but the latter are quite noticeable and require labor-intensive work. If specialists get down to business, they will install everything from preparatory work to launch.
Installing a shower cabin without a tray requires effort, but the result of high-quality work will certainly please you.
It is worth understanding in more detail what are the significant differences between a stationary shower cabin and a cabin with a tray:
- Installation. When installing cabins with a pallet, you will have to work hard, but if you follow the instructions, you can install it in a couple of hours in any convenient place. While stationary cabins without a pallet require lengthy installation and preparatory work.
- Options for sauna, hydromassage, radio, etc. built-in only in a booth with a tray. When purchasing, you can choose the desired set of functions of the shower module and purchase everything ready-made and complete. But in a cabin without a pallet, everything will have to be built in separately (if desired).
- Care and cleaning. A cabin with a tray is more difficult to wash due to its design and additional parts. And in a regular cabin it is enough to wipe the walls and floor.
During the installation of a cabin without a pallet, it is imperative to treat all surfaces and hard-to-reach places against the occurrence of fungus and mold, so as not to experience discomfort with their appearance in the future. It is better to work in advance than to remove bacteria later.
Making a shower tray from brick
In hardware stores you can purchase a ready-made shower tray made of acrylic or cast iron. Its advantage is ease of installation and minimal installation time. However, there is a serious drawback - size limitations. In addition, its installation still requires bricklaying work. Therefore, we offer the most common option - to make a shower tray out of brick with your own hands.
This method is much more reliable and practical, especially if the work takes place at the initial stages of repair.
Initially, the installation location of the drain (siphon) is determined. As a rule, it is recommended to install it in easily accessible places, which will simplify its routine inspections and replacement procedure (drains and siphons often break).
We draw a diagram on the floor for accuracy of future installation, and also install and secure the drain at the level of the future floor of the shower tray. We fix the drain pipe with cement mortar. Be sure to maintain the slope of the pipe, at a rate of at least 1.5 cm per 1 meter of pipe.
Our expert’s comment: “Yes, that’s right. But I would also give this advice - when designing a shower stall, it is better to focus on the size of the tiles with which the shower stall will be covered. Because sometimes you can make the corner of the partition smaller and you won’t need to cut a lot of tiles.”
Now, we lay the first row along the marked line on the cement mortar. The bricks are placed on edge, this will be the front part of the future pallet.
After the first row of the brick pallet is ready, thermal insulation material (expanded polystyrene) is laid on the subfloor. For stronger fixation to the base, you can use polyurethane foam.
It is advisable to put something heavy on top of the insulation so that it sticks more tightly to the floor.
In our example, brick was used. It is also recommended to “foam” the polystyrene foam at the corners and joints to insulate it.
Now, it’s time to mix the mortar for the internal rough screed, with the addition of expanded clay. The proportions of such a screed are standard: 3 buckets of sand – 1 bucket of cement – 4 buckets of expanded clay.
The finished mass is poured into the shower tray, while the master must take into account the slope converging to the drain. You need to maintain a level of 10 mm below the drain neck. The setting and initial hardening time is a day.
After 24 hours from the moment of pouring the rough mortar, you can begin the finishing self-leveling screed, while also monitoring the safety of the slope.
The hardening time is also a day, then you can begin control measurements. We pour the leveling screed into the level with the neck of the drain, but leave a slight slope.
You can check the efficiency of the drainage system, as well as the correct design of the pan, by pouring a bucket of water into it. If all recommendations are followed, all available water should go down the drain.
Requirements for covering a shower area without a tray
The requirements for the coating of the shower area are great, since in this room, due to the slippery floor, there is a high probability of an accident.
An important safety condition is the choice of high-quality non-slip flooring.
The tile must be non-slip and treated with a special coating. If desired and possible, you can lay the floor with tiles made of natural or artificial stone. But the problem is that it is thin - 3-4 mm. This leads to the following requirement - the thickness of the laid tiles in the shower should be 8-10 mm, and the adhesive coating should be 4-9 mm.
Tiles are often used for durable flooring.
Tiling
Regarding tiling a shower stall, we will also not describe the process in detail in this article, because... There is a separate article on this topic, and the only difference here is that there are more cut tiles.
First we finish the shower walls, then the floor. After all surfaces are tiled, you need to make a small side of the same at the location of the door. This will prevent water from leaking out. This is done simply by applying a slightly larger layer of tile adhesive.
Style and color of shower without tray
Most often, all plumbing fixtures in the bathroom are selected in the same color and style. The room itself is decorated in the same tone, using a maximum of three colors.
A bathroom with a shower cabin without a tray in a three-color design looks original.
It is also better to finish the shower room to match the bathroom itself, unless the design suggests otherwise. Moreover, if the walls of the cabin are made of transparent materials, then the shower room will become a continuation of the room, it will seem transparent, creating the effect of absence, despite the fact that the floor there will be made flush with the entire room.
The ideal solution is a shower cabin, designed to match the color of the bathroom.
As for the mirror, what bathroom functions without this attribute? Even the smallest mirrors are installed in such rooms. The larger the mirror, the wider the bathroom appears. And if the mirror is without a frame, then the effect of increased space is even greater.
A mirror is a must for a bathroom with a shower.
Lighting in the bathroom and shower should be full, without dimming. Therefore, one light bulb is definitely not enough. Several light sources are required, the light must be diffused.
The unusual lighting will add a special charm.
Finishing materials are also selected taking into account the size of the room. For example, small elements do not look good in a small room. Mosaics and small tiles are undesirable here. This finish is good in spacious bathrooms. And in a small one you need large tiles and preferably one-color ones.
Dark large tiles look good if the room is not very large.
If you need to create the effect of increased space, then in addition to a large mirror and large tiles, the shower itself will do a great job. It can be installed in the corner of the cabin, making it more inconspicuous and saving space behind the glass doors.
A shower cabin without a tray is perfect even for a small room.
Selection of materials
When making your own shower stall, it is important to choose the right materials. They must be durable, reliable and resistant to moisture and steam.
Wall material
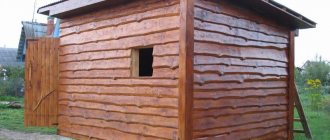
In essence, almost any material can be used to decorate the walls of a hydrobox. The main thing is that it is resistant to moisture. Even wood treated with special antiseptics and water-repellent compounds can be used.
The most common option is finishing with ceramic tiles. Partitions can be made of brick, foam concrete blocks or moisture-resistant plasterboard.
The walls can be made entirely of glass. This design will look as light and airy as possible.
Type and material of doors
Sliding doors are usually installed in ready-made hydroboxes. But for homemade shower structures, this is not the best option. Special expensive fittings are required, which are difficult to maintain in the future. Stone accumulates on the guides and carriages; to completely remove it, the structure will have to be disassembled. Swing doors are much easier to install and maintain.
The shower cabin can be equipped with doors made of glass, acrylic or polycarbonate. In this case, the glass used is especially strong, tempered or triplex. The latter is a material made of several layers of glass, between which polymer reinforcement is laid. Breaking such a canvas is problematic, but even in this case it does not shatter into small fragments.
Acrylic is a more affordable and lightweight material. He is not afraid of moisture. Its main disadvantage is its instability to scratches. Polycarbonate can be monolithic or cellular. It is not recommended to use the latter for installing hydrobox doors, since water can flow into its cells.
Pallet material
A shower cabin with a tray is a more familiar and practical option. Its height may vary. Low pallets - up to 100 mm high - replace the base of the floor. However, you can catch your foot on them. A more optimal option is 120-150 mm. In this case, the sides are clearly visible, but they are easy to step over. Models with a height of 200-300 mm can serve as a foot bath. Deeper structures with a height of 400-500 mm can be used as a sit-down bath, but entering such a cabin will not be so convenient.
As a pallet, you can use a ready-made structure made of acrylic, metal, artificial or natural stone. Another option is to build it yourself from brick or concrete mixture. In this case, ceramic tiles are usually used as a facing material. It is important to ensure reliable waterproofing of such a structure.
Materials for installing a shower cabin without a tray
Before starting work, in addition to the project, you need to draw up an approximate estimate for the purchase of materials. What you may need:
- built-up roofing felt or rubber membrane;
- expanded polystyrene in sheets 50 mm thick;
- siphon;
- waterproofing mastic (consumption – 3 kg per 1 sq.m.);
- plastic pipes with connectors for installing sewer drains;
- waterproofing tape (10 cm wide);
- a mixture of cement and sand (consumption - 5 kg per 1 sq.m.);
- silicone sealant;
- fugue (special mass for grouting);
- tile adhesive (consumption – 5 kg per 1 sq.m.)
What layers does the pallet consist of?
Repairing and building a shower tray with your own hands has a lot of advantages: the possibility of additional insulation, soundproofing layers and decoration. The pallet consists of the following layers:
- The floor or base on which the object will be built.
- Waterproofing or protecting the floor covering from moisture and water.
- Overlay box or layer of cement and screed (depending on the type of pallet).
- Soundproofing.
- Thermal insulation.
- Communication layer.
- Decorative base made of tiles or other materials used in construction.
Layers can be divided into three main ones:
- Cement screed – 5 cm.
- Insulation – 5 cm.
- Expanded clay concrete base – 12 cm.
Between each layer you can apply waterproofing or primer.
Optimal shower sizes
The size of the shower depends on two factors: the size of the room in which the cabin will be installed and the height/weight of its visitors.
If the size of the room allows, the cabin can be fenced off by more than a meter in length and width. You can install two shower heads or a shower plus a sink there. It all depends on the needs and wishes.
For a large bathroom, you can install a shower cabin with several shower heads.
If the bathroom is small and the cabin is planned to be installed in place of the former bathtub, then there is not much choice here; they even install a glass corner cabin in order to save space.
A standard shower stall takes up little space.
In addition, in order to install a stack, you need to raise the floor in the shower area by at least 10 cm. At the same time, the cabin itself will rise, which is difficult in apartments with low ceilings.
The height of the cabin can be different - up to the ceiling or covering a person’s head.
The shower stall does not have to be up to the ceiling.
Material of walls and doors
There is not much choice in cabin wall materials. It is either glass or plastic.
The priority is glass, which can be frosted, transparent or a combination. Also, modern cabin doors can be tinted or any desired color, in accordance with the design of the entire bathroom.
For the shower stall, you can choose translucent matte doors.
Glass walls are installed framed and frameless. The frame is made of steel or aluminum and looks stylish and modern.
The frame shower cabin in gold color looks gorgeous.
Frameless cabins fit perfectly into any bathroom interior. Metal corners look stylish and modern.
Plastic is also not ignored; it gives an aesthetic appearance, transparency and lightness to the structure. In addition, it is easy to use and maintain, relatively inexpensive and durable.
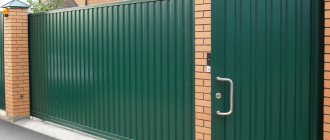
In addition to the walls, if there is space in the bathroom, fences in the form of a niche are also installed, finishing them with tiles or stone. There is also a fence on the floor about 10 cm high from the same material. Such podiums with sides are relevant in the bathrooms of apartment buildings, where such a cabin is installed already during the process of living there. In a private house, fencing may not be required if the floor is sloped for such purposes.
A good solution would be to make a small side.
As for the doors, they are installed from the same material as the shower walls - glass or plastic.
Types of doors:
- Glass blocks. Allows you to separate the space of the shower stall in the bathroom.
- PVC curtains. The advantage of them is that they are relatively inexpensive and can be changed periodically depending on wear or mood. They are quite dense and do not allow water to pass through. The average size of such a curtain is 90*90 cm.
If there are no fences, you can put a special circular frame and hang a curtain on it; during the procedures, everything is tightly covered with it, and after that it simply moves, leaving one pallet.
An economical and unusual solution is a circular curtain.
There are options without fences at all, but the downside is that during the washing process the entire bathroom will be flooded and everything will be covered in soapy spray.
Drains for shower enclosures
These elements are mandatory components of any shower stall; most often they are located in the center of the stall floor. Therefore, it is equally important to choose the right device.
Types of drainage structures
There are several types of drain drains.
- Plastic. Such products have several advantages over their competitors. They are not afraid of aggressive environments, are light in weight, and are easy to clean. Another advantage is the durability of the devices, so they are recommended to be installed in any bathrooms: both in private houses and apartments.
- Stainless steel drains. Such structures consist entirely of metal, including a decorative grille. As a rule, drainage in these devices occurs vertically.
- Cast iron structures. These drains also have a “native” grille. Unlike steel products, they allow horizontal connection to the pipeline.
Since products made from polymers have been successfully pushing out metal structures “on all fronts” for a long time, the choice may seem obvious. For plastic pipes, the best solution is a similar material; for others, the best solution is the one that seems optimal to the owners.
First drain connection
This operation begins long before concrete work. The first step is to carefully study the design of the ladder, then move on to determining its optimal location. Usually it is mounted in the center, but in any case the position needs to be adjusted.
The reason has already been mentioned: these are the sizes of the tiles. The ladder must rest against their edges, otherwise the master will be faced with the need to precisely trim the products, and they, laid in the middle, will not look very attractive. Cut tiles located near the walls, on the contrary, will not be noticeable.
The second potential problem is the combination of the sewer pipe and the drain pipe. In this case, rubber seals will help, allowing you to slightly change the position of the structure. But sometimes it becomes necessary to bend plastic pipes. For such an operation, a hair dryer is usually used.
- First, the problem area is heated along its entire circumference, checking the temperature of the surfaces with your hand.
- After softening the material, they begin to bend it carefully, slowly, avoiding sharp bends.
- Having obtained the desired angle, the pipe is fixed in this position until the walls cool completely. You can speed up this stage: it is recommended to cool the material with a cloth moistened with cold water.
After completing this procedure, proceed to the next operations.
Making formwork for ladders in concrete
It is better to consider this stage separately. This structure can be assembled from the same boards and plywood. Another option is moisture-resistant drywall. Sometimes this operation is simply skipped, distributing the solution around a securely fixed element.
- Before starting work, the ladder is temporarily installed in its rightful place and connected to the pipeline.
- Then the dimensions of the formwork are determined. The distance between it and the ladder is several centimeters. They are necessary to complete the installation.
- The height of the enclosing structure should always be several centimeters greater than the diameter of the sewer pipe.
- The finished formwork is installed in place, the position is checked, and then it is reliably protected from accidental shifting: it is fixed with several nails or dowels driven around its perimeter.
After completing the work on installing the protection for the ladder, they proceed to pouring the solution into the “main” formwork.
Completing the installation of the ladder
After dismantling the formwork, the ladder is installed in place, then the correctness of its location is checked. Since most models have adjustable feet, there are no problems during installation. After the fitting is completed, the drain pipe is connected to the sewer pipe using a part (plastic pipe) included in the kit.
If it is longer, then the excess is cut off with a hacksaw or grinder, and the burrs are cut off with a knife. The ideal drains are those in which the pipe is connected to the system with an adhesive composition. Otherwise, you will have to chamfer the end of the pipe to protect the rubber seal from damage. Before joining the parts, they are moistened with a soap solution.
The last operation is laying waterproofing. Sometimes this element is included with the ladder, but it can also be purchased separately. The material is leveled and bent at the junctions of the walls and the floor so that the hem is located 10-15 mm below the intended surface of the tile. The overlap width in the corners is at least 100 mm. Large excesses protruding onto the walls are cut off, and the edges of the waterproofing are glued with mastic.
Further operations:
- trimming (if required) and installation of the glass in the ladder;
- production and distribution of semi-dry mortar for screed under tiles, always observing the slope.
The last stage is installing the tiles with glue on a dried base. In this case, it is recommended to use standard plastic crosses.
Drain ladder
This is a device in a hole in the shower floor that serves to drain water from the surface. Performs a number of functions:
- Drains water into the drain channel.
- Does not allow debris, hair, etc. into the drain, thereby protecting the drain system from blockages.
- If a blockage does occur, then through it there is access to the system for cleaning.
- Performs the function of emergency drains in cases where there is too much water on the floor, for example, during flooding.
- Eliminates sewer odors in the room.
The most important thing when installing a shower cabin without a tray is the correct installation of the drain ladder.
According to their design, there are three types: angular, linear and point.
The corner drain is quite difficult to install, since it is located at the junction of the floor and wall. It is invisible and its capacity is up to 40 liters. Due to this, it is more expensive than other ladders.
It is convenient to use a corner drain for a shower stall without a tray.
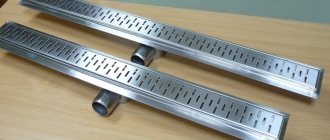
Linear ladder, or slotted. It looks like a rectangular tray. Install it in a corner, at the exit, along the wall or on the sides of the walls. Processes up to 60 liters of water. Makes installation easier, since here the floor slope should only be in one direction. The most reliable and installed in the shower, where there is a lot of water consumption.
The linear drain is easy to use.
Point ladder. Compact. Thanks to this, it is easy to install anywhere in the shower. Basically, they place a shower in the middle of the floor, but at the same time provide it with a slope on all sides. Despite its small size, it admits about 25 liters of liquid.
The design of such ladders is the same:
- Decorative lattice.
- Grate that collects hair and debris.
- Funnel for water.
- Siphon against unpleasant sewer odors.
- Funnel-shaped body.
- The pipe through which water goes into the sewer. Its diameter and the diameter of the drain pipe must match up to a millimeter. Can be in vertical or horizontal position. In an apartment building it can only be horizontal.
The drainage ladder is closed at the top with a decorative grille.
Preparing the base
In order to install a drain, make drainage and get to the drain, you need to completely remove the floor covering. All unnecessary items such as fittings are removed and cleaned of dirt. The base must be perfectly flat, treated together with the walls with special mastic.
Drainage channels are installed according to all the rules, after which layers of the floor are applied, taking into account the installed drain and shower drain in the floor without a tray: first there is concrete, then polystyrene foam, plus waterproofing on top and again a layer of concrete. The last layer is covered and is the final stage of laying the floor. We should not forget that the floor must slope towards the drain, which is installed in any convenient place.
When tiling occurs, they start from the drain, because if you start from the wall and go to the drain, there may not be enough space and the tiles will have to be cut. An unevenly lined drain looks unprofessionally made.
It is not without reason that shower stalls are most often faced with tiles. It's reliable and safe.
If the base is not prepared according to the required technologies, then water will accumulate in puddles near the drain, which will lead to fungus, etc.
Waterproofing
To protect the room from mold and mildew and extend its service life, it is necessary to waterproof it.
This procedure can be either in the form of pasting or putty. The result should be 6 to 8 layers. Those areas that come into direct contact with water are treated first. As a rule, these are the joints between the floor and the wall. In these places, without proper treatment, everything quickly becomes moldy and destroys the wall and floor.
In order to avoid problems associated with leaks when operating a shower stall, it is important to pay special attention to waterproofing.
Waterproofing on the walls is carried out with an overlap of 20 cm, and it is advisable to make it 20 cm higher than the shower. This is minimal processing, because... It is recommended to completely treat all walls due to constant contact with moisture.
Material for waterproofing is found in the following form:
- Coating material. Liquid and most common.
- Roll self-adhesive or weld-on. The latter is difficult to work with, it needs to be melted using a torch, and the surface for such waterproofing must be perfectly flat. Otherwise, either coating or repair.
Possible installation errors
- The drain is not installed correctly. No slope. This will lead to water spilling around the room or stagnation. The most important work for installing a shower cabin without a tray is the preparatory work, which includes pouring the base, installing a drain and a drain. The further operation of the shower depends on these details. It is better to carry out all this work during the construction stage.
- The base of the shower was not waterproofed. When it comes to water, it is important to follow all the rules for installing structures for a long time. Humidity not only damages appliances, but also destroys everything around you. A fungus will appear, which is very difficult to remove and which eats up the entire fill, floor and walls.
Competent installation and thoughtful design are the necessary conditions for installing a comfortable shower stall in the bathroom.
It is very important to carry out all installation work according to the rules, because a shower made by hand without observing technology can flood the apartment of the neighbors below. This is in an easy case. In severe cases - if there is a “warm floor” system, if water gets past the drain under the tiles, a short circuit will occur, which is also fraught with consequences for health and life.
Don't skimp on components. It is better to purchase them from trusted manufacturers. If, for example, a low-quality siphon is installed, then the sewer smell will constantly penetrate into the apartment.
We build a shower partition from brick
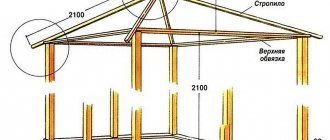
A shower partition is a wall that prevents water from directly entering the room, as well as from splashing onto plumbing fixtures and household appliances. The main material for this process will still be brick. Initially, vertical guides made of wooden beams are fixed on the walls and at the corners of the partition, along which the level can be more accurately maintained. This is not a mandatory item of work, but experienced craftsmen recommend doing it for convenience.
Mix the mortar for laying bricks. Standard proportions for bricklaying: 1 part cement to 4-5 parts sand. Add water by eye so that the solution is not too liquid.
Comment from our expert: “If the installation is being done by a beginner, then you can add a little bit of any detergent to the solution, which will prevent it from drying out quickly. In such conditions, it is much easier to make adjustments and correct errors in installation, if necessary. The detergent will not affect the quality of the mixture and its final properties. Literally 100 grams is enough for a large bucket of solution.”
The brick wall is laid out edgewise, while the principle of “taking a run” is observed. With each laid brick, the level is checked horizontally and vertically.
Regarding the height of the wall - as a rule, a distance of +30 - +40 cm is maintained from the level of the shower head.
In order not to spoil the coating of the pallet, it is better to cover it with cardboard.
To strengthen weak points, reinforcing “punched tape” is used, and between the rows of bricks, on the wall side, it is recommended to fasten pieces of reinforcement. They are designed to connect brickwork to the main wall.
This process is carried out by drilling holes in the wall and placing reinforcing scraps, 20-30 cm long, into them; later they are walled up with mortar and their protruding part will fasten the brick wall to the main one.
The laying of metal parts of the parts occurs every 2-3 rows.
Having completed the construction of the partition, all that remains is to remove the wooden guide bars and wait for the solution to harden. This will take about 48 hours. The final time for complete setting may vary depending on the microclimate in the room.