External or internal insulation: what to choose?
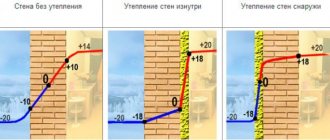
When choosing one of the methods, you should pay attention to the fact that external insulation shifts the dew point, so that moisture cannot penetrate deep into the wall, where it usually freezes and destroys the material from the inside. The disadvantages of this method include a much larger volume of work, the need to carry out high-quality waterproofing of all surfaces and, as a result, the high cost of the event.
Internal insulation will cost much less. In addition, work can be carried out in any weather, while work outside can only be done on days of the year when there is no precipitation.
Conditions for insulation with extruded polystyrene foam
The main problem with this method of thermal insulation is that due to unsuitable conditions or improper insulation, condensation can form, leading to the formation of mold and mildew on the walls. Therefore, when choosing this material, several factors are decisive:
- operating conditions of the house - the presence of high-quality heating and ventilation systems;
- climatic conditions of the region of residence;
- thickness of load-bearing walls.
If it is not possible to ensure conditions where the walls always remain dry, then only external thermal insulation can be created with foam plastic.
Why foam plastic?
This material is one of the most common, so acquiring it will not be a difficult problem to solve. Moreover, polystyrene foam has characteristics that are important for the intended purpose. Such as:
- Good sound insulation.
- Excellent thermal insulation properties.
- Light weight.
- Easy to process and install (easy to cut and attach to wall surfaces).
- Resistant against mold and fungal organisms.
- Durability. The material is not afraid of severe frosts, heat, and temperature changes.
- Moisture resistance. Polyfoam does not absorb moisture, so it does not need additional waterproofing. The moisture resistance of the material is easy to check - to do this, just immerse the sheet in water for 7-10 days. During this time, it will absorb moisture no more than 0.3-0.4% of the volume of the sheet.
The disadvantages of polystyrene foam include its low strength, so when using this material it will be necessary to protect the material from a variety of mechanical damage.
Another disadvantage is the flammability of the material. It can withstand temperatures no higher than 600°C. A simple example will help you understand how little this is: the flame of a lighted match has a temperature of 750°C. In addition, the material has low adhesive properties, therefore, in addition to glue, it will need to be additionally fixed to the insulated surface.
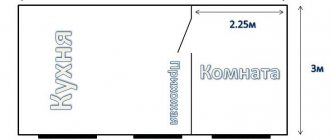
What is important is that the use of polystyrene foam will reduce the usable area of the room, which is also a disadvantage.
Pros and cons of insulation from the inside
Before doing the work yourself, you need to study all the nuances. Thermal insulation of indoor walls is not the right solution from the point of view of such a science as heating engineering. This method becomes only acceptable if it is impossible to use another. The disadvantages of insulating the walls of a house from the inside are as follows:
- reduction of usable area of internal premises;
- the measures taken do not prevent the walls from freezing, and therefore do not protect them from destruction;
- the point of dew (condensation) appears inside the load-bearing wall of the house (there is a high probability of moisture accumulation).
The dew point is at the junction of the wall and the polystyrene foam, so in order to avoid condensation, it is extremely important to apply a vapor barrier.
Insulation with polystyrene foam from the inside can only be done if there is a serious need for it. Most often, DIY work should be done in the following cases:
- Thermal insulation of premises in a multi-storey building. To insulate an apartment with polystyrene foam from the outside, you will need to hire industrial climbers. Such services are expensive, so an alternative option is to use protection from the inside.
- Insulation of house walls with new cladding. When doing work with your own hands in a private house, it is necessary to take into account the condition of the facade finishing. If the external work was completed relatively recently, dismantling the cladding is not practical from an economic point of view. In this case, it is also possible to fix the thermal insulation from the inside of the walls.
Features of choosing the right foam
Polystyrene foam is a gas-filled or foamed plastic in which air occupies the main volume. It is the presence of air in a larger volume that gives the material excellent thermal insulation characteristics. Depending on the raw materials used and the method of manufacturing the canvases, there is a division of foam into the following varieties:
- Polyurethane.
- Polystyrene.
- Phenol-formaldehyde.
- Polyvinyl chloride and others.
The most popular polystyrene foam today is polystyrene. It is produced in unpressed and pressed ways. For insulation, polystyrene material made without pressing is used. When choosing insulation, you must pay attention to its labeling. For example, the designation PSB-S-15 should be read as follows:
- PS – polystyrene type;
- B – non-pressed manufacturing method;
- C – self-extinguishing;
- 15 is an indicator of density, which is measured in kg/m³.
This brand of polystyrene foam is intended for insulation of roofs without attics and attics. To insulate residential premises, facades, loggias, balconies, it is worth using material with a density of 25 kg/m³ (PSB-S-25). Foam plastic with a density of 35 kg/m³ is designed for thermal insulation of foundations, durable and resistant even to harsh weather conditions. Insulation with a density of 50 kg/m³ has the highest strength and stability. It is used for thermal insulation of floors in basements, garages, industrial premises, etc.
Based on this, it can be noted that density is the main criterion for choosing foam insulation. But there are several more important criteria on which the quality of the material depends, namely:
- Storage conditions. If at the point of sale the insulation lies directly in the sun, its thermal insulation properties will be impaired.
- Appearance. The material must only be white. If there are yellow spots on it, this is evidence that poor quality raw materials were used for production or storage conditions were violated.
- No foreign odors. If there are any, then this indicates a violation of the manufacturing technology.
The quality of the material is also indicated by the presence of a manufacturer’s marking or sticker. A reliable manufacturer, for whom its reputation is important, will certainly provide the necessary conclusions and certificates. If the seller cannot show them, this is already a reason to think about the advisability of purchasing insulation from this supplier.
How to protect walls from dampness
As has already become clear, with such insulation, the formation of dampness is almost inevitable. Therefore, you should consider the basic rules that will help you cope with the question of how to get rid of dampness that appears as a result of freezing of the wall.
Thus, in order to eliminate dampness in the wall, it is necessary to use only vapor-tight insulation. This is where the first, most serious mistake of many people arises, namely, insulation with mineral wool using an additional layer of vapor barrier (which in reality is practically useless).
In addition, the complete absence of seams or joints during insulation becomes an important factor, since they also allow steam to pass through, and even in greater quantities than the material itself. And also any joints are a risk of condensation entering the room.
Thus, only good, and most importantly, proper insulation and ventilation will help in solving the question of how to remove dampness. In this case, the following absolutely do not fit the category of good and correct:
- Warm plaster.
- Cork covering.
- Mineral wool.
- Liquid ceramics.
The first two options can only be used as the last element of insulation, nothing more. Let us repeat, any insulation that is performed with vapor-permeable materials is absolutely not suitable.
Almost the best option for insulating walls from the inside in a panel house is to use polystyrene foam. Of course, it is also difficult to achieve maximum tightness with it, especially without using additional solutions, but it wins compared to other materials. Penofol is also a good choice, we will also talk about it a little.
Thus, in order to get rid of dampness in the house, as has already become clear, it is necessary to carry out high-quality insulation. And then we will look at how to make it and what you need for this.
Preparing the walls
If there are remnants of previously applied finishing on the walls, it is completely removed. Next, the surfaces are inspected to identify and mark the largest cracks, depressions, and protrusions. Using a level or plumb line, mark the places with the greatest difference in unevenness.
If the house was built with high quality, the errors are insignificant and can be easily eliminated by applying a thicker layer of adhesive. If the errors are significant, then the depressions are leveled with plaster, and the bulges are trimmed off with an ax or other tool. If this is not possible, you will have to cut a notch on the foam sheet in the place opposite the convexity.
If there are cracks near the window openings or near the door, they must be filled with putty, otherwise the insulation work may be useless. In order for the glue to better adhere to the wall surface, it is necessary to apply 2-3 layers of deep penetration primer. Experts also recommend applying an antifungal additive first. How to prepare and apply the mixture is indicated on the packaging.
Preparatory work
If necessary, clean the wall and level it
. How to insulate a wall with foam plastic indoors can be understood by studying the sequence of these works, starting from the preparatory stage. Before starting the main work on insulating the walls of the room from the inside using polystyrene foam, it is necessary to carry out preparatory work.
The purpose of this work is to create a level base that allows for a tight fit of the insulating material to the insulated surface.
They are carried out in the following sequence:
- dismantling areas of the finishing layer that are weak to hold and are destroyed when touched or tapped; if necessary, remove the entire finishing layer;
- removing stains of dirt, grease, oil and other base defects;
- surface treatment with solutions and putty compounds for leveling;
- checking levelness using a building level and additional leveling with compounds, if necessary, until a smooth surface is obtained;
- priming the resulting base with compounds that have antiseptic properties to protect wall materials and insulation from the negative effects of mold and mildew.
It must be remembered that carefully completed preparatory work will provide the conditions for creating a high-quality and durable structure that allows you to maintain a comfortable temperature in the room without unnecessary energy and, as a result, financial costs.
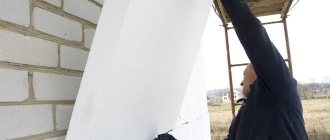
Installation of foam plastic
First of all, prepare the adhesive according to the instructions. Then they begin to glue the foam sheets in small areas: the spaces above and below the windows, behind the radiators, etc.
To do this, carefully measure the surface and, based on the data obtained, cut out the desired element, check its accuracy by applying it to the wall. Glue is applied to the entire area of the foam sheet in a thin layer or dotted in the center and along the entire perimeter, applied to the surface, firmly pressed against the wall and lightly tapped on its surface.
The sheets are laid in a checkerboard pattern, starting from the bottom of the wall. This must be done extremely carefully in order to get the surface as even as possible - this will save you from the work of further leveling them. At the same time, they carefully monitor that the foam sheets fit one to the other as tightly as possible.
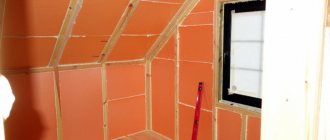
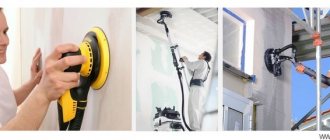
Instructions for wall insulation
Before starting work, you should prepare all the tools necessary for the work, as well as the walls themselves, the surface of which should be as level as possible. To install the foam you will need: a ruler and pencil, a knife, a tape measure, a brush, a roller, a spatula, a fine-toothed hacksaw and a drill.
Work order:
- Using a roller, apply an anti-fungal acrylic primer to the wall surface. Allow to dry for 24 hours.
- Dilute a fairly thick adhesive composition.
- Measure the required size of the insulation sheet, first attach it to the wall and then carefully cut it off , being careful not to damage the edges.
- Starting from the floor, carefully coat sections of the wall with glue to the size of each sheet. The foam panels must be applied to the wall perfectly evenly and in such a way that they fit snugly against the wall itself and to each other. The joints between them should be T-shaped (as in brickwork). After gluing the insulation is completed, the room is left closed for 1-2 days until the glue dries completely.
- Holes for special plastic dowels are drilled through the layer of heat insulation . Most often, 6 such holes are made on a sheet of insulation: 2 in the middle and 4 in the corners. Then the dowels are driven in, and short and thick plastic nails are driven into them.
- Joints more than 4 cm wide are sealed with narrow pieces of insulation, and all the rest are filled with polyurethane foam without toluene, which can corrode the foam. Excess foam is carefully cut off, and the sections themselves are impregnated with glue to protect against mold and fungi.
- Cut reinforcing mesh strips . Using a spatula, apply a thick layer of glue to the insulation and insert a piece of mesh into it. Glue each next piece after the glue under the previous one has dried. The joints of the tapes should not coincide with the joints of the foam panels.
- Now you need to apply a layer of adhesive to the mesh so that it does not stick out at all. Use sandpaper to smooth the dried surface of the glue.
- For the final finishing of the walls, either leveling putty and a primer are applied for wallpapering, or a frame is installed for cladding the walls with MDF or any other wall panels.
Thus, you can handle the insulation of walls with foam plastic from the inside completely independently.
Conclusion
To perform high-quality insulation of walls from the inside, you don’t have to turn to specialists for help: all the work can be done yourself if you have experience working with simple materials and tools.
You can carry out work on laying polystyrene foam both in the house and in utility rooms that are not heated. If heat leakage continues, it is necessary to insulate the ceilings and floors: only a set of measures will help protect the house from the penetration of cold.
Life time
If all the work was carried out in compliance with technology, then new repairs will not be required soon. With proper use, this thermal insulation material can last about 30 years. But over time, its insulating properties may decrease.
You can carry out high-quality thermal insulation of walls yourself, without resorting to the expensive services of craftsmen. It is important to choose the appropriate type of foam, follow all installation technologies and operating conditions.
Methods for attaching foam to the wall
Three methods are used:
- Dry mixes . Materials like tile adhesive are diluted to the desired consistency with water.
- Special glue . Most often it is produced in cylinders, reminiscent of polyurethane foam.
- Dowels with a wide cap are fungi.
NOTE!
The use of fungi is carried out as an additional measure to strengthen adhesive joints.
The glue is applied directly to the foam. Usually the entire area of the slab is not covered, applying stripes along the perimeter and in the central part. The joints are additionally coated with an adhesive or, in special cases, filled with foam.
Fastening with polyurethane foam
Fastening with dowel-nails
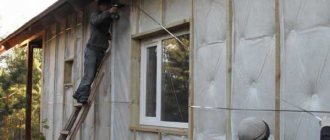
How to properly insulate a house with foam plastic from the outside, how to avoid mistakes?
Insulating walls with expanded polystyrene (a type of polystyrene foam) is not a very difficult task, but you must follow certain rules.
Mistakes made when performing insulation can result in it being less effective and, in some cases, can lead to serious damage to the façade. To properly insulate walls, it is important to follow certain rules and avoid common mistakes. Below are 11 of the most common rules and mistakes when insulating a building with polystyrene foam.
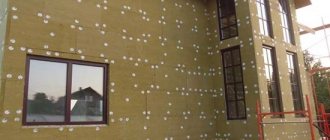
The surface on which the polystyrene boards will be placed must be properly reinforced, stable, level and dry. It should be free of contaminants that reduce adhesion, such as:
The base must be level - small inequalities (up to 2 cm) are leveled using a leveling solution. In case of large unevenness (more than 2 cm), you must use different thicknesses of polystyrene foam boards so that they form one plane.
Underlay-related errors include:
The glue must be applied both along the edge of the slab and on its surface. If you apply glue only along the edge, or only at one point, the plate will bend, and the edges of the plates will be visible on the finished facade.
Proper use of foam glue:
a) along the periphery and points - in this case, the glue should be applied in the form of strips along the edges of the slabs with a width of 4-6 cm. On the remaining surface, the glue is applied pointwise, there will be from 3 to 8 points. The total area of the glue should cover 40% of the white panels and 60% graphite plates.
b) the comb method, which is used only in the case of smooth, plastered surfaces. The adhesive is applied using a notched trowel to the entire surface of the slab.
Note: The adhesive solution is applied to the surface of the polystyrene plate, and never applied to the substrate.
The adhesive on each sheet should be placed around the edge and on the surface.
A poor choice of adhesive or mortar of unsatisfactory quality can lead to the tearing off of the foam plates, along with other layers of the facade. As a rule, it is recommended to use a complete insulation system from the manufacturer - such a system contains all the necessary elements, guaranteed quality, and good coordination of the elements with each other.
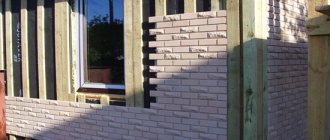
It is important that the foam plates are offset by half their length in the direction from bottom to top, starting from the corner of the wall.
It is also important to position the slabs correctly in the corners. If this is done incorrectly, then thermal bridges appear at the connection of the plates, through which heat loss occurs.
In addition, polystyrene panels must also be laid neatly and tightly side by side. Connections should not form straight lines.
The gaps between polystyrene foam boards should not be filled with adhesive solution (this creates thermal bridges). To fill gaps up to 4mm wide, use polyurethane foam.
Dowels that are not deep enough will cause problems. If they are installed too deep, they will destroy the structure of the insulation board. If they are installed too shallowly, they can create a bulge that will be visible on the wall surface.
If starter baseboard and mesh are not used, the insulation will be exposed to the weather and rodents such as mice, which, seeking shelter for the winter, often bite into the bottom layer of insulation and cause it to become damaged.
The surface of the slabs after their placement must be flat.
If there are uneven surfaces, the surface must be sanded to remove the unevenness. Otherwise, they will also appear on the facade. Unfortunately, sanding polystyrene is a labor-intensive and time-consuming process, so it is often forgotten.
There should be no seams between slabs in the corners of window and door openings. Additionally, you should use additional diagonal mesh strips in these areas.
Layout diagram in the corners of window and door openings
The corners of window and door openings should fall into the central part of the polystyrene plate.
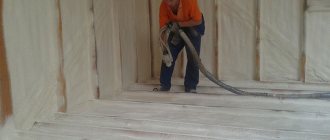
Often installers do not take weather conditions into account during repairs. It is important that insulation work is carried out in appropriate weather - the temperature is not lower than 5 ° C and not higher than 25 ° C.
Of course, there should be no precipitation at the time of insulation. This is important, not for comfortable work, but for the properties of materials that retain their qualities only under certain conditions. For example, at a higher temperature, the adhesive will dry quickly before it can properly bond the foam to the backing.
The use of solar shading is especially important when installing gray foam. When exposed to the sun, it heats up quickly, and the result can be the formation of gaps between the plates and their peeling from the substrate.
Do-it-yourself insulation of a house with polystyrene foam
A lot depends on how well the house is insulated: the microclimate and indoor air temperature in winter and summer, saving money during the heating season. That is why close attention is paid to wall insulation during the construction and restoration of a building.
You can insulate walls inside and outside with different materials: mineral wool, isolon, glass wool, polystyrene foam. The last option is the most profitable and technically accessible.
How to start the insulation process?
Before you start insulating a house from the inside, you need to identify its weak link. That is, that element of the building structure that suffers most from the cold. It needs to be insulated. This could be walls, ceiling or other foundations. The method of installing the heat-insulating material and determining its type depend on the location of the insulation. Taking into account the arrangement of ventilation, it is necessary to focus on the method of insulation and the selected materials. Moisture accumulated on the window profile and on the tiles, stuffiness and humidity are the results of the airtightness of the room. You can plan the air duct system yourself; if this does not work out, then turn to professionals. When planning and drawing up an estimate, it is necessary to take into account that in the process of arranging a home, adjustments may occur due to defects in the foundations and repairs of the house's communications.