Installation
Date of publication: 06/28/2018
0
5565
- Features of using tiles in a frame house
- Tile selection
- Preparing the premises
- Laying tiles on the wall
- Laying tiles on the floor in a frame house
Finishing a frame house differs from repairing a brick or block house. To install tiles in a frame house, it is necessary to carry out preparatory work, because it cannot be laid directly on the wooden surface of the “frame”.
Laying different sized tiles on the floor
Properties of ceramic tiles
The many positive qualities of tiles explain the popularity of its use in premises for various purposes. Indeed, ceramic tiles:
- not afraid of humidity;
- withstands large temperature changes;
- has very high hardness and strength;
- resistant to the formation of fungus and mold;
- inert to the effects of all chemical compounds and substances used in everyday life;
- presented in a wide variety of shapes, sizes, colors and textures.
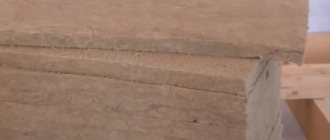
Subfloors made of CBPB on logs device technology
Leveling the subfloor for a decorative finishing coating can be done in more than one way. Cement screed for this case is the most labor-intensive and time-consuming process. Often sheets of particleboard are simply laid on the base. This material shows its weaknesses both in the process of working with it and in subsequent operation. Chipboard is quite fragile and tends to break at the ends and corners of sheets when cut and fastened. Floors with such a base do not tolerate excess moisture and are therefore not suitable for bathrooms and kitchens.
Due to its strength, density, environmental friendliness, resistance to moisture, fire, rot, and chemicals, fiberboard is considered one of the best sheet building materials and is an excellent basis for a subfloor.
For those who are already familiar with the relatively new construction product - DSP, the question of choosing a material for the rough base disappears by itself.
Features of using tiles in a frame house
Laying tiles on the walls and floor of a frame house has its own characteristics:
- Tile should not be glued to a surface that may sag. Such a floor, not having sufficient rigidity and hardness, will “play” and “walk”, and ultimately the seams between the tiles will collapse, and the tile itself may crack and fall off. The permissible deflection for the floor as a tile base is 1 mm/m.
- The thermal expansion coefficients of ceramics and base material should not differ greatly from each other. Do not lay tiles directly on floor sheathing sheets.
- When working with ceramic tiles, you should not use mixtures for laying on a cement screed; you must choose special plastic adhesive mixtures.
How to choose the right tile?
When choosing, you need to consider:
- degree of resistance to abrasion;
- weight of one tile.
For example, for the living room and corridor it is advisable to purchase high-strength tiles - this will significantly extend their service life. Care must be taken when choosing flooring for a bath or shower or sanitary unit. The tile must have a textured surface that provides traction to the foot even if there is water on the surface.
Most owners of frame houses try to save on finishing - by purchasing inexpensive tiles. However, the overall dimensions of such goods may differ significantly from those declared. Adjustments will be required during installation. This will entail additional costs for paying for work and purchasing materials.
Fastening to vertical and horizontal surfaces is carried out using special glue. Dimensional tiles should be used with glue of high plasticity. A non-contact primer will make the appearance of ceramics more attractive. The seams are sealed using grout. It is important to pay special attention to insulation at the junction of vertically and horizontally located ceramics.
Tile selection
When choosing a tile, you must first evaluate its quality. You need to select the material according to the following parameters:
- the difference in diagonal sizes is less than 1 mm;
- the products do not have chips or other damage;
- the ribbing on the reverse side is more than 1.5 mm high.
It is important to know the difference between floor and wall tiles :
- The floor often bears shock loads from objects falling on it, so during production the enamel coating, like the tile itself, is made thicker.
- Floor tiles have a denser structure and are more difficult to cut; you will need a special tile cutter for the job.
- To provide slip resistance, the surface of floor tiles is embossed or matte.
When purchasing ceramic tiles, you should take the material with a margin of 7-10%; this amount will be used for trimming.
When the need arises
Many older buildings require wooden floors. In addition, when building houses of the following categories, you will need to lay ceramics on a wooden base:
- frame;
- frame-panel;
- lumber;
- log
The tiles are quite durable, easy to clean and repel water without problems, so they are perfect for laying on a wooden floor.
In all these cases, the design of the house requires the presence of wooden floors, so when using ceramic tiles as a finishing material, it is necessary to lay them correctly.
The most important question in this case is whether it is possible to lay tiles on a wooden floor. Laying is possible, you just need to take into account some features of the base. The main rooms in the house where ceramics need to be placed are:
- bathrooms;
- bathroom premises;
- kitchens;
- halls;
- corridors;
- hallways;
- utility rooms (for example, laundry room).
In all these cases, there is no better option than laying the tiles yourself. Since this particular material has high strength, wear resistance, moisture resistance and ease of cleaning.
Preparing the bathroom for tiling
Those who want to use tiles in a frame house should take into account that simply laying them on the floor covering sheets will not work. It is necessary to attach gypsum fiber board sheets to the surface, and then the finishing can be glued onto them.
Useful: Second light in a frame house
Alignment
Frame construction technology allows you to set floors level even at the installation stage. And when covering plywood with sheet materials, you can get fairly smooth surfaces.
However, only flat surfaces can serve as a base for ceramic tiles. This means that if the walls and floor of the room have unevenness, this defect should be eliminated. In addition, if the difference in floor surface heights is more than 2 cm, leveling is necessary by pouring a screed.
Primer
Before applying the primer, it is necessary to clean the bathroom floor and walls to a height of 10-20 cm from debris and dust.
If surface unevenness does not exceed 2 mm, you can begin priming. The base is primed in two layers, with the second layer being applied perpendicular to the first to eliminate gaps. Do not forget that the floor of the bathroom should be lower than the floor of adjacent rooms. Otherwise, a threshold is made at the entrance to the bathroom.
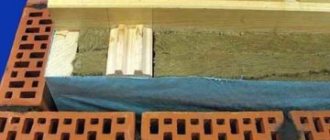
Waterproofing
For wet rooms, it is necessary to take measures to protect building structures from penetration of moisture into their thickness in order to avoid the occurrence of fungus and mold. waterproofing the bathroom in frame houses is so important .
Coating waterproofing is most often used, because such a coating:
- has no seams;
- can be applied to any base, on a damp surface;
- has an inexpensive cost;
- does not require the involvement of qualified performers.
Waterproofing the bathroom of a frame house is done in such a way as to obtain a monolithic waterproof pan consisting of a floor surface and a 20 cm wall height. Additionally, it is recommended to cover the perimeter of the walls with a special tape to protect the most likely areas of cracking of the waterproofing coating.
The material is applied over the entire surface in contact with water. If a shower corner is planned, at the location where it is located, the walls are waterproofed up to the ceiling and 50 cm to the sides from the edge of the shower stall. The same applies if the bathtub is adjacent to the wall. Near the mixer, the composition is applied 20 cm above it, in the same way at the attachment point of the shower head, washbasin and 50 cm to the sides from the edge.
Coating waterproofing can be easily applied with a roller, brush or spatula (the choice of tool depends on the consistency of the composition). When applying the material, empty areas should not be allowed; it is better to apply a coating of 2-3 layers.
When the above work is completed, you should proceed directly to installation. Everyone chooses to do it themselves or entrust it to the masters, but if you have doubts about your own abilities, it is better to turn to specialists.
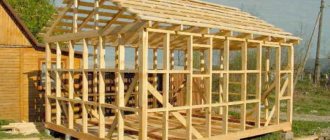
Installation of floors in frames
The work begins with the selection of building materials, primarily wood. Experts recommend focusing on the climate zone and construction budget. For example, conifers perfectly repel moisture, but are short-lived. Hardwoods last much longer, but are also more valuable.
| Name | Functions |
| Antiseptic drugs | Protecting wood from insects and fungi |
| Insulation | Prevents heat loss, reduces heating costs |
| Roll insulation | Prevents penetration of groundwater |
| Paints | Protecting the building from rain and melt water |
| Anchors, nails | Fastening the beams |
After purchasing materials, you need to check the evenness of the foundation, and then start working. Step-by-step installation plan:
- Fastening beams around the perimeter of the foundation.
- Laying a waterproofing membrane.
- Installation of supports and beams, fixation with nails.
- Installation of strapping.
- Installation and fixation of lags.
- Laying and processing of finishing coating.
Installing a floor pie is a painstaking process. Each stage must be carried out efficiently, adhering to construction standards according to SNiP 2.03.13-88.
Laying tiles
This process can be divided into several stages, performed sequentially.
Useful: Lighting in a wooden house: choice of lamps, important installation nuances
Preparing for work
Tile laying work requires the following special tools:
- Ruler and pencil;
- building level.
- tile cutting machine;
- rubber hammer;
- There are two types of spatula: serrated and regular.
Before starting work, it is advisable to calculate the amount of material required for each row. Moreover, if you draw the layout of the tiles, it will be much easier to figure out how to trim later.
Selection of adhesive mixture
The glue must be special, capable of withstanding minor deformations of the floor and walls. Almost all manufacturers of adhesive mixtures offer such plastic compositions for complex surfaces; it will not be difficult to choose one suitable for laying tiles in the bathroom of a frame house.
Laying tiles on bathroom walls
First of all, using a level and tape measure, apply the necessary marks on the walls and floor, and prepare the adhesive mixture. Since tiles are laid on the wall from the second row, a metal profile or wooden block supporting the row must first be attached to the wall.
Next, a small amount of glue is distributed over the surface. At the same time, glue is applied in small quantities to the wall - on two, maximum three tiles. After finishing the walls, they begin to work on the floor.
Dry method
Preparation of the base can be done without wet work; this method is optimal in terms of price and reliability, and allows you to preserve the wood base for as long as possible. You need to start with an inspection of the existing coating.
Laying tiles is only possible on top of a solid, healthy base. If the boards are rotten or the joists begin to mold, then the damaged fragments must be replaced. Or completely replace the entire floor.
Also, the floor must be level. If there are large distortions, you will have to correct them - level the existing coating or add additional coating on top.
There are many variations - ready-made prefabricated adjustable floors, homemade systems of joists and supports. The space between the joists can be filled with insulation.
The most primitive option is to lay plywood or OSB on top of the floor. But it can only be done if the base is level and strong.
Sheets of plywood are laid with gaps that are sealed with sealant. The gap is needed so that the sheets do not swell after gaining moisture.
Since such a wooden base is characterized by mobility, when laying tiles, instead of conventional cement glue, you need to use two-component polyurethane. Its peculiarity is elasticity and mobility.
Floor tiles placed on such adhesive will more easily withstand vibrations and thermal expansion of the base. Also, do not forget to treat the surface of the plywood with an appropriate primer.
This method is fast and inexpensive, but the strength of the resulting base leaves much to be desired.
Watch our video collection on the topic:
Wet method
This is a more reliable method, but at the same time, such preparation will take more time and require more investment. The idea is to pour a leveling concrete screed over the boards.
Before laying tiles, the floor is inspected. If necessary, the boards are removed from the joists and replaced. If possible, the boards are laid with small gaps for ventilation. If this is not possible, then many holes are made in the floor surface.
A layer of moisture-resistant plywood with a thickness of at least 12 mm should be placed on top of the boards. You can use other wood sheet materials instead of plywood.
Then we lay waterproofing material on top. It will protect the wood from moisture from the concrete. Waterproofing must be done with an overlap on the walls.
Now, along the perimeter of the room, you need to glue a damper tape to the walls, which will compensate for the thermal expansion of concrete and will also prevent moisture from the floor surface from penetrating to the wood. At the end, fill in the screed. The thickness of the concrete should be small so as not to create excessive load on the tree.
Even 5 centimeters will be a lot, the optimal thickness is 3 cm. If the moderate curvature of the floor allows, then special self-leveling masses can be used instead of ordinary concrete.
After drying and hardening, the tiles can be laid in the most conventional way. This is the most thorough preparation, but even it is not able to save the floor from destruction after the wooden base becomes unusable.
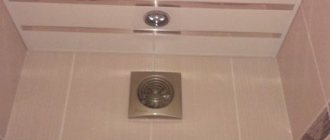
Other Important Points
In order to reduce the level of humidity in the room, it is worthwhile to arrange effective natural and forced ventilation. In some cases, it may be wise to use a dehumidifier. When choosing a bathtub for installation in a frame house, we recommend choosing acrylic models. Such bathrooms are lightweight and can be installed on both the first and second floors. If you decide to use only a shower, then it is better not to use an open stall, but to buy a closed one.
Source