Advantages and disadvantages
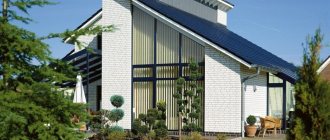
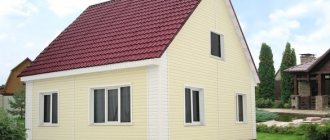
Shed roofs are considered the most inexpensive and easiest to install. And this is true, especially with the small width of the building. However, in our country, houses with pitched roofs are very rare. For the most part, this is due to the fact that two or four pitched roofs are more familiar to us - they look more familiar. The second snag is to find a project adapted to our weather conditions. There are a lot of projects on Western resources, but they are designed for a milder climate and, as a rule, have a large glazing area. Finding an architect who will competently change a project you like is very difficult. But if you succeed, and the harmony of the building is not disturbed, the house turns out to be very original.
One of the projects of houses with a pitched roof
Many people are afraid of uneven ceilings in some parts of the building. They are, of course, more difficult to beat than standard ones, but the result is of a completely different level - 100% original. True, this time it is very difficult to find a designer who can develop such an interior in the vastness of our Motherland, but nevertheless, it is possible.
There is another way out - to level the ceilings by overlapping, and use the free space under the roof as technical rooms. Such options have been implemented and the owners are very satisfied. Yes, the technical rooms are on the ground floor and upstairs, but there are no problems with groundwater.
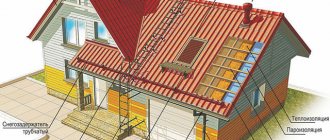
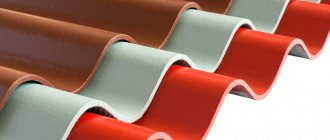
These are, perhaps, all the disadvantages or pitfalls that a pitched roof can bring. There is, however, one more point that can hardly be called a disadvantage. Due to the peculiarity of the structure, the roofing material on such houses is not visible from the ground. If the terrain is flat, without large differences in elevation, there is no point in bothering with the appearance of the roof. It is better to choose simple-looking, but high-quality materials, quiet (the flat surface is large, it makes a lot of noise when it rains) and reliable. One of the popular options is seam roofing. It provides the proper degree of tightness and is not very noisy. Another option is a soft fused roof made from modern materials. Such roofs are even quieter, and modern materials can be used for 20-30 years without repair.
Materials used for covering overhangs
Popular materials used for covering roof eaves include wood and metal.
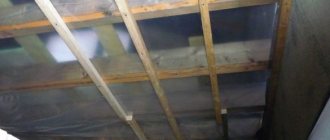
Board overhang
In most cases, this material is obtained from coniferous trees; it has moderate wood moisture content. The thickness of such cladding, according to GOST, is 17-22 mm, and the width and length are selected individually for each specific case. Fastening is carried out on both sides in increments of up to 1 m, before which the wood is pre-treated with impregnation from a moisture-resistant composition. A special protective varnish or moisture-resistant paint is used as impregnation.
Wooden roof overhangs require constant maintenance. Treatment should be carried out every 3-5 years. In this case, they will last longer and retain their original appearance. In addition to the protective coating, the structure must be well ventilated. For this purpose, inlet openings are arranged at a rate of 1:400 of the ventilated weight area. With proper organization of ventilation, air exchange is carried out through drilled holes and holes in the roof ridge. Protective nets are used to protect against birds and insects.
Made from galvanized steel
This type of roof overhang lining takes the form of a steel sheet, the thickness of which is up to 0.8 mm - flat or perforated. Anti-corrosion paint is applied to the edges of the sheets.
Aluminum sheets
They are coated with a protective layer that prevents the formation of metal corrosion. The dimensions of the sheets can be within the following limits: thickness - 6 mm, width - 100-300 mm, length - 6000 mm. Aluminum cladding sheets are fastened using special latches.
Construction of a pitched roof
Organize the required slope of the pitched roof due to the difference in heights of the opposite walls. One wall of the building turns out to be significantly higher than the other. This leads to increased consumption of materials for the walls, but the rafter system is very simple, especially for buildings of small width.
Shed roof
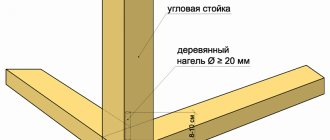
If the load-bearing capacity of the walls is sufficient, the truss system of a pitched roof rests on a mauerlat attached to the wall. To make the load distribution more uniform, the top row of the wall masonry is reinforced with longitudinal reinforcement (for brick walls, concrete blocks) or an armored belt is poured over the last row (for walls made of lightweight concrete, limestone, shell rock). In the case of a wooden or frame structure, the role of the Mauerlat is usually performed by the last crown or top trim.
If the building material of the walls is insufficiently strong, most of the load can be transferred to the ceiling. To do this, install racks (steps of about 1 meter), on which purlins are laid - long bars running along the building. The rafter legs then rest on them.
How to transfer the load from the walls to the floor
When pouring an armored belt or laying the last row, studs are installed into it in increments of 80-100 cm, with the help of which the mauerlat is then attached to the walls of the building. In wooden houses, if you do not make an armored belt, it is impossible to install studs. In this case, installation on pins with a hexagonal head is allowed. Under the pin, through the Mauerlat, a hole is drilled, a couple of millimeters smaller than the diameter of the pin. A metal rod is driven into it, which attracts the wooden beam to the wall. The connection is tightened using a hex wrench of the required size.
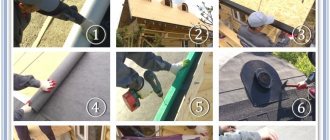
Do-it-yourself pitched roof: step-by-step installation
When starting the construction of any structure, you need to make a project or diagram with the dimensions of the main elements. Calculation of materials and necessary fasteners is made based on dimensional data. To avoid wasting time in the process, you need to have a reserve of 5-10% of the volume.
Work order
A pitched roof is simple to install, but violation of installation technology can lead to failure of the entire structure, wetness of the thermal insulation and loss of functionality of the roofing pie.
Mounting the Mauerlat
The beam is laid flush to the wall made of brick or block. Between the vertical surfaces and the wooden element you need to lay a layer of roofing felt waterproofing. Fastening to the wall is carried out with metal rods or anchor bolts in increments of 70-100 cm.
All wooden structural elements must be treated with antiseptic compounds before installation to prevent premature destruction.
Rafter system
Markings are made on the Mauerlat to fix the rafter legs, and grooves are cut at an angle equal to the angle of the roof slope, the average step is 80 cm.
Step-by-step instructions for constructing the structure:
- Installation of the outer rafter legs into the grooves on the Mauerlat. Between them you need to stretch a fishing line to align the intermediate structures. Laying beds for support posts.
- Installation of jibs on each rafter leg, racks and ties between the Mauerlat and the base made of boards or timber.
- Installation of wind protection.
- Fixing the rafter structure with lags and sheathing.
Fastening is carried out with metal corners, self-tapping screws, bolts and nails for rigid fixation or elements for a sliding system.
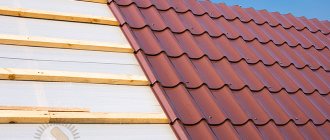
Installation of sheathing
The construction of the base is carried out based on the choice of roofing: for rolled materials the pitch of the board is 1.5 m, for slate 1 m, for the installation of piece elements and metal sheets a continuous sheathing is made. A beam or board is installed across the rafters and firmly fixed.
If a warm roof is being built, this will be the basis for the roofing pie and a counter batten will be needed to fix the covering.
Fastening insulation, vapor barrier, waterproofing
The installation of a warm roof is achieved by layer-by-layer fixation of materials on the rafter system. When installing, it is better to use two layers of vapor barrier. The bottom one is fixed to the sheathing, and the second one is above the insulation - this minimizes the process of condensation formation on the roofing cake.
Stages of creating a warm roof:
- The vapor barrier material is laid out on the sheathing and secured with a stapler.
- Laying a waterproofing layer, which is fixed on the surface with an overlap of 5-10 cm. The material should not be stretched too much; a slight sag should be left for shrinkage.
- Laying insulation starting from the bottom plumb to the top. Fixation is not carried out, but if the roof has a strong angle of inclination, adhesive compositions can be used.
- Attaching the second layer of vapor barrier with fixation with a stapler to the rafter structure..
Next, the pie is sewn up with a counter-lattice, which will serve as the base for the roof.
Fastening roofing material
The number and type of elements for fixation to the rafter system depend on the coating. Regardless of the type of material, laying out sheets and unwinding the roll begins from the bottom tier.
Fastening elements for roof coverings:
- ondulin is fixed with special nails;
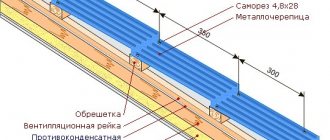
- the tiles are fastened with galvanized clamps or self-tapping screws in places with increased load;
- the corrugated sheet is fixed with roofing nails on the upper wave of the sheet;
- roofing material is glued at the joints with mastic and attached to roofing nails or self-tapping screws with washers;
- the slate is fixed with nails and screws along the upper wave of the sheet.
During installation, special attention should be paid to the junctions of the cornice rows and the joints of the sheets with each other. Fasteners are installed only after adjusting the material in place and connecting the elements to each other.
Upon completion of the installation of the roofing material, the roof eaves are hemmed and a drainage system is installed. The phased implementation of work on installing a pitched roof guarantees long-term operation without repairs.
Rafter system of a pitched roof
Such roofs are especially popular in the construction of courtyard buildings - sheds, garages. It’s just that the size of the buildings allows the use of not very powerful beams, and beams are required in small quantities. With a building width of up to 6 meters, the rafter system of a pitched roof contains almost no additional reinforcing elements (supports and purlins), which is beneficial. Also attractive is the absence of complex knots.
For Central Russia, for a span of up to 5.5 meters, beams of 50-150 mm are taken; up to 4 meters, 50-100 mm is enough, although in an amicable way, you need to consider the snow and wind load specifically in your region, and, based on this, decide with beam parameters.
Rafter system of a pitched roof with a small span (up to 6 meters)
With a distance between the walls of up to 4.5 meters, the pitched roof consists of two mauerlat bars fixed to the walls, and rafter legs that rest on the mauerlat. Really very simple design.
With a span width of 4.5 meters to 6 meters, a support is also required, fixed to a higher wall at the floor level and a rafter leg that rests on the beam almost in the middle. The slope angle of this beam depends on the distance between the walls and the level of installation of the beam.
More complex rafter systems in a pitched roof with a building width of more than 6 meters. In this case, it is optimal if the house is designed in such a way that there is also a load-bearing wall inside on which the racks rest. With a house width of up to 12 meters, the trusses are still simple, and the cost of installing the roof is minimal.
Construction of pitched roof trusses for buildings with a width of more than 6 meters
For buildings more than 12 meters wide, the system becomes more complex - there are more rafter legs. In addition, manufacturing beams longer than 6 meters is expensive. If an increase is required only by the width of the roof overhangs, the beams are extended along the edges with fillets. These are pieces of beams of the same cross-section, connected to the beam and secured on the sides with two wooden plates at least 60 cm long, fastened with bolts or nails, allowing the use of mounting plates.
Option for splicing rafters
If the total length of the beam is more than 8 meters, they are usually spliced. The joints are further reinforced by nailing boards or mounting plates.
Options for attaching the rafters to the mauerlat: sliding at the top and rigid at the top on the right. Below on the right is a version of a tie-in without overhangs (very rarely used)
There may also be questions about how to attach the rafters of pitched roofs to the Mauerlat. There are no fundamental differences. Everyone also makes a cutout in the rafter leg, with which the beam rests on the mauerlat. In order not to suffer with each rafter leg, leveling its fit, having cut out the first one, a template is made from a piece of board, thick plywood or timber that exactly repeats the resulting “cut”. All subsequent rafters are sawn before installation. A template is applied to them in the right place, a recess of the required shape and size is outlined and cut out.
This was about rigidly attaching the rafter legs to the mauerlat. It is used on all buildings that exhibit low shrinkage. This method of fastening cannot be used on wooden houses - the house always settles or rises slightly, which can cause misalignment. If the roof is fixed tightly, it may tear. Therefore, when installing a pitched or any other roof on wooden houses, a sliding connection of rafters and mauerlat is used. For this there are so-called “slippers”. These are plates, consisting of corners that are attached to the mauerlat and metal strips movably connected to them, which are attached to the rafter leg. Two such slips are placed on each rafter.
Tools for constructing a rafter system
To install a gable roof rafter system, you will need the following set of tools:
- tape measures of different lengths 5, 10, 20 meters;
- markers, pencils;
- cord for tensioning;
- hammers, for various purposes, nail puller;
- scissors, for cutting;
- roofing knife;
- putty knife;
- scotch;
- hacksaws, electric saw, electric drill with various drills and attachments;
- screwdriver with attachments;
- markings, horizontal and vertical levels;
- slats, rulers;
- polyurethane foam;
- safety belt and rope - for safe work.
Keep all tools on the roof in a tool bag for safety reasons.
Overhangs and their types
- Flush eaves overhang: with this option, the rafters do not extend beyond the front boundary of the walls. You will also need to install a drain board along the edge of the rafters. It should be located in a horizontal position. The board protects the ends from moisture and also provides a reliable fastening system for gutters. As a result, the individuality of the roof will be emphasized. The disadvantage is the lack of protection for the upper parts of the walls. They may get wet. The flush overhang of a wooden house, as a rule, has a length of 55 centimeters. Brick and panel structures allow shorter overhang lengths. When releasing the ties with the rafter legs beyond the front line of the walls, do not forget about the installation of eaves of this design (read: “How to make eaves under the roof”). This will protect the attic from drafts. Cornices will also prevent snow from forming in the cracks of the structure. If the protrusions of the rafter legs are missing beyond the line of the walls, then lengthen them with “fillies”. Timber trims are suitable for this purpose. It will need to be screwed or nailed to the rafter ends. After this, you can attach the cornice board.
- Eaves roof overhangs that have an open type - the protrusion of the main rafters of the roof frame beyond the walls. With this option, the drainage system is attached to the sides of the rafters or to the upper edges. This system is often used in the construction of country houses.
- The overhang of the roof from the wall is of a closed or protective type - in this case, the eaves of the roof of the house covers the ends of the rafters protruding beyond the gable part. In this case, you can very often find a groove on the inside. Sheathing elements are usually inserted into it. Advice
: If the attic is designed as an isolated room, then the closed eaves overhang must have mandatory holes for ventilation. - Gable overhang: made flush or with a projection beyond the walls. It all depends on the design of the house, but both methods can be safely used with a standard design. Please note that if the overhang protrudes beyond the walls, sheath the area of the unprotected roof.
Types of overhangs
The design depends on the structure of the roof. For the single-slope option, there is only one solution - a side overhang. A gable or multi-slope roof involves the appearance of a pediment and side walls. The front cornice appears. On a hip roof, which includes 4 slopes, only a side overhang is also possible.
Frontal
The front overhang protects the building façade from rain and snow
It protects the pediment - the final, usually triangular part of the wall that appears between two slopes. A cornice is formed due to the departure of both slopes. The width of the cornice is from 40 to 100 cm. There are 2 types of this design.
The roof overhang can be formed by rafters. To do this, you need to move the horizontal crossbars and the ridge outside the perimeter. A wooden beam of the same cross-section is used, and the cornice is hemmed underneath with a board. This option is very durable and reliable, so its length can reach 1 m. Heavy materials can be used for the roof: ceramic tiles, slate.
A lighter structure is obtained by removing only the sheathing. Such a cornice does not exceed 50–60 cm, and is sheathed with light material, such as metal tiles, ondulin, or soft tiles. The front overhang is almost always classified as closed and is lined with boards and clapboard.
Side
Side eaves roof overhang
The projection of the slope above the wall of the building is located on the sides of the roof. The length is within 50–70 cm. Its dimensions are determined by the weather conditions of the region, the width of the blind area, and the height of the house.
The length of the cornice may exceed the specified parameters, but it is no longer rational to create an overhang. In this case, it will not be able to protect the walls from rain and the attic from blowing.
Overhang cladding: materials and installation
- The most common material for covering overhangs is board. Preference is given to coniferous wood, such as spruce, larch or pine.
The process of attaching plank sheathing is carried out on both sides. The exception is boards longer than 6 meters. Here the fastening step is 1 meter of the length of the sheathing material. Before installation, treat each board used with a waterproof solution. For this purpose, it is recommended to use special paint or varnish for wood. Wooden roof overhangs need to be treated as often as possible - once every few years. Only then can the roof eaves overhang last for a long period of time.
Hemming material and installation features
Roof overhang lined with wood
The closed overhang is finished from below with suitable material. It should be lightweight, waterproof and durable. The choice is large.
- Boards are the most obvious option, especially for a wooden country house. They use specially hemmed boards, clapboards, and edged boards. The material is pre-treated with antiseptics and coated with varnish or paint that is resistant to water. This is necessary, since under the influence of moisture the wood begins to rot. It is necessary to provide good ventilation of the box, since if condensation accumulates it will become unusable.
- Lining the roof with corrugated sheets is the second most popular option. The profiled sheet is coated with a layer of zinc, which protects the steel from corrosion. Grooves and recesses facilitate the drainage of rain and condensation. The corrugated sheet is quite lightweight and is attached with self-tapping screws. Serves as an excellent basis for mounting lighting fixtures.
- Galvanized steel - a flat sheet can also be used for lining a roof made of corrugated sheets. This option is more convenient when constructing box-shaped cornices.
- Siding – plastic or wood. The first one is used more often, since the plastic is resistant to water, does not rot, and does not corrode. The ventilation requirements in this case are minimal. They do without ventilation if they buy perforated siding.
- Copper profile is an expensive and exclusive solution. Copper plates look beautiful and are not afraid of water, frost, or sun. Create the effect of golden illumination of the wall and roof.
There is also a more labor-intensive option, formed by pouring stones. In this case, the wall under the overhang is expanded so that the rafter leg remains within the perimeter, and only a fragment of the roof protrudes above the wall. The brick lining is reinforced with mesh.
The facade finishing kit often includes all the necessary elements for installation: plastic panels, J-profile, soffit strips, etc.
Roof cornice - purpose, structure and finishing methods
No wonder people have said since ancient times that the most important thing is a reliable roof over your head. Professional roofing craftsmen also confirm that only a reliable, durable roof ensures comfortable living in the house. Moreover, the reliability and durability of this complex structure sometimes depends on seemingly very insignificant elements.
For example, the roof cornice, despite its small size and percentage of the surface area of the slopes, this element performs important functions that affect the service life, insulating ability and strength of the roof. In this article we will talk about the design of the roof eaves of a house, methods of its formation and optimal dimensions.
Device and functions
The roof eaves are an important element of roofing structures; this term refers to the lower parts of the roof slopes, which are their continuation. Installation of cornices is carried out during the arrangement of the rafter system by increasing the length of the rafters or by installing fillies. On top, the cornice, like the entire area of the slope, is covered with roofing material, and from below it is sewn up using lumber, soffits, and siding. In the roof structure of a house, it performs the following functions:
- Protects the walls of the house from moisture. The eaves overhang of the roof protects the upper part of the external walls from atmospheric moisture and dirt, maintaining their attractive appearance and integrity.
- Prevents the flow of melt and rain water onto the foundation area. The structure of the roof eaves is such that it carries streams of water and blocks of snow sliding off the slope further from the foundation of the house, preventing erosion and destruction of the blind area.
- Gives the roof a finished, neat look. Roof overhangs, being a continuation of the slope, give the structure a more proportional appearance, harmoniously completing the architectural design of the house.
Note! Installation of eaves is a mandatory stage of roofing work, which is required by the technology of roof construction, regardless of its type, shape and type of waterproofing coating. Even flat roofs have a slight projection, protruding beyond the outer walls of the structure.
Many homeowners are interested in whether it is possible to design a roof cornice with their own hands, since visually its design seems extremely simple. Experienced craftsmen believe that this is a job that even a non-professional can do. The main thing is to understand the purpose and types of cornices. In the design of pitched roofs, the following 2 types of overhangs are distinguished:
- Pedimental. The gable overhang is the part of the roof slope that protrudes beyond the outer walls of the house from the gable side. Typically, this type of cornice is short in length and is formed by the sheathing and fascia that gives it its shape.
- Cornice. The eaves overhang or cornice is the lower part of the slope, starting from the intersection of the roof plane with the external load-bearing walls. These cornices are usually much larger than gable cornices as they prevent splashes of water flowing from the slope from hitting the wall finishing.
Important! In essence, the cornice is an extension of the rafter legs. Since the overhang is located at the bottom of the slope, it bears minimal snow load. However, the installation of a gutter or snow guards changes the distribution of loads, so significant pressure may be exerted on it.
Types of overhangs
In the roof structure, there are two types of overhangs: frontal and eaves.
- Front - part of the gable roof, which is located on the front side of the house. The front overhang has a slope corresponding to the slope of the entire roof. This place takes on serious wind loads; air currents can push water inside the roof. To prevent this from happening in these places, the roof is lined with sealed elements.
- The eaves overhang is located on the side of the roof and is horizontal. This overhang is important from the point of view of ventilation of the roofing “pie”. The air from the bottom of the eaves should pass through the ventilation gap and exit through the ridge vent (ridge vent) or ridge outlet. Air circulation ensures the removal of condensation, so the insulation does not get wet and does not lose its thermal insulation properties. For this reason, lining the eaves overhang requires the installation of soffits with ventilation holes.
Scheme of ventilation of the eaves overhang through a perforated soffit.
Formation methods
Before you make a roof cornice, you need to understand the structure of this element of the roof structure, as well as the methods of its formation. The method of installing an overhang depends on the design and type of roof, and on the length of the slopes. The most common technologies that can be used to form a roofing cornice are:
- Lengthening rafter legs. The easiest way to form a roof overhang is to use rafters that are longer than the size of the slope. The more overhang you want, the longer the bars from which the rafters are made should be. The disadvantage of this method is that it increases the weight of the frame and, consequently, the load on the foundation.
- Extension of rafters using fillies. To form the roof cornice, you can extend the ends of the rafters using fillets - lighter and cheaper elements made from edged boards of lesser thickness. Thanks to the fillies, the frame has less weight, despite the large cornice.
Professional craftsmen consider it advisable to use fillies to form an overhang if the length of the slope exceeds the standard size of lumber. Typically, the length of the boards from which the roof frame is made is 6 meters. If the roof slope is 6 meters or more long, the installation of the cornice is carried out using fillies.
Cornices: classification and main types
There is the following classification of overhangs:
- Hemmed. In most cases, they are used on hip gable roofs.
- Not hemmed. This type is the most common; it is used in almost every roofing structure, both single-pitch and gable.
- Shortened. They are used on each of the main roofing structures.
- Box-shaped. Used for hip single-pitched and double-pitched roofs.
The assembly of the eaves of the house is selected depending on the climate in the region in which construction is taking place.
- Flush eaves overhang. In this case, the rafters do not extend beyond the boundaries of the walls, and along their edges a horizontal drain board is fastened, to which gutters are subsequently mounted. The disadvantages of such overhangs include the lack of protection of the upper elements of the wall from moisture.
- The open one is widely used in private construction. The drainage system is fastened to the upper edges of the rafters or along their lower edge.
- Closed. For such an overhang, the protruding ends of the rafters are covered with the help of a cornice, which has a special groove for fastening the soffit on the inside. If there is an insulated attic, such a cornice must have a ventilation hole.
- Pedimental. In this case, the roof structure is completely determined by the designer’s imagination and can go beyond the boundaries of the walls and fit flush. The protruding area of the roof requires mandatory hemming, the width of which is at least 50 cm.
Optimal size
It is often difficult for non-professional craftsmen to determine what size cornice to make. This is indeed a very important design decision, because if it is too small, then melt or rain water from the slope will fall on the lining of the external walls, on the foundation blind area, leading to destruction and also damage to the appearance of the structure. When choosing the length of the cornice, the following factors are taken into account:
- Climatic conditions. The optimal size of the roof eaves depends on the amount of precipitation falling in winter and summer. In snowier regions, roofs with wide eaves are traditionally used to protect the walls and foundation from snow. For example, alpine chalets located in the mountains usually have eaves overhangs at least 1 meter wide.
- Roof slope. The greater the angle of inclination of the roof slopes, the smaller the cornice can be made. This is explained by the fact that with a flat roof shape, the trajectory of falling snow and water goes far from the outer walls of the house. If the slopes are steep enough, then it is better to make the cornices wider to protect the structure from splashes of water that can reach the wall during intense snowmelt or rainfall.
- Proportions of the house. A wide cornice with a flat roof makes the building visually lower, squat, distorting the optimal proportions. A narrow overhang with a high, steep roof, on the contrary, elongates the silhouette of the house.
Important! The minimum permissible width of cornices is 45-50 cm, but this is clearly not enough for regions with high snow loads. If necessary, the size of this structural element is increased to 1 m.
Eaves overhang assembly
The roofing units made of metal tiles and the structure with lining to form a technical space are noticeably different. The design is divided into 4 main types.
Made flush
Roof overhang made flush
In this case, the length of the rafter legs does not extend beyond the perimeter of the building. But since the cornice is still necessary, a forced extension is made: a drain board is installed horizontally to the edge of the rafter beam. After laying the roof, a drain is installed here. In a wooden house, such an overhang should be at least 55 cm; in a brick house, the length can be reduced to 40 cm.
A significant drawback of the solution is the lack of protection. Rain and snow fall on the walls, and the wind freely penetrates into the under-roof space.
Open
The simplest option: the overhang is formed by rafter legs, the drainage groove is mounted on the upper edge of the roof. The formed cornice is not hemmed, so no extra costs are required. The length is sufficient - 55–65 cm, so it protects the walls well, especially with a steep slope.
Closed
Roof overhang lined with corrugated sheeting
Also formed by the projection of the rafters. Grooves are made on the inside of the beams, and the sheathing is fixed in them. The design is more complex, since in this case it will be necessary to arrange ventilation. Ventilation slots are left between the cornice and the wall, or holes are made in the filing and a grille or perforated slats are fixed in the metal profile. In this case, air passes freely through the cracks, and dirt and water do not enter the ventilation system.
Ventilation through the overhang allows you to get rid of condensation that appears on the upper floors and in the attic of the building.
Pedimental
There are no design restrictions. According to the standards, the roof overhang can be hemmed or unlined. But in reality, it is better to trim the cornice with suitable material to protect the rafters and beams.
Material for filing
Installation of overhangs is carried out at the final stage of work on assembling the rafter frame. When the sheathing is ready, the rafter legs are leveled, and then the frontal (wind) strip is fixed at their ends. To protect the lower surface from moisture penetration or bird colonization of the overhang, the cornice is hemmed. This task can be accomplished using various materials:
- Boards. You can sew up the lower surface of the overhang using a regular edged board or other lumber. The advantage of this method is that wood is a fairly affordable, lightweight, environmentally friendly material. However, wood does not tolerate moisture well and is susceptible to rotting. Therefore, lining cornices with boards does not last long; in addition, it requires regular renewal of the paint layer, which protects the wood from rot.
Remember that ventilation of the under-roof space is an important factor affecting the service life of the rafter frame. Therefore, experienced craftsmen recommend using soffits for filing overhangs. It is better to use models with central perforation, providing an average level of ventilation.
Types of eaves overhangs
The final design of the overhangs depends only on the wishes of the developer. It does not have any effect on functionality, but only if all recommendations of building codes and regulations are strictly followed.
Table. Types of eaves structures
| Overhang type | Short description |
Open | The simplest design, most often used on uninsulated roofs. The rafter legs are not sheathed; only a cornice board or metal strip is used to protect the ends from moisture. The fillies are covered with continuous lathing. This option is recommended for use on roofs with soft roofs or flat structures. |
| Closed | A more complex and beautiful overhang completely protects the under-roof space from the penetration of moisture, birds and large insects. Currently, it is used not only as a structural element, but also as a decorative element, and can serve as a basis for the installation of lighting fixtures. |
Before making a final choice, you should consult with professionals, taking into account the appearance and the need to ensure the recommended operating conditions of the roof.
Prices for various types of construction boards
Construction boards
Binding methods
In order for the eaves overhang to not only perform its functions efficiently, but also to look aesthetically pleasing and neat, it must be properly hemmed. To do this, it is not enough to choose high-quality material; you also need to decide on the method of filing, which depends on the slope and length of the slope. There are two methods:
- Diagonal hem. This method involves hemming the cornices using soffits so that they are parallel to the slopes. In this way, roofs with a large slope but a short slope length are hemmed. The diagonal method is considered more labor-intensive.
- Straight hem. This option differs in that the roof eaves are covered with soffits using a box located at right angles to the outer wall of the structure. Direct hemming takes less time, but it is more expensive in terms of consumption of building materials.
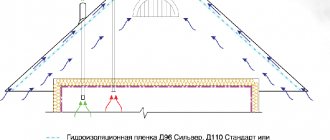
How to organize eaves ventilation
Both in a cold attic and in the attic floor, the roof needs ventilation. As a rule, the air flow is organized through the eaves, and the exit through the ventilation ridge or point aerators. This air flow ensures the evaporation of moisture from the inner surface of the sheathing or (in the design of an attic roof) from the waterproofing carpet on the insulation.
There are two main options for installing supply cornice ventilation. The first is to install a metal perforated strip or strip (both are produced by metal tile manufacturers) on the wind board. The method requires builders to have a lot of experience and accurate calculations, since if the gutter brackets sag or ice forms on the gutters, the ventilation holes can be blocked.
The second option is inflow through perforated plastic or metal soffits. Previously, they often simply left gaps between the boards, but at the same time, wasps and other flying insects inevitably settled under the roof.
The total area of roof ventilation openings (eaves and ridges) must be at least 1/150 of the area of the horizontal projection of the roof.
Snow guards are usually located along the eaves. It is important that they do not cause the formation of snowdrifts, under the weight of which the overhang can bend.
Vladimir Grigoriev/Burda Media
The design of the snow retainer consisting of two pipes of oval cross-section is recognized as optimal - they cut the snow layer.