Materials
Publication date: 02/06/2020
2
17671
- Choosing the type of roofing system
- Beginning of work
- Hanging system technology
- Installation of an inclined system
If there are no problems with the construction of the frame and walls of a wooden house, then, as a rule, a number of questions arise regarding the construction of the roof. They relate to both the choice of the type of rafter system and the device itself and the fixation of its main elements. The roof frame is one of the main parts of a frame house, since it bears the main load from the roof (rafters are the most important element). The roof of a frame house is most often made of wooden beams; it can have a different appearance, slope and construction principle.
Roof frame of a frame house
Content:
- Roof of a frame house - choice of type
- Flat
- Single-pitch
- Gable
- Broken (attic)
- hip
- Where to start installing a roof
- Rules for choosing a roof structure
- Selection of slope angles
- Selection of rafters
- Roof structure
- Roofing materials - selection parameters
- Insulation - rules for assembling the “pie”
- Necessary tools for DIY roof installation
- Roof installation - step-by-step instructions
- Conclusion
In low-rise frame construction, the roof of the building is usually made of a simple shape. Its installation does not take much time and does not require special skills or special equipment. Developers can easily make the roof of a frame house with their own hands. But to do this, you need to choose the right type of structure, calculate the slope of the slopes, select insulation, and finishing.
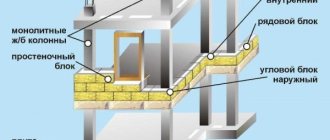
Types of roof frame structures
It should be noted that the roof frame may differ depending on the roofing structure used, for example:
- Rafter type frame - made of lumber, intended for pitched roofs of buildings.
- Reinforced concrete frame - made from special floor slabs, designed for flat roofing structures.
- Metal frame - made of iron beams, used for arranging the roofs of industrial buildings.
- Frame made of lumber - used in private housing construction for gable roofs.
Choosing the type of roof in a frame house
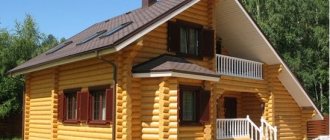
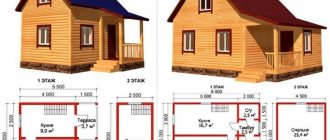
Figure 2. Frame house with a gable roof.
Construction in the Borki cultural center. Individual project. At the first stage of constructing the roof of a frame house, its type is selected. In frame-panel buildings, simple, inexpensive structures are used: flat, single-pitched, double-pitched, broken, hip. It is possible to equip the roof with a more complex shape: multi-gable, conical or spire-shaped. But these options are much more expensive and more difficult to install.
Different types of construction differ in strength, convenience, appearance, complexity of installation and maintenance.
Flat
This form is the cheapest and easiest to install; it is easiest to do it yourself. But in private construction it is practically not used. This is due to the difficulty of maintaining a flat roof. Snow lingers on a flat surface and puddles remain after rain. It needs to be cleaned regularly to prevent roofing materials from leaking.
If snow removal is not timely, there is a risk of collapse of building elements due to an increase in weight load.
Flat roofs do not allow the installation of an attic, which serves as an additional warm zone and protects the floors from moisture leaking into the house. They are usually made for non-residential buildings. In this case, at least a minimum slope of 2-3° is performed relative to the horizon.
Single-pitch
This is a reliable, easy to install, inexpensive type of construction. A pitched roof can withstand significant wind loads; snow, hail, and water easily roll down it. To equip one ramp, a minimum amount of components is required, and installation work is completed very quickly.
The lean-to option is suitable for compact buildings that occupy a small area in plan. If the surface of the slope is very large and there is heavy snowfall in winter, the fastenings may collapse due to a significant increase in pressure on the floors.
Gable
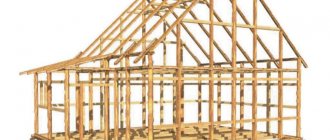
Figure 3. Scheme of a gable roof of a frame house.
A gable roof of a frame house is most often found in practice. It is slightly more complicated than a single-pitched one, but has many advantages. This is high strength, resistance to wind and snow loads, functionality. This shape allows you to adjust the angle of inclination, so the snow does not linger on the building, but easily slides down under its own weight.
A roof with two slopes has an attractive, unusual appearance and can be combined with different architectural styles. The space under the gable roof is adapted for service or living space (attic).
Broken (attic)
The option with two slopes with a break is most convenient for constructing an attic - an additional living space in the attic space. Such houses are classified as one-and-a-half-story. The sloping roof has an original, beautiful appearance. It withstands pressure from precipitation well.
Among the disadvantages of a broken structure are the significant consumption of building materials, the need for high-quality thermal insulation of the surface and the installation of an effective ventilation system. Without this, the roof will become a source of significant heat loss from the house, and wooden rafters will quickly become damp, rot and lose strength.
hip
The peculiarity of this form is the presence of a ridge and four slopes. It is easy to recognize by its appearance; such a house looks neat and visually does not seem very tall. The slopes located on the longer side of the house are trapezoidal, and the end ones (hips) are triangular. In the traditional version, the hips go from the ridge to the cornice. There are also subtypes of hip roofs: half-hip or hipped.
The hip structure is very durable, rigid, and resistant to deformation. Precipitation practically does not linger on it, it can withstand any wind. Overhangs located on all four sides reliably protect the upper corners of the building from leakage, which increases their service life.
The disadvantage of this form is its higher price than that of gable or single-pitch options, and difficult installation. You can build a hip roof on a frame house with your own hands only if you have experience. In addition, there is very little attic space. Windows in the attic can only be made of the dormer type. Their installation locations require more careful insulation than for conventional end windows, otherwise the roof may leak.
What needs to be done before arranging the roof of a frame house
Choosing a roof configuration
Let’s say the dimensions of a frame house are 6x8 m. Then the sections of the frame elements will be as follows: floor beams - 180x130 mm, and the beam of the top frame connecting the vertical posts of the frame at the top - 100x150 mm. The pitch will be 600 mm.
To arrange the roof of a frame house, it is necessary to calculate what the slope angle will be, how many slopes there will be, what roofing material is needed, what the pitch and sections of the counter-lattice, sheathing and rafters will be. Let's look at all these subtleties in more detail.
What should be the slope of the slopes?
If the slope is more than 5 degrees, such a roof is pitched; if less, it is flat. If the slope of a pitched roof is less than 28 degrees, such a roof is called loaded, which means that its construction is approached in accordance with more stringent requirements. In this situation, the roof needs a powerful rafter system, since in winter more snow accumulates on it, since it practically does not slide off it.
If the slope of the slopes exceeds 50 degrees, the roof can withstand wind loads less well. Roofs with a slope of 35-45 degrees withstand the load best, and they look much nicer. The roof doesn't look too flat or sharp. In our example (we are building a house measuring 6x8 meters), the slope will be 45 degrees.
Let's say that under the roof we will not have an attic space, but a living space - in the form of a heated attic floor. The height of the walls of this room is 1.1-1.6 m. What height is better to choose? It all depends on how comfortable the room should be. The minimum height is 1.1 m, and it is quite acceptable for a feeling of comfort. Under the slope, in the lowest place, the owner of the house will be able to place a chest of drawers or a bed.
If an attic is not needed, but you need a place to store unnecessary things, then you should arrange an attic space under the roof. There is no need to insulate the attic - only the floor will be insulated. Then you won’t have to raise the walls even 1.1 m.
Selecting the number of slopes
What is a pitched roof? This is a roof consisting of slopes, or inclined planes, the slope of which is more than 10%. From a constructive point of view, pitched roofs are divided into attic (combined) and attic (separate). If the roof is without an attic, its load-bearing elements act as ceilings for the upper floor of the house. If it is an attic, there is a non-residential attic inside it, located between the attic floor and the roof.
Roof ridge
Based on the type and number of slopes, the following roofs of houses are distinguished:
- Shed roofs are roofs with one slope from wall to wall. Such roofs are usually erected for city buildings and structures from which it is prohibited to dump snow and install drainage systems. Such a roof is quite suitable for buildings such as sheds, sheds or garages;
- Gable roofs are roofs with two slopes. This is the most popular type of roof, which is successfully used in the construction of any buildings and structures;
- Semi-hip or hipped roofs are roofs with four slopes. Most often, such roofs are erected in rural areas and at dachas;
- Spire-shaped are roofs that are several steep isosceles triangles-slopes, which, when connected, form a sharp peak. Suitable for covering towers, rounded wall buildings or bay windows;
- Hip hipped roofs are roofs whose tops of the slopes are connected at one point. They cover houses with a polygonal or square layout;
- Attic roofs are broken roofs located above residential premises, country houses and buildings.
How do you know how many slopes to choose for your future roof? If money allows, and you want the roof to look attractive, it is better to make a complex roof with several slopes. If the home owner does not want to incur high costs, it is better to choose a gable roof. It also looks quite nice, unlike the lean-to one. You can, of course, build a hipped roof, but you will have to spend more money on materials.
Let's say the choice fell on a gable roof. It doesn’t matter what you have under the roof - an attic or an attic space - such a roof is suitable for both options. The main thing is that the height of the walls of the attic floor is at least one and a half meters, and the slope of the slopes does not exceed 45 degrees. Valleys are not required for a gable roof, and only one ridge is needed. And this is good, because these roofing parts are the most complex and fragile.
Which roofing material is preferable for the roof of a frame house?
The slope of the slopes depends on the choice of roofing material. In order to safely lay the material, each type has a recommended slope range. If, for example, the roof is covered with ordinary slate, a certain slope is allowed for it, at which snow will not linger on it more than it should, etc.
Of course, in some cases the slope can be changed up or down. Then the design of the roof will also change: you will have to lay the sheathing more often, make a solid flooring instead, strengthen the waterproofing, more often fix the slate itself or other roofing material, etc. We will give the most optimal slope values depending on what roofing materials the roof will be constructed from:
- Ondulin (other names: bitumen corrugated sheet, bitumen slate, euroslate) - from 15 degrees. If you strengthen the sheathing, you can allow a slope of 10 degrees, replace it with a solid flooring - from 5 degrees;
- bitumen shingles - from 12 degrees and more - the maximum is not limited;
- ceramic and cement-sand tiles - from 25 to 60 degrees;
- polymer sand tiles - from 20 to 60 degrees, it can be less if you strengthen the sheathing;
- metal tiles - from 20 degrees, or from 15 degrees if you seal the joints of the metal tiles;
- profile iron - from 10 degrees;
- ordinary, asbestos-cement slate from 12 to 60 degrees.
In our example, for a frame house measuring 6x8 meters, we will choose bitumen slate - the most preferred roofing material in terms of price-quality ratio. Firstly, it has an attractive appearance. Secondly, it is lightweight, so it is easy to work with. Thirdly, ondulin is quite affordable. Its only drawback is that it fades gradually and evenly over several years. However, it’s not such a terrible drawback.
We draw a diagram of the roof structure of a frame house
Having decided on the material for the roof, we will draw a diagram of the roof structure of the frame house. We evaluate the feasibility of using crossbars, struts, tie rods, additional purlins and other structural elements. Having determined exactly what the roof of the house will look like, we select the cross-sections of all roofing elements and calculate how much lumber will be spent on its arrangement.
Rafters, crossbar, roof plate
Since our version considers the construction of a roof for a house measuring 6x8 meters, the best choice for it would be a roof in the shape of the letter “A”, consisting of a crossbar (other names: lintel, tie, etc.) and a rafter system.
Determining the cross-section of the rafters of a frame house
Since in our example the house has a heated attic floor, this means we will have to insulate the roof. It turns out that we need to take into account that the insulation will be located between the rafters along the height - we need to build on this when calculating their sections. Most often in construction, 100 - 150 mm of insulation is used to insulate the roof, with rare exceptions - more.
Thus, this insulation should fit well and accurately between the rafters in height. To get an approximate idea of what the thickness of the insulation should be, we present the calculated thickness of this material for a number of large cities. So, in the following cities the thickness of the insulation material is:
- in Moscow - 138 mm;
- in Sochi – 75 mm;
- in Sevastopol – 109 mm;
- in Yekaterinburg – 140 mm.
For example, if the thickness of the insulation for a frame house does not exceed 100 millimeters, the cross-sectional size can reach 100x50 mm. In any case, it is necessary to calculate such a minimum cross-section of rafters, based on their ability to withstand the thickness of snow familiar to the region in which the frame house is located, the pitch size and other criteria. If such a calculation is not made, then just in case, even if the thickness of the insulation is up to 100 mm, you can use rafters with a section of 150x50 mm to arrange the roof of a frame house.
If insulation with a thickness of 100 to 150 mm is used, then the cross-section of the rafters should be from 150x50 to 150x70 millimeters. The minimum - 50 and 70 mm - should not be increased, since rectangular rafters can withstand the load better than square ones. As an example, we can cite the sections of I-beams and channels.
If insulation with a thickness of over 150 mm is used in arranging the roof of a frame house, then the cross-section of the rafters should be 200x70 mm. In our case, the cross-section of the rafters is 150x50 mm.
How long should the rafters be for the roof of a frame house?
How to choose the length of the rafters for arranging the roof of a frame house? Let's consider one of the options for such a selection. As a rule, builders use just this. If you have no idea what the corner of the roof will look like in the end, use this option too.
The procedure for determining the length of the rafters:
- Take a couple of six-meter slats and fasten them with a nail so that you get a structure in the shape of the letter “L”. Using this sample truss we will determine the length of the rafters. There is no need to lift it onto the roof yet;
- Attach another long batten to the sample truss at the desired level and measure the required length of the crossbar. We will get a sample of the crossbar;
- Lift a sample of rafters onto the roof and rest it on the top frame beam. Next you need to select an acceptable angle of inclination, changing the angle and length of the rafters;
- We measure the resulting length of the rafters, not forgetting to take into account their overhang “behind” the wall by 30-55 cm. As a result, we will get a sample of rafters.
Roof overhang
By the way, if you don’t know what an overhang is for, let us explain: the purpose of a roof overhang is to protect the windows and walls of the house from rain and other precipitation. An overhang measuring 30-49 cm will not be suitable if you do not install a drainage system at first, or if you refuse to install it altogether. In this case, the length of the overhang should be at least 50 cm. But for better protection of the windows and walls of a frame house, it is better to set the overhang size to 50 centimeters even if there is drainage. By the way, he looks much nicer.
The main thing is not to forget when determining the length of the rafters in this way that after installation they will sit 5 centimeters lower on the Mauerlat. To make the connection as stable as possible, the rafters must be cut to the Mauerlat. If the cross-section of the rafters is 150x50 cm, in the place where the rafters rest on the mauerlat, in each of them it is necessary to cut out a triangle measuring 5x5 or 5x6 cm.
Roof of a frame house.
If the cross-section is different, the side of this triangle will be approximately equal to a third of the height of each of the rafters. Selecting the length of the rafters and determining the angle of inclination does not depend on such a landing. It’s just that later it will be noticeable that the rafters have become lower by about 5 centimeters. When trying on rafters, make a mark on the underside of the rafter where it rests on the mauerlat, and then draw a vertical line upward. You will get one of the sides of the triangle, and you will draw the second at right angles to the first.
How to determine the pitch of the rafters for the roof of a frame house
The rafter pitch is the distance between two rafter legs. Its value is influenced by the size and slope of the slope, as well as the cross-section of the rafters. There is no point in listing all rafter spacing options for different values of these parameters - there are too many of them. But if we take our specific example (the size of the frame house is 6x8 meters, the cross section of the rafters is 150x50 mm, and the slope is 45 degrees), then the distance between the rafter legs is 70-80 cm. If you are building a frame house with other parameters, for your case The pitch of the rafters will be different.
By the way, if the house has an insulated roof, the rafter pitch can be 60 cm. The fact is that then you won’t have to cut the insulation - the width of the roll is, as a rule, exactly 60 cm. And yet, do not rush to adjust the rafter pitch to the width of the insulation . If you reduce it, you will have to use more rafters. Where it leads? This will seriously increase the weight of the roof structure, which means that the foundation and walls will experience greater pressure. So feel free to cut the insulation - this is the simplest procedure that allows you to cut it to the desired pitch of the rafters.
Now you are familiar with the technology for preparing a sample of rafters, calculating their pitch, length and cross-section, as well as the size of the triangular support cutout with which the rafters rest on the Mauerlat. What do we do next? Next, while on the ground, you need to attach a sample of the rafters to the bars from which you will make the rafters. Try on, mark and saw off to the desired length. We do the same with all the bars intended for cutting rafters.
Remember that the rafter sample should be the only measurement - you apply only this to each block! If, after measuring the second rafter, you apply it to the third block, and further along the chain, an error will eventually accumulate, and each rafter will be several millimeters (and eventually centimeters) larger than the sample. Let's explain clearly. Let's say the second rafter turned out to be 3 millimeters larger. If you cut ten rafters during incorrect fitting, the last one will be longer than the first by as much as 3 centimeters!
What should the crossbar be like?
A crossbar is a horizontal element used in building structures that connects rafters in roofs. The crossbar must be positioned very low, but it should not be below the ceiling of the first floor. Why does it have to be placed so low? Thanks to this, the crossbar better accepts the thrust. What happens if you place it high? He simply won't be able to play his role.
Crossbar of the future roof
What should be the minimum height of the crossbar? If we take into account our version of a frame house, then we calculate it as follows: the height of the entrance doors is 2.1 m, add 0.1-0.2 m (10-20 centimeters) of space above the doors, plus another 0.05 m (5 cm) for the finishing material of the ceiling. As a result, we get a minimum distance of 2.25-2.35 m from the top of the finished floor to the crossbar, provided that the height of the entrance doors is 2.1 m. If the height of the doors is exactly 2 meters, then the crossbar can be lowered even lower - by 10 cm, then it will be located 2.15-2.25 meters from the top of the finished floor.
What else is good about low crossbar placement? This reduces the volume of air in the attic space, which means less heat will be used to heat it.
Despite the fact that the ceiling height in residential premises should reach at least 2.5 meters, 2.15-2.35 m is quite enough for bedrooms, unless, of course, you have the height of Uncle Styopa.
The cross-section of the crossbar will be the same as the cross-section of the rafters - 50x150 mm. Thanks to this analogy, you can’t go wrong when ordering lumber for the rafter system, and the remains of the rafters can be used for crossbars. As for the pitch of the crossbar, it is identical to the pitch of the rafters, and in our example is 70-80 cm.
What should the counter-lattice be like?
Why do you need a counter-lattice? To provide an upper ventilation gap in the roof structure. It doesn’t matter whether you insulate the roof or install an attic in it, you cannot do without waterproofing and a couple of ventilation gaps 2-4 cm high. Ventilation gaps are as follows:
- Top ventilation gap . It evaporates condensation that collects on the inner surface of slate, tiles or other roofing material. Located above the waterproofing;
- Bottom ventilation gap . It evaporates condensation that collects on the inner surface of the waterproofing due to increased humidity in the room. Located under waterproofing.
Roof composition
In addition to these properties, ventilation gaps provide normal conditions for the use of wooden roof structures. If you forget to install at least one ventilation gap, over time these structures will be covered with mold or fungus will begin to eat.
This means that the counter-lattice helps ensure the presence of an upper ventilation gap. It is fixed along the rafters. In our example of arranging the roof of a frame house, the pitch of the counter-lattice is 70-80 cm (the same as the pitch of the rafters), because it is attached to each rafter. The cross-section of the counter-lattice is 20x50 mm, with 20 cm in height.
What should the sheathing be like?
Why do you need a sheathing? To attach roofing material, for example, bitumen slate, it is attached specifically to it. Due to it, roof trusses become more stable. What should be the cross-section and pitch of the sheathing? It depends on the material with which you will cover the roof. In our case, the step is 35 cm, and the cross-section is 40x50 mm.
When determining the length of the sheathing, the following circumstance is taken into account: the overhang beyond the outer rafter should be 20-50 cm. Usually, the overhang of the sheathing is left the same as the overhang of the rafters (the distance by which the rafters extend beyond the outer walls). If the overhang of the rafters is 50 cm, the overhang of the sheathing will be the same. To make it more convenient to work when securing the sheathing, it is better to lengthen its overhang. Once the work is completed, the excess can be trimmed off. And it is not at all necessary to make the sheathing from edged boards - unedged ones are also quite suitable for this. Thanks to this, you will save at least a little on lumber.
Which lumber is better
Now that you have calculated the dimensions of all elements of the roofing system of a frame house, you can purchase lumber. Don’t order the material “butt-butt”: let it be of standard length, and even longer. Leftover lumber is always useful in construction!
What kind of lumber to buy – dried or not dried? For roofing structures, it is better to buy damp, not dried wood. The dried analogue is much more expensive, and it is not needed in the roof - there the wet one will dry as it should. By the way, the price of dried wood is determined per square meter, and not per cubic meter, like wet wood. Just don’t take a “blooming” tree that is infected with fungus and mold (low-quality material has a gray color). If you take unedged material, for example, for sheathing, be sure to remove the bark from the edges so that bark beetles do not grow under it.
For greater reliability, before assembling the roof, soak the wood with a combined antiseptic. First, soak it, dry it for two hours, and immediately begin assembling the structure so that the wood does not warp. There is a second impregnation option: first we install the rafter system, and then impregnate it with a brush. But this method risks the fact that you will not be able to saturate the internal planes of the parts with antiseptic in the places where they are connected to each other.
What tools will you need when arranging the roof of a frame house?
Here is a list of the most popular tools that you will need when assembling a roofing structure:
- Roulette
- Pencil (plain or colored)
- Chainsaw or circular saw
- Bulgarian
- Drill or screwdriver Hammer drill
- Construction level (laser or water)
- Electric planer Fomka
How to install the roof of a frame house
There are several ways to install the main elements of the roof of a frame house: they are connected using steel plates or wood overlays, cut in, fastened with nails, etc. The simplest and most affordable way is fastening with nails.
There are many options, and you can always choose the most suitable one for your case. And today we will describe how to quickly and inexpensively connect the structural elements of the roof at the main nodes:
- How to connect rafters in a ridge. The most convenient and easiest way to connect the rafters in the ridge is using the half-foot method, and it is better to cut it with a chain saw rather than a circular saw. If the cross-sectional area of the rafters is 150x50 mm, they are secured in the ridge with three or four nails 100-150 millimeters long, and the nails are bent on the reverse side;
- How to attach rafters to the mauerlat. First you need to cut the rafters under the top frame beam (mauerlat). The rafters are attached to the mauerlat in the place where the rafter is thinnest, with nails 200 mm long. Each rafter requires a pair of nails: one at an angle on each side. Having stitched the rafter, the nail enters the beam;
- How to attach a transom to rafters. For this you need nails 150 mm long. The crossbar, with a cross-section of 50x150 mm, without any gaskets, is connected to rafters with the same cross-section on one side. The nail pierces the rafter and bends on the reverse side;
- How to attach a counter-lattice to the rafters. The counter-lattice, the cross-section of which is 20x50 mm, is attached to the rafters closely using black wood screws. The length of the screws is 35 mm, the pitch is about 50 cm;
- How to attach sheathing to rafters. The sheathing, with a cross-section of 40x50 mm, is connected to the rafters at the intersection points with one self-tapping screw 60 mm long.
Where to start installing a roof
Figure 4. Scheme of a sloping roof of a frame house
Before making the roof of a frame house, the following points are determined:
- Type – single-slope, double-slope, hip, broken or flat.
- The slope angle of the slopes.
- The length of the rafters, the cross-sectional area of the beams, the pitch of their installation.
- Type of insulation, its thickness, installation method.
- Type of roofing.
These issues are addressed during project development. At the same time, the climatic parameters of the construction region, the configuration of the house, and the developer’s budget are taken into account.
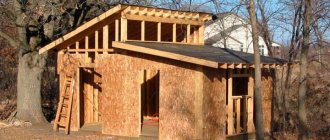
Construction of a roof frame, attic flooring of a frame house
The beams are secured with metal corners - one side of the corner is attached to the framing beam, the other to the attic beam. Fastening angles are installed on both sides of the beams. Next, they begin to install the rafter system of the frame house. In order to work on the floor, temporary flooring is first made over the beams for safe movement during work. Assembling rafter elements into frames - a rafter pair - is preferable at the bottom, followed by lifting the finished rafter element. This method of assembly provides an advantage in speed and convenience - the pair of rafters will need to be installed with vertical and horizontal alignment and secured on the upper strapping belt or along the beam floor. Working alone, it is impossible to lift large elements upstairs, even using small-scale mechanization, so work in the attic and roof of a frame house is usually carried out by a team of at least two people.
Attaching rafter legs is possible using various methods. The angle of inclination of the roof dictates the method of fastening and the use of fastening elements, of which there are many, both for rigid fastening and with the possibility of slight freedom - in cases where shrinkage of the structure is possible. The main method of fastening the rafters of a frame house is to install the boards on the top frames with a preliminary cut of the ends of the rafter legs at certain angles; the fasteners are made on special corners.
Options for fastening rafter legs by cutting grooves and further installation and fastening to the strapping beam are also used. It is also possible to attach the rafters to the projections of the floor beams - on both sides of the roof.
The fastening method, when the rafter legs are screwed to the floor beams, requires precise adjustment and cutting of the rafter boards at an angle, and the beams must extend 30 - 50 cm beyond the wall contour in advance.
The rafter legs are fastened at the ridge level using bolts and wide washers, using metal or wooden overhead elements. A very simple way to fasten ridge rafters together is to screw the rafter boards to a common ridge element; this method is used for small outbuildings and the roofs of country houses.
The rafter system can only have one tightening, which gives overall rigidity to the entire roof frame. If the roof slope is large, then additional rack-mount side elements, strut and middle parts are installed to ensure reliability and strength of the roof. The choice of roof elements is made depending on the thickness and size of all parts of the frame system, which in turn depends on the material and weight of the roofing covering, as well as wind and snow loads in the area. Before starting the roofing, in some cases the roof gables are sheathed with plywood sheets or clapboard, but this part of the work can be done after laying the roofing material.
Roof of a frame house
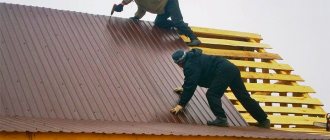
The rafter system is securely covered with a wind and moisture protective membrane, which is laid perpendicular to the axes of the rafter legs. Installation of the membrane begins from below - from the eaves. The membrane films are laid with an overlap of at least 150 mm, and the strips are connected with waterproof construction tape. The roof of a frame house is usually ventilated, with a vapor barrier layer and protective membranes. The film membranes are attached to the rafter boards using staplers, then a counter batten measuring 30*50 mm is attached to the rafters on top of the film to provide a ventilation gap between the membrane and the roofing.
The next step is the lathing on which the roofing will be installed. Various types of sheathing are used for frame houses: solid ones made of plywood sheets or OSB, boards with a tight fit - this is the case of choosing soft roofing materials that require an even and dense solid base. If the roofing covering is chosen to be sheet or piece, then the lathing is made of sparse, made of bars with a cross-section of 50*50 mm, with a calculated pitch depending on the type, dimensions of the roofing coverings and the load from them.
Roof coverings are installed as the final stage, starting installation in rows always on one side of the roof slope, below the level of the eaves. Sheets of roofing coverings are laid with an overlap of one or two waves in a vertical position and with an overlap of at least 20-25 cm in the horizontal direction of laying. The exact size of the overlap depends on the angle of the roof slope.
Some of the modern materials that are increasingly popular for roofing frame houses are new types of roofing corrugated sheets and metal tiles. Light weight, durability and reliability ensure operation of the building without repairs, are easy to install and do not place significant loads on the frame of the house. One of the most beautiful and popular roofing materials - flexible tiles - despite the relatively high prices, also arouses interest and has some advantages for installing roofs on frame houses.
Rules for choosing a roof structure
Figure 5. Roof diagram in a two-story frame house
All roofs of frame houses consist of slopes and a rafter system supporting them. Before installation begins, you need to determine how they will be located.
Selection of slope angles
It is important to choose the right slope of the slopes. It must ensure free spontaneous rolling of precipitation and prevent excessive windage, which increases the wind load on building elements. Calculations and operating experience show that the slope should be at least 10-15° and no more than 45-50°.
It is best to make an angle of 30-45°. With this slope, snow does not linger on the surface, it is possible to move on it safely during repairs, and gusts of wind do not tear off the casing.
Slopes with such a slope have a proportional, harmonious appearance. They provide sufficient space to equip a functional attic or loft.
Selection of rafters
The rafter system is the roof frame. The reliability, strength, and durability of the entire structure depend on its correct installation. The standard size and spacing of wooden rafters are calculated when developing a construction project. And for a preliminary estimate of the costs when installing the roof of a frame house with your own hands, it can be determined using special online calculators. Such programs are intuitive to use and provide fairly accurate results.
The choice of lumber cross-section for the rafter system depends on the following parameters:
- calculated snow and wind load for a specific construction region - a reference value;
- type of roofing materials - their thickness, dimensions, weight;
- total area of slopes;
- slope of the slopes - the load on the rafters increases in proportion to the angle of inclination;
- the length of the rafter boards, the pitch of their installation - the farther they are from each other, the larger the cross-section should be.
The length and cross-section of the rafters are determined based on the initial data using calculations or using summary tables. In this case, the total length of the beams and the fastening pitch are taken into account.
Roof installation sequence
The construction of a roof in a frame house begins with marking the bottom frame. At the next stage, the necessary calculations and verification of the parallelism of the installation of the entire structure are carried out; the last stage of preparation for the construction of the roof is the alignment of the strapping boards.
Gable roof.
Roof construction technology:
- Strive to ensure that the resulting roof meets as much as possible all the parameters specified in the technical documentation. Be sure to carry out additional strengthening of the structure in regions where strong winds are observed;
- The ridge beam is installed on supporting supports. It is extremely important that they are installed exactly level; you can check the correctness using a stretched construction cord;
- The length of the ridge beam starts from 11 meters, the structure itself is prefabricated, it consists of 4 boards;
- The rafters must have the same appearance and be made according to a single template;
- Take care of your own safety when working at heights;
- When working with soft tiles, an under-roofing carpet or membrane is used.
We looked at the main points that should be emphasized during the installation of the roof in a frame house. The main condition is to strictly adhere to the sequence of actions, and then no problems with installation should arise. The roof is considered one of the lightest structures, but not the roof of a frame house with your own hands; the video will help you get acquainted with all the nuances of installation and avoid making serious mistakes.
It is better to give preference to a gable roof; it is considered the most optimal option for any region. The main condition for long-term operation is the correct calculation of the load and the selection of suitable slope angles; it is equally important to insulate the roof well, otherwise all the heat will escape through the cracks. Thermal insulating material is laid in several layers.
Roof structure
Figure 6. Roof diagram of a one-and-a-half-story frame house
The roof of a frame house consists of a main set of structural elements. These are: rafter system, fasteners, components of the “pie” (insulation, hydro- and vapor barrier), finishing external coating.
The basis of the structure is the rafters, from which the roof frame is formed. The rafter system is a set of inclined trusses connected to each other by a ridge and horizontal sheathing beams. You can assemble inclined beams yourself or use ready-made trusses.
A gable-type rafter system is assembled from the following elements:
- Mauerlat. This is the lowest layer, which serves as the basis for the entire structure. It is made from load-bearing wooden beams, which are placed on the top frame of the frame house.
- Rafter legs. Inclined beams, the upper part of which is connected in a ridge girder, and the lower part rests on the mauerlat. They act as a skeleton and serve as a frame for insulation and roofing.
- Wind transom. This is a horizontal board that reinforces the rafter system. It increases the rigidity and reliability of the frame. Install it in the upper part, closer to the ridge. In this case, when assembled from the end side of the house, a structure in the form of the letter “A” is obtained.
- Longitudinal (horizontal) beams. With their help, the rafters are connected to each other. They are installed on vertical posts that rest on the beds laid on the top floor.
- Sheathing - horizontal beams or boards fastened to the outside of the rafters. Needed for laying the finishing coat.
All elements are connected with reliable fasteners, long beams and supports are additionally reinforced with bevels. During installation, it is important to maintain a uniform pitch of the rafter legs and maintain the same angle of inclination in order to create an even plane of the slope. To do this, a string is pulled between the outer, end slings and only then the remaining intermediate beams are mounted.
The installation of the rafter system is the most labor-intensive and dangerous installation stage. To carry out this work, it makes sense to hire professional installers.
In St. Petersburg and the Leningrad region, such services are provided by those involved in the construction of frame houses. We build buildings of various configurations and carry out roofing work of any complexity.
Choosing materials for the frame
Let's see what we need to purchase in order to build a gable roof frame ourselves.
The rafters are made of wood. This is the most important element in the construction of the frame. You need an edged board (50x150 mm), you will also need timber (150x150 mm).
The best wood is coniferous, especially if it was harvested in winter. It’s great if the resin hasn’t been drained from it first. Resin serves as a natural antiseptic and will extend the life of wood for many years. It is important how the tree was stored before sale and how dry it was. In general, already at this stage you need to be very careful in order to buy high-quality material. It is necessary to carefully inspect the wood so that in no case are there woodworms or their traces, there are no cracks or other defects.
In general, only high-quality material is purchased, the rest is mercilessly rejected as unsuitable for constructing a frame for the roof of a house.
You should know that wooden frames are not the only ones in nature. Roof frames made of metal channels are also possible, or reinforced concrete are possible. The roof with such frames is very heavy, it is impossible to build it yourself. That is, only a wooden frame is suitable for DIY work, which is what is being considered.
The roof frame consists of rafters, purlins, racks, attic floors, counter battens and sheathing. Each element has its own task and purpose.
An attic space can be an ordinary attic, a warehouse for unnecessary things, or it can be thought of as an attic, an additional area of the house. So, if this is a simple attic, 50x150mm boards are suitable for the attic floor. For an attic, it is clear that the flooring must be much stronger; a board cannot be used here. You need timber 150x150 mm. It gives quite sufficient strength. Place it directly on the Mauerlat.
Next, you need material for the sheathing and counter-lattice. A thinner beam is suitable here. Perhaps 50x50 or even 40x40, square section. These beams can support the weight of a roof made of any material.
The timber for the sheathing must be strictly straight. You need to keep an eye on this when purchasing it. The slightest error will significantly complicate roofing work. So this condition of straightness of the beam is important.
Lathing and counter-lattice can be made not only from timber. A material such as a perforated galvanized iron profile is also perfect.
In addition to the materials actually used for the rafters, both sheathing, ceilings, some other things are needed.
- To attach the support beam, called the Mauerlat, you need threaded metal studs.
- The rafter legs are attached to the mauerlat using staples and brackets, therefore, they are also needed.
- The rafters also need to be connected to each other. This is done using various fasteners, such as wood screws, studs of different diameters - 8 and 10 mm.
- You need galvanized nails.
The tools for the job are quite common - these are hammers of different sizes, you will need different ones, and a drill to drill holes. You need a grinder or a saw to cut the rafters to size and give them the required shape. You need a carpenter's ax and planes. All this is often found in a man’s toolbox at home. So there is no need for new acquisitions, everything is simple.
A measuring tool is a must. These are a level, a plumb line and a tape measure. In the construction of the roof frame, everything must be very precise, no “by eye”.
Roofing materials - selection parameters
Such coatings are used for finishing the roof. They protect all elements of the building from the effects of precipitation and wind, serve as an additional layer of insulation, and play a decorative role. At the same time, coatings differ greatly in type, appearance, and cost.
When choosing roofing coverings, it is recommended to adhere to the following principles:
- Select the material according to the characteristics of the construction region. If it rains frequently in the area, it should be of increased moisture resistance. In severe frosts in winter - resistant to negative temperatures. In regions where there are hail and hurricane winds, hard, impact-resistant coatings are chosen.
- The type of coating must match the roof configuration. Use soft or hard materials, roll, sheet or piece.
- The service life of the material should coincide as much as possible with the estimated service life of the roofing structure. This will avoid unscheduled repairs.
- Choose the right ratio of price, quality, and complexity of installation. For example, in a simple-shaped country house, it is illogical to use expensive building materials. Here it is more appropriate to choose affordable, easy-to-install coatings.
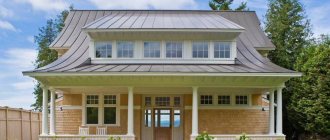
Figure 7. Frame house with metal tile roof.
Construction in the village "Pavlovskie Dachas". Individual project The choice of roofing covering is influenced by the slope angle of the slopes. There are general recommendations for making the angle of inclination for different types of coatings:
- Slate – recommended slope 12-60°.
- Ondulin (or Euroslate) – minimum 6°.
- Corrugated sheeting – from 10° and more.
- Bitumen shingles – minimum 12°.
- Polymer-sand tiles – 18-60°.
- Ceramic tiles – 18-60°.
- Metal tiles – minimum 15°.
When choosing coatings, you need to take into account the complexity of their installation and the experience of the builders. For laying expensive materials that require certain skills, it is better to involve contractors.
Correct installation of the power plate
Scheme for fastening a Mauerlat that does not transfer thrust to the wall.
It is worth recalling that the Mauerlat is the main supporting structure not only of the future frame, but also of the entire roof as a whole. It is this element of construction that takes on all roofing loads with its own hands, evenly distributing such loads onto the load-bearing walls of the house.
This allows you to increase the service life of the entire building, because in the absence of such timber, the roof load will destroy the walls in certain places. It is safe to say that the Mauerlat is the main supporting element of all known rafter systems.
This support element is not required only in the construction of wooden houses, in which the final row of logs or beams is used as a mauerlat. The described supporting element must be mounted flush with the inside of the load-bearing walls, which will simplify interior finishing work.
From the outside, the Mauerlat must be covered with brickwork or a strip of metal, which will protect the lumber from environmental influences. The top row of brick or block masonry requires a high-quality concrete blind area, which is covered with several dense layers of roofing felt or bitumen mortar.
Scheme of fastening the Mauerlat, which receives and transmits thrust to the walls.
Roofing material is needed so that all the moisture present in the walls stops in front of the support beam, which may suffer from excess moisture, as evidenced by its design. The simplest and most reliable way of attaching a support beam to the walls of a house can be considered the use of unique metal studs, which will connect the mauerlat and load-bearing walls.
Holes of the required diameter are drilled in the masonry, into which prepared metal pins made of simple steel reinforcement are lowered. By attaching the prepared support beam to such studs, you can mark the places for drilling holes.
The length of the studs should be such that after installing the Mauerlat, the reinforcement protrudes beyond the beam by at least 1.5 centimeters. At the ends of the reinforcement it is necessary to make threads, which will be required for the final fastening of the support beam with your own hands using extremely wide washers and nuts. This process of attaching the support beam can be simplified and done using a simple welding machine, which is used to weld a metal rod or washer to the rods.
Insulation - rules for assembling the “pie”
Figure 8. Scheme of insulation of the roof of a frame house
Thermal insulation of the roof of a frame house is practically no different from the insulation of other building structures: external walls, floor, attic floor. A layered “pie” is also assembled here. The following are used as insulation:
- Rolled mineral wool. The material is suitable for different structures, it can be laid independently. The mineral wool is cut into squares, then placed tightly between wooden beams. Along with it, it is necessary to provide for the installation of wind protection and vapor barriers.
- Ecowool. This insulation is applied using a compressor. This creates a smooth surface and fills all the cracks. Ecowool can be used to insulate non-standard shaped structures. Its disadvantage is that it is difficult to apply; you need to have experience in such work.
- Expanded clay. The bulk material is suitable for thermal insulation of flat surfaces. As with the insulation of floors or interfloor ceilings, it well fills the entire space between the rafter beams. And the presence of air space between the expanded clay fractions provides natural ventilation and prevents moisture accumulation.
- Polystyrene foam or polystyrene foam. Rigid board insulation is also suitable for installation between rafters. But it is important to carefully seal the joints and cracks.
When doing the work yourself, mineral insulation is most often used - glass wool or basalt wool.
Choosing a roof type
Before designing a house, its owners must decide whether the second floor will be used for living. The fact is that the technology of a frame roof for the second floor is different, because the living space is located directly under the roof. In this case, there is no need to build the walls of the upper floor and install a roof above it.
In addition to advantages, frame roofs for the second floor also have disadvantages, including the inability to install full-fledged window openings, and it is difficult to make the living space comfortable.
Necessary tools for DIY roof installation
To carry out installation work, you need to make sure that all the necessary building materials, as well as tools, are at hand. The list of essentials includes:
- perforator, drill;
- universal tools for woodworking - axes, hammers, saws, nails;
- compressors, spray guns;
- measuring instruments - rulers, squares, calipers;
- level, construction cord;
- fasteners, drills, nails.
You will also need wood (timber for beams, boards, slats for sheathing), insulation, waterproofing and roofing materials, and sealants.
How to choose roofing material
To comply with safety requirements and increase the service life of the entire roof structure, it is necessary to select a roofing covering based on the slope of the slopes. Otherwise, there is a need to strengthen the rafter system and reduce the pitch between the sheathing elements. In addition, more dense waterproofing and an increase in the frequency of fasteners will be required.
For each roofing material, there is a certain slope slope that must be observed when performing installation work:
- For corrugated sheeting, a slope of more than 10 degrees is required.
- Slate can be laid on a roof with a slope of 12-60 degrees.
- Ondulin can be used flawlessly on a slope whose slope is more than 6 degrees.
- Ceramic tiles require a slope with a slope of 18 to 60 degrees.
- Bituminous shingles can be laid on roofs whose slopes are more than 12 degrees.
- A roof with a slope of 15 degrees is suitable for metal tiles.
When choosing a roofing material, you must adhere to the following rules:
- The material is selected taking into account the type of roof and its shape.
- The operational period of the coating must correspond to the shelf life of the entire roofing structure.
- The material must be selected in accordance with aesthetic and economic criteria. This takes into account the complexity of installation and the cost of roofing.
- It is very important for a roofing material to have the most advantageous characteristics, such as durability, resistance to various influences, ease of maintenance, and the ability to operate in any climatic conditions.
Roof installation - step-by-step instructions
The roof of a frame house is mounted on the upper floor of the building. First, mark the strapping. Then the geometric dimensions of the rafter system (the length of the rafters, the pitch of their installation) are calculated and installation work begins.
Installation technologies include the following steps:
- Mount supporting posts for the ridge beam. When installing supports, it is very important to maintain their parallelism. To do this, use a roofing level and stretch a construction twine along which the racks are leveled.
- A ridge beam is installed on the supports. This is a prefabricated element consisting of four boards. Its length is usually at least 11 m.
- Install the rafters. Their upper part is fixed into a ridge beam, and the lower part is supported on the Mauerlat. For rafter legs, boards of the same size and length are used. The assembly is carried out according to one template, and parallel installation is also observed.
- Strengthen the rafters with a wind crossbar.
- Fix the horizontal fastening beams.
- The “roofing pie” is laid. It can be assembled from the top or bottom side.
- On the outside, a sheathing of wooden boards or slats is made on top of the insulation.
- Finishing is done with roofing material. When using soft tiles, a membrane or under-roof carpet is laid underneath.
Thermal insulation with mineral wool can be installed in the following order:
- fix a layer of membrane vapor barrier from the inside;
- hem the vapor barrier film underneath with slats, boards or plywood;
- lay mineral wool tightly between the rafters - this is done in two layers;
- Sew the insulation on top with a layer of wind-hydroprotection, seal the joints of the insulation.
It is important to strictly adhere to all requirements of the construction project. It is necessary to comply with the design dimensions, install all fastenings and necessary reinforcements. This is especially true in regions with strong winds or snowfalls.
When performing installation work at height yourself, it is important to follow safety precautions.
Types of rafter systems
The most common material from which the sheathing and rafters of the roof frame are made is wood. However, if the weight of the roofing material is large enough and the length of the slope is more than 6 meters, then the structure turns out to be too massive. Builders have to reduce the pitch between the rafter legs and increase their cross-section, which is why the roof assemblies acquire a lot of weight, increasing the load on the foundation. You can relieve load-bearing walls and the base of the building by using stronger, but lighter metal rafters. Based on the type of material used, the following types of rafter systems are distinguished:
- Wooden. Rafters and lathing made of wood are used for the construction of roofs, the length of the slope of which does not exceed 7-10 meters. The frame elements are fastened to each other using self-tapping screws, nails or movable metal elements. The step between the legs is usually within 50-80 cm.
- Metal. Metal roofing frames are made from steel metal profiles with a zinc coating, which is not afraid of moisture. Rafters and sheathing made of this material are light and durable, so the step between them can be increased to 1.5-2 meters. The metal profile is fastened using welding or fasteners. Metal roof components are used for slope lengths of 10 meters or more.
- Combined. A rafter frame that combines metal and wood components is called combined. The combination of support elements made of wood and galvanized steel makes it possible to create a cheaper structure with high load-bearing capacity by increasing the pitch between the rafters.
Metal frame construction
Please note that metal and wooden frame elements cannot be connected to each other without a lining of waterproofing material or treatment with an antiseptic drug. Since metal has high thermal conductivity, its proximity to wood leads to the formation of condensation and rotting of the rafters.
Parameters of sheathing and counter-lattice elements
The slope of the roof and the type of roofing are of great importance when determining the dimensions of the sheathing and the pitch between the elements. For example, on a roof with a slope of 45 degrees, the distance between the sheathing elements should be 37 cm, for a slope of 20 degrees - 33.5 cm. The size of the sheathing is also affected by the spacing between the rafters. At a distance of 60 cm, the sheathing elements should have a cross-section of 2*10 cm; with a pitch between the rafters of 90 cm, the size can be 5*5 cm. If the pitch increases to 1.2 meters, then for the manufacture of the sheathing it is necessary to use material with a cross-section of 5*7.5 cm.
For the counter-lattice, you can choose a material with similar parameters as the lathing. In this case, the step should correspond to the distance between the rafter legs.
Installation of the roof of a frame house is carried out in several stages.
Laying roof covering
Metal tiles are very popular among private developers, so it’s worth considering this option in more detail.
The starting point for laying metal tiles is the installation of the eaves strip; its fastening is carried out using self-tapping screws. The material should be laid in the direction from bottom to top, extending the edge of the roofing material 0.4 meters beyond the edge of the eaves. The first sheet is attached to the cornice strip using self-tapping screws, and in this place the fasteners are located in each recess. Further fixation is performed in every second notch. If the sheet length is insufficient, extensions can be made using free pieces. In this case, the installation is done with an overlap and fixation with self-tapping screws.