The floor in the basement largely determines the microclimate of this room. The proximity of groundwater can cause increased humidity, so high-quality protection of all surfaces, including walls, is required. What to make the floor of the cellar from is decided based on the geological features of the site and one’s financial capabilities.
Concrete floors
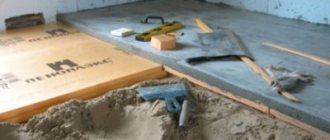
The thickness of such floors is taken to be 10-15 cm. In the basement, you can make an insulated concrete floor, for which some kind of insulation is laid between two layers of concrete (a layer of expanded clay, slag, pumice, broken brick, etc.) or simply make concrete from these materials, adding them in prescribed proportions instead of crushed stone.
Insulation of concrete floor
However, when the groundwater level is high, these materials are not recommended for use , since their structure is permeable to water.
Before concreting, the floor area must be cleared of debris and vegetation, leveled and compacted. Then you need to pour an underlying layer of crushed stone or gravel and also compact it.
In order for the floor to be horizontally level, you need to use a level and a long, even strip to mark the upper boundary of the fill on the walls with chalk. In large rooms, the same marks should be installed in the middle.
To do this, it is necessary to use metal rods 250-300 mm long and 8-15 mm thick, which are driven into the ground so that their upper end is flush with the chalk marks on the wall. This can also be done using a level and a staff.
Then the underlying layer of crushed stone or gravel is filled with concrete mortar mixed with cement grades M300, M400, M500. The higher the cement grade number, the more sand and crushed stone must be added to the mixture, without violating the established proportions.
The mortar is laid in strips 1-1.5 m wide. To prevent the concrete from spreading, the strips must be limited by a board, the top edge of which is aligned with the marks on the wall or rods.
Concreting the floor
The screed is smoothed by following the marks with a plaster float or some other similar wooden or metal device. As the work progresses, unnecessary rods should be pulled out or buried in the solution.
Concrete floors are considered ready after 1-2 days, when the solution has completely hardened.
Required tools and materials
The choice of tools and materials for arranging the floor depends on which construction method is chosen. So, if we are talking about a clay field, then you will need:
- shovel;
- buckets;
- crushed stone;
- sand;
- clay;
Choose the most suitable option for creating a garage floor.
A completely different set is needed for a wooden structure:
- saw;
- hammer;
- screwdriver;
- self-tapping screws;
- nails;
- crushed stone;
- beam;
- board;
- roofing felt;
- membrane.
Well, the set for a concrete floor is quite logical:
- concrete mixer;
- grater and rule;
- beacon strips;
- building levels;
- concrete mixture;
- sand;
- expanded clay
As can be seen from these lists, building a basement floor requires relatively little investment in tools and materials.
Ceramic tile floors
Ceramic tiles are one of the most common materials for flooring in basements and semi-basements for various purposes. It is durable, washes well and looks beautiful.
Ceramic floor in the basement
There are many types of tiles, differing in shape (four-, six- and octagonal), size, pattern on the surface (carpet and piece, smooth, rough and grooved), as well as in their composition. When equipping the basement floor for a garage or workshop, it is best to lay floors made of thick fire- and acid-resistant tiles, the installation method of which has its own characteristics.
The lower surface of the tiles is always rough or corrugated, which is necessary for better bonding to the concrete base using cement mortar mixed with water in a ratio of 1:3 or 1:4, or mastics and other adhesives specially designed for this purpose.
The base must be smooth and clean. If the tile is glued, then its humidity level should not exceed 8%.
Floor tile laying technology
Before starting work, the tiles should be laid out on the underlying field and the number of rows and the number of tiles in each of them should be determined, and the pattern, if any, should be compared. In addition, you need to calculate how many pieces and what size of a whole tile need to be cut in order to cover narrow areas of the floor. The tiles can be cut neatly and evenly with an electric cutting machine by installing a special ceramic disc on it.
In order not to cause unnecessary inconvenience, the tiles begin to be laid from the wall opposite the doorway or entrance (if this is a garage space).
Before laying, it is necessary to pre-install pendulum tiles one level at a time along the walls of the room. If the room is large, then they should be installed in the middle. To ensure that the floor is level, the level must be periodically checked during operation using a long, level strip. The deviation from the norm should not be more than 4 mm.
The tiles are laid on a cement-sand mortar as follows. A layer of solution 5-15 mm thick and 2-4 cm wider than the width of the row is applied to the pre-moistened base. Then the tile is dipped with the lower surface into cement milk, prepared from water and cement in such a proportion that the resulting mixture is thick enough, and lowered onto the solution. By tapping with a hammer, the tiles are aligned relative to the others.
So much mortar should be applied so that when the tiles are laid down, it protrudes out through the seams, filling all the voids. Excessive solution must be removed. After 2-3 days, such a tiled floor is ready.
Before gluing the tiles, the base is primed with the mastic used or with 1 part bitumen dissolved in 2-3 parts of gasoline or kerosene. To cover the floor with ceramic tiles, use mastics intended for this purpose, made independently according to the recipes described above or purchased in a store, at the rate of 0.6-0.9 kg per 1 m².
The main stages of laying ceramic tiles
The peculiarity of laying tiles that are resistant to high temperatures and potent substances is that liquid glass can be used as a binder. Seams with such a layer should be minimal. Therefore, the tiles are laid close to each other, and the seams are sealed.
Features of the basement
The basement can be not only a place where various communications pass, heating boilers are installed, or all sorts of old and unnecessary things are located. The ground floor of the house can become:
- storage for products, preparations;
- living room;
- garage;
- a sports hall with all kinds of exercise equipment.
If you use your imagination, you can come up with many more options for how the basement floor can be used. However, in order to implement all these ideas, it is important to ensure that it has a good floor and ensures waterproofing. This need is related to the functional features of the basement.
Basement in a house
Basement floor waterproofing
Most people always associate the basement of a house or any other building with dampness. However, excessive dampness or water entering the basement threatens to destroy the foundation of the house, and therefore damage the structure itself in the future. This is why the basement floor is waterproofed during the construction phase or later.
There may be increased humidity not only in the walls and floor, but even in the air. By the way, this figure will in any case be higher than in the house itself, even despite the high quality waterproofing. Moisture from the soil easily penetrates through concrete and other materials with which the base is finished. It gets into the basement especially actively if groundwater lies close to the surface of the earth in this place. Don’t forget about spring floods, when the water level sometimes rises very high.
Basement floor waterproofing scheme
On a note! A large amount of water in the basement is dangerous not only because it creates a humid environment and stimulates the development of mold and mildew, but also because it negatively affects concrete, leaching various substances from it. This causes the material to lose its performance qualities.
Three reasons for dampness in the basement
Also, the basement is characterized by such an effect as rather sharp and significant temperature changes. If heating is not provided in it, then, most likely, the basement floor will be quite cool, which, of course, has a beneficial effect on the products stored in it and home preservation. But even if the basement serves only as a place to store food, it should still have a high-quality floor. Although it may not be as beautiful and neat as in the residential part of the house.
Floor in the basement of a private house
Mastic floors
Mastic floors are a film formed on the surface from hardened mastic specially designed for this purpose. For the floor in the basement, epoxy . It is made from epoxy and urea-formaldehyde resins with the addition of fillers, dyes and hardeners and is highly resistant to chemical and physical influences.
Mastic floor
The concrete base for such a floor must be strong, dry (humidity no more than 5%) and specially prepared for such a coating. To do this, you need to make plinths from cement mortar, to which a dispersion of PVA glue is added instead of water (the ratio of glue to water is 1: 3). All large recesses should be covered with the same solution. To prevent the mastic from flowing into one place, you need to make an even horizontal cement screed. The maximum permissible clearance between the surface of the screed and the control strip is 2 mm.
Then, using a vacuum cleaner, remove debris and dust from the base and cover it with a ten percent PVA dispersion solution. After it has dried, a layer of putty 0.5 mm thick is applied to the entire surface. To prepare it, you need to take 4 parts of fine sifted sand, 1 part cement, 1/4 part alkali-resistant dye and mix this mixture with the same PVA solution. For ease of use, the putty should be similar in thickness to sour cream.
After the putty has dried, the surface to be treated is sanded and after two days the floor is filled with mastic.
Layers of mastic floor covering
The mastic is applied in two layers and smoothed over the floor with a wide notched trowel or lath. The first, leveling layer, containing more filler, fills all the cracks and depressions, and the second creates a flat, smooth floor surface.
Floor coating with epoxy mastic
In order to avoid mastic getting on the walls of the room, they must be covered with film, thick paper or some other similar material to a height of 1-1.5 m from the floor.
When applying mastic, maintain the same coating thickness over the entire floor surface.
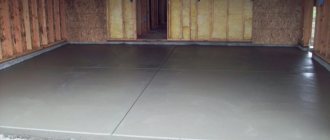
How to pour a basement floor: concreting stage
Before pouring the concrete, a reinforcing mesh is laid. It must be placed on pieces of brick so that, due to its elevation, it ends up inside the concrete screed and not below. The cells are laid with a slight overlap.
The concrete mixture used for the floor must be at least grade M400. If the mixture is prepared independently, then the proportions must be 2:3:1 for sand, crushed stone and cement, respectively. It is better to supply the mixture directly from the concrete mixer.
Attention! If concrete is carried in buckets, and the room is large, then pouring can be done in parts, dividing it into squares using wooden fences.
After pouring the concrete, workers have about half an hour to level it. For this, both ordinary shovels (at the initial stage) and rules with long handles are used.
If the room temperature is high enough (21 ° C) and the humidity is not high, then it may take only 5 days for the concrete to harden. Otherwise you will have to wait up to a month. At the initial stage of hardening of the material, it is necessary to sprinkle it with a little water so that it does not crack.
Plank floors
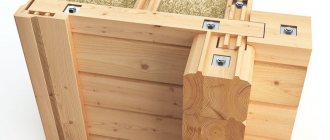
The plank floor on the ground in residential basements and semi-basements has a complex structure (figure below).
Diagram of the floor arrangement of a living space on the ground: 1 - floor boards; 2 - logs; 3 — wooden linings; 4 - two layers of roofing felt or roofing felt; 5 - brick column; 6 - underlying layer (crushed stone, concrete); 7 - compacted base soil
Plank floors are arranged as follows. First, a concrete base is made, the manufacturing process of which is described above. Instead, a clay-sand layer 20 cm thick or an adobe layer of the same thickness is poured, consisting of two layers of clay and crushed stone laid in succession. The first layer of crushed stone is poured onto the ground, which is covered with clay and compacted. Then the second layer is laid in the same way.
To compact the base, a small roller is used, made of a heavy metal cylinder, to the axis of which a handle is attached. Instead of a roller, you can make another, simpler device. To do this, you need to take a piece of log 1 m long with straight ends, to one of which a handle is nailed. Using these handles, the log is lifted and forcefully lowered onto the underlying layer of the floor.
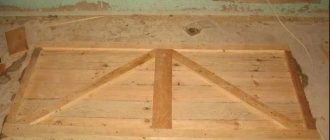
Next, square concrete or brick columns with a side of 25 cm and a height of 15 cm are installed on the underlying floor. It is important to remember that if brick is used for the columns, it is best to use red, well-burnt brick, which does not absorb moisture and is not destroyed as a result. In columns of bricks connected with cement mortar, the top ones should lie perpendicular to the joist. The posts are installed at a distance of 80-100 cm from each other, depending on the thickness of the logs. The distance between the rows of columns should be 40-50 cm, and the gap between the walls and the outer joists should be 3 cm.
Installation of brick pillars
To protect the wooden floor elements from rotting, a waterproof layer (double-folded roofing felt, roofing felt or PVC film) is laid on the surface of the posts.
Then wooden spacers measuring approximately 15 X 25 cm and a thickness of 3-5 cm are installed on it, and logs are already placed on them.
When planning the installation of joists, you need to take into account that the floor boards lying on them should be oriented with their ends in the direction of light, and in corridors - along the walls in the direction of movement. It is necessary to ensure that all logs are positioned strictly horizontally at the same level. If they lie unevenly, they can be leveled by replacing the spacers with thicker or thinner ones - this depends on whether the adjustable side of the joist is raised or lowered.
When installing floors, it is necessary to check the moisture level of the wood and backfill. The moisture content of sand used as backfill should not exceed 4%, logs and boards - no more than 12%.
Raw boards can only be used for temporary floors, which are made with every fifth laid board. After a month, such floors will be re-laid.
For flooring, a tongue and groove board with a width of 12-15 cm and a thickness of 30, 35, 40 cm is most often used. If this is not available, you can use an edged board, which should then be covered with linoleum, chipboard, fiberboard or some other beautiful and smooth material.
tongue and groove board
The boards must be selected even, of the same thickness and the required length, and cut so that each of them is 2-3 cm shorter than the length of the room. The internal and side surfaces must be treated with an antiseptic solution.
There are two main methods of flooring boards:
- Parquet, in which the nail is driven at an angle of 45° into the end of the board, and its head is completely embedded in the wood.
- Conventional, in which the nail is driven in from the front side of the boards.
The process of laying the boards is as follows. The first board, in case of deformation, is placed at a distance of 1.5 cm from the wall with a ridge to the next board. The boards should fit tightly against each other with a groove on the crest of the already reinforced boards. The boards are brought together before the nails are driven in using a hammer through a wooden spacer or as follows: 10-15 cm from the laid but not nailed board, metal brackets are driven into the joist, a 40-60 cm long strip is applied to the end of the board, and then between it and the bracket drive in wooden wedges until the gaps between the boards are completely eliminated. After this, the board is nailed obliquely with nails 60-70 mm long in order to even better attract it to the previous one. Nail heads must be sunk into the wood.
Laying plan for floor boards
Staples designed for logs can split the joists. Therefore, it is advisable to use the so-called Smolyakov clamp to seal the boards (figure below).
Smolyakov bracket
When assembling plank floors, you can also use lever-screw and lever-gear mechanisms.
The procedure for laying boards when laying floors
When adjusting the boards, it is necessary to align the ends as accurately as possible and ensure that the end joints of the boards fall on the joists. It is also important that on adjacent boards the annual layers of wood are directed in different directions (figure below), since this results in a more even and durable floor.
After laying the boards, the baseboards are nailed at intervals of 1-1.5 m. In the corners of the room they are joined by cuts at an angle of 45°.
The last step in laying plank floors is to level the floor surface with a plane where the boards join.
Floor on the ground with dry prefabricated screed
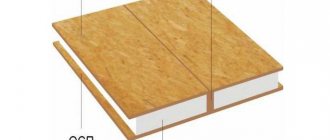
In ground floors, instead of a concrete screed as the top load-bearing layer, in some cases it is advantageous to make a dry prefabricated screed from gypsum fiber sheets, from sheets of waterproof plywood, as well as from prefabricated floor elements from different manufacturers.
For residential premises on the first floor of a house, a simpler and cheaper option would be to install a floor on the ground with a dry prefabricated floor screed, Fig. 5.
A floor with a prefabricated screed is afraid of flooding. Therefore, it should not be done in the basement, as well as in wet rooms - bathroom, boiler room.
The ground floor with a prefabricated screed consists of the following elements (positions in Fig. 5):
Fig.5. Floor on the ground with dry prefabricated screed in a private house.
Floor coverings made of particle boards (chipboards)
The design of floors made of this material has much in common with the design of plank floors.
Chipboard flooring
Logs made of unplaned boards are installed at a distance of 30-40 cm from one another. It is important to take into account that the joints of the edges of the slabs must fall on the logs.
The gap between the wall and the outer joists must also be kept within 2-3 cm, and between the wall and the edge of the slab 1-1.5 cm, which, as in the first case, is covered with skirting boards.
When laying the slabs, they should be kept horizontal with the help of an even strip and level, and only then nailed with nails 50-60 mm long and 2.5-3 mm thick or screwed with screws 35-40 mm long, 4 mm in diameter. The interval between nails along the edge should be approximately 20 cm, and between screws 30-35 mm.
Chipboard flooring diagram
The slabs are laid close to each other, and only in certain places are gaps of up to 1 mm allowed. When all the chipboard slabs have been laid, baseboards are nailed around the perimeter of the room, and then all the joints of the slabs and the heads of nails and screws need to be puttied.
After the putty has dried, it must be sanded with sandpaper and painted with two layers of varnish. The top layer is applied only after the bottom layer has completely dried.
What you need to consider before starting work
Construction of a basement in a private house begins with soil analysis. The result of the geological study will answer a number of questions:
- To what depth can underground spaces be immersed and the level of their clean floor;
- What waterproofing to use for structures;
- Will a drainage system be required around the house?
The answer to these questions is included in the project, where the diagrams reflect all the necessary dimensions of the structures, design marks, dimensions of the foundation wall, and the material of its manufacture.
At the design stage, the issue of heating and thermal insulation of walls and floors must be resolved.
For normal operation the following must also be developed:
- Ventilation system with hood and windows;
- Methods of finishing all surfaces of the room (walls, ceiling, floor).
Floor coverings made of fibreboard (fibreboard)
Such coverings are made on a rigid concrete base or plank flooring, for which they use 2-3 grades of coniferous boards with a length of at least 80-100 mm, a width of up to 12 cm, and a thickness of 25 mm.
Laying fiberboard on the floor
Chipboard waste can also be used. The wood base for fiberboard must be antiseptic and nailed to the joists with nails 50-60 mm long. It is recommended to nail nails into base slabs (chipboards) obliquely at a distance of 2-2.5 cm from the edges with an interval of 10-20 cm along the joint of adjacent slabs and 30-40 cm between joints.
Before installation, solid types of fiberboard must be moistened as follows.
The back side is wetted with water at the rate of 0.6-0.8 liters per 1 m². Then the slabs are stacked in a stack up to 25 cm high, and every two slabs should be in contact with each other with their moistened back sides, covered with some kind of waterproof material (PVC film, roofing felt, roofing felt) and evenly pressed down with a heavy load. As a result, the moisture content of the slabs before cutting and laying should not exceed 10%.
It is important to remember that you cannot join the four corners of the slabs in one place, and also allow the edges of the fiberboard to coincide with the edges of the base floor elements.
After the slabs are adjusted, adhesive mastic is applied in strips to the wood base. In this case, it is necessary to take into account that the total area of gluing the fiberboard sheet must be at least 40%. The slabs laid on mastic are nailed with nails 30-40 mm long and 2.5-3 mm thick at a distance of 120-150 mm from each other on the long side and 70-80 cm on the short side of the slabs. When nailing, you should retreat 10-12 mm from the edges of the slab.
The types of mastics used for gluing fiberboard, as well as methods for their preparation, are discussed in detail in the section on linoleum flooring.