House on 6 acres
After you have purchased a small plot of six acres, it is extremely important to develop a design for the house and its location.
In this case, it is necessary to plan everything in a complex, since different types of landscape design require certain conditions for the choice of material for building construction. If living in a house is not expected during the cold season, it makes sense to consider options for building a small house. This will significantly save the area of the site for planting or create a unique landscape design.
Before construction, it is important to study all the main requirements for the construction of objects on a land plot:
- Buildings should be located no closer than five meters from the border of the site and three meters from the neighbors’ territory.
- The distance between your house and neighboring buildings should not exceed six meters.
- Site fencing should be erected to a height of no more than one and a half meters.
- Toilet and cesspools can be located at a distance of no closer than fifteen meters from residential buildings or water sources (wells, boreholes).
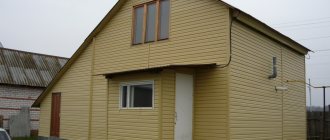
With attic
The idea of increasing living space by adding an attic floor comes up often. It is believed that construction costs do not increase much, since most of the superstructure is a modified roof. In reality, if the attic is used all year round, the difference in the price tag for a two-story house and a one-story house with an attic will be small. After all, we must take into account that the area of the attic floor premises is much smaller, and the costs will be high, since good heat, sound, and vapor insulation is required.
For some, a dream home looks like this
Attics under a gable roof
A country house with a summer attic will be really cheap. But it must be taken into account that on sunny days it will be too hot there without insulation, so thermal insulation is still necessary, but not as “serious” as for winter use.
Country house 6*6 with veranda and attic
A country house with a summer attic will be really cheap. But it must be taken into account that on sunny days it will be too hot there without insulation, so thermal insulation is still necessary, but not as “serious” as for winter use.
Small country house 5*4 for two living rooms with an attic
The country house projects presented above are intended for seasonal visits. They provide only living rooms. In the room on the first floor you can organize a kitchenette.
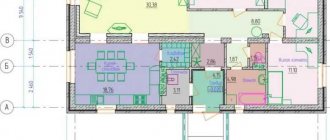
Below is the layout of a small garden or country house measuring 5 by 5 meters with a dedicated kitchen. Please note that the porch is attached and is not on the plan.
5*5 cottage plan with attic and kitchen
All these houses are designed as frame houses. With minor modifications, these designs can be used for houses made of any other material. You just need to take into account the thickness of the walls and choose the right foundation.
Cottage with a covered veranda and attic 6*10 meters: floor plan
If desired, the covered veranda can be made open. Although, usually the opposite happens. Having built an open one, it is glazed or pushed out to half the wall, and single frames are installed. If you want fresh air, you can always open the windows, and the area can be allocated for a summer dining room or kitchen.
How to increase the area of the attic floor
All projects of country houses with an attic floor are made under a gable roof. This is good in the sense that the snow will not linger on such steep slopes. The second advantage is the simple rafter system. The downside is the small area of the “full” room upstairs. Too much wasted space around the edges. You can make cabinets there, but this area is unsuitable for living.
If the attic roof is gable, a lot of space is lost
If it is important for you to increase your living space, you can make the roof sloping. It is more complex and more expensive, but the area of the premises on the attic floor is much larger.
House project for a 7*7 dacha with an attic under a sloping roof and a bay window
Another way to increase the area is to raise the walls above the level of the first floor. They say to build “one and a half floors.” This option is good for dachas that are visited during the cold season. The roof can be made as you like, but a large area of the rooms still turns out to be broken.
Example of “one and a half floor”
When choosing a project for a country house with an attic for periodic visits, it is better to make the attic cold and make the ceiling insulated. On the stairs that lead to the second floor, it is necessary to provide a door/cover that will fence off the upper tier. Otherwise, heating will take a lot of fuel and time. In winter, there are usually fewer people, and visits are short. Warming up both floors is too time-consuming and expensive, so this isn't a bad solution.
Which house project to choose?
Before starting construction work, you need to decide on the size of the house. The most relevant size can be considered if the building contains:
- Living room (or several rooms).
- Kitchen.
- Terrace (open or closed veranda).
Conventionally, all house projects can be divided into three types:
- One-story buildings, which have no heating and no electricity, but can protect against adverse natural factors. Such structures, as a rule, do not have a strong foundation, and inexpensive material was used in its construction.
- Universal buildings with a small area, suitable for year-round living. The most common among owners of their own plots. In such projects, it is possible to provide for the placement of a kitchen, toilet and additional living room. These are mainly permanent buildings with a reliable foundation and heating.
- Two-story houses, which are equivalent to full-fledged country cottages. It is advisable to plan the placement of a kitchen and living room on the first floor, and one or two bedrooms on the second floor. To make your house more spacious, you should think about adding an attic.
Projects of two-story country houses
Building a two-story house is not such an expensive undertaking. You still need one foundation, albeit a more powerful one, but its cost does not increase twice, but by 60%. The dimensions and insulation of the roof do not depend on the number of storeys at all, so there is no need to increase investments. The costs of the walls are added - their area is twice as large, but in general the cost per square meter of area is cheaper than when building a similar one-story dwelling. That’s why many people are looking for designs for two-story dachas.
Project of a small two-story house for a summer residence with an attached garage: living area 100 sq. m. m, total 127 sq. m, garage for one car
The above project is designed for aerated concrete or ceramic building blocks. Suitable for long areas. The attached garage is very convenient to use - from the garage you can get into the house. Another plus: this option saves space on the plot, and there is always little of it at the dacha, no matter how big the plot you have.
In this layout option, there is a spacious terrace on the back side of the house. It is not included in the total area of the house. An interesting design makes the house different from others: a large window on one and a half floors, a cubic-shaped garage and a canopy in front of the house do not affect the price tag too much, but make the house unique.
Project of a two-story country house with a garage attached to the side
Another project for a two-story dacha with a garage attached to the side is presented above. This option is more suitable for square or wide areas. The building area in plan is 10*10 meters, living area is 108 square meters. The tall windows on the second floor give this house an unusual appearance. The selection of finishing materials and the combination of light beige and brown colors also contribute. Overall an interesting project.
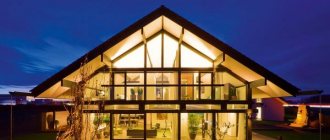
Project of a summer house with a balcony around the perimeter of the second floor
A non-standard-looking two-story house with a balcony that encircles the entire building. At the rear there is a large open terrace. The roof is hipped, which complicates the design, but gives the building a special flavor.
Country house with a bathhouse under one roof
Projects for houses with a bathhouse are mainly made in two versions. Each of which must meet the main requirement - the combination of two buildings with different functions.
In the first option, the steam room and washing department are located on the first floor, and the rest room is located on the second.
When using the second method, a bathhouse is attached to a residential building. It can be placed directly next to the house or connected to it with a small vestibule.
What these methods have in common is the presence of one roof.
It is important to understand that when building such a structure it is necessary to use additional heat and waterproofing materials.
The undoubted advantage of such buildings is the possibility of creating a unified communication system. This will allow you to use the sauna all year round without the need to carry water and firewood.
Dimensions of residential buildings
The smallest residential country buildings are 4 by 4 m in size; there is no point in making houses with a smaller area. The layout of this option is very simple - one room.
Such houses can differ from each other only in the number of windows and location in relation to the cardinal directions. It is advisable to place doors in the middle or at the end of the building. Area about 16 square meters.
A building measuring 6 x 3 m will be slightly larger, approximately 18 square meters. You can already include a place for cooking in the layout.
The above options are unlikely to be optimal. Timber or log houses measuring 6 x 3 m are much more in demand among summer residents. This is explained simply - the length of the timber (log) is six meters.
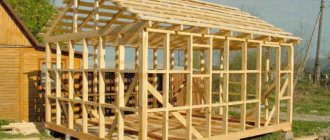
Materials used to build country houses and their durability
- Frame houses.
The most common construction method. According to statistics, more than seventy percent of country houses are frame or panel. They are erected quite quickly, during the summer season. The minimum construction time, without finishing and installing the foundation, can be one and a half months.
The frame is sheathed on the inside and outside with inexpensive material (plywood, OSB or lining).
Insulation is placed between the sheathing material. Advantages - the ability to complete and rebuild the structure. A good option in terms of price/quality ratio. If construction technology is followed and regularly treated with special antiseptic compounds, it is quite durable.
- Log houses.
The second most common construction method. When purchasing a ready-made log house (taking into account the time required to build the foundation), it is realistic to build a house within 3-4 months.
Important! It will take approximately six months for the building to shrink.
You can build a house yourself; the process of constructing the structure is not complicated. Like any wooden building, the house can be easily completed or redesigned. Durable, subject to treatment with bioprotective materials. It is environmentally friendly and can last for decades if properly used.
Not a bad option. The truth will require close attention to the assembly process. If all recommendations of professionals are followed, the owner has the right to count on warm and reliable housing.
- Country houses made of timber.
A very popular method. Solid, profiled timber is used in construction.
Assembly is carried out from ready-made beams, so the construction period will be 2-3 months. Taking into account the laying of the foundation. As in the case of log houses, the time for shrinkage will be about six months. As a rule, houses are made and assembled by professionals.
If you decide to build such a house yourself, there is no guarantee from the manufacturer. Advantages – warm; reliable; do not require finishing; possibility of modernization; durability; environmental friendliness; beautiful appearance. The disadvantage is the high cost.
- Brick projects.
Brick structures are not afraid of temperature changes and unfavorable natural factors (precipitation, strong wind). However, this method has a number of disadvantages: brick is a rather expensive building material; The process of building a house can take a long time. Advantage - the service life of a brick cottage can be several decades without special preventive measures.
Important! When constructing such buildings, special attention must be paid to the optimal temperature conditions - high humidity is unacceptable.
In addition, due to the significant mass of bricks, the construction of a capital foundation is mandatory. The best option is a monolithic base.
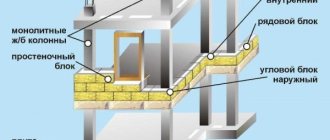
- Houses made of gas silicate blocks.
The main reason for choosing this material is its low price. About twice as cheap as brick.
Important! The blocks are fragile, so you need to be especially careful when transporting them.
Used in the construction of external walls. External cladding will be required, since the appearance of a bare house is not presentable. It is best to use materials that have increased moisture resistance and resistance to deformation. For example: siding or facing clinker bricks.
The construction of such a house will not take much time. The building turns out to be quite warm.
Flaws:
- the building must be one-story, otherwise the walls will not withstand the load;
- in the field of laying the walls, you need to make a monolithic strapping belt;
- at a minimum, a strip foundation is required;
- Over the years, the structure will shrink.
- Residential buildings made of aerated concrete.
Pros:
- light weight, correspondingly small load on the foundation;
- low thermal conductivity;
- long service life;
- ease of handling blocks (using a regular hacksaw you can give them any shape);
- vapor tightness and environmental friendliness.
Minuses;
- fragility of blocks;
- inability to firmly hold fasteners.
- Houses made of foam blocks.
Low price of material. The mass of the block directly depends on the quality of the cement mortar used in its production. The maximum number of floors is 2-3.
DIY frame garden house
The frame technology for constructing a summer house is simple and involves several options for the foundation and wall cladding. But how to build a small garden house with your own hands if you have no experience? You can’t do this without step-by-step instructions for work and knowledge of some secrets.
Useful: Insulation for the floor of a frame house
Strip foundation
A shallow strip foundation can withstand heavy loads. Suitable for use on heaving soils, but not on peat, sapropel, or clay soils . The width of the base is 10 cm greater than the thickness of the walls, the height is about 50 cm. Typically, such a foundation lies above groundwater, so in the spring it flows upward along with it, and then sinks.
Note! When installing a strip foundation, it is possible to equip a basement under the summer house, for example, for storing garden tools.
The installation of a shallow strip foundation is carried out according to the diagram.
- The area is marked using pegs and a cord stretched between them , which marks the boundary of the future pit.
- Taking into account the markings, trenches are dug for the foundation.
- A sand and gravel cushion (15+15 cm) is laid at the bottom of the trench. It is spilled with water to compact it better.
- The walls of the pit are covered with a layer of waterproofing material, for example, roofing felt.
- Formwork for pouring concrete is assembled from boards 4-5 cm thick. It should protrude 30 cm above ground level.
- Fill the trenches with concrete mixture.
- Cover the base with film and periodically moisten it so that the concrete does not crack.
For potentially large loads, the foundation is additionally reinforced. The process is quite labor-intensive, so it is worth comparing the scale of the house being built with the cost of constructing the foundation.
Shallow block base
For a small and light garden house, a shallow columnar base made of individual concrete blocks is sufficient. Elements measuring 20x20x40 cm are suitable .
Holes about 50 cm deep are dug under the blocks. Layers are laid at the bottom:
- waterproofing;
- sand – 15 cm;
- crushed stone – 15 cm.
Concrete blocks are laid on top of such a “pillow” in two rows. For fixation, cement grade M-150 . The result is pillars protruding approximately 20 cm above ground level.
It is important! The second row of blocks is laid across the first.
Geoscrew foundation
Geoscrews are an analogue of screw piles, but of shorter length. They are used for light and small buildings . They are absolutely not suitable for working on floating and loose soils. The bottom trim of a frame house is mounted along the heads of geoscrews.
Advantages of the technology:
- no special equipment is needed for work;
- stones and even medium-sized cobblestones in the ground are not obstacles for geoscrews;
- no preparatory work on the site is required;
- Raising the frame can be done immediately after screwing in the last geoscrew.
Geoscrews are screwed into the ground strictly vertically . To do this, using a hand drill, first make pits 35-50 cm deep. Geoscrews are inserted into them and tightened by hand. It is enough to insert a crowbar into the head and use it as a lever. On dense soils, a piece of metal pipe with handles welded to it . The design fits onto the head and also serves as a lever.
Some craftsmen purchase multipliers in stores, connect them to an electric drill using a metal pipe, and thereby increase the torque of the device. The finished structure, fixed on the head, allows you to reduce the time for screwing in geoscrews. Work starts from the corners. The vertical alignment of geoscrews is carried out after they are buried approximately 1/3 into the ground.
Useful: Plywood: main types and areas of use of the material
Assembling a wooden frame
The assembly of the wooden frame begins with the bottom frame. To do this, use a board with a section of 5x15 cm or a beam - 15x15 cm . The selected lumber is laid on the foundation over a layer of waterproofing (roofing felt). In corner joints, wooden strapping elements are connected by cutting “half-wood”. The frame is fixed to the foundation using anchor bolts. The logs for the future floor are laid across, maintaining a distance of 50 cm between them.
Raise the frame, starting with the installation of beams in the corners. The intermediate posts are fastened in increments of no more than 200 cm. For this, a half-timber cut and reinforced steel corners are used. To give the structure rigidity, temporary supports are installed in the corners - jibs . Provide for door and window openings.
After this, the upper framing of the frame is assembled in the same way as the lower one, the transverse floor beams are attached and the rafter system is mounted.
Note! Part of the roof can be assembled in advance and then raised upward. So, when installing a hip roof, it is convenient to first assemble the ridge girder and central rafters on the ground, and then secure the diagonal rafters at the top.
Approximate prices for country houses
When choosing the option with a frame or frame-panel house, the approximate price will be from 11 thousand rubles per square meter. Construction of a wooden house box will cost about 13,000 rubles. for one m2. For a building made of foam concrete blocks you will have to pay from 15 thousand rubles. for 1 m2. Brick house – 18,000/m2. Thus, knowing the total area of the designed house, it will not be difficult to calculate the final cost of construction. But these are only the costs of building walls. To this amount it will be necessary to add funds for laying the foundation, insulation, costs of laying the roof, and interior decoration of the premises.
In Moscow and the Moscow region there are a huge number of offers for the sale of ready-made turnkey country houses. Example: a house with dimensions width/depth/height - 6000/6000/3020 made of laminated veneer lumber is sold at a price of 367,000 rubles.
The final cost of the house depends on your preferences regarding the choice of additional options and can double or even triple.
House made of clay
If you don’t know what to build a dacha from, then try installing an environmentally friendly adobe house in your dacha
If you don’t know what to build a dacha from, then try installing an environmentally friendly adobe house in your dacha. You'll have to tinker here. The fact is that to construct such a structure, a large volume of clay and straw should be prepared in advance in the summer. It is these components that will become the main ones in the construction of a cheap house.
Building a country house with your own hands
- So, after the clay has rested for the winter, it can be used. To do this, clay is loaded into a specially prepared pit and moistened with water in an amount of 20% of the total mass of the material. Cut straw moistened with water is also added here. The straw cutting length should be 9-16 cm.
- The whole mass is thoroughly mixed. You can use your feet. And to make the adobe mixture stronger, you can add lime to the solution. It will strengthen the strength of the finished house.
- The mass is left overnight, and in the morning adobe blocks are made from it. To do this, the mixture is compacted into a specially prepared form, cutting off the top of the mixture with fishing line or wire. Five holes are made in the blocks so that moisture can freely leave the brick.
- The finished blocks are knocked out and laid on a platform in the sun, arranged at an angle.
- After two to three hours, the blocks can be transferred to the shade and left on edge until completely dry.
- In this way, you should prepare a sufficient amount of adobe bricks.
- The construction of the house is carried out on a pre-laid foundation. The masonry is carried out according to the principle of brickwork. And the same clay mass is used as a solution. The width of the seam in this case should be no more than 1 cm.
Important: you need to lay adobe blocks no more than two rows per day. This is necessary so that the adobe mixture can dry thoroughly. At night, the rows of masonry are covered with film.
- Once the walls of the adobe house are ready, they can be plastered outside and inside.
- The floor in such a house is made on the ground, first laying waterproofing, and then laying joists and insulation between them.
- The roof of an adobe house can be anything, but it is important to make good projections (at least 70 cm) so that moisture from rain or snow does not spoil the clay walls. When installing windows in an adobe house, it is worth making canopies over the frames and ebbs in the area of the window sills. A house built in this way will serve the family for decades.