For the construction of houses and cottages, a strip foundation is often chosen and, although it is most popular in low-rise construction, in some cases it is also used for multi-storey construction .
By type, such a foundation for a house can be monolithic or prefabricated , for which FBS blocks or, much less commonly, rubble stone are used.
A strip foundation is necessary if you plan to build a house made of brick or stone, the weight of the walls of which can exert a large load on the foundation.
For private housing construction, this type of foundation allows you to equip a basement or basement space , which is a very attractive point.
In addition, all work can be carried out independently and may not even require the use of special equipment, which is not always possible in conditions of limited space. But before starting work, it is necessary to analyze the condition of the soil and mark out the territory.
Soil condition and groundwater level
It is best to entrust this part of the work to professionals , but it is quite possible to conduct the necessary research yourself. For this purpose, pits or wells are used , along which the structure, type of soil, groundwater level should be probed and, taking into account the data obtained, use the recommendations specified in SNiP to carry out calculations of the future foundation.
Based on climate maps, it is necessary to obtain data on the depth of soil freezing in the region where construction is planned. This parameter affects the depth of the foundation , which should exceed it by 15-30 cm. But at the same time, the level of groundwater , which should remain below the point of laying the foundation. In cases where compromise is not possible, multi-layer waterproofing of the base will be required.
Foundation types
To decide which foundation is best to make, you need to know their main characteristics.
In the construction of a private house, several types of foundations are used, the choice of which depends on factors such as:
- weight of the planned structure;
- quality of the underlying surface;
- terrain;
- depth of soil freezing.
Available types of foundations for private houses are:
- tape;
- columnar;
- pile;
- slab.
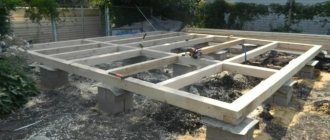
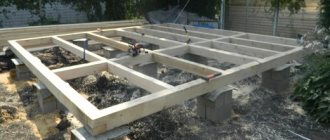
Strip is the most popular type of foundation. Its arrangement is recommended for the construction of heavy structures (made of bricks, slabs, blocks) in stable soil conditions, not subject to erosion and landslides, on a leveled surface and in a temperate climate.
This is what the strip foundation of the future house looks like
A columnar foundation is laid in unstable soil conditions, as well as on relief terrain. The depth of its laying reaches up to 3 meters. Laying a strip foundation to such a depth is very expensive.
Pile foundations are recommended for wetland areas, as well as for northern conditions where deep freezing of the soil occurs. Pile foundations are used for capital structures only in cases of extreme necessity, because... after a short time it becomes loose for one reason or another, which can lead to deformation of the walls and base of the building.
A slab foundation is an ideal solution if there is mobile, unstable soil, as well as in areas where there is pronounced heaving of the soil when it freezes.
An example of a finished slab foundation for a cottage
The slab foundation can withstand the heaviest structures and allows you to maintain the integrity of the foundation and walls of the building during soil movement. However, its price exceeds the cost of all of the above types of foundation, which is due to the large amount of building material consumed.
So, let's look at how to make a foundation for a house with your own hands. Let's focus on the strip base, as the most common in private construction.
Let's look at the stages of earthworks, learn how to make formwork for the foundation and how to pour it under the house.
Calculation of the cost of constructing a strip foundation
Even before starting to build a house, you should be prepared for the fact that the cost of a strip foundation will be about 1/3, and sometimes more, of the cost of the entire construction. Conventionally, several mandatory expense items can be identified:
- For the purchase of building materials (cement, sand, reinforcement, etc.);
- Purchasing the necessary tools and equipment;
- Transportation costs for the delivery of concrete mixture or blocks to the site and the use of special equipment.
In proportion, the costs of constructing a foundation are as follows:
- 25-30% — cost of concrete;
- 20-25% - this is the cost of the fittings;
- from 10-15% are the costs of paying workers (you can save on this cost item if you build a strip foundation with your own hands);
- excavation work and site preparation from 5-10% and above , depending on the complexity of the work and the need to use special equipment;
- the same amount will be the cost of formwork equipment ;
- transport costs up to 5%;
- expenses for the purchase (rental) of tools and special equipment are 5-15%.
to reduce the cost of construction somewhat if you build a block foundation instead of a monolithic foundation, but its installation without the use of a crane is impossible - and this means additional costs for renting equipment and the driver’s salary, so the savings will not be so obvious.
When designing, you can use a strip foundation calculator , i.e. online service that calculates one cubic meter of foundation construction. And then everything is simple : knowing the perimeter and height of the foundation, we get the total cubic volume which is multiplied by the cost of 1 m³.
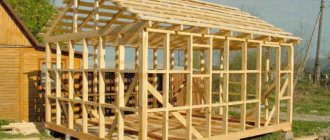
Construction of a foundation for a house using frame technology
The combination of “frame house - slab foundation” is most effective, since the structure of a frame building is quite light, and a slab foundation can be built on any type of soil, even the most difficult and problematic ones. A slab foundation is installed when, for some reason, it is not possible to construct a foundation for lighter structures.
The principle of its construction is somewhat similar to the tape method, the only difference is that it is not the trench that is poured with concrete, but the entire area on which the building will be located. Slab foundations are necessarily reinforced with rods. There is also the option of using ready-made reinforced concrete slabs, but it is cost-effective only when the distance from the factory of reinforced concrete products is not too great.
Tools and equipment for the construction of strip foundations
If the construction will be carried out on your own , you must purchase the necessary tools. You will need shovels, buckets, a hammer, a drill or hammer drill, a building level, a tape measure, rope, nails and screws, the cost of purchasing which is not so significant compared to the cost of the foundation. The costs of purchasing a concrete mixer, a deep vibrator for concrete, and a generator for supplying electricity if there is no main line on the site appear to be much more expensive But costs can be reduced if you rent equipment.
Step-by-step instructions - do-it-yourself foundation
The thickness and height of the tape of the base under consideration, as well as the depth of its placement, are selected based on soil analysis, climatic conditions of the area and the number of storeys of the building being built. Without knowledge in this area, it is better to entrust this design stage to a professional. There are many nuances and requirements of GOSTs that must be observed.
But it is quite possible to create a support for your house using a ready-made project yourself. But in order to avoid mistakes, it is best to make the strip foundation yourself with the step-by-step instructions given below. It describes all the intricacies of building such a structure for a typical one-story cottage.
Stages of work
The first stage is marking and excavation work. Regardless of the depth of the foundation, the sole must rest on solid layers of soil. It can be clay, sandy loam, rocky layers or loam. They are usually hidden under turf and layers of ordinary soil. All this will have to be torn down and removed before starting to build the foundation of the house.
To mark the area you will need pegs, tape measure and twine. If the soil is dense, then the walls of the dug trench will make excellent formwork. It will only be necessary to build it up from above. If the soil is loose and constantly crumbling, then the trench will have to be dug somewhat wider so that formwork boards can be placed inside the hole.
The second stage is preparing the pillow. The bottom of the dug trench is leveled with sand and fine gravel. This sand and gravel layer should be thoroughly compacted, pouring water as it is poured. It should be between 10–30 cm in height. This cushion serves to redistribute and reduce point loads on the strip foundation from below during seasonal heaving of the soil.
The third stage is placing the formwork. Here you will need bars with a cross section of 30 to 40 mm and boards with a thickness of 15–20 mm or laminated chipboard. The formwork created for the concrete foundation of a house will subsequently be required to withstand a considerable mass of concrete poured into it. It should be made strong and reliable. If, after filling with the concrete mixture, it collapses, then everything will have to start again.
If the groundwater at a construction site is high, then reinforced concrete will require waterproofing. From above, at the level of the base of the house, it is usually done as a coating. And to protect that part of the base that remains in the ground, roofing material should be laid in the trench on the sides and on the bottom. It will reliably protect concrete from excess moisture in the soil at the stage of its hardening and after.
The fourth stage is laying the reinforcement. For reinforcement, steel rods with a cross-section of 14–16 mm and thin dressing wire are usually used. The reinforcement can also be fastened using electric welding. But in this case, you need experience working with a welding machine and yourself. Plus, when performing welding, you must be prepared for the occurrence of metal corrosion in the future.
Inside the trench, a frame of reinforcement with cells of 25–30 cm should eventually be formed. Moreover, it is laid so that the steel is covered on all sides by the poured concrete. Otherwise, the metal will inevitably begin to rust, and the house will definitely not last long.
The fifth stage is pouring concrete or laying out FBS. If it is decided to equip the foundation for a house being built using block technology, then this greatly speeds up the process of its construction. Here you don’t have to make formwork and wait almost a month for the concrete to set. However, support on foundation blocks will cost more than a monolithic counterpart. Plus, they will have to dig a larger trench in width. To distribute the loads for the bottom row, FBS masonry is made with an expanding base. If a monolithic option is chosen for the support structure, concrete should be poured immediately over the entire surface. No breaks in length and no layers in height. A monolith is just a monolith. The house must stand on a reliable foundation.
When preparing the concrete mixture yourself, you need to mix cement, sand and crushed stone in proportions 1: 3: 3
But it is better to initially order a ready-made solution with a grade of M300 or higher.
When pouring concrete, it is extremely important to ensure that no voids form inside it. There are special vibrating machines to perform compaction.
However, you can also use a piece of reinforcement to pierce the poured mass and release air from it.
The sixth stage is waterproofing and blind area. It is allowed to begin waterproofing work 3-4 days after pouring concrete. It takes about three weeks for it to fully set. But you can already begin treating the strip foundation for the house with mastic, even if it has not yet completely hardened.
Also, along the entire perimeter of the building, you will need to make a blind area to drain rainwater away from its walls.
Reviews
Before starting construction of the house, I considered different options for foundations - I really didn’t want to incur large expenses, so the strip foundation was not taken into account at all. But in the end I built just like this and I don’t regret it, although I had to tinker with it, since I did everything myself. But now I have a large basement under the house, an underground garage and absolutely dry, thanks to waterproofing. And if I decided to save money, I would lose so much usable space. Peter, Uvarovo
We bought the plot on clay soils, so at first they wanted to put the house on a pile or columnar foundation, but wise people recommended a buried strip foundation. We did just that and have not regretted it for six years now - there are no cracks in either the house or the foundation. Anatoly, Rossosh
I agree that a strip foundation is reliable and will last for centuries, but in winter our ground freezes to 1 m 90 cm - which means we need a foundation with a height of at least 2.10 m. And this is very expensive, so for my house I am now choosing between a pile-screw and slab Alexey, Murmansk
White sand-lime brick: price per piece, sizes and types of bricks. This article will tell you which interior doors are best to choose.
In this article you can find out reviews about PVC interior doors.
Choosing a foundation
In modern construction, three main foundation construction technologies are used:
- Pouring the slab, a thick concrete base is poured under the entire area of the house or a prepared reinforced concrete slab is laid.
- Strip foundation, concrete is poured along the perimeter of the structure and along the supporting structures.
- Pile foundation, piles are installed in the ground in the form of a lattice over the entire base area.
Each of the three methods has its own advantages and limitations. But if we are talking about a way to make a foundation for a house with your own hands, then the strip option looks more preferable. The specific choice depends primarily on whether you are going to build a temporary shed or a three-story mansion.
What is better: slab or strip foundation?
A reinforced concrete slab at the base of the house seems to be a solid and reliable foundation option.
But there are still a number of factors that force you to choose a foundation in the form of a tape:
- in terms of material costs, it is significantly lower than pouring a slab, and accordingly, labor costs and financial investments are reduced;
- the slab will not allow the space under the floor to be used either for storage or for insulating the house.
Why is a strip foundation better than a pile foundation?
But compared to a strip foundation, there are several global disadvantages:
- pile technology is practically inaccessible in its entirety to a non-professional without special equipment, and screw piles are not suitable for every soil, require decorative finishing and, if the technology is violated by an inexperienced installer, may lose stability over time;
- the appearance of a house on a pile foundation makes one think of a hut on chicken legs; almost always the owners cover the pile foundation with one or another type of cladding, while the aesthetics of the house suffers irreparably, and additional costs of time and money arise;
- if even one of the piles is displaced, due to the fact that they are not tied together, a distortion may occur in the internal floors of the building.
Technology for making a monolithic strip base
Before you start making a foundation for a house, you need to examine the soil to determine its composition and the height of the groundwater. This will help you choose the right foundation design, as well as determine its depth. After completing the drawings and calculating the volume of materials, work can begin.
Site preparation and marking
The construction site must be cleared of debris and greenery that will interfere with construction. After this, you can begin marking the foundation of the house on the site. This can be done with a rope and pegs, or use a construction level and theodolite.
To correctly mark the future home, you need to:
- First of all, the axes of the structure are laid out on the site.
- Next, the extreme corner of the structure is tied from the boundary of the site and a peg is driven in. A rope is pulled from it at right angles to the next corner of the house.
- Then, using a theodolite or square, the next corner of the building is located.
- After this, the angles are checked along the diagonals.
- If the test result is positive, then all corner pegs are connected with a rope.
- Now you can begin marking the inner edge of the foundation. To do this, you need to step back from the stretched rope to a distance equal to the width of the future foundation.
After marking is completed, it is worth checking the elevation differences on the site. Then you need to find a low point and measure the depth of the foundation from it. This will eliminate differences in the height of the structure.
Now you can start digging a trench or pit. The work can be done manually with a shovel or using construction equipment. In any case, the final leveling of the walls and bottom of the trench is done manually using a shovel. To ensure that the depth of the trench is the same, use a construction water level.
Arrangement of the pillow
After completing the trench, they begin to prepare the base for pouring the foundation:
- At the bottom of the trench there is a sand cushion 20-30 cm high.
- After laying, the sand is spilled with water and thoroughly compacted.
- Sometimes it is recommended to waterproof the sand bed, although this is not necessary. For insulation, you can use a durable film or make a layer of M 150 concrete with a height of 100 mm. Such a concrete layer will increase the strength of the base and protect it from shrinkage and cracking. It is especially recommended to carry out such concrete footing on sandy and sandy loam soils, as well as when groundwater is high.
Important: do not use geotextiles as insulation. This material can have the opposite effect and reduce the load-bearing capacity of the base.
Formwork installation
After a week, when the concrete mortar has set, you can begin to make formwork from planed boards 40-50 mm thick. Instead of boards, you can use moisture-resistant plywood or OSB. When erecting formwork, it is necessary to strictly control its verticality.
Above the ground, the formwork should rise to the height of the base according to the house design. Before pouring concrete, the inner surface of the formwork can be lined with plastic film. This will reduce the adhesion of concrete to wooden elements and make it easier to remove the formwork. In addition, boards protected from contamination can be reused.
Attention: when installing the formwork, it is necessary to provide a hole for an asbestos-cement pipe, which will serve as a sleeve for passing utility networks through the foundation into the house.
The formwork can be removed after the concrete has gained its initial strength. This usually happens within a week.