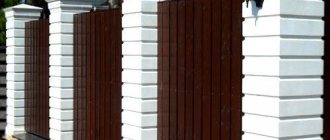
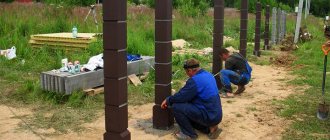
You can make a reliable and relatively inexpensive fence for a site using a combined fence - the posts are made of brick, and the filling (spans) is made of any light material - wood, corrugated sheets, forged fences. The look is solid, and the costs are much lower than for a “pure” brick fence. Moreover, laying pillars is not the most difficult task, but it is profitable. Two years ago craftsmen were asking for 2,000 rubles per pole, but today prices have more than doubled. You can build brick fence posts with your own hands without the skills of a mason. It is important to follow the technology and everything will work out.
Foundation for a fence with brick pillars
The choice of the type of foundation for brick pillars depends on what material the filling will be made of and also on the type of soil. If the fence span is made of light material (corrugated sheets, wood), you can make a pile foundation for each post. The depth to which the pile must be driven/screwed depends on the type of soil and the height of the groundwater. If soils are prone to winter heaving (clay or loam) with highly located groundwater, it is necessary to dig in 15-20 cm below the freezing depth of the soil. On well-drained soils (sands and sandy loams), it is enough to dig down to 80 cm.
Pile foundation for a brick fence post with light filling
A pile foundation for a brick pillar is made using standard technology:
- drill a hole of the required depth (diameter 25-35 cm);
- a bucket or two of crushed stone is poured into the bottom;
- compact;
- they place a pipe around which the pillar will subsequently be laid (on heaving soils, several pieces of metal rods, tapes, and corners are often welded to the part being buried for greater stability);
- the pipe is positioned strictly vertically and fixed;
- for heaving soils, if metal pieces are not welded to the pipe, you can stick several reinforcing bars into the hole; for very difficult soils, you can tie a frame;
- high-grade concrete is poured - M300 or higher (read about grades and composition here).
The length of the pipes consists of two quantities: the part that is walled up in concrete and the part that will stick out from above. Moreover, the upper section of the pipe in this case does not necessarily have to be up to the very top of the pillar. It can be 40-50 cm shorter. An exception is the pillars on which the gate and/or wicket will be hung. Here the internal reinforcement should be almost to the very top.
If the fence is planned to be entirely brick or there are high wind loads in the region, most likely you will need to make a full-fledged strip foundation. Another option is piles connected with shallow tape.
Fence design with brick pillars on a monolithic reinforced concrete foundation
Read more about the types of foundations for various types of fences in the article “Foundation for a fence: how not to bury extra money.”
Selecting bricks for pillars and material for fence sections
When choosing a brick for pillars, each developer proceeds from his personal ideas about beauty. However, here too the practical side of the issue plays a big role. Ordinary smooth facing bricks have not proven themselves to be the best in such structures.
After a few seasons, it begins to crumble and loses particles of the outer layer. This fact is partly explained by the negligence of the owners who do not cover the poles with reliable caps. Part of the blame lies with manufacturers who are unable to make high-quality material.
Textured brick for pillars, called “rock,” is more resistant to precipitation and frost. A compromise option, both aesthetic and reliable, is a combination of the two mentioned types of bricks (photo No. 4).
Photo No. 4 Combined masonry is an excellent option
In the photograph, we see the rational combination of the fence grillage with its finishing. Brick here plays a dual role: formwork for concrete and a decorative layer.
The design of the posts for gates and wickets is not fundamentally different from ordinary sections. To install heavy swing gates made of metal, the cross-section of the reinforcement frame or post pipe is increased. In this case, the embedded plates need to be thicker and wider so that the rotary hinges do not tear them off the racks (photo No. 5).
Photo No. 5 Pillar embedded part with a plate for hanging the gate and a plate for the automation motor
The front gates of the estate are often crowned with decorative lamps, and are also complemented with automation and intercom. If you intend to do this, do not forget to place a corrugated cable with wire in the masonry.
Photo No. 6
Having decided to make brick pillars with your own hands from start to finish, decide in advance on the material for filling the sections. Among the most common options are steel profiled sheets, forging, picket fences and unedged boards.
The most expensive, but at the same time the most elegant option is forged grilles (photo No. 7).
Photo No. 7 Forged gratings on brick pillars
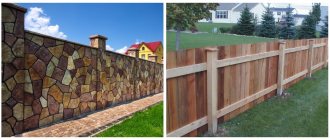
The combination of brick with natural stone and forging is no less aesthetic and durable (photo No. 8).
Photo No. 8 Combined option (brick pillars + natural stone + forging)
What is good about the combination of three materials? In it, each element contributes to the overall appearance. The grille can be ordered in a minimum area. It will perfectly serve as a decorative accent.
Photo No. 9 shows a not very successful example of a combination of brick with forging and corrugated sheeting.
Photo No. 9 The corrugated sheet looks out of place in such an environment
Having opened part of the fence using a forged lattice, the owner for some reason decided to close it again by placing a sheet of flooring in the opening. The result was an absurd and strange combination.
Brick and wood are perfectly combined in any design, helping to create an inexpensive and beautiful fence (photo No. 10).
Photo No. 10 Classic version of the fence with brick pillars and a solid picket fence
A picket fence or board in a section can be mounted not only vertically, but also horizontally (using the overlapping method).
Photo No. 11 Horizontal installation of boards between brick fence posts
Metal picket fences are becoming increasingly popular. It is several times more durable than wood, and looks no worse (photo No. 12).
Photo No. 12 Metal picket fence - a close relative of profiled sheeting
A mandatory design element is caps for brick pillars. Without them, the material will not last long. Moisture freezing in a brick will destroy it. There are two types of caps on the market – metal and concrete.
Photo No. 13
The choice of material for protective caps is purely individual. It should be taken into account that the metal on the pole will last longer than concrete, which is less resistant to frost and moisture.
Mortar and brick for posts
The solution is made of cement-sand with a ratio of 1:5 (or 1:6). It is better to take fine sand, high-grade cement - no lower than M400. For plasticity, you can add a little liquid hand soap or dishwashing detergent (20-30 g per standard batch - 1 bucket).
It is important to obtain the desired fluidity when preparing the solution. It should not be dry, but it is also inconvenient to work with liquid, so add water gradually, monitoring the consistency of the solution. The desired condition can be checked as follows: lay out a certain amount of solution on some surface, and use a trowel to make a cross on it. Then take the marked area with a trowel and watch the cross: it should not “float”.
Optimal mortar consistency for laying brick pillars
If you wish, you can get a black solution by adding soot to it. It is sold in construction stores in bags. You add a small portion of soot and get decorative seams without painting.
Black grout adds decorativeness
Any brick can be used for pillars, just pay attention to the number of defrost-freeze cycles (the more, the better) and the geometry. Ideally, deviations in size should not be more than a couple of millimeters. Then your work will be easy. If you come across a batch of different sizes, carefully sort by size so that the bricks in one column have minimal discrepancy.
Laying fence posts: technologies
In most cases, fence posts are made of 1.5 or 2 bricks, the cross-section is 380*380 mm and 510*510 mm, respectively, and the height is up to 3 meters.
The masonry is carried out with bandaging (offset) - the seam of the bottom row is overlapped by the “body” of the brick lying on top. The standard seam is 8-10 mm. The diagram for laying columns of one and a half and two bricks is in the photo below.
Brick pillars of 1.5 and 2 bricks
Laying pillars: work order
Cut-off waterproofing is spread on the finished foundation. It can be roofing material in two layers, but it is better to use waterproofing with bitumen mastic. This layer is necessary so that the brick does not “pull” moisture from the soil. If wet brick freezes, it will quickly begin to crack and crumble. Therefore, waterproofing is necessary. Rolled waterproofing can be replaced - coat the foundation twice with bitumen mastic, and in areas with high humidity it is better to do double waterproofing - coat it with mastic, and then lay “Gidroizol” as well.
According to the size of the pillar, a layer of mortar a little more than 1 cm is applied to the waterproofing. Bricks are laid on it, according to the diagram. They are leveled in vertical and horizontal planes by tapping with a special rubber hammer. Craftsmen can use the handle of a trowel, but in this case, the remains of the mortar can fly off the surface of the trowel, staining their hands and the brick, and it is difficult to wipe off the cement.
Ceramic brick absorbs moisture very quickly, so if you hesitate a little, it will be difficult for you to “put” it in place. To ensure that the solution retains its plasticity longer, the brick is dipped in water for a few seconds before laying. The same maneuver makes it easier to wipe the solution from the surface (it is removed immediately with a dry cloth).
We hit with a hammer
The second row is laid in the same way: the mortar is spread on the bricks, the bricks are placed on it, but with a bandage - unfolded so that the seam is blocked. Level again. Then take a tape measure and check the dimensions of the laid rows. Even a small displacement of 1-2 mm is eliminated. Tap the end of the brick (called a “poke”), moving the bricks closer. Then, if the side edges were not coated, fill the vertical seams. All subsequent rows are placed similarly.
If there is a void between the inner reinforcement pipe and the brickwork, it is filled. If the distance is small, you can use masonry mortar; if the void is significant, to save space you can fill it with crushed stone, compact it, then pour it with liquid cement-sand mortar.
Masonry under the rod
The masonry of pillars described above has long been tested, but for beginners, when making it themselves, it is difficult to maintain an even seam. Another problem is that the solution comes out of the seam, staining the surface. It doesn't turn out very nice. To make the work easier, we came up with a laying under the rod. Take a square metal rod with a side of 8-10 mm, cut it into pieces, 10-15 cm longer than the dimensions of the post.
Bar layout
Having laid the first row, a rod is laid on it along the edge of the brick. Fill the area with a small amount of solution, with a larger layer being made closer to the pipe. Then, running a trowel along the rod, remove the excess, clearing the rod of the solution. But at the same time, the slope of the solution is maintained. They place a brick and level it. At the same time, the rod prevents it from settling too much, and we control the position of the other end with a level.
Apply the solution to the side edge under the rod
Then take a short piece of rod about 10 cm (for a vertical seam), place it along the butt, apply the mortar with a trowel to the side of the laid brick, also removing the excess along the rod. The second brick is placed and leveled. After the level is set, the seam is pressed from above with a trowel, and the vertical rod is removed.
We take out the rod, holding the seam with a trowel
This is how all the bricks are laid out in a row. Then the rods are removed and proceed to the next row. This technology for laying brick pillars allows you to control the seams and make them neat. Even a novice amateur mason can fold a pillar this way with his own hands. It is only important to control the parameters of each row during the process (so that the column in the cross-section is the same size).
Video lessons
A more complex version of a brick pillar - twisted with a screw
Features of working with ceramic bricks
Do-it-yourself brick fence posts: step-by-step instructions
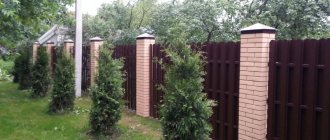
Brick pillars give the fence of a suburban area solidity and make the fence more durable. They are quite applicable to almost all types of fence, serving as its support, and if desired, over time, the fencing material can be changed to another, completely changing the design. And the brick pillars themselves can, for example, be repainted in a different shade, and this will also update the appearance of the fence. But still, the main thing in brick fence supports is the reliability, strength and durability of the structure, which can last for many decades, and with proper laying and timely restoration, their service life is even difficult to estimate.
DIY brick fence posts
Any owner of the site should be able to build brick fence posts with his own hands. Of course, the process of erecting pillars by an inexperienced craftsman will not go as quickly as, say, a professional who is constantly engaged in this work, but you can save a decent amount on this.
A novice mason who decides to install a brick fence needs to carefully study the technology of this process, as well as find out in advance what tools need to be prepared and for what purpose.
Tools and accessories for work
Since it is very difficult to get by with ordinary improvised tools when performing any brickwork with “little effort,” it is necessary to prepare professional ones. In addition to them, you will need auxiliary devices that will help make the seams between the bricks perfectly even and neat.
Set of tools for making brickwork
So, for work you need the following “arsenal”:
- Shovel and bayonet shovel. These tools are usually found in every private home, but if you have to purchase one, the money will not be spent in vain, since shovels will come in handy more than once for a variety of needs. In the process of erecting a fence, shovels have many functions - this includes preparing trenches for pouring the foundation, backfilling bulk materials, and preparing masonry mortar.
- Container for solution. Since brick pillars are quite heavy, they will have to build a foundation, which requires a considerable amount of mortar, so the container must be quite voluminous. An old bathtub or a large galvanized trough, for example, would be quite suitable. If there are no such containers, then you will have to knock down a wooden box and line it from the inside with a galvanized metal sheet, in which it will be convenient to mix the solution. To make a box, dimensions of 1500×1000 mm are suitable; the height of the sides should be at least 200-250 mm, but there is no need to make them too high.
Homemade trough container for mixing concrete mortar
The issue will be solved much easier if the farm has a concrete mixer, or it is possible to rent one for the duration of construction work.
In addition to a large capacity, you will also need a convenient smaller one. It will come in handy when laying bricks, as it is convenient to carry it to any part of the fence. A basin of 8 ÷ 10 liters is suitable.
- Two galvanized buckets. One of them will be needed for water, which should always be at hand, and the second - for fine crushed stone or pebbles, which are used to fill the voids inside the brick pillars, if they have a large empty space.
- Trowel and spatulas. A trowel is, in general, the most necessary tool in a mason’s work when laying bricks - it is used to apply and remove excess mortar. A medium-sized spatula will help to level the laid mortar in the right places. Some craftsmen simply prefer to use it during masonry work.
- Measuring tools - building level, angle, tape measure and plumb line. These tools will help you control the horizontality of rows, the verticality of supports and walls, the accuracy of angles, and measure the sides of pillars, their height and the distance between them.
Boers. Manual is cheap, but the work requires significant physical effort. A motor drill is an expensive tool, but it does the job extremely quickly and efficiently
- A hand drill is useful for drilling wells (holes) to a tedious depth for installing metal supports. The foundation for the pillars must be buried deeper than the rest of the foundation strip, because the main load from the fence spans fixed between them will fall on the supporting elements.
- Five reinforcing bars of round or square cross-section, 8x8 or 10x10 mm in size (but only - all the same!). Four rods should have a length 150 ÷ 170 mm longer than the side of the square brick pillar, and another one should be 20, 25 mm longer than the thickness of the brick. With the help of these simple devices, you can maintain the same thickness of horizontal joints between rows of masonry and vertical joints between adjacent bricks.
Scaffolding may be required for working at height
- Scaffolds or trestles are useful for laying masonry at the top of the posts, since they usually rise to a height of at least 1800 ÷ 2000 mm. The level of the stage above the ground should be approximately half this height. This device will help you work in more comfortable conditions, since next to you it will be quite possible to place several rows of bricks and a container with mortar, as well as all the tools necessary for work.
Fabric gloves with a rubberized working surface are comfortable for working with concrete.
- When working with cement-based mortar, it is imperative to protect your hands with rubberized gloves, since cement has a corrosive effect on the skin, especially if it has even very minor damage (wounds, scratches, inflammation, etc.).
Prices for building bricks
Construction brick
Main stages of work
Having prepared everything you need, you can proceed to drawing up a work plan, simultaneously writing down all the necessary materials in a separate list. The construction of brick pillars includes the following main stages of work:
- Marking the future fence on the ground. Carrying out this process, determine the number of pillars and their location. It is necessary to take into account that the supports must be installed at the corners, on both sides of the gate or wicket, and on straight sections - at a distance of 2000÷2500 mm from each other.
- Digging a trench and drilling holes for installing pillars and pouring a foundation.
- Installation of metal supports around which the brickwork will be made. The pillars are embedded in the drilled holes using cement mortar.
This process will require: sand-cement mortar, crushed stone, sand, waterproofing material and a support pipe with a diameter of 100÷150 mm.
- Brickwork of support pillars. For masonry you need mortar and brick.
- Installation of ebb columns or roof caps on top.
Material calculation
The calculation can be made quite accurately if their different cross-sectional sizes are planned in advance. Most often, they are laid out in such a way that one side of the pillar consists of one and a half bricks, that is, 4 pieces are required for one row.
One of the most common masonry schemes
The standard size of fired masonry brick is 120 × 250 mm. With the type of masonry indicated above, one side of a square pillar will have dimensions of 250 + 120 + 10 = 380 mm. The last value in the given amount, 10 mm, is the width of the seam.
Standard size brick
The thickness of the brick is 65 mm and, taking into account the seams between the rows of masonry, for one column, 2000 mm high, approximately 108 of them will be required.
The calculation is made as follows:
65 + 10=75 mm – row thickness including seam;
2000: 75= 26.7 – number of rows; after rounding, there are 27 rows;
27 × 4 = 108 bricks - in this case, the number of rows is multiplied by the number of bricks in the row.
When making calculations, you need to take into account the fact that the bottom three ÷ four rows, according to all the rules, must be laid out of solid bricks. This is necessary so that the lower part of the support has more weight and good stability.
A metal pipe can be installed in the column cavity, which is embedded in the foundation. The number of pipes should be equal to the number of pillars, and they should have a height of 400 ÷ 600 mm greater than the height of the planned brick pillars, since they will be buried in the ground and foundation precisely by this difference.
The “filling” of a brick column can be from a pipe (in the figure - below), or from reinforcing bars (above)
Instead of pipes for supports, reinforcing metal rods Ø 12 ÷ 16 mm are often used, which are also fixed in the concrete of the foundation and connected to its reinforcing belt. For each pillar you need to plan from two to six rods of the required length.
Do you have experience doing brickwork?
If you have to do this for the first time, then it would be useful to familiarize yourself with the basic technological techniques in advance. About the rules for making brickwork - in a special publication on our portal.
Step-by-step instructions for building brick pillars
To understand the stages of work well, they need to be considered in detail. And then, when constructing the pillars, you can rely on these instructions, taking into account the specific features of your own fence installation plan.
| Illustration | Brief description of the operation performed |
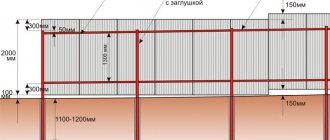
| The installation diagram for brick pillars looks something like this. The diagram shows the following elements in numbers: 1 – support pipe installed inside the brick structure; 2 – part of the pillar foundation, filled with a rough mortar made of sand, crushed stone and cement; 3 – strip foundation for laying the span between the pillars; 4 – top layer of foundation made of thin mortar of sand and cement; 5 – brickwork; 6 – protective covering (cap or ebb) of the pillar. | |
| First, the area where the fence will be installed is marked. It is carried out based on the existing site plan, on which the so-called “red line” is defined, along which the fence can be installed. The first step is to determine the reference point into which a peg or piece of reinforcement is driven, the width of the future trench under the foundation is determined, and the second one is driven at the required distance from the first peg. | |
| Two strings are stretched from the support points in the desired direction, which are stretched and also secured to reinforcement or stakes at the other end of the future fence. If the fence borders the area not on one, but on several sides, then the same marking by stretching the cords is made on all fenced sides. Next, on the strip marked with markings, a trench is dug under the general shallow foundation of the fence. Its depth can vary from 250 to 300 mm. Taking into account the required thickness of the sand backfill, the depth of the trench is made 100 ÷ 150 mm more. | |
| After completing the digging of the trench, holes are drilled in it at a distance of 2000 ÷ 2500 mm from one another for metal poles or reinforcing bars. The depth of the holes should be 500 ÷ 700 mm, and the diameter should be 150 ÷ 200 mm larger than the cross-section of the installed column. At the bottom of the trench, a sand and gravel cushion with a thickness of 100 ÷ 150 mm is poured and compacted as much as possible. | |
| Before installing the support pipe there, it is recommended to prepare the hole by laying waterproofing material in it, and filling and compacting sand with a layer of 80 ÷ 100 mm at the bottom. | |
| The next step is to install a pipe into the well - a stand, with metal crossbars fixed to it by welding from below and on the sides, the role of which can be played by sections of angles, pipes or thick fittings. After the concrete hardens, they will ensure the stability of the stand and will not allow the pipe to sag over time under the influence of load. | |
| The column is set strictly vertically according to the level or plumb line, and is fixed in the desired position. Then, a rough solution consisting of concrete and crushed stone is poured into the hole around the post. It needs to be compacted so that there are no air voids left in it. | |
| After the concrete around the racks has hardened, a reinforcement structure is installed in the trench, which is fastened with twisted wire and in the same way connected to the racks in their middle part. Next, they move on to assembling the formwork for the entire foundation strip. The formwork is raised to the required height and its bottom and walls are lined with waterproofing material so that the concrete solution does not seep between the boards and moisture does not escape from it into the soil. | |
| Next, the formwork is filled with concrete mortar. It is recommended to carry out this process in one approach, and if the fence is long and the formwork is high enough, then a lot of solution will be required. Therefore, it will be almost impossible to get that amount of concrete at once if you mix it by hand. There are two ways out of this situation - rent a concrete mixer or order a ready-made solution from a specialized company. You need to walk over the concrete poured into the formwork with a bayonet shovel - it is used to pierce the solution every 200÷250 mm. This process must be carried out in order to free the still plastic concrete from air bubbles that may form during pouring. After this, the surface of the concrete is leveled according to the rule, and the structure is left to harden and gain strength - this process takes quite a long time, the work can be continued only after 20 ÷ 28 days, depending on the thickness and height of the foundation. In order for the foundation to be strong, starting from the second day after pouring, it must be watered daily for 10 ÷ 14 days. | |
| Stripping can be done after one to two weeks, depending on the air temperature. In order not to waste the time remaining until the tape is fully matured, you can do some operations with the metal stands. | |
| All metal racks are connected to each other by horizontal jumpers. They are fixed at a height of approximately 350 ÷ 400 mm from the foundation and from the top of the posts, maintaining a horizontal level. Additionally, you can install a jumper in their middle part. These elements together will give the frame rigidity, which is very important for the design of the fence. | |
| After the fence frame is ready and the foundation has gained its original strength, you can move on to bricklaying the pillars. The brick is laid around the supporting metal posts. The mortar for laying bricks must be uniform and thin, that is, the sand included in its composition is sifted through a sieve with small cells. | |
| But, before applying the mortar to the foundation, metal pieces of reinforcing rod are laid on its edges, along the perimeter of the future brick row. With their help, the same thickness of the seams is maintained throughout the entire masonry. The rod is laid on all four sides. Then, holding it, the solution is applied to the area where the masonry will be done and leveled to the thickness of the rod. Next, a brick is laid on top of the mortar and rod, the evenness of which is controlled using a building level. If necessary, the brick is tapped with a rubber hammer to achieve its ideally precise position. | |
| To maintain the width of the vertical joints between the bricks, a piece of rod is also placed at the level of its outer edge. Then, the side of the brick is coated with mortar, holding the rod, and the next brick is laid. | |
| Having aligned and leveled the brick, the vertical rod is removed from the seam and installed to the edge of the newly laid brick. This side is again coated with mortar, and a third brick is laid on it, and then, according to the same scheme, a fourth. | |
| After completing the laying of the row, all the rods are removed from the seams, leaving between the bricks on the outside of the masonry a narrow empty space of equal thickness, which, after laying three ÷ four rows, must be filled with mortar and smoothed out - “jointing” using a special tool. | |
| Next, the process is repeated cyclically - rods are placed on the finished row of masonry, mortar is applied and brick is laid. This continues until the pole is raised to the desired height. | |
| After laying the last row of a brick pillar, its upper part must be properly decorated. If a metal pipe has an unsealed hole on top, it must be closed so that less moisture enters the cavity. Therefore, it is most often covered with a metal plate, and cement mortar is applied on top of it. | |
| After this, a roof is mounted on top of the pillar, which is usually chosen together with the material installed in the spans between the pillars. The metal cap is usually secured to the pillar walls using dowels. Concrete castings can also be used - then they are installed on the solution. After completing the design of the posts on top, you can proceed to installation of the fence spans themselves on the metal lintels. |
What type of fence is suitable for brick posts?
Yes, almost anyone. So, a brick fence . of a wooden fence are also perfectly combined with such supports . A wrought-iron fence will give the site a special impression . Well, if funds are limited, then it is quite possible to install a fence made of corrugated sheets .
Detailed instructions for all listed types are on the pages of our portal.
It should be noted that some craftsmen do without installing reinforcing metal pillars inside a brick structure, especially in cases where the pillars are large in cross-section. Instead of racks, fine crushed stone or pebbles are poured into the column cavity, which are then filled with cement mortar that is liquid in consistency.
Backfilling is done as the pillar is raised. So, for example, having laid 5 ÷ 6 rows, the internal cavity is filled and poured, then another 5 ÷ 6 rows of masonry go on and so on until the very top.
It is necessary to decide in advance how the brick pillars will be installed, and depending on this, purchase the required amount of materials.
What about the gates?
Once a fence is being built, it means that it is necessary to immediately plan the construction of the gate. There are also many options here. You can make simple swing gates . Anyone who likes more complex tasks will certainly like the design of sliding gates . Detailed instructions are on the pages of our portal.
Making any kind of brickwork is not as easy as it seems at first glance, especially if you have no experience in this work. Therefore, before you start laying out pillars or walls, it is recommended to practice and first lay a flat brick wall dry, and then with mortar in a place that will not be conspicuous. Well, if everything goes well and the work is done independently, you will be able to save a very decent amount.
Don't have enough money for brick pillars?
It's okay - you can slowly accumulate material, but for now just concrete the fence posts . It will be possible to cover them with brickwork later.
And at the end of the publication - a video master class on the construction of brick pillars for a fence.
Video: nuances of correct laying of a brick pillar
Possible problems and their solutions
The main problems that may arise when laying pillars with your own hands are changes in size and “twisting”. Both defects arise from insufficient control.
When laying pillars with your own hands, often the top rows become much wider than the bottom ones. This happens gradually, a millimeter or even less is added, but in almost every row. As a result, at a height of 2 m the width of the column is 400 mm or even more. This is instead of 380 mm. The fix for this error is to control the size of each row.
It is not enough to control the dimensions of the pillar using the building level alone. Basically, a household tool (yellow) is used, and it has a fairly large error. And if the level is 60-80 cm long, you simply will not see minor vertical deviations. Therefore, they additionally use a tape measure - measuring each row. To reduce the time it takes to control, you can make a template according to the size of the column (for example, from even planks) with which to check for deviations.
The fence posts are laid around a metal reinforcing pipe, verticality is checked after laying each row
Laying pillars on your own without experience in such work can lead to another mistake: the edges of the pillar can shift, causing the pillar to twist around its axis. This drawback is much more unpleasant: try attaching spans to such pillars. There will be many problems. Therefore, when laying each row, you must strictly ensure that the corners are located strictly one above the other.
You can make the task easier by using two corners screwed to opposite corners. They are temporarily attached to the lower rows (with bolts or self-tapping screws in the seam) and then used as a guide, placing the bricks strictly in the corner.
Calculation of bricks for a fence post
There is nothing complicated about the calculation either.
Let's take a standard installation, when 4 bricks are laid around an installed pillar. Let’s take the size of one unit according to GOST “Ceramic brick and stone”: it varies from 55 to 88 mm, let’s stop at 55 mm. Let's take into account the error per layer of mortar that should be in the masonry - here you need to rely on the thickness of the reinforcing bar, which is laid between the layers in order to maintain uniformity. Let it be 8 mm. Total brick + mortar = 63 mm.
Suppose you need to build a pillar 2 meters high - or 2000 mm. These 2000 mm (height of the support) must be divided by 63 mm (height of the brick together with the cement layer). It will turn out, in round numbers, 32 rows of 4 bricks each, for a total of 128 pieces. Plus four more pieces (one row) just in case.
Mortgage elements and gate fastening
When laying brick pillars, you need to think about how you will attach the span to them. In order to be able to secure the horizontal guides for filling the fence, the embeds are pre-welded to the pipes located in the middle of the column. These can be corners, studs, “ears” for attaching wooden planks, etc. They are welded at the same height so that the attached crossbars are strictly horizontal.
One of the options is suitable for fastening corrugated sheets, picket fences
Mortgage options may vary. Some people make it from a corner; for others, hairpins are enough. It all depends on the type of fence filling (what the spans will be made of) or the weight of the gate leaf.
Options for mortgages in brick pillars
Different weights require different power elements
At least three metal parts with a metal thickness of at least 3 mm (preferably 4 mm or even more) are required for gates or wickets.
An example of the location of mortgages for swing gates
The construction and installation of sliding gates with your own hands is described here. Read about how to automate swing gates here.
Making a cap for a brick pillar
To protect the brick from moisture, the top of the pillar is covered with a cap. They are sold in large quantities, some are metal, concrete or composite. If desired, you can make a cap for a pole from roofing iron yourself. Below is the diagram. All you have to do is set the dimensions and then bend it using a bending machine along the marked lines. The product is fastened with special rivets, but self-tapping screws can also be used. You just need to pre-drill the holes, coat them with anti-rust, and then paint them.
Drawing of a cap for a brick pillar
Materials required for work
The list may vary, but the main components are always the same:
| Brick | The posts will be constructed from this material; you can also lay out 2-3 rows at the bottom, this will improve the appearance of the structure and protect the wood from moisture from the soil. There are many options, but we advise you to choose one that will be combined with the house and other buildings on the plot |
| Tree | As noted above, you can use either a picket fence or edged board, or unedged material, as well as a block house or imitation wooden beams. There are no restrictions, and you choose the option that best suits your design. Naturally, the price depends on the type of product chosen, so we recommend that you find out the cost of all types and make a decision based on this |
| Cement and sand | Of course, you can use a ready-made solution, but using a mixture of sand and cement is much more economical. To fill the foundation, concrete with crushed stone is prepared, masonry mortar is used for the columns |
| Metal elements | They are needed, firstly, in order to install racks for the pillars, which will ensure the rigidity of the structure, and secondly, for the veins on which the spans will be attached. If you use wooden veins, do not forget about the fastening plates protruding from the posts by 20-30 cm |
Important! Of course, this is not all that is needed, because you need protective compounds for wood, caps for posts, as well as a variety of working and measuring tools with which you will build the fence.
Block house is an excellent solution for a fence that goes well with any type of building