The roof is one of the most complex and important architectural elements of a house. Its construction must be approached very responsibly - mistakes are too expensive. It is not for nothing that roofers are considered the most paid builders; the durability and comfort of a building largely depends on their skill. The construction process itself consists of several steps.
We build the roof of a house with our own hands step by step
Instructions for preparation for construction
Step 1. Select a project
The main differences between roof projects are not design, although they are primarily striking, but structural. When choosing a specific project, you should take into account the maximum number of technical characteristics of the building and the climatic zone of its location.
What roofing options are offered to developers today?
| Roof type | Short description |
Flat inclined | The simplest one, used in small houses. The advantage is a simple rafter system. The disadvantage is the lack of residential attic space. It is rarely used in our country; such houses can be seen more often in Scandinavian countries. |
Gable | A universal roof for houses, allows you to build attic spaces, can be simple or broken. In terms of complexity, cost and manufacturability, most developers are satisfied. By changing the angle of inclination, the load indicators on the elements of the rafter system are adjusted. |
Four-slope (hip) | A more complex design, it is recommended to install it on larger houses. The rafter system must be installed taking into account all building codes and regulations, and preliminary calculations must be made. |
Half-hip | It differs from the hip one in that the sizes of the slopes are not the same. Two slopes are large, and two trimmed ones are small. The technical structure is somewhat more complicated than the hip roof, but such roofs increase the volume of the attic space. |
Tent | All slopes have the shape of equilateral triangles, and their vertices converge at one point. The roof can be installed on square-shaped houses. |
Multi-forceps | The most complex of all the roofs listed, it is rarely used and only on multi-story buildings. |
Step 2. Selecting materials
Once a specific roof option has been selected, you need to decide on the materials for the construction of the rafter system and the type of roofing coverings.
Important. At the same stage, you need to decide whether the roof will be warm for living quarters or cold.
Rafter system
The rafter system requires only high-quality materials of at least second grade.
Edged board 2nd grade
Grade 1 edged lumber
Practical advice. To save money for the rafter system, you can buy wet boards rather than dry ones; they are much cheaper. But it should be remembered that raw lumber must be used no later than 7–10 days, during which time the rafter system must be installed and the roof covered. The boards will dry optimally under load, and strong mechanical connections will prevent them from warping.
Raw edged board
Prices for various types of construction boards
Construction boards
The Mauerlat is made from 100×100 mm timber or 50×200 mm boards. Rafter legs are made from boards 50×150 mm or 50×100 mm. The linear dimensions of the rafter legs must take into account the maximum possible static and dynamic forces. The width of the boards can be changed by using various vertical and angular stops. Each rafter system has its own characteristics; the master must have extensive practical experience in order to correctly solve problems that arise during construction. And, of course, a project must be ordered for a residential building; a self-built building is considered illegal and will not be accepted for use. This means that light and heating cannot be connected to it, such a room is not registered, it cannot be given or bequeathed. The project, among others, has working drawings of the rafter system; it is necessary to strictly follow the engineers’ recommendations.
Rafter system design
The type of lathing depends on the type of roofing; for soft roofing materials it is necessary to make a continuous one, for hard ones any kind is suitable. For a solid one, you need to prepare sheets of plywood or OSB, the thickness is at least one centimeter, but it can be changed depending on the pitch of the rafter legs.
OSB-3
Prices for OSB (oriented strand boards)
OSB (oriented strand board)
You can make a continuous sheathing from edged slats, although this option is difficult to consider optimal - it is very expensive and time-consuming. For solid roofing materials, the sheathing is made of slats or unedged boards. Unedged lumber must be sanded.
Unedged board
Roofing materials
For residential buildings, the most budget-friendly options are bitumen or metal shingles.
Metal tiles
Less commonly used are profiled sheets or roll coverings.
Corrugated sheet
Very rarely natural or artificial piece tiles.
Roof tiles
The rafter system largely depends on the type of materials. At the design stage, it is necessary to take into account the weight and fastening features of roofing coverings.
Prices for various types of roofing materials
Roofing materials
Insulation materials
Warm roofs are installed only in cases where attic spaces are planned to be converted into residential attics. Currently, two types of insulation are used: mineral wool or polystyrene foam.
Insulation with mineral wool
Roof insulation with polystyrene foam
The distance between the rafter legs should take into account the factory width of the insulation, thereby reducing the amount of unproductive waste and speeding up work.
Rafter foot step
The weight of insulation is minimal and can be neglected during the design of the rafter system. But you should keep in mind the climatic zone where the house is located; the thickness of the insulation and, accordingly, the width of the rafter boards depend on this.
Practical advice. For all climatic regions, the thickness of the insulation should be at least 10 cm; for the middle zone, this parameter increases to 15 cm. If the insulation layer is less than the recommended values, then the efficiency of heat saving sharply decreases.
Additional roof materials
If the roof is warm, then it is necessary to provide for the installation of steam and water protection, and the installation of counter-lattice to ensure natural ventilation of the under-roof space. The range of materials is huge, but by and large they are not much different from each other. The performance characteristics are influenced to a greater extent by compliance with installation technology than by the physical characteristics of roofing membranes. Even very cheap material can be used in such a way that it satisfies all building codes and requirements. Conversely, the most modern innovative material can be mounted in such a way that, apart from harm, there will be no positive effect.
Water vapor barrier for roofing
Diffusion membranes
And the last thing you should think about when planning the construction of the roof is the drainage system and special elements for bypassing chimney and ventilation pipes. For some linings and snow retainers, it is necessary to provide additional fixation points on the rafter system. It is much more expedient to do this at the stage of its construction than after fixing the roofing materials. Although modern technologies make it possible to use both options for installing additional and special roof elements.
Brick pipe passage through the roof
Pipe passage through the roof
Connecting a pipe to a slate roof
This completes the preparatory stage. If all building materials are prepared, the type of roof and roofing coverings are selected, and the rafter system is designed, then you can begin the actual construction of the roof.
Roof repair at the dacha
The country roof is subject to wind and snow loads and requires periodic inspection and maintenance. In the event of natural wear and tear or extreme weather conditions, complete or partial destruction of the roofing pie may occur, requiring major repairs. In such a situation, it is necessary to conduct a thorough examination of the rafter group and the condition of insulation and roofing materials.
To determine the damage caused by the elements, a thorough examination of the roof is necessary to determine the sequence and scope of work
Roof repairs in emergency situations must be carried out as quickly as possible, but without loss of quality.
Construction of the rafter system
Important. Mistakes made during the construction of the rafter system are very difficult to correct. Most of them will become noticeable already during the operation of the building, this is extremely unpleasant. There are situations when it will take more money to correct the shortcomings of the rafter system than to build a new roof. And this is also the case when, due to leaks, there is no need to repair the interior.
As an example, we will look at step-by-step instructions for one of the most complex roofs - a hipped roof. Understanding the construction technology of this rafter system, it will not be difficult to understand the technology and assemble simpler single-pitch or gable roofs yourself.
Step 1. Take two long boards, with their help it is easier to determine the length of the rafter legs, the angle of the slopes and the height of the roof. Temporarily fix the boards to a vertical support on the wall of the house. Raise or lower them until you find an acceptable position. If the size of the house allows, then it is better to design the rafter system so that the length of the legs does not exceed 6 m. Such lumber can be purchased, there will be no need to increase it. Building up not only takes a lot of time, but also weakens the structure and requires the installation of additional supports.
Step 2. Fill the reinforcing belt. It not only increases the height of the attic space, but also makes it possible to extend the overhang of the rafters and additionally protect the facade walls from precipitation. The width of the belt should be at least 30 cm, the height depending on the size of the house.
How to fill a reinforcing belt?
- Drill holes 15–20 cm long in the walls, insert metal rods with a diameter of 12–15 mm into them. There must be a thread at the top. If it is difficult to find such elements in the market, then you can weld threaded studs to ordinary building reinforcement. The distance between anchors is approximately 1 m.
- Install formwork around the perimeter of the house. To do this, use 20x150 mm edged boards so that they are not pushed apart by the concrete and secure them with pegs after 1.5–2.0 m. There is no need to be afraid that the reinforcing belt will not have a perfectly even width along its entire length; this element will be closed during further construction of the roof.
Installed formwork
- Prepare the concrete. The solution must be made strong; one part of cement should be given one part of sand and two parts of crushed stone. You can prepare it manually directly on the floor slabs of the house or on the ground with a concrete mixer, and then feed the mass upstairs manually.
- Place reinforcement in the formwork; one rod is enough around the entire perimeter. Be sure to raise the rod at least 5 cm above the ceiling surface. It should not lie in the middle of the belt; in this position the reinforcement does not work. You can use any pieces of wood or pieces of concrete blocks as pads.
- Fill the belt with concrete; you must work carefully and strictly maintain the horizontal position of the upper plane. To check, use an ordinary level.
The process of filling the armored belt
The armored belt is flooded
Important. The difference in height at the corners of the reinforcing belt should not exceed ± 2 cm. To check, you need to pull the rope, with its help it is much easier to level the concrete surface.
Allow at least three days for the concrete to harden. Remember that it will gain 50% strength only after two weeks, only then can the structure be fully loaded. If the weather is very warm and windy, then the concrete belt should be watered generously with water at least twice a day. Concrete gains strength not during drying, but during favorable chemical reactions; this constantly requires moisture.
When the concrete hardens, the formwork is removed
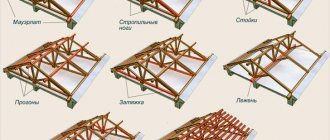
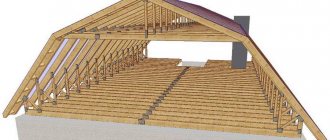
The construction of a rafter system conventionally consists of four stages: installation of the mauerlat, installation of the ridge beam, installation of rafters (hip and diagonal) and arrangement of the sheathing.
Components of the roof structure
In different roof systems, the elements vary, but the main ones still remain the same. These include the following:
Basic roof elements
- Ridge - the top part of the roof, the place where its slopes connect. This element is absent in the tent and lean-to version.
- Slopes are the main planes of the roof covered with roofing material.
- Endova - the inner corner of the roof, formed at the junction of two slopes. This element is present only in complex structures. When arranging a roof, valleys need to be given special attention during waterproofing work, since such an area is one of the most vulnerable places in the structure; it is in them that the largest accumulation of snow occurs.
- The eaves overhang is the overhang of the roof on the sides of the house. Drainage systems are installed for them.
- Gable overhang is the protruding part of the slopes above the front side of the roof.
- The rafter system is a structure that is the basis for the installation of slopes. There are several varieties of these systems, but the most reliable of them is the triangle, since it is this figure that gives the structure rigidity.
Rafter systems
Before installing any structure made of wood, the material must first be coated with antiseptic agents and fire retardants, which can protect it from fungal formations, insect colonies and will ensure increased fire safety of the entire system.
Main design details of the rafter system
The main element in the rafter system is the rafters, laid on the mauerlat, supported by racks, fastened with beams and ties.
In the upper part, the rafters are overlapped and fastened, while the lower ones are fixed to the mauerlat or to bars laid between the rafters.
The rafter system has different shapes and can be layered or hanging.
It is very important to correctly calculate the cross-sectional size of the rafters. The calculation is made taking into account the distance between the walls and the installation pitch of the rafters.
Video: approximate design of a gable roof truss system
Layered rafter system
Layer systems are most often used in buildings where there are internal load-bearing walls that create a supporting base for the rafter system. The layered type is much lighter than the hanging type, it is easier to install, and will require less building material. The defining point of support of the system is the ridge, in which the paired rafters are fastened.
Schematic diagram of a layered rafter system
The non-thrust type layered rafter system is mounted in three different versions:
1. In the first case, the rafters are connected at the ridge and secured with a support, which is called a sliding one, and the lower end of the rafter is secured to the mauerlat by cutting. In addition, the rafters are additionally fixed to the wall using wire.
2. In the next version, the rafters are secured to each other on the ridge with bolts using metal plates, and the lower edge of the rafter is secured with a movable connection to the mauerlat.
3. In the third case, at the top, the rafter beam is connected to the purlin on the ridge, using rigid fastening with boards and bars located horizontally. To secure the bottom, the same method is used as in the previous case.
Scheme of fastening the layered system
Floating rafter fastenings do not transfer the stresses of the roof structure to the wall structure, so the walls will be protected from damage. It is this type of fastening that is the main difference between layered and hanging systems.
But sometimes you still have to use a spacer system; in such cases, the lower end of the rafters is attached to the mauerlat and walls with a rigid fastening, and reinforcement with struts and tie-downs is used to relieve the load from the walls.
This option is no longer layered or hanging - rather, it can be called combined or intermediate.
Expert opinion: Afanasyev E.V.
Chief editor of the Stroyday.ru project. Engineer.
On the pages of our website I have prepared many articles about roofing - I recommend that you read them in more detail.
Before proceeding with the installation of the rafter system, it is best to lay a temporary flooring of boards on the floor beams built into the wall. It will be more convenient and much safer to move along it, arranging a base for the roof covering. Having completed these preparatory work, you can begin installing the rafter system.
Since in private construction conditions a layered rafter system is most often used to install a roof, you need to know in more detail how its installation is carried out.
- Waterproofing material is laid on the longitudinal walls of the house - usually roofing felt is used for this.
- Next, along the upper end of the wall, a mauerlat is laid and secured with anchors, which is a beam with a cross-sectional size of at least 150 × 150 mm.
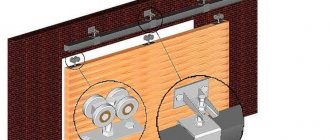
Video: how to install the Mauerlat on the walls
- Rafters are installed on this element, which are fastened with brackets to the Mauerlat, and their upper part is overlapped, using overlays, or fixed to a ridge beam.
One of the options for attaching rafters to the mauerat
- In addition, the rafters must be secured to the wall of the house using twisting. To do this, a crutch is driven into the wall, at a distance of 30 ÷ 35 cm from the top, the wire is hooked onto it and attached to the rafters and its ends are twisted. This manipulation will keep the roof intact during strong winds.
- The rafters and ties must be brought beyond the outer edge of the wall to form an overhang, which will protect the wall during rain. The length of the overhang must be at least 550 ÷ 600 mm.
- Next, the rafters are strengthened with struts, purlins and racks.
Hanging rafter system
In buildings where there are no internal capital partitions, and the distance between opposite load-bearing walls reaches 6 ÷ 11 meters, a system of so-called hanging rafters is used. It is suitable for buildings in which the roof will be supported only by the walls located around the perimeter.
The principle of the hanging rafter system
It should be taken into account that such a roof structure gives a large expansion load on the walls, and in order to reduce it, horizontal elements are used that connect the rafters, which are called crossbars or tie rods. These components of the system can be attached anywhere in the rafters along their height - they can even be used as joists for the attic floor, secured at the very bottom.
Common schemes for tying and strengthening hanging rafters
Installation of this system is carried out using rafters made of timber with a cross-section of at least 50 ÷ 200 mm, however, accurate size calculations must still be carried out by a specialist architect.
- When installing a hanging system around the perimeter of the building, the Mauerlat is first installed.
- Next, the first two paired rafters are prepared. Their lower and upper parts are cut at the desired angle, and on the lower edge, in addition, cuts are made for greater stability.
- Then the two rafters are lifted up, installed on the Mauerlat, without yet being secured to it, and the upper parts are connected at a cut angle, but also not fastened.
- It is very important to accurately fit the first two rafters together, as they will be a template for the manufacture of other components of the rafter system. The first pair is removed from the walls downwards, and the remaining elements are made along it.
- When all the parts are prepared and numbered, they are lifted up, installed and secured first only the outer parts of the rafter system. Then their upper corners are connected with a stretched cord; it will be the same level along which the remaining elements will be aligned.
- After installing all the rafters, they are connected at the top with timber, maintaining the required distance between them - it should be exactly identical to the distance between them in the lower part, when secured to the Mauerlat.
Methods used for fastening rafter system parts
- The next step is to install the ties, which are best installed at the bottom of the system, overlapping.
Attachment point for rafters to mauerlat
- The connections of the entire system are marked with nails, but then all the nodes must be fastened with bolts, through metal plates and using metal corners. Such fastening will ensure the rigidity and strength of the structure.
- If necessary, the system is strengthened with slopes and racks.
Video: example of installation of a rafter system
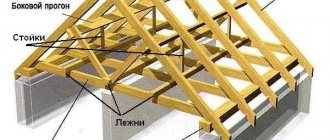
Mauerlat installation
Work begins after the concrete of the reinforcing belt has gained sufficient strength and the formwork has been dismantled. For the Mauerlat, 200×100 mm timber is used. This is a very important element of the rafter system; it serves to support the rafter legs and uniformly distribute point loads over the entire area of the façade walls.
Step 1. Place the timber next to the reinforcing belt, accurately mark the exit points of the anchors. It's easier to do this without a tape measure. Turn it over with the narrow side down and place it on your belt, using a pencil to mark the position of the anchors. Then transfer the marks to the wide side of the beam; holes must be drilled in these places.
Drilling holes
Practical advice. If there are doubts about the accuracy of taking measurements, then drill holes for anchors with a diameter 2–3 mm larger than the diameter of the studs. This will not have a negative impact on the strength of the Mauerlat, but will make it much easier to install it in place.
Step 2. Drill holes, hold the drill as vertically as possible, do not allow distortions. The work must be carried out by an experienced carpenter. A beginner can ruin the beam; all the holes will have to be shifted by reducing its length.
Practical advice. If there are doubts about the strength of the concrete of the reinforcing belt, then do not tighten the nuts with great force. They can be tightened later during the construction of the rafter system.
Step 3. Prepare strips of waterproofing under the Mauerlat; it is better to buy ordinary cheap roofing felt. The strip is cut from the roll; there is no need to roll it out. The material is perfectly cut with a grinder and a metal disc.
Step 4. Spread strips of waterproofing on the reinforcing belt. Making holes is much easier with a hammer. Place the roofing felt on the anchors and use a hammer to carefully punch holes in the waterproofing for the studs. You just need to do this carefully, you can’t hit it too hard. Otherwise, there is a risk of damaging the upper threads and problems will arise when tightening the nuts. If you are afraid, then before laying the roofing material on all the studs, screw the nuts; after unscrewing, they will automatically align the damaged turns.
Laying waterproofing material
Step 5. Install the beam onto the anchors and tighten with nuts. Be sure to place large diameter washers under them. If the Mauerlat fits tightly onto the studs, you will have to hammer it in with a sledgehammer. This situation indicates insufficient qualifications of roofers.
Installation of timber
It is better to make Mauerlat from pine rather than spruce; it contains much more resin, and accordingly, it is not damaged by putrefactive diseases longer. How to distinguish pine from other coniferous woods? For several reasons. First, the wood smells of resin and turpentine. Second - the pine has a bright yellow tint, large and lively knots. Third, the presence of black spots on pine lumber indicates a high resin content; it acquires this color after oxidation in air. Spruce is whiter, lighter in weight, has few knots and has an unpleasant smell of cat feces.
At the corners and along the length, the beams are connected into half a tree; it is advisable to fix these places with long nails or self-tapping screws made of stainless alloys.
Along the length, the beams are connected into half a tree
The studs are filed, the nuts are tightened through the washer
Accurate calculation is a guarantee of creating a high-quality roof
How to correctly calculate the rafter system of a pitched roof
Already in the process of creating a project, you need to think about what type of roof the building will have. After all, it depends on what materials are required, their quantity, and even the design of the upper part of the house. Moreover, often the roof project can be developed separately - and it will have to be “tied” to the house project.
In any case, it is necessary to clearly calculate not only the amount of building materials that will be used to create the roof, but also take into account the loads that it experiences. That is, it must withstand:
- Roof frame weight;
- Roofing pie weight;
- Covering weight (tiles, corrugated sheets, reeds - the differences in weight are significant);
- Average snow load typical for the region;
- Wind load;
- Total weight of people performing work on the roof;
- Additional margin of safety.
Thus, for the calculation it is necessary to take into account all the above load elements. And set a truly sufficient margin of safety. It must be taken into account that the snow load will vary significantly from year to year. Moreover, it differs not only for different types of roofs, but also for a difference of literally several degrees of inclination angle.
The greatest loads occur on flat roofs, from where snow cannot slide off on its own. In this case, it is necessary to add dynamic loads to the weight of the snow when cleaning such a roof.
Slope loads on pitched roofs are much lower. But you should definitely know what the average and maximum amounts of snow fall in a given region. Otherwise, there is a very high risk of roofs collapsing under its weight. Wind load in combination with snow can also contribute to the disruption of the integrity of the roof. The optimal angle of inclination should be taken into account, at which the risk of the roof being torn off by strong winds is minimized.
It is also very important what kind of roofing will be installed. Wide sheets can be more vulnerable to strong winds due to the large windage. At the same time, small elements are more easily torn off if the technology of their fastening is violated. The greater the weight of the roofing materials, the greater the load that must be taken into account when calculating roofing structures.
This is important! To prevent the roof from collapsing under extreme loads, a safety margin of at least 20% of the total load is provided. In general, any roofing structure must be designed in such a way as to withstand, in addition to the weight of the roof itself, at least 200 kg per square meter of area.
When calculating the amount of materials, be sure to take into account that sheet roofing materials are most often laid overlapping, so the distance between the rafters must correspond to their sizes. The pitch of the sheathing when using tiles must correspond to its dimensions. Moreover, the roof slope must be of such length that a whole number of rows of tiles can fit. On complex multi-slope roofs, the calculation of the number of rows of tiles is done for each slope separately, and the most accurate joining on different slopes is ensured.
This is important! The roofing material is also an important point. Ceramic tiles are much heavier than other types of roofing and therefore require greater rafter strength. For sheet materials, it is necessary to especially carefully consider the angle of the roof in order to minimize the risk of such sheets falling off during strong winds. For exotic eco-materials like reed, it is necessary to be able to easily change the final layer of the roof, because its “lifetime” is shorter than that of other materials.
Installation of a ridge beam
For horizontal support, vertical posts and the upper ridge girder, you can use 50x150 mm timber. The lower element must be secured with anchors, and waterproofing must be placed between the concrete floor slab and the wood. All fastenings are made with nails; they should be driven in obliquely. If you wish, you can use metal corners. To calculate the size of the ridge beam, you need to subtract its width from the length of the house, the resulting value is the length of the element. Calculation is needed to ensure that all four overhangs are the same.
What does the step-by-step construction of a house roof include?
Roof construction is a technologically complex and multi-stage process.
The first stage after calculation is the mandatory preparation of roofing materials. This includes treating them with protective agents that prevent the roof frame from being damaged by fungus, moisture protection, as well as treatment for maximum fire resistance of all wooden structures. After all, as a rule, roofs, especially in private houses, are built using a wooden frame that is exposed to all of the above factors.
This is important! Particular attention should be paid to the protection of wooden structures, especially cornices, and protection from fungus. After all, it is the fungus that most quickly causes a tree to become unusable. Therefore, be sure to use products that prevent the growth of fungus, especially in places that are in close proximity to places of contact with water: the fungus loves high humidity.
The second stage is the installation of the roof base, namely the rafter system. Here the calculation must be as accurate as possible, since it is the rafter system that bears the greatest load.
The third stage of roof construction, after the construction of the rafter system, is the installation of waterproofing, vapor barrier and thermal insulation structures in the roof space.
The fourth stage is, in fact, the installation of the final roof itself, as well as the installation of additional functional elements designed for water and snow removal.
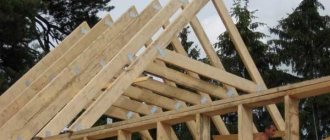
Installation of rafters
This is the most difficult stage of building a rafter system. The system will be without thrust; special cuts are made on the rafter legs to rest against the mauerlat. In this position, they do not push the walls apart, but press them together; this rafter system is more stable than a layered one.
Step 1: Install diagonal rafters. For their manufacture, a 50×150 mm board is used; if the length is not enough, then the materials should be spliced. During splicing, it is necessary to strictly follow the existing recommendations, while at the joints it is necessary to install a support in the future; this should be kept in mind when choosing the location for the extension. Make sure that all four elements are located at the same angle. If the overhang size is slightly different, this is not a problem; the parameter can be easily adjusted to the required value using fillets.
Diagonal rafters
Practical advice. To increase the strength of the diagonal rafters, it is recommended to knock down two beams, as a result the thickness will increase to 100 mm. It is necessary to knock down with a shift, due to this the length of the element simultaneously increases.
Step 2. Proceed with the installation of ordinary rafters. In the places where the mauerlat stops, you need to saw down the platform, the upper end is fixed to the ridge girder.
Support platform
One of the rafter legs rests on the platform
Construction view
Supporting the next rafter legs on the platform
Drive all connections onto three nails at an angle. Two nails are driven into the sides and one into the edge of the beam.
All connections are strengthened with nails
The process of constructing a rafter system
Important. If the roof is insulated, then the rafter spacing is 60 cm, which is exactly the width of most insulation materials. But dimensions should be taken not along the lateral planes of the lumber, but along the axis of symmetry.
To increase stability, additionally secure the rafters with metal corners. It is not necessary to screw in self-tapping screws; it is much more convenient to use nails; this does not reduce the stability of the structure. The fact is that they work for cutting, not pulling out.
Intermediate rafters are fixed with metal corners
View of the connection
Junction node of rafter legs
The rafters must be positioned under the rope. First, the two outer legs are mounted and their position is carefully checked. Everything is within normal limits - stretch a rope between them and install all the remaining elements under it.
Photo of the roof construction process
The craftsman fastens the rafter legs with nails
Step 3. Align the overhang of the rafter legs under the cornice. It should be marked with a construction rope; it is easier to cut with a gasoline saw.
Four-pitched rafter system of the house
Fixing support units with metal corners
Practical advice. If piece tiles are used to cover the roof, then the rafter structure will have to be strengthened. This is not difficult to do; you just need to install additional purlins and rest your feet on them.
Fastening material
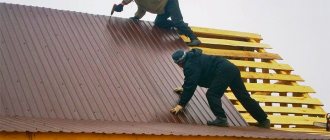
To fasten the profiled sheet, special galvanized fasteners with a hexagonal head are used. These are self-tapping screws 4.8x19 mm. They are screwed from the ridge to the eaves in increments of 50 cm. Along the ridge or on the eaves, screws are screwed into every second corrugation so as to attach the material to the sheathing. For the remaining area of the profiled sheet, 4.8x38 mm self-tapping screws are used, taking into account that there are 4-5 of them per 1 m2 of sheet.
Fastening corrugated roofing sheets with self-tapping screws
To fasten corrugated sheets, only roofing screws are used, which have special linings made of dense rubber that protect the metal from moisture penetration. The screws must be screwed in tightly, at right angles to the surface.
Self-tapping screw structure for corrugated sheets
Installation of sheathing
As we mentioned above, the type of lathing depends on the type of roofing. But in all cases, it is recommended to treat the lathing materials with antiseptics. The fact is that they work in conditions difficult for natural ventilation; additional protection against rotting is very important. Building codes require that all wooden elements be impregnated with fire protection; now there are dual-action preparations that protect against both fire and rot. The requirements must be fulfilled. But in practice, both protected and unprotected houses burn with equal success.
Lathing for metal tiles
Video - Installation of lathing under metal tiles
We fasten the Mauerlat correctly
Attaching the rafter leg to the mauerlat.
The Mauerlat is the part of the house on which the main load will fall; in other words, it is the “foundation” of the roof. To construct this element, it is recommended to use beams with a section of 15x15 cm; they are installed parallel to the ridge. Fasten the bars well - only then will your structure function normally. The best way to fasten the Mauerlat is as follows: even at the stage of laying the walls, a wire rod is pierced between the brick blocks (the process starts from the fourth row), and the material is subsequently fixed with it. To protect the beams from rotting, place several layers of roofing felt under them.
Roof installation
The technology depends on the selected materials. For all cases, there is universal advice - you need to cover the house as quickly as possible. If insulation is installed, it must be done from inside the building, thus eliminating the risk of the mineral wool getting wet. Wet wool is a problem for roofers. It will have to be removed for drying; during dismantling, a large amount becomes unusable, and the total time for constructing the roof of the house increases significantly.
Prices for mineral wool
Minvata
Video - DIY metal roofing installation
Video - Errors in installing metal tiles
Cornice filing
Roof cornice diagram.
The next step on the way to the finished roof of the house is filing the eaves. Its box should fit closely to the already insulated walls of the building. The best material is wood; By the way, it will allow you to avoid organizing additional ventilation. In general, a binder is something like a box attached to the rafters and fillet; the frame is made of two boards that are connected at an angle of 90 degrees: the first goes down from the wall to the edge of the overhang, the second goes from the rafters. Fasten the joints with self-tapping screws or self-tapping screws; the use of metal plates is not prohibited. Leave small gaps between the boards. Cover the bottom of the frame with boards.