4.8 / 5 ( 6 votes)
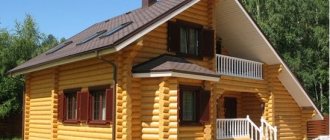
A house is much more than just four walls and a roof. If you want to build your future home well, then understanding the construction process is the best research you can do in preparation. After all, it's better to be safe than sorry. From clearing the site to building your home from the bottom up. We will deal with the specifics, which are too many in the design process, and describe the process in 10 steps.
Having purchased the plot on which you will build, you will begin to calculate your budget for building a two-story or three-story house and develop its plan (standard or individual). Now is the time to decide what you really need and want. If you want the space to expand later, for a potential pool, garage or just to feel the morning sun on your face, you should reflect that now rather than try to modify it later.
You will also need to think about preparing the site for the house and make preliminary landscaping around the house.
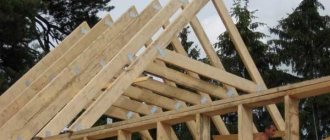
Roof roof installation
At this stage the main wooden frame for the roof will be erected. The main requirement is the tightness of the roof. You need to sew OSB sheets on top, and roofing felt, bitumen shingles, metal tiles or other material on top of them. Thermal insulation and sealing materials must be laid between the beams. If you choose a flat roof rather than a pitched roof, you need to waterproof it at the base level. The process of waterproofing such a roof is not much different from waterproofing a foundation - we take a brush, roller and bucket and apply it until the tone is uniform.
Thermal insulation and sound insulation
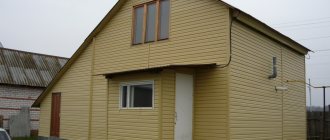
After installing the roof, you can begin insulating the walls of the house. The house must be well insulated. This must be done both outside and inside the house. For thermal insulation of walls from the inside, plasterboards and mineral wool are ideal. The external walls of the house are insulated using siding or plastic panels; there is also a large selection of facade tiles with insulation.
By the end of the insulation work, a rule should already have been developed - start shopping and plan internal work in advance. Having electrical cabinets, boilers, utilities and work surfaces prepared in advance means that work can be done from actual model specifications and their dimensions and design can be refined on site, reducing the likelihood of miscalculations.
How to build a house with your own hands
Living in a big city is becoming less and less prestigious; many people perceive it as living in concrete boxes in an anthill. People are attracted by a calm and measured lifestyle outside the city in the fresh air, but when doing the calculations, it turns out that purchasing materials and hiring expensive workers results in an unaffordable sum. Therefore, more and more people are interested in the question of how to build a house with their own hands, saving money and living a healthy and comfortable life on their own plot of land.
Modern building materials have breathed new life into DIY home construction. Of course, many people build houses from traditional bricks or gas blocks. But the availability of alternative technologies and materials, their financial availability, and the ability to quickly build a house on your own created the conditions for the emergence of mass suburban construction.
So, any high-quality construction begins with a project and selection of a site for construction. Creating a project and step-by-step development of each stage of construction helps to avoid unnecessary costs, and this, in turn, is the answer to one of the main questions - how to build a house cheaply.
When choosing a site there are also some nuances - its price, the cost of buildings on it, as well as the complexity of construction will depend on several aspects:
- Location of the site in the center or periphery;
- Terrain. The choice of foundation for the house, and accordingly its final cost, will directly depend on this parameter. The topography also affects drainage and the laying of utilities;
- Useful area of the plot. Not on all plots you can locate the house of your dreams, since when choosing the configuration of the house you need to be guided by current standards, namely, maintain the required distance from neighbors, auxiliary buildings, etc.;
- Opportunity to engage in agriculture;
After you have decided on the site and also thought about the configuration of the house, you need to choose the appropriate construction technology. Currently, there are several building materials that are most popular when building a house; the following types of buildings can be built from them:
- Brick house;
- House made of foam concrete or aerated concrete;
- Monolithic design;
- Frame house;
- House made of vulture panels;
- Houses made of wood (timber or logs).
Depending on your own preferences and financial capabilities, you can choose any of these building materials. They differ in operational characteristics, labor intensity and speed of construction. When using any of the presented materials, the result is a permanent structure that is comfortable for year-round use. It is worth noting here that you can build a house with your own hands from certain materials, while some will require the involvement of specially trained workers.
You need to select a house design based on the number of residents and the personal preferences of the home owners.
To save money, you can take a standard project or order a design based on your own sketch from architectural bureaus. We strongly advise you not to neglect the project, since competent calculation of structures, soil study, calculation of all necessary materials will help to avoid fatal mistakes during construction and save time. Simultaneously with the choice of project, the planning of the site and its zoning into residential, utility parts, a playground, a recreation area and a garage are provided. After carrying out the design work, it is necessary to document everything and then proceed directly to the construction work.
Customers often wonder how to build a beautiful house without overpaying. There is only one option here - to look for inexpensive finishing materials, or to entrust the interior and exterior project to a good designer who will help you choose suitable finishing materials for the facade and interior decoration.
When the project is approved and the documents are drawn up, the main technical stage begins - the construction of the house. The durability and reliability of the building primarily depends on the quality of the foundation. There are several main types of foundations for a house, the use of which depends on the design of the building, its weight and the materials used:
- Strip foundation;
- Pile foundation;
- Columnar foundation;
- USHP.
The remaining types of foundations are, in one way or another, variations of those presented.
In addition to design features, when choosing a foundation for a house, soil characteristics are also taken into account.
All types of foundations behave differently on different foundations. For example, you will not be able to build a high-quality shallow strip foundation on a swampy or clayey foundation, even if the project provides for a lightweight frame house. If a house is built using new technologies from sip panels, a pile or bored foundation is used, for heavy multi-story buildings the foundation must be appropriate - USP or strip. A strip foundation can be called traditional for simple country houses.
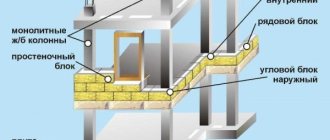
After the foundation is built and brought to technological condition, the walls begin to be erected. This work must be carried out in strict accordance with the rules for using a particular building material. We have listed all the main types of building materials above. Having studied each of them, you can save on this expense item by choosing cheap material.
Upon completion of the construction of the walls, their external finishing is carried out, that is, finishing the facade of the house. All this is done in order to protect the facade from the effects of precipitation, and also to ensure that the house against the backdrop of the site is not only functional, but also beautiful.
At the final stage of the main construction work, the roof is constructed. The roof of a house is at the same time a functional element, protecting it from precipitation, and an element that gives the building a finished and original look.
The following types of roofs are distinguished:
- Shed roof;
- Gable roof;
- Hip roof;
- Mansard roof.
Each type of roof is selected depending on the project and has a number of advantages and disadvantages.
You can learn about each type of roof in detail from the articles on our website. Until the roof is built, there is no point in carrying out interior finishing work, since precipitation or low air temperature can negate all repair efforts.
After the roof is installed, doors and windows are installed, creating a so-called closed thermal circuit. From this moment the construction phase ends and the stage of rough and fine finishing and installation of necessary communications throughout the house begins.
Rough finishing refers to the preparation of surfaces for finishing work. During rough finishing work, coarser finishing materials are used to eliminate wall defects and create the best conditions for finishing.
Rough finishing includes such types of work as plastering and puttying walls, pouring floor screed or installing dry screed. Finishing is a large-scale complex of works, ranging from wallpapering, painting walls, laying laminate flooring, installing suspended ceilings and ending with installing doors, baseboards and other small details.
It is important to remember that if you build a house with your own hands, you usually save half the construction budget. Therefore, if you don’t know how to build your own house cheaply, do it yourself.
One of the main aspects of life support in the house is the supply and distribution of utilities. This is done at the rough finishing stage. Often, it is necessary to involve professional craftsmen, gas workers, electricians, and mechanics in this work, since only they can carry out the work competently, safely and in accordance with all legal standards.
At this stage, the following engineering systems are connected to the house, as well as wiring throughout the house to consumers:
- Gas pipeline;
- Circuit;
- Water supply;
- Sewerage;
- Heating.
After completion of the main construction and finishing of the house, landscaping of the site begins.
A well-groomed area is attractive not only in appearance. All efforts to improve the territory create a solid base for the main landscape of the site, which will please the eye and provide comfort for decades. Therefore, it is necessary to approach landscaping with the utmost seriousness, and plan the development of green spaces and other elements of the territory for a long time to come. At the same stage, the construction of outbuildings, a bathhouse and a garage begins, but this is a topic for separate articles.
The Archive section of the site presents all articles of the Strhouse.ru project in chronological order. We hope they will help you on your way to your goal - building your own home.
Insulation of internal walls.
To insulate interior walls, you must first mark and attach an aluminum profile onto which the drywall will be attached. In this case, the distance between the profiles should be as ideal as possible for laying mineral wool. The process is greatly simplified by the use of thermal insulation foam, which can be applied to the rows between the profiles. Apply from a spray bottle; this can be done very quickly and without much experience. Keep in mind that insulating your home can be a great investment to protect against heat loss and save on gas bills.
Construction of the first floor
Before installing the walls of the first floor, the platform was installed and insulated and pipes for the sewerage system were laid. The bottom of the platform is left open, the insulation is fixed by means of fixed cuttings of boards. 3 layers of foam plastic, 15 cm thick, were used as platform insulation. The subfloor is made of 150x50 mm boards.
insulation of the platform with foam plastic
subfloor is sewn
The walls were installed in a horizontal position. Foam plastic and 8 mm plywood protection are laid between the racks, and windows are also installed. The windows in the project were used second-hand. Installation of the assembled wall into a vertical position was carried out by two men. It was decided to abandon the installation of jibs in the construction of the walls. The builder assumed that the frame would be sufficiently rigid due to the plywood sheathing.
assembly of frame walls
insulation of external walls with foam plastic
wall frame
windows installed
wall on temporary braces
After assembling the walls of the first floor, the installation of internal partitions was carried out. Polystyrene foam was also used as insulation.
external walls are covered with plywood
assembly of internal walls
interior walls raised
first floor assembled
Primer of walls.
Depending on whether you are going to decorate the walls with wood, beautiful stone, wallpaper, or paint the walls, it is worth spending time priming the drywall. It's a good idea to do this now. Without any worries, you can be messier with your work without the fear of priming your finished floor.
We prime the walls before laying laminate or parquet
Another advantage of priming now is that you will be able to see defects in the drywall through the dried primer. At the current stage, it is also necessary to paint everything that is planned to be painted: the ceiling, walls, any decor, and so on. If your trim doesn't require painting, you can skip this step.
Where to get material for construction in Minecraft
When creating our house, we use only 1 unusual material - End rods or Edge rods. These are special elements that can be obtained in Minecraft with any tool.
How to get a?
Rods can be obtained from a fire rod. Which in turn drops when killing efreets (flying hostile mobs). To obtain the rod, you also need a Chorus fruit (purple block).
What are they used for?
The Edge Rod is often used to illuminate rooms or outdoors. Attaches to any block and from any side. It cannot even be destroyed if the block it is attached to is broken.
What can they do?
The rods are capable of melting snow and ice in the area of two blocks. Easily moved by pistons. The light level is equal to a torch. They do not harm the main character. Therefore, they can be used inside houses, as well as as elements adjacent to the house. For example, as steps.
Vulnerability
The rods can be washed away by water and or lava.
The remaining resources are very easy to obtain. Find the appropriate type of tree and cut it down. The stone is mined in quarries. Many resources can be found in bonus chests. And trees still grow from seeds. So try planting a few seedlings nearby. To use trees as building material to build your own beautiful home in the world of Minecraft.