Building your own home is not an easy task, and it’s not for lack of significant savings. This is an objective reason.
Many people are stopped by the fact that they do not know where to start building a house on their site. The variety of types of work, costs, documents, time, the risk of making a mistake and its possible consequences are scary. Our goal is to provide information on how to step by step complete all stages of building a private house with your own hands. And the final decision is yours.
Individual housing construction - what is it?
Where to start building a house on your site
Explanation of the abbreviation IZHS is individual housing construction. Individual housing construction involves the construction of a residential building on a privately owned plot of land.
Individual housing construction objects are : residential building, extension, superstructure, garage and other permanent buildings. Those. those buildings the construction of which requires permission from local authorities and, in some cases, the consent of neighbors.
A land plot is a territory that has clearly defined boundaries. At the same time, the surface layer of the earth is also considered private property. The depth of the layer is not prescribed at the legislative level. But it is worth remembering that when you are going to dig a well, you are acting within the framework of your interests. If you plan to drill an artesian well, then you are encroaching on state property, which means that its drilling must be agreed upon and documented.
Does this scheme affect the timing of work?
No, it doesn't. If you pay for each stage without delays, then construction proceeds continuously.
The speed of construction of a cottage is largely influenced by two factors - weather conditions and the absence of delays in financing. In good weather, without frequent or heavy rainfall, and without delays in payment, a building with an area of 140 to 170 square meters can be erected in 3 months.
During this period you receive a foundation, a frame with interfloor ceilings, a rafter system and a roof. If we add another month here, then we can install windows and doors, as well as finish the entire facade.
If you are interested in stage-by-stage construction of a house, we recommend contacting this company https://idompk.ru/.
Plot for building a house
To start construction, you need to have a certain budget and land. If there is no plot, and the budget allows, you can buy it.
What you need to pay attention to when choosing a site to build a house:
- personal interests . First of all, set the direction for the search. Perhaps there are memories associated with a certain place, or you want a plot near the water, or in the forest, etc.;
- location . More in demand are plots located within the city or at a distance of 10-15 km from it;
- plot dimensions . Affect the scale of construction. In construction, the proportion is 1:10. That is, on a plot of 6 acres it would be appropriate to build a house of 60 square meters. Whether or not to follow this recommendation is up to the owner of the plot, but in the event of a sale it significantly increases the liquidity of the property;
- availability of infrastructure . Even if complete privacy is planned, it is desirable that there be several more buildings located on the development territory, a medical center, a store, a school, etc. This is especially important if the house is intended for a family with children and is planned for year-round living;
- proximity to transport . It is important for car owners to evaluate the quality of access roads and the presence/condition of asphalt pavement. So as not to end up in a situation where, in order to get home, you need to change your car to another one with a higher ground clearance. For those who do not have a car, proximity to public transport is desirable;
- availability of communications . Is it possible to connect to central heating, water supply, sewerage. Are power lines connected to the site? Owners of plots in newly created satellite villages often face this situation;
- state of ecology in the area . It may turn out that living here is fraught with negative consequences (proximity to hazardous production);
- soil type . The choice of foundation and the possibility of constructing a well depend on it. In practice, it may turn out that this soil is generally not suitable for the construction of heavy objects. That is, it is possible to build a summer house or a small dacha on it, but building a two-story house with an attic is unrealistic.
- market value of the plot . It is determined by all parameters together. The final price will depend on the owners of the site and your ability to bargain reasonably.
Advice. Having decided on a site, do not be lazy to check the legal purity of the documents and the compliance of the actual dimensions of the site with the dimensions indicated in the cadastral passport. You may be sold territory that actually belongs to someone else.
The situation with the site can develop according to two scenarios:
Firstly , permanent buildings may already be located on the site. A fairly common situation is the acquisition of a plot of land with an already built house. Now we are talking not about its restoration, but about demolition. The advantage of such a site is that the main communications are connected to it. In this case, in addition to the above parameters, you need to check the legality of communications.
Secondly , the site may not be developed. We will pay attention to this option.
Stage two: External (external) wall insulation
Insulating the walls of a house is done in order to save heating costs. With external insulation of the facade with modern thermal insulation materials, it is possible to achieve savings in heating or cooling costs of the house up to 50%, provided that the finishing is done correctly.
Insulating a house from the outside is a set of measures that includes vapor barrier, waterproofing, finding the dew point, laying an insulating layer and external decorative cladding.
The advantage of external insulation is that you can use mineral wool or polystyrene foam of any thickness without worrying about reducing living space inside the house. In addition, it is convenient to carry out work and environmentally safe.
Developers use internal insulation instead of external insulation, usually in one case: if the facade of the house is of decorative value (log frame, wood carving, etc.).
The main material for wall insulation in Russia is, of course, mineral wool.
Wall insulation with mineral wool
Mineral wool (mineral wool) is made from various materials that are broken down into fibers. They are then formed into slabs or rolls. Mineral wool fibers have a random weave, which increases the material’s resistance to deformation.
The main advantage of mineral wool is, of course, its thermal insulation qualities. It is also especially important that mineral wool not only protects the house from the cold, but also keeps out the heat in summer, thanks to its insulating ability.
In addition to thermal insulation, developers also use mineral wool for soundproofing premises. It is mainly used to insulate external walls, pipelines and ventilated floors. It is also preferred because of its fire resistance; it can withstand high temperatures and does not support a fire for a long time.
Is mineral wool harmful to health?
Disputes on this issue have not stopped for several years, but no solid evidence has been obtained regarding the harmful effects of the material on the human body. Mineral wool is officially classified as hazard class 3 for human exposure and is considered a material that cannot be classified as a carcinogen.
Given the current level of air pollution, mineral wool is perhaps the least evil, so its use in residential areas is quite appropriate.
How to choose mineral wool?
First of all, it should be noted that the product must be manufactured in accordance with GOST. This is a guarantee that thermal insulation using it will be performed at the proper level. In order to ensure an optimal level of thermal insulation, it is necessary to pay attention to the density of the material. The higher it is, the denser the mineral wool, which means it will better cope with its functions.
When insulating vertical walls, you need to pay attention to the location of the mineral wool fibers. If they are arranged in a chaotic manner, the insulation is more resistant to deformation, which means it is more suitable for insulating vertical walls, because it is less subject to shrinkage and deformation.
When thermally insulated with mineral wool, the area of the room is reduced due to the exposure of lathing and sheets of plasterboard, which must be used to cover the insulation. If a small country house is being built, in this case every square centimeter is valuable, so reducing the area due to the internal cladding of the walls leads to a visual reduction in space.
Is there an alternative to mineral wool?
In addition to mineral wool or materials based on it, private developers also use foam plastic made using special technologies to insulate walls. This can be extruded polystyrene foam or penoizol, made from polymers based on various resins.
Below is a table of thermal conductivity characteristics, from which it is easy to understand that polyurethane foam, polystyrene foam and polystyrene foam retain heat better than mineral wool.
Both finishing materials are allowed for use in the Russian Federation in the construction or renovation of residential buildings. But, despite their environmental safety, it is recommended not to use them indoors if it is possible to insulate the house from the outside.
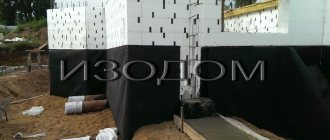
In addition to foam plastic and its analogues, you can pay attention to materials that came to us from Canadian construction technology: sandwich panels. They are also called sip panels or OSB boards.
Such slabs consist of a thick layer of insulation and two sheets of chipboard.
The SIP panel is a ready-made facade material and does not require additional insulation, waterproofing or vapor barrier. This technology allows you to build a warm house within one calendar month, and work can be carried out at any time of the year.
Where to start building a house on an empty lot?
Decide on the style of the site/house
The appearance of the building, its location, the choice of material, etc. will depend on the design.
The size of the house depends on the number of people permanently living in it. The house can be made into several floors, thus it is possible to obtain sufficient space, but not at the expense of developing the site.
Note. If you plan to dig a well, you need to immediately call the experts who will tell you where the water is. Perhaps the only place on the site where the aquifer is close to the surface will be exactly the place where it was planned to place the house. By the way, in this case, you need to talk with your neighbors and find out what quality the water is in the area.
Independent construction of a country house will be easier, since there is no need, for example, for heating.
When to start building a house?
It is better to start construction work as soon as it gets warmer - i.e. in early spring. There will be six months of good weather at your disposal. In practice, the best time to start construction is late spring. More precisely, the period when the night temperature does not drop below +5°C. At this time of year, not only will the snow melt, but also the water will leave, interfering with digging a pit or making a foundation. In addition, in warm weather, labor productivity is much higher.
Note. You should not expect to complete the construction of a house in one season. According to standards, only the foundation must survive for 1 year. And, for example, the construction of a brick house differs in time from the construction of a frame house. So, conservation of unfinished construction is inevitable (with the exception of prefabricated houses).
What material to build a house from?
The choice will be influenced by: the period of operation of the house (for permanent residence or only in the summer), budget, environmental requirements, fashion, the ability to complete the work quickly with the involvement of specialists or with your own hands. Let's consider several options:
- building a brick house. A common material for construction. The undoubted advantage of a brick house is its time-tested service life;
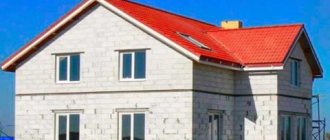
- building a house from foam blocks. In terms of price/quality ratio, foam concrete occupies an advantageous position. A foam block made of durable cellular concrete, due to air bubbles, has good thermal conductivity and low weight;
- building a house from aerated concrete blocks. This material is durable, lightweight, has high thermal conductivity and breathability, and is easy to process. Construction with aerated concrete does not impose any special requirements on the construction of the foundation;
- construction of a house from wood concrete. It is practiced less frequently due to the high cost of the material. Arbolite blocks are a type of lightweight concrete, consisting of a mixture of cement and crushed wood (chips). Characterized by low water absorption and high thermal insulation properties;
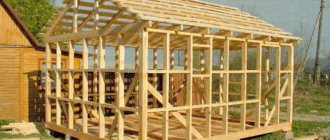
- frame or modular construction. A special feature is the availability of modular designs. They are cheaper, and the work is completed in a short time. This structure is lightweight and therefore does not require significant foundation costs;
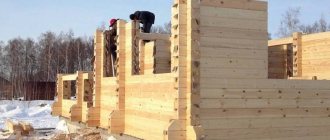
- construction of a wooden house.
Based on the cost and manufacturability of the work, it belongs to the category of elite construction: – houses made of rounded logs; – houses made of profiled timber; – houses made of laminated veneer lumber.
Do not forget that any building material has both advantages and disadvantages that need to be eliminated.
What to build a permanent home from?
A brief comparative description of materials for building a cottage in the table (approximate prices for 2016-2017). Which one is better is up to you to decide.
| Material | Brick | Foam block | Aerated concrete blocks |
| Cost, rub/m3 | from 6 000 | From 3 300 | From 3 500 |
| Construction period | 5-7 months | 4-6 months | |
| Construction start time | End of spring | ||
| Advantages | — durability; — reliability; - thermal conductivity | - price; - speed; - thermal conductivity. | |
| Flaws | — wet work; — deadlines. | - not environmentally friendly; - finishing required; - presence of counterfeit. | inherent disadvantages of foam blocks + complete air permeability + shrinkage and cracking of the material. |
| Material | Arbolit | Frame construction | Beam/log |
| Cost, rub/m3 | from 000 | From 000 sq.m. area | From 8 000 |
| Construction period | 4-6 months | 1-2 months | 3-4 months |
| Construction start time | End of spring | all-season | The beginning of spring |
| Advantages | - speed; — reliability; — thermal conductivity. | - speed; — no shrinkage; - light weight. | - speed; - environmental friendliness; - no need for finishing. |
| Flaws | - price; - need for finishing; - presence of counterfeit. | - price; - additional finishing; — risk of fire; - low noise insulation. | — shrinkage is possible; - drying of wood; — the need to attract specialists. |
Who will build the house?
The solution to this issue involves choosing from three options:
The work is entrusted to the general contractor
This is a company that undertakes to deliver a turnkey project. The set of services includes everything from site assessment and project development to finishing work. Searching and delivering material is also their responsibility. The general contractor may involve subcontractors. But he must invest within the agreed time frame and budget.
The work is done entirely by hand
It is worth mentioning that it is almost impossible for one person to build a house. This implies the involvement of assistants from among friends and relatives, at least one of whom knows the procedure for performing work of a certain type. This option allows you to save up to 20% on the cost of materials (often contractors include their interest in the cost of the purchased material), as well as up to 100% on the cost of work. In addition, full control over the construction process is exercised.
Disadvantages of the do-it-yourself approach:
- increase in construction period;
- lack of knowledge and experience in performing this or that type of work;
- difficulties in obtaining design and permitting documentation;
- responsibility for the result of construction.
Some are done in-house and some are done by subcontractors.
The most common and realistic way. In this case, the owner performs independently that part of the work that he is able to do, and specialists are brought in for the remaining tasks. At the same time, the customer, being on the construction site, can quickly assess the quality of work.
But this approach is fraught with disadvantages:
- searching for highly specialized companies takes a lot of time, and the cost of their services is higher. As a rule, they turn to handicraftsmen (shabashniks), but there is no confidence in the quality of the work;
- complete control over the progress of work. If the owner unknowingly missed some point in the construction, no one will point out the mistake. Hired people do their part of the work and leave;
- violation of deadlines. There may be some part of the work that was not completed on time. Because of this, the construction of a cottage with your own hands will have to be suspended, which is fraught with additional payments and loss of time;
- shared responsibility. When a marriage occurs, it is difficult to find the culprit. For example, tilers will blame the mason or plasterer for crooked walls, or the floor was poured incorrectly. And there are many such examples.
Note. Users advise hiring craftsmen who will do the next stage of work and evaluate the work of the previous ones. This way they take responsibility for their part of the work.
Budget for building a house
After all of the above, it makes sense to reconsider the construction budget.
What increases construction costs:
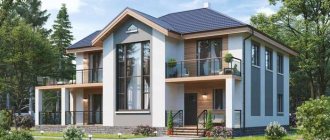
- individually developed project;
- complex structure configuration;
- the presence of balconies, basements, winter garden, garage, swimming pool, sauna, etc.;
- a significant number of rooms;
- broken roof;
- use of unreasonably expensive materials in construction.
What reduces the cost (what to save on):
- ready-made standard project;
- simple form of structure;
- refusal of the second floor in favor of the attic (subjective);
- the presence of a significant number of windows;
- reduction of partitions;
- reasonable choice of foundation type;
- reasonable thickness of external and internal walls;
- choosing a roof configuration that allows rational use of lumber and minimizing waste of roofing material.
Cost ratio for building a house
The data from the table will help you calculate the budget, or rather, distribute it.
| Work cycle | Contents of the cycle | % of total costs |
| Preparatory | — preparation of documents; — search for contractors; — purchase or development of a project. | 0-1 |
| Null | - digging a pit; - pouring the foundation. | 15-35 (depending on the type of foundation) |
| Elementary | general construction work: - erection of walls; — installation of the rafter system and roof; — conservation of unfinished buildings if necessary. | 35-50 (depending on the number of partitions, roof configuration and cost of roofing material) |
| Final | - filling window and door openings. | 5-15 (depending on number, area, material) |
| Engineering work | — laying of intra-house communications and their connection to central networks; — installation of electrical wiring; - plumbing work; - heating and insulation. | 15 |
At this point the planning stage is over, it’s time to move on to direct action.
Construction of a wooden house: material
Deciding in favor of a wooden building usually involves choosing between three popular solutions. This is log, timber or frame-panel construction. If the construction of a house from logs is considered a centuries-old tradition, now the “palm of championship” has been taken over by buildings made from timber. It is not entirely correct to include frame buildings in this wooden category.
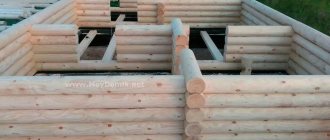
Houses made of logs or timber
The construction of log buildings in Rus' has been carried out since time immemorial, so the technology is thought out and honed to the smallest detail. If it is not violated, then such a building will serve people for about 150 years, or even more, without any problems. The main building material can be a regular or rounded log, timber - simple, profiled or glued, a carriage and other auxiliary lumber.
Since there is no shortage of attractive offers on the construction market, choosing only one of them can leave you at a loss. The reason for the confusion is clear: after the construction of a building is completed, not all owners are satisfied with its quality. Some owners have no complaints, while others, on the contrary, are faced with unpleasant facts - deformed walls, gaps, cracks, twisted lumber or skewed roofing.
How to get a strong, reliable home, but not go broke? Purchase high-quality material and study the technology and features of wooden house construction in advance. However, that’s all: the longevity of a building is influenced by its proper operation, on which its service life directly depends.
Frame-panel buildings
It is not entirely correct to classify such buildings as wooden houses (or rather, completely incorrect), although many of their manufacturers prefer to call these structures that way. The share of wood in them is only about 10%.
Frame-panel houses are mainly attracted by the speed of construction. Like any structure, “frame” buildings have disadvantages, but in this case it makes no sense to consider them, since frame buildings have not “deserved the honor” of being called real wooden buildings.
Where to start building a house on your site
The beginning of work on a site with dilapidated buildings includes the demolition of old buildings and clearing of debris from the area. The demolition of the building must be reported to the local BTI and a document must be obtained confirming the exclusion of the demolished house from the federal register.
If the house was connected to communications, you need to coordinate their disconnection before demolition with the relevant services, for example, the gas service. It's easier when the site is empty.
In this case, the sequence of work can be presented step by step:
Home supply
Water supply and sewerage
Before carrying out water supply work, it is necessary to draw up an appropriate project. Then, according to it, you need to dig a trench, lay pipes, install a meter, and for internal water supply you need to use metal-plastic or plastic pipes. If the central sewerage system does not reach your home, you need to dig a cesspool or a septic tank (a cesspool with bacteria). Dimensions are determined taking into account wastewater calculations. Sewage is done at the site planned according to the house design.
Electricity supply
At the final stage of building a house, it is necessary to carry out electrical installation work, adhering to the existing energy supply project. After all the work has been completed, the electrical wiring system needs to be checked (an inspector from the appropriate authority is called). This stage involves laying electrical wiring and grounding.
Gas supply
To order a gas supply project, you need to contact an organization that has the appropriate license. Having purchased the necessary materials, you should connect to the in-house gas pipeline. Next, the stove and heating boiler will be connected using metal connections. At the last stage of the gas supply installation, a tie-in into the main gas pipeline is carried out.
Where to start building a house with your own hands
First stage - Pouring the foundation for the house
A concrete foundation is a significant part of the construction work of a house. Do not forget that the foundation must stand for some period (depending on the type) and gain strength.
The choice of foundation type depends on:
- soil composition on the site;
- depth of soil freezing in the region;
- structural features (its weight, configuration and dimensions);
- desire to have a basement.
We recommend which foundation to choose for your home
Types of foundation:
- brick, timber. Suitable only for light buildings: gazebos, baths, saunas, greenhouses, summer houses. They are unable to withstand significant weight;
- columnar foundation. The device consists of installing support pillars under the key components of the future structure. It is also suitable for light buildings. It is used if the soil on the site is not subject to heaving and movement. The disadvantage is the inability to make a basement;
- pile foundation. These are poles with pointed ends that are installed on moving soil or in the presence of groundwater located close to the surface. Suitable for heavy buildings. Rarely used in private construction;
- pile-screw foundation is a type of pile foundation, in contrast to which metal piles are used instead of concrete piles. Screw piles are screwed into the ground, and a frame (grillage) is mounted on top. Foundations on screw piles are popular among individual developers because... well suited for uneven terrain and problematic soil; in addition, it is cheaper and can be done with your own hands.
- shallow strip foundation. Filling MZLF allows you to get a high-quality foundation for the whole house at lower costs compared to tape.
- strip foundation. The most common type. Filled below the freezing depth, it compensates for soil movement and allows you to evenly distribute the load of the house on the soil. Its lower cost compared to a solid foundation has made it a leader in individual construction;
- monolithic (slab, floating) foundation. The most expensive of the types, but it has a large margin of reliability and durability. It is chosen when the soil on the site is prone to movement (peaty soil, swampy soil, floating soil, heaving soil). Despite the fact that it is not laid to the freezing depth, such a foundation is able to withstand significant loads due to its ability to move along with the soil.
General requirements for pouring the foundation
Pouring each type of foundation has differences in technology and its own nuances.
- Reinforcement is a prerequisite when pouring most types of foundations. At the same time, the reinforcement for the foundation must be laid around the entire perimeter and secured together by tying, not welding;
- fragments of wire or iron are not used as reinforcement;
- for pouring, only freshly prepared concrete is used, grades not lower than M 200 (strength B 15);
- the foundation of any kind must stand;
- A mandatory step is waterproofing the foundation;
- solid foundations are insulated, which reduces heat loss in the house;
- installing a drainage system near the foundation or later near the blind area will increase its service life and prevent subsidence of the building;
- Compliance with foundation manufacturing technology is mandatory.
While the foundation is being built, you can start building other objects.
Stage 2 – Construction of the basement of the house
The base is a continuation of the foundation. But it is located in a more aggressive external environment compared to the foundation and walls of the house.
When using a columnar or pile foundation, facing the base may include sealing the free space with various materials (smooth slate, metal, brick, etc.).
The base is affected by: snowdrifts and melt water, the weight of the walls, pressure from soil heaving and other factors. Therefore, more durable materials are used for its manufacture or additional finishing is provided.
Material for cladding the base:
- granite;
- clinker brick;
- acid-resistant brick;
- insulation + plaster;
- basement siding.
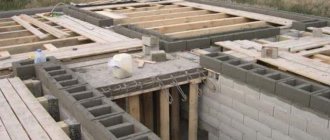
Stage 3 – Construction of the walls of the house
External and internal walls are built simultaneously to distribute the load on the foundation. The construction of the walls is planned in such a way as to be completely completed during the season. Materials for constructing walls were discussed a little higher.
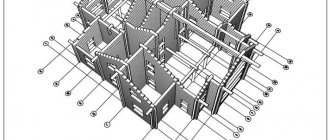
When building a two-story house, the installation of floor slabs affects the speed of work. Round hollow-core slabs can be used as floors; this will reduce the time for pouring monolithic floor slabs during the construction of walls.
Stage 4 – Roofing work
Depending on the developed project and the selected material, the roof truss system of the house and the roofing material are installed.
Types of rafter system
- single slope;
- gable;
- hipped;
- attic;
- multi-pincer;
- hip (half-hip, hip or tent).
Types of roofing material
Well proven (in order of appearance on the market):
- natural tiles;
- seam roofing;
- asbestos-cement slate;
- ondulin;
- corrugated sheeting;
- metal tiles;
- bitumen shingles;
- cement-sand tiles.
All roofing materials are divided into piece and sheet. Each of them has its own characteristics and requirements for the rafter system. When choosing, you should take into account the load that the roof will have on the walls and foundation, as well as the time and complexity of the work.
A comparative analysis of the advantages and disadvantages of roofing materials is given in the table.
Comparison of roofing materials (advantages and disadvantages)
At the stage of building the roof of a house, a drainage system is installed. External systems (plastic, metal) are used more often, but there are cases when internal drainage is indispensable.
Note. A polygonal roof is typical for buildings with complex contours (geometry). The more bends the roof has, the more difficult it is to ensure its functioning, from the point of view of roof leaks.
Stage 5 – Installation of windows and external doors
The best option is to install metal-plastic windows and a metal entrance door. The traditional and cheaper material for making windows and doors is wood.
Stage 6 – Insulation of the house
- insulation of walls. There are external insulation and internal insulation of the walls of the house. The choice is determined by objective factors, but ultimately depends on the preferences and capabilities of the owner;
- insulation of the ground floor floor;
- insulation of the roof or attic floor.
Stage 7 – Engineering communications in the house
Interior work is possible only after the house is reliably protected from external factors: rain, snow, wind. For this stage:
- construction of interior partitions;
- electrical network wiring;
- floor screed or installation of a subfloor made of plywood, or a wooden floor on joists. An effective option is a heated floor system (water, electric, infrared);
- plastering walls;
- distribution of heating, water supply, gas and sewerage pipes;
- installation of heating devices (boiler, radiators) and plumbing;
If it is impossible to connect to the central heating system, in private construction, home heating systems are used: electricity (convectors, electric boiler, heated floor, PLEN), gas (water heating), solid fuel, combined, or install a stove.
It is better to entrust the installation of a heating system to specialists.
Stage 8 – Construction of a blind area around the house
Performed one year after the construction of the house is completed. During this period, the house will shrink, and the blind area will perform its functions well. A storm water drainage system is installed under the blind area or a drainage system is installed.
Stage 9 – Finishing work
They can be performed at any time of the year, even after the house is occupied. Finishing work does not require conservation due to the weather; it can be carried out over a long period of time.
Where to start building a house - video
Pouring the foundation
After marking the location of the house and identifying utility networks, we move on to the next stage of building a house - pouring the foundation. Since I live in a seismic area, I will talk about capital concrete construction.
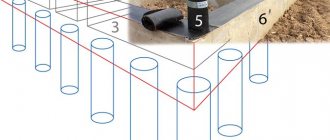
When pouring the foundation, it is necessary to take care of installing mortgages for introducing utility systems . Systems can be installed under or through the foundation. If the nets pass under the foundation, then they can be immediately thrown through steel sleeves. If the networks pass through the foundation, then both steel sleeves and asbestos-cement pipes can be installed. So some people make mortgages from wooden boards with a reserve. Then a sleeve is installed in the remaining hole through which the nets are inserted.
Also, after pouring the foundation, do not rush to fill it up, not inside or outside . Since, it will be necessary to lay networks around the perimeter of the house or inside the house, or to do hydro and thermal insulation of the foundation. This is an important point in the construction phase of a house. Many people now do this right away. A special hydroprotective mixture, for example Penetron, is added to the concrete, and heat-insulating polystyrene slabs are immediately installed into the foundation formwork.
I also never tire of saying that if all the utility networks have not been installed, then under no circumstances should you pour rough screeds, much less finishing screeds . But in 90 percent of cases, foremen do this by simply recruiting clients for work. Just recently I looked at one object where there is no heating, but a finishing screed with a thickness of 150 mm has already been poured.
The man who bought this unfinished house for himself wanted to install warm water floors in it. Again, based on the recommendations of local coven workers, that the floors are mounted on foil insulation. But when I consulted a man and told him that the thickness of the heated floor pie is at least 120 mm, his hair stood on end. Consequently, we decided to install radiator heating and run pipes along the walls and cover them with plasterboard. Thus, if your foreman, before installing all the engineering systems, mentions the need to fill the screed, then kick this foreman in the neck.
But we must understand that construction according to all the rules requires enormous costs, and not everyone can afford it right away. Thus, waterproofing the foundation can be done after dismantling the formwork , and after waterproofing, install thermal insulation.
Preservation of house construction at various stages
- at the foundation stage. To ensure its safety, it is enough to insulate the foundation and fill the space between it and the soil with gravel or sand. Cover the surface of the foundation with waterproofing. If you didn’t have time to do this, you need to at least cover it with film;
- at the stage of construction of the basement. One of the acceptable stages of conservation. The base must be covered with a film, the bottom of which must be pressed down or weighted so that it does not move. It is important to monitor the safety of the film during the period of inactivity.
- at the stage of wall construction.
The most undesirable option. Users and craftsmen agree that if you don’t have time to complete the construction, then it’s better not to start. If such a situation occurs, the type of material used for construction will be of great importance. Walls made of brick and foam concrete will survive the winter normally. It is important to cover areas such as window sills, doorways and the top of the wall with film. Conservation of aerated concrete walls is more difficult. Aerated concrete blocks need to be treated with a concrete primer (for example, Aquastop 300 rub/1l). Unprotected floors will have to be dried. Wooden floors dry naturally, but hollow-core floors will need to be drilled and the water drained out of them. Monolithic floors do not need drying;
- at the stage of roof construction. The second of the acceptable stages of conservation. A box covered with a roof is an almost finished structure. Door and window openings are covered with film or wooden panels. Further types of work relate to finishing and engineering.
Stage-by-stage construction of a house. How much money do you need at each stage?
This scheme for building your own home is attractive because the costs to start construction are low. Conditions, of course, are different for everyone. Before the start of construction, for each stage, some take 10%, and some take 25% of the total cost of the first stage. Although, in any case, splitting the cost of building a house into several stages is a fairly reasonable decision, since you only pay an amount that is comfortable for you, without taking out loans or burdening the family budget.
When choosing a phased house construction scheme, never agree to pay 50% or more. No normal company will ask for so much before the start of work, because each stage of construction is divided into substages and handed over to the customer, so there is simply no need for such a payment. The remaining amount is paid only after signing the acceptance certificate for the work done.
As a rule, construction financing is not divided into the following stages - first the foundation, then the box with floors, and finally the roof and exterior finishing. Materials for each stage are paid 100%. A separate estimate is drawn up for interior finishing and installation of utility networks and a separate contract is signed.
Mistakes when building a private house with your own hands
- tempting prices for work or material. Remember, free cheese is only in a mousetrap. Find out what causes this price level. What does the price include. Perhaps it does not include transportation, or the goods are second-class, or the work will not be guaranteed. There are many other factors that influence pricing; it is advisable to analyze and make an informed decision whether to buy cheap materials;
- lack of a house project. The importance of the project and the consequences of unauthorized construction are described above;
- replacement of materials provided for in the project without agreement with the project developer and specialists. Even replacing the source material with one that is similar in composition, dimensions and physical and mechanical properties, but different, is fraught with consequences. For example, replacing foam concrete with aerated concrete (despite the fact that these are essentially two types of material made from cellular concrete) will come back to haunt you at the stage of preserving the house and on its additional insulation.
Note. Any change in materials of supporting structures must be included in the design.
- choosing a foundation without geological survey of the site. Failure to take into account the type of soil and the depth of its freezing will affect the reliability of the foundation. The construction of a powerful foundation, on simple or rocky soil, entails unreasonable expenditure of funds;
- lack of a diagram of utility networks. The presence of a diagram is mandatory, because part of the communications is laid in the wall, plinth or foundation. And this is difficult to do without a diagram.
- lack of a full estimate for building a house. Even if at the moment you do not have the required amount of funds, this does not mean that you can do without an estimate. It is important to understand how much it costs and within what time frame must be paid in order to have an idea of how long construction will take and how often funds should be received to continue the work. To the amount received, another 10-15% should be added for unforeseen expenses. An estimate is needed even if the construction of a private house is done with your own hands. Fixing expenses will help you estimate the value of the house upon completion of construction.
House project
So, let's start with the project. The project usually indicates the location of the house relative to the site or the layout of the apartment. Construction begins by marking the site where the house will be built.
Before this, it would be great to obtain all permits and technical conditions regarding the connection and input of utility networks, such as electricity, gas, cold or hot water supply, sewerage, etc. But since this is all long and bureaucratic, many developers make technical conditions during construction.