The arrangement of a recreation area on the shore of a reservoir or on a slope assumes that the floor in the bathhouse on screw piles will be installed taking into account the characteristics of alluvial or sedimentary soil. It is these rocks that make up the soil on the banks of a river or pond, slopes, and hills.
The foundation for a bathhouse on screw piles is suitable for location on a slope, so it is possible to adjust the height of the pile
Advantages of a foundation on screw piles
Installing a floor in a bathhouse on screw piles is much easier to do than on a massive foundation. Advantages of this design:
- the foundation can be installed very quickly with your own hands;
- screw piles noticeably compact the soil, ensuring the stability of the entire structure;
- the foundation is convenient to repair if necessary;
- installation of screw piles is easy to do using modern devices and devices;
- the foundation can be installed in any weather;
- screw piles provide effective automatic ventilation of the underground space of the bathhouse;
- the service life and reliability of the pile foundation are quite long;
- a properly installed floor will protect the walls of the bathhouse on screw piles from the absorption of sediment and melt water from the soil;
- a screw foundation can be installed on unstable soil, which swells and swells during the season of heavy rainfall.
The foundation for a bathhouse on stilts can be installed even in winter
A screw pile foundation is installed very quickly.
The advantages of a pile foundation make its installation quick, and its operation reliable, simple and convenient. The main thing is to first study the properties of the soil in the area chosen for the bathhouse, carry out all the calculations correctly and carry out the necessary work in strict accordance with the instructions.
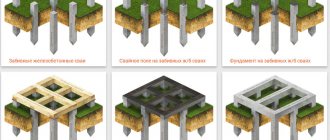
Screw piles must be selected depending on the type of soil
Scheme for installing a screw pile in the ground
Screw piles are installed for all load-bearing walls and elements
Bathhouse foundation design: advantages of screw supports
You can make almost any foundation for a bathhouse with your own hands, but screw piles are most often used to build a support base. Supports have undeniable advantages over other types of foundations:
- Screw supports can be easily screwed into the ground with your own hands without the help of special complex devices and devices; you only need the help of two more people at the time of installation of the piles.
- The construction of a foundation for a bathhouse made of screw piles allows you to install a structure on almost any site, even in the presence of a high groundwater level and a significant slope.
- Screw supports can be installed in any type of soil.
What is the floor in the bathhouse made of?
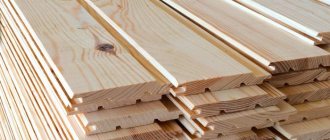
The floor in a bathhouse on screw piles can be made from different materials. Concrete screed and coniferous wood are mainly used. Installing a concrete floor will require significant material costs. However, such a floor is resistant to constant exposure to moisture. Therefore, the concrete floor in the bathhouse will last for decades. Wood is a lower cost material. However, when exposed to moisture, a wooden floor quickly deteriorates. Treatment with an antiseptic will significantly slow down this process. But after 7-10 years, the wooden floor will need to be replaced.
Scheme of fastening various floor materials to a pile
The concrete floor in the bathhouse is most resistant to moisture
The advantages of a wooden floor are not only the low cost of the material. If necessary, you can replace damaged elements without completely changing the coating. If you regularly re-treat wooden components with an antiseptic, you can almost double the service life of such a floor. The optimal option is when a concrete screed is made in rooms of high humidity - steam room and washing room. You can make a wooden floor in the locker room and rest room, because the humidity level here is much lower.
It is better to place a wooden subfloor in a bathhouse in the locker room area
Floor construction
Installation varies depending on which type you belong to.
Spilling floors
If you decide to make a floor in a bathhouse on screw piles, it will not require a significant financial investment, it is easy to install and lightweight in design.
However, preparation for this type of coating begins when marking the perimeter of the future bathhouse and screwing in the foundation piles. A pouring floor in a bathhouse on stilts involves the flow of streams and drops of water falling down through the floor covering.
Previously, most bathhouses and shower cabins were built this way, where water flowed through the boards in the floor directly onto the ground, but the eternal problem was excessive floor moisture and a constantly damp floor.
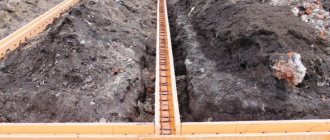
With this arrangement of floors in a bathhouse on stilts, care is taken first of all for the underground, which will absorb the entire amount of flowing water. Thanks to the fact that the building stands on pillars, this is easy to do. To do this, a pit up to 700 mm deep is dug in the middle of the bathhouse area, to which slopes with a gradually increasing level approach from the edges. Such a wastewater receiver is covered with a layer of fine crushed stone and filled with a layer of screed.
From the pit to the cesspool, or the place designated for drainage, a pipe runs that drains water. Sometimes, instead of this design, special plastic pallets are used that perform a similar function.
Attention! Before installation, all wooden parts of structures are carefully treated with an antiseptic.
Once the water intake is ready, you can proceed directly to the installation of the pouring floor. To do this, crown beams and intermediate logs connecting to them are laid on piles covered with waterproofing.
Floor boards are laid directly on the joists, with the most common option being to create floor boards with load-bearing boards running along the joists. The technical gap between the boards is 3 mm, between the floor boards and the perimeter of the bathhouse - 2 cm. This design allows you to periodically remove the floor covering and dry it.
Information. With all the advantages of poured flooring, it should be recalled that it is made most often in the southern regions and is used in the summer. In winter, or in cold windy weather, it will be uncomfortable to be in such a structure, much less take a shower.
Non-spill floors
Against this background, a non-spillable floor looks much more solid and substantial.
A leak-proof floor system is much more complex.
It requires a larger variety of materials, a responsible approach and execution of work.
However, it justifies itself perfectly from an operational point of view.
Technically, a leak-proof floor in a bathhouse can be made in two ways:
- made of wood;
- made of concrete.
Let's say you decide to build a wooden floor in a bathhouse on stilts (we'll look at how to insulate the floor later). First of all, it should not absorb or allow water to pass through. This design is perfect if you decide to build a bathhouse from timber.
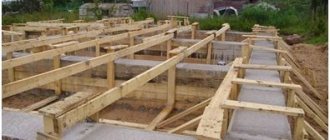
The floor in a frame bathhouse on stilts is made on separate support pillars, screwed or dug into the ground, and crown beams installed on them. To do this, the transverse logs are attached to the crown and intermediate beams by means of a notch or with the help of anchors. The pitch of the transverse beams is 400-500mm.
Let's consider further installation of the floor using the example of its structural pie and the following components:
- subfloor;
- waterproofing and wind protection;
- insulation;
- panel covering lag;
- insulation layer;
- vapor barriers;
- reinforcing mesh;
- heated floor;
- screeds;
- finishing floor covering.
How to make a floor
- After marking and installing the pillars, crown beams are attached to them (with anchors through holes in the end plates of the piles). Logs are installed across them;
- Boards are nailed to the bottom of the joists - holders of the subfloor. OSB sheets 6 mm thick are placed on them and screwed with wood screws. A hole for the drain is cut right there in the right place;
- The subfloor is covered with hydro- and wind protection in the form of a special film, which is nailed to the joists with a stapler and staples. The joints of the film are taped with mounting tape.
- The next stage of building a bathhouse on screw piles is insulating the floor. A layer of insulation is placed in the existing space between the joists. Most often it is easy-to-use ecowool, less often - mineral wool. If ecowool is used, it is compacted and leveled with the logs. A drain is installed here.
- The insulation layer is covered with another layer of OSB board 18 mm thick. OSB sheets are cut so that the joints fall on the centers of the joists. The technical gap between the joints should be 2-3mm. The drain is waterproofed using plumbing tape and sealant.
- The next stage is laying insulation in the form of extruded polystyrene foam (EPS), in the form of slabs. They are mounted staggered, the joints between them are glued or foamed with polyurethane foam, and a hole is cut for the drain. In a place where a stove or other floor heating means is provided in the bathhouse, insulation is not installed.;
- The EPPS is covered with an overlapping vapor barrier film, the joints are taped. The film is applied to the walls and connected to the vapor barrier of the walls to prevent rotting of the supporting beams of the structure.;
- If a furnace is built in the future, the space left without EPS is reinforced with a metal grid, surrounded by formwork, and a screed is poured. — This is followed by laying a metal grid over the entire area and installing the contours and elements of a heated floor - electric or water (if this is included in the project);
A finishing screed made from a mixture of cement and sand is poured over the beacons. The screed should be poured so that there are no voids left. Otherwise, cracks may appear, which will lead to failure of the heated floor elements.;- Complete drying of the screed takes 14-28 days. It should dry naturally, without the use of heating systems and without turning on the heated floor. Only after this can you begin laying the finishing coating, which can be wooden (removable) or tiled.
- In the second case, the screed is coated with a primer and covered with ceramic tiles using tile adhesive.
Concrete floor
It is rarely used, but in practice it still occurs sometimes. But it should be noted right away that this option is acceptable only for hard soil, where, for technical reasons, piles were chosen as the foundation.
Information! The concrete floor is bulky, difficult to install and requires significant financial costs. However, unlike wooden floors, it is not subject to deformation and is designed for a long service life.
A distinctive feature of this design is the use of welded I-beams as joists.
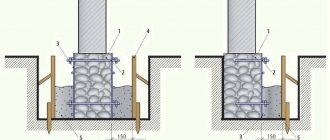
First you need to prepare the foundation of the floor for the bathhouse. To do this, support piles are calculated and screwed along the perimeter of the structure - along the load-bearing walls with a certain pitch - individual for the size of a particular building.
I-beams are attached to piles covered with a layer of waterproofing. Such beams are especially strong due to their stiffening rib design. They are able to withstand and not bend even under heavy weight (for example, when erecting a two-story building on such a foundation).
The next structural element is corrugated sheeting, which is screwed to the beams due to the presence of factory perforations in them. Corrugated sheeting should be chosen with a thickness of at least 1.2 mm. with a wave crest height of at least 15 mm. The waves of corrugated sheeting are filled with a rough screed. Slabs of extruded polypropylene or dense foam are laid on the screed that has dried naturally.
The area is covered with a layer of waterproofing and foil-coated polystyrene foam with the foil down to prevent heat loss, as well as a reinforcing knitted metal mesh. You should immediately lay a heated floor, supply all communications, and drain the sewerage system to a pre-connected pipe. Then, using a well-known technology, a layer of finishing screed 2 - 5 cm thick is poured, after drying it is followed by priming and laying the floor covering.
Thus, the structural pie of such a floor looks like this:
- perforated I-beams mounted on piles;
- load-bearing corrugated sheet, thickness 0.7 - 1.2 mm;
- rough concrete screed with a thickness of 70 - 150 mm;
- insulation (for insulating floors in a bathhouse on stilts, polystyrene foam, mineral wool or extruded polystyrene foam are best suited;
- waterproofing layer;
- finishing screed 2-5 cm thick;
- finishing floor covering in the form of tiles, boards.
Note that the floor created in this way is an independent base, not tied to the walls or strip foundation of the bathhouse. This option is designed for those cases when the construction of a bathhouse is planned with the number of floors of 2 or more.
Or when the walls in the bathhouse are planned to be built not from timber, but from brick, foam blocks, gas blocks and other building materials in which the binder is a solution of cement and sand. In this case, the pie acts as a kind of pillow with a preset zero level.
Below you can watch a useful video on the topic of making a concrete floor on stilts:
Preparatory work
So, the foundation is installed and the walls are erected. Now we are making the floor in the bathhouse on screw piles. You need to thoroughly prepare for this work, study the technology, purchase everything you need, and invite assistants.
For work you will need the following materials:
- tongue and groove board;
- beam;
- fastening material - nails, etc.;
- cement;
- coarse sand;
- expanded clay and/or other bulk materials;
- roll waterproofing;
- antiseptic composition;
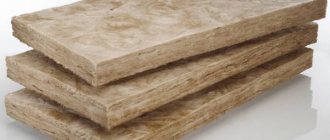
- mineral wool or other insulation.
Tools and equipment for work will require:
- construction mixer;
- tank for mixing the solution;
- wood hacksaw;
- grinder saw;
- construction knife;
- hammer;
- mittens, work clothes, rags.
The list of necessary tools and materials can be specified after it has been determined from what material and in what way the floor in the bathhouse will be installed on screw piles.
Wooden floors - features
The main condition for a leak-proof floor in a steam room is that the logs are mounted perpendicular to the direction in which the used water flows. The main element of such a floor is strong logs resting on a beam reinforced over a columnar foundation.
It should not be forgotten that all contact areas must be carefully insulated using roofing felt material and liquid bitumen, which is used to treat the connecting areas.
If floors are laid on piles, it is recommended to use more effective insulating material - expanded clay stone, mineralized wool and others. Boards pre-impregnated with antiseptic compounds are laid on the fixed logs. It is worth noting that the impregnation of the floor in the bathhouse must be chosen correctly, taking into account the type of wood. If the floor is constructed of a leaky type, then gaps of several millimeters are left between the boards, through which water will be able to freely flow into the drainage hole.
Floor insulation: general rules
Before installation and insulation of the floor, it is necessary to carry out an antiseptic treatment of all wooden components of the finished structure. A special composition for this can be purchased at a construction supply store. An antiseptic will protect the wood from the penetration of harmful microorganisms that can destroy it.
The depth of floor insulation depends on the premises of the bathhouse
If a bathhouse on screw piles will be used in winter, floor insulation begins with laying insulation between the supporting elements of the building. Most often, mineral wool (layer thickness 25 cm) or polystyrene foam (layer thickness 15 cm) is used for this.
Scheme of insulation of a concrete floor in a bathhouse
If the thickness of the beams is insufficient for laying insulation, additional bars are attached to them perpendicularly. Waterproofing is pre-installed. On top of it, between the beams, the bottom layer of insulation is laid out. The top layer is laid between additional bars. Next, another layer of waterproofing is laid, on top of which the finishing floor is mounted. An insulated layer in a bathhouse on screw piles will extend the service life of the structure and significantly increase the comfort in the bathhouse.
Scheme for insulating a wooden floor in a bathhouse
Thermal insulation of the floor in the dressing room
The dressing room performs an important function - it does not allow cold air from the street to penetrate into the steam room and washing room, retaining heat. It is reasonable to assume that thermal insulation will not be superfluous here either.
The method of work and the list of materials used are almost the same as those used in insulating other bathhouses. The difference is that there is no need to create a slope for water flow. The insulation is either laid between the joists on top of the subfloor, or placed on a sand and gravel cushion, previously covered with film. The option of thermal insulation of the rough screed is also possible.
- Protection and prevention of bath floors
- The main danger to the flooring in a bathhouse is high humidity, which occurs due to regular evaporation of water. The use of waterproofing is strictly mandatory here, as is the treatment of all materials used for construction with specialized impregnations with a fungicidal additive. Neglect of these requirements will inevitably lead to the appearance of fungi and mold, which can lead to the destruction of wooden and concrete elements of the building in a fairly short time.
- Each structural element of the floors must be treated with an antiseptic composition. In building materials stores, such compositions are presented in a wide range. Each surface must be processed at least twice. If insulation material is laid between the rough and finished floors, laying a waterproofing film is also mandatory. A set of such actions will have a positive effect on the service life of the bathhouse. After all, activities related to its repair will be delayed for several years.
- If objective reasons prevent the implementation of such a set of protective measures during construction work, other procedures are carried out to prevent the destruction of concrete and wooden surfaces. For this purpose, it is necessary to disassemble the wooden flooring, dry and ventilate the boards. Decaying areas must be removed and replaced with new ones. Then the joists and floorboards need to be cleaned with emery, soaked well with antiseptics and dried again.
Base installation
Effective insulation of the floor in a bathhouse on screw piles is done using a base, which is mounted around a pile-screw foundation. The plinth reliably closes the free space under the bathhouse floor from the penetration of cold air and significantly improves the appearance of the finished building.
The empty space of the plinth is covered with some panels
The main materials for the base are thermal insulation boards and decorative panels. An additional layer of heat insulation is laid between them. Typically, penoplex, polystyrene foam and similar materials are used for this. Sealing the joints between the panels after assembling the base is done using polyurethane foam.
To reduce heat loss, insulate the basement under the bathhouse
You can insulate the base of a bathhouse using penoplex.
Principles of installation of screw piles
In order for the installation of screw piles for the foundation to be carried out as correctly as possible, a number of basic rules should be followed.
It is necessary to pay attention to the following points:
- The distance between separate piles should not exceed 3 meters, otherwise the floor in the bathhouse will begin to sag due to excessive load.
- If the distance between adjacent joists exceeds 3 meters, additional supports must be installed in the central part of each beam so that the floors do not spring when walking.
- Since a pile-screw foundation requires a sparser placement of supports than, say, a strip foundation, it is advisable to tie the central row of piles with a channel.
- If wooden beams are used for piping, the height of the central piles should be made 15 cm lower than the rest.
- Where the fifth wall adjoins the building, two additional supports should be installed.
The standard height of screw piles for a log bathhouse is 6 m. When installing supports, care should be taken to ensure that there is as little waste as possible.
Let us note that if all building codes and support installation technology are followed, a bathhouse on a pile foundation can last for at least half a century, or even longer.
Installation of a pouring floor
The optimal solution is considered to be a poured floor in a bathhouse on screw piles. In the cold season, it is necessary to carry out mandatory insulation of the entire structure.
A large amount of water gets on the floor in the bathhouse, so it is necessary to increase its moisture resistance and trouble-free removal of used water. To do this, it is necessary to equip a special drain ladder. Through it, water will flow into the sewer pipeline or into the drainage system.
Diagram of a pouring floor in a bathhouse
Installation of the pouring floor begins by laying logs on the grillage. They are placed strictly horizontally without tilting. Edged boards made of coniferous wood are fastened to the logs with nails. Gaps 7 mm wide or more are left between them. Even if the wood swells, the gaps between the individual elements will still remain. Used water will pass through them freely.
To protect the subfloor from the accumulation of water, you need to install a concrete screed in it in the shape of a cone with an inclination towards the sewer or drainage system.
Advice! To avoid the appearance of unpleasant odors and/or harmful microorganisms, the concrete structure must be regularly washed, cleaned and treated with special compounds.
To prevent anything from rotting and moisture from accumulating, it is necessary to install a concrete bowl with a drain in the bathhouse
Practical recommendations
Beginners should not experiment with such a complex hydro-engineering project as installing self-leveling floors. Excellent recommendations will undoubtedly help you get rid of unnecessary speculation and make it easier to install a pouring floor in a bathhouse:
- There is an opinion that it is preferable not to fasten the board with nails for such a structure. Subsequently, after finishing washing in the bathhouse, they are placed on an edge for the best drying. The omission is that according to the principles of ventilation, the volume of air removed is related to the size of the inlet and outlet openings. The boards installed on the side strengthen the inlet openings, while the outlet mouth of the vents does not change. Therefore, the boards cannot dry out faster, since the humidity remains in the middle of the room, and the hassle is only added with their return installation.
- Replaceable panels in the steam room are also not the best option for flooring. Drying of the wood will become uneven. If the exhaust hood is set up badly from the inside, such parts of the pouring floor in the bathhouse dried outside will again increase the humidity, and the work will be in vain and labor-intensive. It is acceptable to arrange effective ventilation in the underground.
- A smoothly processed board is required only for the outside, in order not to get a splinter. On the reverse side, sanding does not contribute to the best rejection of moisture. Wood absorbs moisture evenly from rough and smooth surfaces. Excessive sanding reduces the thickness of the floor, which reduces the reliability and service life of such a floor.
The strength of the poured floor is ensured by the correct ventilation system, as well as high-quality impregnation of wood parts. A high-quality poured floor in a bathhouse requires thoroughness from the developer. Despite the fact that the work does not seem labor-intensive, it must be carried out with strict adherence to all installation operations, then the Russian bathhouse on the personal plot will delight users for a long time.
Dry wooden floor in the bathhouse
The dry floor is laid from boards in 2 layers. First, the subfloor is installed. A waterproofing agent is placed on top of the boards. Then the insulation is laid. On top of it - 1 more layer of waterproofing. Finally, a finished floor covering is laid. For this, a tongue-and-groove board made of durable softwood is used. Individual floorboards must be laid close to each other without cracks or gaps. When laying the finished floor, a slope to one of the corners of the room is required. A hole is made here under which the siphon is attached. This will help you easily remove used water during use of the bath.
How to make a floor in a bathhouse on screw piles with your own hands
The arrangement of a recreation area on the shore of a reservoir or on a slope assumes that the floor in the bathhouse on screw piles will be installed taking into account the characteristics of alluvial or sedimentary soil. It is these rocks that make up the soil on the banks of a river or pond, slopes, and hills.
The foundation for a bathhouse on screw piles is suitable for location on a slope, so it is possible to adjust the height of the pile
Advantages of a foundation on screw piles
Installing a floor in a bathhouse on screw piles is much easier to do than on a massive foundation. Advantages of this design:
- the foundation can be installed very quickly with your own hands;
- screw piles noticeably compact the soil, ensuring the stability of the entire structure;
- the foundation is convenient to repair if necessary;
- installation of screw piles is easy to do using modern devices and devices;
- the foundation can be installed in any weather;
- screw piles provide effective automatic ventilation of the underground space of the bathhouse;
- the service life and reliability of the pile foundation are quite long;
- a properly installed floor will protect the walls of the bathhouse on screw piles from the absorption of sediment and melt water from the soil;
- a screw foundation can be installed on unstable soil, which swells and swells during the season of heavy rainfall.
The foundation for a bathhouse on piles can be installed even in winter. The screw pile foundation is installed very quickly
The advantages of a pile foundation make its installation quick, and its operation reliable, simple and convenient. The main thing is to first study the properties of the soil in the area chosen for the bathhouse, carry out all the calculations correctly and carry out the necessary work in strict accordance with the instructions.
Screw piles must be selected depending on the type of soil. Scheme for installing a screw pile in the ground. Screw piles are installed for all load-bearing walls and elements.
What is the floor in the bathhouse made of?
The floor in a bathhouse on screw piles can be made from different materials. Concrete screed and coniferous wood are mainly used. Installing a concrete floor will require significant material costs. However, such a floor is resistant to constant exposure to moisture.
Therefore, the concrete floor in the bathhouse will last for decades. Wood is a lower cost material. However, when exposed to moisture, a wooden floor quickly deteriorates. Treatment with an antiseptic will significantly slow down this process.
But after 7-10 years, the wooden floor will need to be replaced.
Scheme for attaching various floor materials to a pile. The concrete floor in the bathhouse is most resistant to moisture.
The advantages of a wooden floor are not only the low cost of the material. If necessary, you can replace damaged elements without completely changing the coating.
If you regularly re-treat wooden components with an antiseptic, you can almost double the service life of such a floor. The optimal option is when a concrete screed is made in rooms of high humidity - steam room and washing room.
You can make a wooden floor in the locker room and rest room, because the humidity level here is much lower.
It is better to place a wooden subfloor in a bathhouse in the locker room area
Preparatory work
So, the foundation is installed and the walls are erected. Now we are making the floor in the bathhouse on screw piles. You need to thoroughly prepare for this work, study the technology, purchase everything you need, and invite assistants.
For work you will need the following materials:
- tongue and groove board;
- beam;
- fastening material - nails, etc.;
- cement;
- coarse sand;
- expanded clay and/or other bulk materials;
- roll waterproofing;
- antiseptic composition;
- mineral wool or other insulation.
Tools and equipment for work will require:
- construction mixer;
- tank for mixing the solution;
- wood hacksaw;
- grinder saw;
- construction knife;
- hammer;
- mittens, work clothes, rags.
The list of necessary tools and materials can be specified after it has been determined from what material and in what way the floor in the bathhouse will be installed on screw piles.
Floor insulation: general rules
Before installation and insulation of the floor, it is necessary to carry out an antiseptic treatment of all wooden components of the finished structure. A special composition for this can be purchased at a construction supply store. An antiseptic will protect the wood from the penetration of harmful microorganisms that can destroy it.
The depth of floor insulation depends on the premises of the bathhouse
If a bathhouse on screw piles will be used in winter, floor insulation begins with laying insulation between the supporting elements of the building. Most often, mineral wool (layer thickness 25 cm) or polystyrene foam (layer thickness 15 cm) is used for this.
Scheme of insulation of a concrete floor in a bathhouse
If the thickness of the beams is insufficient for laying insulation, additional bars are attached to them perpendicularly. Waterproofing is pre-installed. On top of it, between the beams, the bottom layer of insulation is laid out.
The top layer is laid between additional bars. Next, another layer of waterproofing is laid, on top of which the finishing floor is mounted.
An insulated layer in a bathhouse on screw piles will extend the life of the structure and significantly increase the comfort in the bathhouse.
Scheme for insulating a wooden floor in a bathhouse
Base installation
Effective insulation of the floor in a bathhouse on screw piles is done using a base, which is mounted around a pile-screw foundation. The plinth reliably closes the free space under the bathhouse floor from the penetration of cold air and significantly improves the appearance of the finished building.
The empty space of the plinth is covered with some panels
The main materials for the base are thermal insulation boards and decorative panels. An additional layer of heat insulation is laid between them. Typically, penoplex, polystyrene foam and similar materials are used for this. Sealing the joints between the panels after assembling the base is done using polyurethane foam.
To reduce heat loss, insulate the base under the bathhouse. You can insulate the base of the bathhouse using penoplex
The optimal solution is considered to be a poured floor in a bathhouse on screw piles. In the cold season, it is necessary to carry out mandatory insulation of the entire structure.
A large amount of water gets on the floor in the bathhouse, so it is necessary to increase its moisture resistance and trouble-free removal of used water. To do this, it is necessary to equip a special drain ladder. Through it, water will flow into the sewer pipeline or into the drainage system.
Diagram of a pouring floor in a bathhouse
Installation of the pouring floor begins by laying logs on the grillage. They are placed strictly horizontally without tilting. Edged boards made of coniferous wood are fastened to the logs with nails. Gaps 7 mm wide or more are left between them. Even if the wood swells, the gaps between the individual elements will still remain. Used water will pass through them freely.
To protect the subfloor from the accumulation of water, you need to install a concrete screed in it in the shape of a cone with an inclination towards the sewer or drainage system.
Advice! To avoid the appearance of unpleasant odors and/or harmful microorganisms, the concrete structure must be regularly washed, cleaned and treated with special compounds.
To prevent anything from rotting and moisture from accumulating, it is necessary to install a concrete bowl with a drain in the bathhouse
Dry wooden floor in the bathhouse
The dry floor is laid from boards in 2 layers. First, the subfloor is installed. A waterproofing agent is placed on top of the boards. Then the insulation is laid. On top of it - 1 more layer of waterproofing. Finally, a finished floor covering is laid.
For this, a tongue-and-groove board made of durable softwood is used. Individual floorboards must be laid close to each other without cracks or gaps. When laying the finished floor, a slope to one of the corners of the room is required. A hole is made here under which the siphon is attached.
This will help you easily remove used water during use of the bath.
Before pouring a concrete floor, it is necessary to carry out preliminary work in a bathhouse on a screw foundation:
- laying water supply and sewerage pipes;
- installation of a ladder on which the finishing floor will be laid;
- forming a cushion of bulk material under the base of the bathhouse building;
- laying roll waterproofing on foundation sections;
- laying insulation.
Scheme for preparing concrete mixture
Nuance! It is better to fill the pillow for forming a floor cake from bulk material of different fractions, which must first be completely dried.
Insulation of concrete floor
The concrete floor in a steam bath on screw piles begins to be insulated when the screed sets and hardens. The following is usually used as insulation:
- extruded polystyrene foam;
- expanded clay;
- perlite;
- mineral wool.
Bath floor insulation: perlite, expanded clay, polystyrene foam, mineral wool
Before laying the insulating layer, it is necessary to completely clean the surface of the concrete floor from foreign objects, dust, debris, etc. Then roll waterproofing is laid. Fractional insulation is applied as part of a special mixture. After it dries, a cement screed is poured on top.
Tile insulation requires sealing the joints between panels after installation. This is usually done using polyurethane foam. After it dries, a 2nd layer of roll waterproofing agent is applied. To evenly distribute the load on the floor in a washing bath on screw piles, in a steam room or in another room, a reinforcing mesh is laid.
You can insulate a pouring floor in a bathhouse using expanded clay; it must be laid before the concrete screed
Floor tiling
Ceramic tiles can be laid on top of the wooden floor in the bathhouse. In this case, instead of boards, fibreboard, fiberboard or plywood are used for the rough coating.
In the washing compartment you can lay tiles on the floor in the bathhouse
Ceramic tiles are laid on top of the laid sheet covering. This is done in the usual way. Under the tiles, you can lay a system heated floor in a bathhouse on screw piles. You can use a hydraulic or electric infrared option.
In the locker room you can lay a heated floor in a bathhouse. Installation of an electric heated floor. Diagram of a water heated floor.
Preventive measures
A bathhouse on screw piles has a high level of moisture; special preventive measures will help make the floor inaccessible to fungus and mold, which inevitably appear in a humid environment. During the construction process, all structural elements used must be coated in several layers with a special antiseptic composition.
To prevent the floor from rotting longer, it is necessary to cover it with an antiseptic against fungus.
It is imperative to use high-quality waterproofing materials. This can be roofing felt or plastic film. These measures will help increase the service life of the structure and protect it from rotting and premature destruction.
Scheme of waterproofing the floor in the bathhouse
If pockets of rotting of the wooden material are noticed, the entire structure must be dismantled. Damaged elements need to be replaced.
Nuance! After thorough drying, treat all components with an antiseptic and dry again. Before assembly, you need to coat the wooden elements with wax or water-repellent varnish.
Source: https://banyabest.ru/vsyo-dlya-bani/kak-sdelat-pol-v-bane-na-vintovyx-svayax-svoimi-rukami.html
Concrete floor in the bathhouse
Before pouring a concrete floor, it is necessary to carry out preliminary work in a bathhouse on a screw foundation:
- laying water supply and sewerage pipes;
- installation of a ladder on which the finishing floor will be laid;
- forming a cushion of bulk material under the base of the bathhouse building;
- laying roll waterproofing on foundation sections;
- laying insulation.
Scheme for preparing concrete mixture
Nuance! It is better to fill the pillow for forming a floor cake from bulk material of different fractions, which must first be completely dried.
Insulation of concrete floor
The concrete floor in a steam bath on screw piles begins to be insulated when the screed sets and hardens. The following is usually used as insulation:
- extruded polystyrene foam;
- expanded clay;
- perlite;
- mineral wool.
Insulation materials for bathhouse floors: perlite, expanded clay, expanded polystyrene, mineral wool
Before laying the insulating layer, it is necessary to completely clean the surface of the concrete floor from foreign objects, dust, debris, etc. then lay a roll of waterproofing material. Fractional insulation is applied as part of a special mixture. After it dries, a cement screed is poured on top.
Tile insulation requires sealing the joints between panels after installation. This is usually done using polyurethane foam. After it dries, a 2nd layer of roll waterproofing agent is applied. To evenly distribute the load on the floor in a washing bath on screw piles, in a steam room or in another room, a reinforcing mesh is laid.
You can insulate a pouring floor in a bathhouse using expanded clay; it must be laid before the concrete screed
Step by step construction process
Step 1. Installation of grillage and joists
I began constructing the floor after the screw piles that served as the foundation for my bathhouse under construction were screwed in and filled with concrete. The height of the posts above the ground is 50 cm, 10 pieces in total.
The first step is installation of the grillage. I made it up from horizontal planks (boards 200x50 mm) extending into the internal space between the piles and vertically installed boards 150x50 mm. The beam boards are fastened with self-tapping screws and nailed. The grillage is installed on piles and screwed to them with anchor bolts.
The logs are laid on the beams, pulled through the vertical grillage boards with self-tapping screws and nailed with 100 mm nails.
All boards are antiseptic with HMF BF. According to the project, a polycarbonate tray will be pushed under the grillage and screwed to the beds.
The grillage is laid and screwed to the pile heads
Step #2. Ventilation duct device
To ensure air supply to the stove convector, a ventilation duct was formed in two spaces between the logs (under the stove). To do this, I drilled holes in the grillage board, closed the opening between the joists with crossbars, hemmed an OSB sheet underneath, and sealed the seams with sealant.
Holes in the grillage board - for air access to the ventilation duct
Logs under the bottom of the furnace, forming the frame of the ventilation duct
The bottom of the ventilation duct is made of OSB sheet
I made a double cover for the ventilation duct, also from OSB. In the first part of the lid (it is permanently installed and cannot be removed), I cut out holes that will be placed under the bottom of the oven. I covered them with a fine metal mesh to protect them from dust and dirt.
The second part of the cover was not secured with anything; it can be removed to clean the ventilation duct if necessary. I sealed the joint with plumbing tape. On top of the lid I placed two LSU plates with cut out windows so that they coincided with the holes in the ventilation duct cover. All seams were sealed with sealant. As a result, I got a ventilation duct with thermal protection.
The cover for the ventilation duct is made double with two holes through which air will flow to the stove convector
Glass-magnesium sheet (GFS) is a non-flammable material with excellent thermal insulation properties
Outside, I installed an anemostat on the ventilation duct openings to be able to block access to the duct (reducing draft, protecting against insects). I also installed a supply fan there to increase the flow of fresh air.
The anemostat allows you to open and close the ventilation duct as needed
The supply fan allows you to increase the flow of outside air into the steam room
Step #3. Pallet assembly
Let me remind you that the design of my pouring floor consists of two parts - the floor itself (floorboards on joists) and a sealed tray that slides under the grillage.
I'll start with the pallet. It is made of a wooden outline (board) and a polycarbonate bottom with a drain. The shape of the pallet is the simplest, providing for the inclination of the body boards to the right corner of the grillage. This is where the drain goes.
The body is made from boards 150x50 mm, treated with HMF BF antiseptic.
The bottom material is polycarbonate, used for greenhouses, 4 mm thick. I’m not worried about it; it’s one of the most reliable and durable structural plastics. The polycarbonate is screwed to the body boards with self-tapping screws. The contact areas of the polycarbonate caps are protected with plumbing tape.
Polycarbonate sheet screwed to the wooden body of the pallet
To prevent the polycarbonate from sagging, the bottom is reinforced with wooden slats.
The slats will not allow the polycarbonate bottom to sag and crack under its own weight and the weight of water
The drainage area is lined at the bottom with a triangular OSB cover. All seams and joints are coated with sealant.
Place for draining water from the pan
The finished pallet is pushed under the grillage, lubricated with sealant, jacked and screwed to the planks with plumbing bolts. The joints are sealed with sealant.
The pallet is pushed under the grillage of the bathhouse
Installing jacks and lifting the pallet to the grillage beds
The pan turned out to be very sealed, the water leaves only through the drain. When the drain becomes clogged (with soap, small debris), the water sits in the pan, like in a trough. This necessitates checking the condition of the pan and cleaning the drain as necessary.
The pallet is screwed to the grillage
For the ventilated floor scheme to work, it is not necessary to make a special tray, like mine. The main thing is that the underground is airtight.
For example, concrete when using a strip foundation. Then the foundation walls will become the walls of the underground. But! The vents will have to be plugged while heating the bathhouse, otherwise, instead of heating the floor, you may end up with condensation on the subfloor surfaces.
Step #4. Laying floorboards
I decided to use dry planed boards as floorboards. I laid them on the joists and left gaps. I didn’t secure the boards with anything, I just laid them out and that’s it - fortunately, they are heavy, so they practically don’t “walk”. This solution helps me simplify the maintenance and cleaning of the tray. After visiting the bathhouse, the boards are removed, placed on edge and dried. The pan can be washed and the drain cleaned.
The floorboards are laid with gaps - for water drainage and free air circulation
A hot pouring floor in a steam room is a worthy solution to the problem of heavy steam and musty air in a bathhouse
Floor tiling
Ceramic tiles can be laid on top of the wooden floor in the bathhouse. In this case, instead of boards, fibreboard, fiberboard or plywood are used for the rough coating.
In the washing compartment you can lay tiles on the floor in the bathhouse
Ceramic tiles are laid on top of the laid sheet covering. This is done in the usual way. Under the tiles, you can lay a system heated floor in a bathhouse on screw piles. You can use a hydraulic or electric infrared option.
In the locker room you can install a heated floor in the bathhouse
Electric heated floor installation
Water heated floor diagram
Disadvantages and advantages of the leaking type
This type of flooring is relatively easy to install and quite cheap.
This is a regular flooring where gaps are left between the boards to allow water to drain onto the ground. In this case, no additional sewer “delights” are provided, except for the drainage pit located under the floor. Insulation is not provided, so this type of bathhouse is built on summer cottages in the southern regions. How to properly slope the floor in a bathhouse
Replacement of damaged fragments and complete overhauls are also not difficult. This design does not require fastening the boards to the joists; they can be removed and periodically dried in air. If possible, you can install a plastic pan instead of a drainage pit and direct the wastewater to the nearest sewer.
Preventive measures
A bathhouse on screw piles has a high level of moisture; special preventive measures will help make the floor inaccessible to fungus and mold, which inevitably appear in a humid environment. During the construction process, all structural elements used must be coated in several layers with a special antiseptic composition.
To prevent the floor from rotting longer, it is necessary to cover it with an antiseptic against fungus.
It is imperative to use high-quality waterproofing materials. This can be roofing felt or plastic film. These measures will help increase the service life of the structure and protect it from rotting and premature destruction.
Scheme of waterproofing the floor in the bathhouse
If pockets of rotting of the wooden material are noticed, the entire structure must be dismantled. Damaged elements need to be replaced.
Nuance! After thorough drying, treat all components with an antiseptic and dry again. Before assembly, you need to coat the wooden elements with wax or water-repellent varnish.