Introduction
Initially, a woven wire mesh, which was invented by the mason Karl Rabitz at the end of the 19th century, was used in construction for plastering walls - it replaced a lattice made of strips of shingles. Over time, the mesh has become widely used for the installation of lightweight fencing.
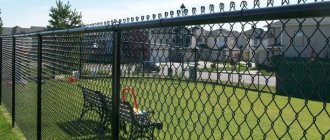
Temporary chain-link fencing
Classic chain-link is made of low-carbon wire with a diameter of 1 to 6.5 mm . The cells are square or diamond shaped; the side length can range from 2.5 to 100 mm. The scope of application of the material depends on the thickness of the wire and the size of the mesh - fine mesh is used for the manufacture of cages and enclosures, coarse mesh is used for the construction of fences.
In recent years, chain-links made of polymer materials have appeared on the market. It is less resistant to loads and is most often used to delimit areas with neighbors and for fencing inside one’s yard.
Characteristics and application of chain-link mesh
The mesh is made of metal round wires intertwined with each other. This is how diamond-shaped cells are formed. The difference between the types of connection is determined by the diameter of the wire used and the cross-section of the resulting cell.
In the country
Today, several common mesh options are manufactured. Moreover, various companies have the opportunity to produce different types of chain-link, taking into account the specified parameters, features and scope of use.
The most common models are meshes with a cell cross-section of 15–120 mm and wire with a diameter of 1–6 mm. For the construction of wickets, gates, and fences, as a rule, a universal size of 55×55 mm is used, where veins up to 3 mm are installed.
The height and length, technical characteristics of the profile differ, but the most popular sections are 3x10 m. The chain-link is packed in rolls and wrapped in special paper.
In field
The popularity of the material in domestic conditions and various construction areas is explained by its low price and ease of attachment to the fence, excellent strength indicators and long service life.
Fastening to a corrugated pipe does not require special knowledge or effort and is done with your own hands.
Attachment to round pipe
Today the mesh is used in the following areas:
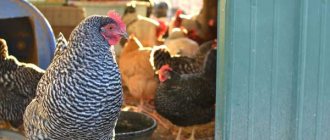
- Production of cages for different types of domestic animals.
- Construction of fences.
- Production of concrete monolithic slabs.
- In industry (for example, installation of partitions).
- Thermal insulation of the pipeline.
- For garden plots (rose garden fencing).
- Construction of houses (during laying the foundation and plastering the walls).
Fastening with self-tapping screws to wooden veins
Types of metal chain-link
The wire for making mesh can be processed to increase its resistance to external influences.
According to this criterion, the chain-link differs:
1 Non-galvanized . There is no protective coating, so the chain-link quickly begins to rust in the open air; its service life is 4-5 years. This is the cheapest material for fence construction, and it is used today only for temporary fencing. If you paint the fence immediately after installation with metal enamel, and then repeat the painting every 2-3 years, you can extend the service life of the material by 2-3 times
Non-galvanized mesh
2 Galvanized. This material is more expensive than untreated mesh, but it also lasts several times longer due to the anti-corrosion coating. In terms of price-quality ratio, this is the best option and therefore is in greatest demand
Galvanized mesh
3 Plasticized . In this case, the mesh is made of metal wire with a protective and decorative layer of PVC. The advantages include resistance to moisture, attractive appearance, variety of colors. But the cost of such material is higher
Plasticized mesh
When purchasing plasticized chain-link, pay attention to the availability of a material quality certificate. A low-quality mesh's coating quickly cracks under the influence of temperature changes, and it rusts.
Chain-link mesh - what kind of material is it? Advantages and disadvantages of using it for a fence
The history of the creation of this material takes us to the end of the 19th century. In 1878, Czech engineer Karl Rabitz patented his invention. He used this mesh as a reinforcing agent when plastering walls.
This material is a metal wire woven using a machine by twisting flat spirals. Currently, chain-link mesh is widely used:
- in the construction of fences and barriers for country houses, houses, garden plots, sports and children's playgrounds;
- in the manufacture of animal enclosures and cages for poultry;
- for the manufacture of fences and protective sections in industrial premises;
- as a reinforcing material when laying a slab foundation;
- for the manufacture of a protective layer of walls when working in mines.
Reliable and easy to install fencing
The use of chain-link mesh in the construction of a fence has both positive and negative criteria. The advantages of using it for these purposes include:
- One person is enough to install this material on the poles. This does not require any special knowledge or skills. It is enough to secure the structure by simply twisting the wire.
- The material does not require large financial costs, so the constructed fence will have a minor impact on the construction budget.
- The design of the material is such that it will not interfere with air circulation and the formation of a continuous shadow. This quality of chain-link mesh is especially valuable when used in fencing for gardens, vegetable gardens and summer cottages.
- In winter, a fence made of such material will not create snow drifts.
- Chain-link mesh fits perfectly into any environment. Thanks to its visual transparency, this fence does not disturb the landscape, which indicates its versatility.
- With appropriate processing and proper use, the metal mesh will not lose its original appearance for several decades.
The disadvantages of chain-link mesh as a fence include:
- It must be properly secured to the posts, using not just pieces of wire, but also bolts and nuts or a welding machine. Otherwise, there may be people who want to kidnap her.
- Not everyone will like visibility through the mesh, so you will need to additionally cover this space.
- Since the material is made of metal, it is susceptible to corrosion.
Types of fence mesh
To make chain-link mesh, various materials or combinations thereof are used. This significantly affects its service life, technical characteristics and, naturally, the price. Therefore, this material is divided into types:
- Non-galvanized mesh has the lowest cost due to its short service life. When wet, this mesh will rust, so it must be treated with a special solution or painted. After several months, these procedures should be repeated, the cost of which will ultimately exceed the purchase price of the mesh itself.
- Galvanized mesh. If you purchase this option, the price is quite high, which not everyone can afford. However, such a mesh does not require additional processing and will last a long time.
- Plasticized mesh is distinguished by the fact that its entire fabric has a polymer coating. This innovation appeared not so long ago, but has already become popular. Prices for mesh with this coating are significantly higher than for previous types. Having installed a fence with it, you can forget about the service life, since with high-quality plastic the wire is well protected from moisture and other weather influences.
- Plastic or polymer mesh differs from the previous ones in that it does not contain metal wire. In the manufacture of this material, special additives are used that make it resistant to ultraviolet exposure. This type of mesh is made with cells of various shapes, sizes and shades. Unlike the first three types, it is much softer, so it is not advisable to use it to fence the perimeter of a household.
Galvanized, on the contrary, does not require additional processing
Non-galvanized mesh requires protection from moisture
The polymer coating of the plasticized mesh will reliably protect against natural precipitation and temperature changes
The plastic is UV resistant, which is its undeniable advantage.
Advantages of chain link
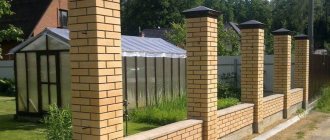
Decorative fencing
Using mesh for installing fencing has a number of advantages:
- low cost of material - savings on the construction budget;
- due to the low weight of the mesh fabric and the absence of windage, there is no need to build massive supports;
- the material is resistant to mechanical stress, so the fence will last a long time provided it is installed properly;
- the absence of shade has a beneficial effect on the development of plants planted close to the fence;
- the fence does not require special care (except for the use of non-galvanized chain-link, which requires painting);
- Fence installation work does not require much time
A carefully executed chain-link fencing looks aesthetically pleasing. It can be used as a support for climbing plants to create a striking hedge. In addition, a mesh fence is suitable for decoration using a wide range of materials - the chain-link serves as a canvas for weaving thin wire, strips of plastic, nylon cords, wires in colored insulation, etc.
Material selection
Variety of choices
When choosing a chain-link for installing a fence, take into account:
- wire diameter (at least 2.5 mm)
- cell size (optimally 40-60 mm)
- width (1.5 meters)
- availability and type of coverage
The larger the cells, the thicker the wire should be, otherwise the fence will not be strong enough and prone to deformation. The height of the fence depends on the width of the chain-link. Manufacturers offer mesh fabric with a width of 1.2 m, 1.5 m, 2 m, you can find a width of 3 m or 4 m, but for a summer cottage such a fence height is excessive. The standard roll length is 10 meters.
When purchasing a chain link, pay attention to the quality of the mesh. The roll should not have dents or other damage or deformations. The ends of the wire should be bent and be about half the length of the cell - this indicates that the material is made by a large manufacturer with good equipment. Small workshops do not have a wide range of machines and produce cheap mesh with protruding “tails”.
Selecting a suitable mesh
Chain-link is made from different raw materials, has differences in the diameter of the cells, type of coating, which is why it has a wide range of applications. Let's look at the main types that are most suitable for fencing.
Photo: mesh fencing on a metal frame
Metal type
Happens:
- stainless steel;
- made of low carbon steel.
In the first case, the material has increased rigidity, so it is more often used for fences.
Cell size
Available in diameters from 25 to 100 mm. Moreover, the larger the dimensions of the cells, the lower the price, but the load-bearing capacity of the mesh is also low. A product with a small cell will be heavier in weight, because more metal is spent on it, and therefore cost more.
Photo: cell shape - a method of weaving a chain-link. On the left is rhombic, on the right is square.
On the border with the neighboring plot, it is recommended to install a chain-link fence with a diameter of 40 mm to 60 mm. If this is a fence for poultry (chickens, ducklings), then the mesh should be taken with a fine mesh of 25, 30 mm.
Coating
There are three types:
- Non-galvanized. The cheapest due to its fragility. Has a tendency to corrosion. To avoid this, the mesh must be painted immediately after fastening. The layer will have to be updated once every 2-3 years. Cell size from 50 to 100 mm. The thickness of the wire used is 1.2 – 5 mm.
- Galvanized. The steel mesh is coated with zinc, which makes it durable and resistant to environmental influences. Does not require maintenance. The cell diameter ranges from 50 to 100 mm. Wire thickness - 1.6 - 5 mm.
- Plasticized or with polymer protection. Covered with a layer of PVC. It has a neat appearance and a large selection of colors. The service life is much longer than the first two types, but the price is higher. Wire thickness is from 2.5 to 2.8 mm. Cell diameter is from 25 to 50 mm.
Photo: woven mesh with polymer coating
Advice from builders: when buying a polymer-coated chain link, ask the seller for a quality certificate and a warranty card. A product with a regular PVC layer, without protective additives, will be inexpensive, but after 2 years it will become unusable, causing cracks on the surface.
Support structures
Fencing with wooden posts
To install a chain-link fence, you need to select reliable supports. The main criteria are durability, ease of fastening the mesh fabric, and accessibility. The supports can be made of various materials:
- Tree . Wood is not durable, so to extend its service life it is necessary to treat the pole with an anti-rotting compound, waterproof the underground part of the support, and paint the above-ground part every two to three years. The advantages of wooden poles include low cost and simple installation of chain-link using nails, staples or wire. To make wooden supports, use timber with a cross-section of at least 100x100 mm or round timber of similar sizes
- Metal . Pipes with a diameter of at least 60 mm or a square profile with a cross-section of 25x40 mm are used. Metal thickness – from 2 mm. This is the optimal type of support for a chain-link fence due to its high strength and durability, and the ease of fastening elements by welding. This type of fencing looks aesthetically pleasing. Poles made of metal profiles are treated with an anti-corrosion compound, primed, and painted. A cap is attached to the top end to prevent moisture from entering inside, causing corrosion. Manufacturers offer special poles equipped with hooks for attaching chain-link, but this option is more expensive
- Concrete . Reinforced concrete pillars are rarely used in combination with chain-link. Monolithic supports are labor-intensive to manufacture; delivery and installation of finished products requires special equipment due to their heavy weight - this increases the cost of construction. In addition, it is difficult to attach the mesh to a concrete pillar
- Asbestos cement pipes . This is a relatively inexpensive material and easy to install. But to fasten the chain-link you will need to use clamps or twisted wires, which is not very convenient. It is necessary to install a plug on the upper end, otherwise moisture that gets inside may freeze and the pole will burst.
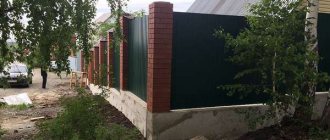
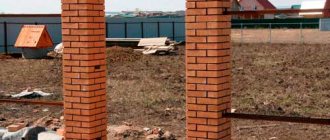
- Brick or stone . The construction of supports made of brick or stone requires the construction of a foundation, and the construction material itself is not cheap. But the combination of such pillars with frames covered with chain-link looks aesthetically pleasing. To fasten sections by welding, it is necessary to provide embedded parts
Brick supports
Choosing fence posts
Among the questions faced by those who decide to independently build a fence near the house, the first thing that needs to be decided is which posts to use when building a fence?
In practice, the following supports are used:
- made of wood;
- steel;
- made of concrete.
As usual, each of them has its pros and cons, let’s look at this in more detail.
The use of wooden poles looks quite attractive, the main factor is that they are chosen because of their availability and low cost. But when choosing such a rack, you must be prepared for the fact that in ten years you will have to either change them or install new ones. This comes from the properties of the tree itself. That part of the post placed in the ground begins to rot and, as a result, the post begins to tilt and falls, pulling the entire fence with it.
Installing poles made of wood means that they must be treated with an antiseptic compound and the lower part of the pole must be protected with waterproof mastic.
Metal supports, of course, will last longer with anti-corrosion protection; in addition, several methods of fastening the fabric to the support are used - welding, using fasteners (bolts or self-tapping screws), using clamps.
Metal racks require attention, which is expressed in an annual preventive inspection and, as soon as they are detected, immediately eliminating rust stains, etc. During the installation process, the racks are coated with an anti-corrosion compound.
For the manufacture of pillars, profile pipes are used, including pipe pipes, rails, etc.
Useful Types of fences made of corrugated sheets on screw supports, installation rules
To use pillars made of reinforced concrete, you will need to purchase them either from the nearest reinforced concrete products, or make them yourself. And this is a troublesome matter.
To fasten the fence sheet to the posts, welding and clamps are used. For welding, embedded parts must be installed in the body of the pillar.
Which supports will you choose?
From metal From wood From concrete
Types of structures
Options for attaching the mesh to the supports
There are several ways to build a chain-link fence. The choice of installation technology depends on the purpose of the fence, budget and even the topography of the site.
- Tension fence without guides. The mesh is stretched between the installed posts and fixed to them with wire. The advantages of the technology are simplicity and speed of installation, minimal consumption of materials, the ability to use supports of almost any type (except brick). Typically, a tension fence is installed as a temporary fence or for zoning your site.
- Tension fence with guides. It is mounted according to the same principle, but reinforced with one, two or three longitudinal guides, which can be wooden beams or metal profiles. This type of fencing is more reliable and looks more solid. But a design with metal pillars and horizontal elements made of profiles or reinforcement welded to them is not suitable for installation on heaving soils - rigid connections can break when moving
- Sectional fence. The most labor-intensive and expensive option, but it looks the most aesthetically pleasing. To build it, you need to make frames from a metal corner and weld a filling made of mesh fabric. The frames are attached between the supports by welding, which requires the use of metal pillars, or brick, concrete with metal embedded parts. A sectional fence is the best choice if the fencing needs to be done in an area with a strong difference in relief - it is convenient to install it in “steps”, placing the frames at a given height relative to the ground surface
Preparatory stage
At the preparatory stage, a fencing project is developed with reference to a specific site. It is important to know the exact dimensions of the area in order to calculate the optimal step for installing supports and calculate the amount of materials required for installation. You should also choose the location of the entrance gate and gate in advance.
To do this, measure the perimeter of the territory, draw a sketch indicating access roads, buildings, and large vegetation. If there is a noticeable difference in elevation on the site, the construction of the fence is carried out in a cascade (steps). With a relatively small difference, the mesh can be stretched parallel to the surface of the earth.
Fencing installation options
To take measurements, it is most reliable to use a cord stretched between pegs driven around the perimeter of the area. Add 2-3 meters to the cord measurement result to find out how much chain-link you need to purchase.
The step for the tension fence installation of pillars is from 2 to 2.5 m, so that the mesh does not sag. If guides are used or a sectional fence is mounted, the supports can be placed in increments of up to 3 meters. The exact value is selected depending on the length of the straight section of the fence; the posts should be evenly spaced. After counting the number of supports, you can calculate the number of fasteners.
Tools and materials
To install a chain-link fence you will need:
- mesh in rolls, the total length should correspond to the perimeter of the area with a small margin
- pillars
- steel wire for fixing the mesh to the supports
- fastening elements - bolts with nuts, clamps, staples, plates, nails (the choice depends on the type of poles and installation technology)
- wire cutters
- pliers
- hammer
- grinder with cutting disc
- welding machine with universal electrodes 3 mm + sleeves and mask (if the installation technology requires welding)
Marking
Marking the area for support pillars
It is necessary to remove debris along the perimeter of the site; if necessary, cut out bushes or cut down interfering trees. Then pegs are driven into the corners and a fishing line, construction thread or strong cord is pulled between them. Pegs are driven along the cord in the place of future posts, with a step provided for by the project.
Installation of pillars
Pole installation methods
To ensure that the supports are on the same line, the installation order must be followed:
- Corner pillars. Since they will experience maximum load when the mesh is pulled, the corner supports are reinforced with spacers
- Posts at breaks in the fence contour (if the area has a complex geometric shape)
- Gate and gate supports (must be concreted for reinforcement)
- Intermediate supports with the same installation spacing on straight sections
Before installation, the lower part of wooden poles is treated with an antiseptic and waterproofed. To protect wood from moisture and decay, you can use used machine oil, heated bitumen, and bitumen-polymer mastic. You can burn wood at a fire - this also protects it from rotting.
When building a fence on a site with a strong slope, terracing of the terrain is required. Supports of greater height are used, to which the mesh (or sections) are attached at different levels so that the fence runs in steps.
For metal supports, the lower part is cleaned of traces of rust and treated with a composition that protects against corrosion, covered with a primer or a layer of bitumen is applied. A plastic plug is put on the upper end or a metal plate is welded.
Work progress
In places where the location of the pillars is marked, pits are prepared using a drill or shovel. The depth depends on the level of soil freezing in the area, but it should be about a meter so that the fence does not sag under loads. The exception is dense clay soil that is not prone to heaving; supports can be immersed in it to 80-90 cm. For heaving and loose soils, the bottom of the hole should be 15-20 cm below the freezing point - this will protect the supports from being pushed up.
Butting and concreting
A 10 cm layer of sand and a 10 cm layer of gravel are poured onto the bottom of the pit; both layers are well compacted - this is drainage, facilitating water drainage. Then the prepared post is installed in the pit.
The free space between the support and the walls of the pit is filled with crushed stone and small stones, alternating with layers of soil, and each layer is compacted well. If a sectional fence is being erected, the weight of which is noticeably higher than the tension one due to the welded frames, the supports are additionally concreted to 40 cm of the pit height or completely filled with concrete instead of backfilling.
A temporary fence on metal supports can be erected without concreting. The posts are driven into the ground with a sledgehammer through a piece of thick board (to protect against deformation). To make it easier to maintain vertical installation, dig a pit to half the required installation depth and finish the support to the required level.
Instructions for installing a chain-link fence
Selecting the height of the fence
Table 1 shows the standard dimensions of the chain-link mesh, the corresponding minimum recommended column lengths, and the recommended column heights above ground level. Table. 1. Pole lengths
| No. | Chain-link mesh height h1, mm | Length of the used column h2, mm | Pole height above ground level, mm |
| 1 | 1200 | 2000 | 1200 |
| 2 | 1500 | 2000 / 2400 | 1500 |
| 3 | 1800 | 2400 | 1800 |
| 4 | 2000 | 2800 | 2000 |
Territory marking
Marking the area for the future fence is carried out using wooden pegs and a strong thin cord. Initially, the installation locations for corner and end posts, posts for wickets and gates, and intermediate posts are determined. When marking the location of intermediate posts, a pitch of 2500 mm should be taken into account. If it is impossible to maintain a column pitch of 2500 mm, the pitch should be reduced to the required value.
If a chain-link fence is installed using threaded clamps and tension wire, then it is necessary to provide holes in the ground for installing stops (Fig. 1).
Rice. 1 - The depth of the holes for installing the support for the post and the fence post are the same
| Chain-link mesh height, mm | N, mm | Dimensions of the pit for installing the stop, mm |
| 1200 | 800 | 600x250 |
| 1500 | 1000 | |
| 1800 | 1200 | |
| 2000 | 1300 |
Installation of pillars
In accordance with the preliminary markings, holes are dug for fence posts.
Preparing the post hole depending on the soil type:
a) For heaving soils, it is necessary to make special preparations for the installation sites of the pillars. To do this, a hole of 800x800x1200 mm is dug (Fig. 2). The depth of the hole under the post must be no less than the depth of soil freezing (for the Republic of Belarus, the depth of soil freezing is 1000-1200 mm). Medium fraction sand or ASG is poured into the pit and thoroughly compacted. The filled hole is watered abundantly. Under normal weather conditions, after 48 hours you can begin drilling with a manual (mechanical) drill or digging a hole for concreting a pillar using a shovel. The minimum recommended foundation depth for a pillar is 1000mm.
Rice. 2. Pole hole. (*—dimensions for reference)
| Fence height, mm | N, mm |
| 1200 | 800 |
| 1500 | 500 (for a 2,000mm post)/1000 (for a 2,400mm post) |
| 1800 | 600 |
| 2000 | 800 |
b) For sandy soils and areas with asphalt and gravel surfaces, the foundation depth is at least 1000 mm without additional preparation.
When installing fence posts, the following sequence is observed:
— The first to be installed are corner and end posts, posts at break points in the fence, posts for gates and gates;
— between the corner (end) pillars a nylon thread is stretched along the upper cut of the pillar;
— intermediate pillars are installed. The height of the pillars above the ground is controlled by a stretched string. The vertical installation of each pillar is checked using a building level or plumb line.
The process of pouring concrete into a pillar occurs in the following order:
— the required layer of concrete is poured into the pit for concreting the pillar;
— a pole is installed. Concrete is poured into the hole around the post and compacted. The vertical installation of each pillar is checked using a building level or plumb line;
— the pillars are fixed in a strictly vertical position with wooden stops, guy wires or other available material;
— After the concrete hardens, special polymer plugs are placed on all pillars.
For the foundation of the fence, it is recommended to use concrete grade C12/15 with a crushed stone fraction (or ASG) of no more than 2 cm. It takes 48 to 72 hours for the concrete to completely harden.
Assembling a mesh fence
After installing the posts, the next step in installing the fence is installing the mesh.
Important: Assembly of fence elements in mounting option 4.2. and 4.3. carried out using self-tapping screws - self-tapping screws. To prevent the screws from turning when tightening, the torque of the screwdriver should be limited (as a rule, 8 Nm is sufficient; if the screw gets into the seam lock of the pipes, the torque must be increased)
4.1. Option for attaching the mesh using tie wire
The mesh is attached to the posts using galvanized wire.
The sequence of attaching the chain-link mesh to the posts:
— The roll is unrolled in the area along the line of pillars. If you need several rolls, then you need to immediately connect them together into one mesh. To do this, the wire is turned out from the end of one roll and from the beginning of the next. Then use these parts of the mesh to connect it together. You need to do the same with all the other rolls.
— the mesh is attached to the post using metal wire. Then the next span of the fence is stretched and attached to the post with wire (Fig. 3). Installing the mesh on poles requires one or two assistants to support the mesh while tensioning.
The main rule during installation is to prevent the wire from sagging and uneven tension.
Rice. 3
4.2. Mesh fastening option using threaded clamps
The mesh is attached to the posts using galvanized threaded clamps.
Sequence of attaching the mesh to the posts:
- mesh rolls are connected to each other in accordance with clause 4.1;
— a tension rod is threaded into one end of the mesh fabric;
- part of the mesh with a rod inside rises to a vertical position and leans against the first post. Using a clamp, the mesh is attached to the post (Fig. 4);
Rice. 4
— then the mesh is stretched between the posts and fixed with clamps (Fig. 5);
— every 20-25 meters and at the end of the fence, the mesh is attached to the posts using a tension rod.
The main rule during installation is to avoid sagging of the mesh wire and uneven tension.
Rice. 5
4.3. Mesh fastening option using threaded clamps and tension wire
Sequence of attaching the mesh to the posts:
- on the corner and end posts and posts every 20-25 meters, brackets (ratchets) are attached using tying wire, which are used to tension the wire (Fig. 6); It is recommended to mount the brackets from the top of the post at a distance of 25÷70 mm, from the ground surface at a distance of 70÷100 mm.
Rice. 6
— the mesh rolls are connected to each other in accordance with clause 4.1;
— a tension rod is threaded into one end of the mesh fabric;
- part of the mesh with a rod inside rises to a vertical position and leans against the first post. Using a clamp, the mesh is attached to the post (Fig. 4);
- then the mesh is stretched between the posts and fixed with clamps (Fig. 5);
— every 20-25 meters and at the end of the fence, the mesh is attached to the posts using a tension rod;
— after installing the mesh, a wire is threaded along the entire length into the outermost upper and lower cells for tension;
— the ends of the wire threaded through the chain-link mesh are inserted into brackets (ratchets) and the process of tensioning the wire occurs (Fig. 8);
— after tensioning, Ø8 mm holes are drilled in the posts for wire holders. It is recommended to drill holes at the same distance from the top of the post on which the brackets for tensioning the wire were attached.
— a wire holder is inserted into the drilled hole, then the wire is inserted into this holder and fixed with a hook (Fig. 7).
Rice. 7. Installing the wire holder
The main rule during installation is to avoid sagging of the mesh wire and uneven tension.
Maintenance of products made of galvanized steel and galvanized steel with polymer coating
In order for a metal fence assembled from Skyprofile materials to perform its functions for a long time and reliably, it is necessary to perform the following operations:
— The condition of thin sheet steel products and their fastenings should be checked by external inspection at least once a year.
— Contaminated surfaces should be cleaned with a soft brush and washed off with running water or a pressure washer (maximum pressure 50 bar) from top to bottom. Heavily contaminated areas should be washed with a diluted soap solution. Residues of detergents must be thoroughly washed off.
— The use of solvents or other chemically active substances that may damage the polymer coating is not allowed.
— Damage to the polymer coating that occurs during installation or as a result of other actions is eliminated using special paint sold by Skyprofile. Further development of damage is eliminated by timely repair of defects. If the scratch does not penetrate the zinc layer, one coat of careful painting is sufficient; if the scratch reaches the steel, painting should be done in two layers using a primer. Before restorative painting, the damaged area is cleaned and degreased (and rust is also removed, if any occurs). The paint is applied with a thin brush only to the scratches, without expanding the repair area. This prevents any noticeable color difference between the painted surface and the original surface.
Concreting
The concrete mixture is poured into a pit around the pillar. The support should first be secured with spacers made from pieces of reinforcement so that it is positioned strictly vertically (checked by level) and does not tilt under the influence of concrete.
Pillar concreting
For concreting, a working mixture of sand (one part), cement (two parts), crushed stone (two parts) is used. Crushed stone is added after mixing cement with sand. Water is added so that the solution does not turn out to be too liquid. For high-quality mixing of components, it is advisable to use a compact concrete mixer.
The poured concrete is compacted with a reinforcement rod or a bayonet shovel, ensuring that large air bubbles disappear. Then you need to let the concrete set and gain strength - this takes about seven days.
To make it easier to control the vertical installation of intermediate supports, a cord is pulled between the corner posts 10 cm below the top edge.
To install the supports of a sectional fence, you can make a strip foundation. This will significantly increase the cost of construction, but such a design is as reliable, durable, and visually attractive as possible. Strip foundations are suitable for metal and brick supports.
Fencing on a strip foundation
Tension mesh installation
The choice of fastening the chain-link for the tension method of installation depends on the type of pillars:
- wooden - nails, wire, staples
- metal – hooks, welding, wire
- concrete and asbestos cement – wire, clamps
Installation begins with a corner post. Having secured the edge of the canvas, the mesh is unfolded to the next support. It is more convenient to work with three people to secure a well-tensioned mesh - then it will not sag in the future. A reinforcement rod is threaded through the cells across the canvas - this will help two assistants to tension the chain-link as much as possible and keep it in this position while a third person attaches the mesh to the post in the chosen way.
Fence with tension rod
If the end of the roll falls between the supports, it is necessary to bend the bent tails on the outermost spiral element and remove it. Then the edge of the new fabric is overlapped onto the mesh and the removed element is inserted back.
Corner posts should not be wrapped around mesh fabric - this increases the load on the support. It is advisable to separate the canvas and attach the edges separately by inserting a reinforcement rod into each of them and welding the reinforcement to the post.
To eliminate sagging and strengthen the tension fence, wire or reinforcement is threaded through the upper part of the canvas and attached to the supports. You can do the same in the lower part.
If installation is carried out without welding, the supports are painted in advance. After attaching the mesh and broaches by welding, it is necessary to treat the metal structures with an anti-corrosion compound, prime them, and paint them in two layers.
Attaching the mesh to the guide
The construction of a fence with guides is carried out according to the same principle, only in this case longitudinal elements are welded to the posts, on which the chain-link is fixed.
Method No. 1
One of the popular designs is modular. With this solution, it is possible to install a fence made of galvanized chain-link mesh yourself, without outside help.
First, measure the distance between the posts. Based on this data, a module will be created. It has the following structure:
- a frame made from a corner onto which the mesh will be welded;
- eyes made of a metal strip, two pieces on each side, onto which the frame is attached.
The corners are measured in a workshop or garage according to the required dimensions. They cut the required amount according to the number of spans and weld them together. Then the eyes are welded. The height of the frame must correspond to the height of the chain-link roll.
When the frame is ready, the mesh is stretched to it. It can be pre-tensioned by drilling holes in the corners and securing them with wire on each side. Then the mesh is welded. In the case when the structure is made without welding, it is screwed on with self-tapping screws or special fasteners for wire structures. Holes are pre-drilled in the eyes, which will then be attached to the pipe with a bolt.
Installing a chain-link fence is easy to do on your own. Installation of ready-made modules is very simple due to the fact that it is enough to secure the eyes in the holes. The mesh in this design is stretched and with timely anti-corrosion treatment will last a long time.
Installation of a sectional fence
Steel plates 5 mm thick are welded to the installed metal posts at a distance of 20-30 cm from the top and bottom edges. The width of the plates is 5 cm, the length is from 15 to 30 cm. The brick supports must be provided with appropriate mortgages.
Mesh attachment methods
For welding rectangular sections, a metal corner 30x40 mm or 40x50 mm is used. Pieces of chain-link fabric are welded into the frames, along the edges of which reinforcement rods are inserted - it is the reinforcement that is spot welded to the inside of the corner. Or, hooks are welded inside the corner to which the mesh is attached.
The finished sections are welded to the plates on the posts, trying to maintain the same gap between the edge of the frame and the support. The finished structure is treated with an anti-corrosion compound, primed, and coated with metal enamel in 2 layers with intermediate drying.