A house made of rounded logs is a more progressive analogue of the traditional Russian log house - the hut, which our ancestors built. Although building a house from chopped logs has still not lost its relevance.
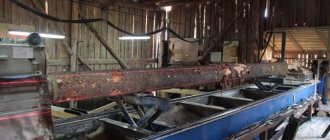
Paying tribute to traditions, modern technologies make it possible to obtain a building material - a rounded log that has the same diameter along its entire length, with clearly defined parameters for longitudinal grooves and seats (bowls).
Visually, the modern log house has also undergone changes and began to look much smoother and neater. The operational characteristics of the log itself have also changed. As a result of processing, it has become more stable, resistant to torsion, and most importantly, rounded logs, unlike chopped logs, have no curvature. Stable geometry increases the speed of house assembly and its quality.
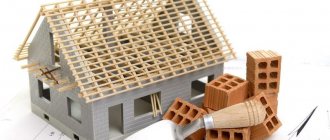
Construction of houses from rounded logs - step-by-step instructions, assembly stages
Advantages and disadvantages of houses made of rounded logs
Both advantages and disadvantages can be identified, most of which are subjective or depend on the source material or the quality of processing.
Advantages of houses made of rounded logs
- Predominantly natural materials are used. Usually the finishing is chosen to match the house made from natural materials;
- excellent natural ventilation, due to which there are no prerequisites for the appearance of condensation, dampness, development of cracks and mold;
- there is a unique spirit of natural wood, which has a positive effect on human health; Material prepared for the website www.moydomik.net
- warm in winter and cool in summer. Due to the tight fit of the logs and the low thermal conductivity of the wood itself, a house built from large-diameter logs does not need additional insulation and air conditioning;
- attractive facade, exterior and interior.
In addition, a log house is a strong, reliable, stable structure, the construction of which takes from 5 to 30 days, depending on the project. At the same time, building a house from a log is considered one of the economically feasible projects in private construction, with an optimal combination of price, quality and construction time.
Disadvantages of houses made of rounded logs
Disadvantages need to be considered, first of all, in order to take measures to eliminate them and avoid possible mistakes.
- shrinkage. The main disadvantage of a house made of rounded logs. Note that wooden construction is always associated with shrinkage of buildings, this is due to the characteristics of the wood itself. But, a six-month break in work for the most active shrinkage, the choice of dry material, the use of jacks, strengthening the junctions of logs, etc. nuances will reduce the shrinkage of the log. The optimal figure is 8-10%;
- flammability. Wood burns - that's a fact. But it is not a flammable material, and the likelihood of spontaneous combustion (for example, from electrical wiring) is no higher than in other houses. But it is easier to extinguish a wooden house, and the smoke released during the combustion process is not as toxic as that of the insulation materials used to insulate stone houses;
- cracking. The appearance of cracks is also a natural process for wood. Their occurrence can be minimized by purchasing dry logs and putting the house into operation correctly, in particular the correct mode of heat supply when cold weather sets in;
- care. A wooden house constantly needs maintenance. From time to time it is necessary to caulk the cracks and cover the log to protect it from external factors. But, any private home needs care. Taking care of your own home can hardly be considered a serious drawback.
Choosing wood for the walls of the house
Nature took care by providing us with a large selection of wood for walls. Let's look at their advantages and disadvantages.
Interior walls of a log house
Pine log house
Inexpensive, due to its prevalence, the material has an excellent price-quality ratio. The wood is quite dense, which provides good thermal and sound insulation of housing. Unfortunately, pine is susceptible to fungus, and to avoid its appearance, preliminary protective treatment of the wood is necessary. And the most optimal process is the construction process from pine logs in winter. This prevents the appearance of fungus from the very beginning.
Spruce log house
Much in common with pine. The only difference is that it has a slightly higher price; the material is slightly less dense than pine, therefore somewhat less durable, but spruce has higher thermal insulation properties.
Larch house
Houses made of larch are warmer than similar houses made of spruce. Larch is not afraid of moisture, but only becomes harder from its influence. Larch is less susceptible to fires, has a positive effect on the human body, and also has a very interesting and original wood pattern. The only drawback of larch is its high cost.
Cedar house
Cedar wood is light and easy to process. Also, due to the large height of the trees, long logs are obtained, which makes it possible to build large buildings. And yet, cedar has such a beneficial effect on the human body that it surpasses even larch in this.
Oak house
Oak has the strongest wood among all other types. Houses made from oak logs are durable, not afraid of moisture and can last for several centuries without changing much. But as a material, oak is very expensive.
Linden house
Although many people do not consider linden as a material for building a house, nevertheless, due to its low cost, linden is used for the construction of auxiliary buildings. The color of linden wood is light and buildings made from it create the impression of a certain lightness.
Log house
When is the best time to build a house from rounded logs?
You can choose to start construction based on your own capabilities. Any time, with the exception of autumn, allows construction work to be carried out. However, the most preferred time of year to start assembling a log house is the end of winter. This is due to the following factors:
- winter forest is considered the best for building houses;
- in the winter season there is no precipitation, and it is easier to protect a log from snow than from rain;
- since the house is being built quickly, the developer has spring for the gradual drying of the wood, and summer for the most active phase of shrinkage, and in the fall it will be possible to install a permanent roof.
Project of a house made of rounded logs
Any construction must begin with the development of a project, and the design of a residential building made of rounded logs needs approval from various authorities.
What is needed to design a log house:
- order the development of an individual project, develop the project yourself using computer programs, download a standard project and modify it taking into account the characteristics of the location and operating conditions (you will need to conduct geodetic research);
- calculate the parameters of the future house: total square footage, usable area, number of living rooms, their purpose, take into account the special requirements of residents (for example, pensioners or people with disabilities), take into account all wishes, because the house is being built for the whole family and will be used by several generations ;
- think over the rafter system and choose roofing material. It must be heavy enough to create pressure on the walls and prevent gaps from appearing between the logs;
- will take care of protecting the south side of the house. As you know, it is this material that is most susceptible to rapid shrinkage due to direct sunlight. Therefore, most designs contain a veranda or covered terrace along the south side of the log house;
- make a log sheet - a document that will allow you to order a house kit from rounded logs for self-assembly or will simplify the adjustment of logs when using moldings.
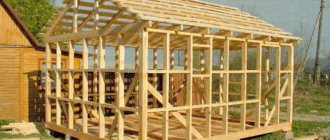
Features of the construction of residential buildings from logs
Cottages made of chopped and rounded logs have their own characteristics. One of them is installation. Everything here is not so simple, and you won’t be able to just cut down a forest and assemble a house out of it.
First, a project is made in which each log, its size and the location of the “cup” are drawn. And only then, according to this project, the log house is assembled.
Another feature is the length of the log. Most often it does not exceed 6 meters and the house design is done with this in mind in order to reduce material consumption. Of course, logs of greater length can be supplied to order, but their cost will be much higher.
Also, the price of a log house can be affected by what kind of wood will be used. Pine can be considered the most economical, while larch and cedar are more expensive.
So, if you have already decided to build a house, you will have to figure it all out. Moreover, with proper assembly and care, a log house can become not just a building for recreation, but a place of permanent residence and will serve more than one generation of your family.
Of course, over time, it can be completed and rebuilt. The main thing is to do everything wisely, since laying logs requires certain preparation, efficiency and adherence to technology. Also, do not forget that wooden houses require special treatment with antiseptics and fire retardants.
Which log is best to build a house from?
A log house will only be able to reveal all its features when it is made of high-quality building material.
How to choose a rounded log? To make the right choice, you need to know the technical characteristics and parameters of the log:
- log diameter For the construction of a residential building for year-round use, only logs with a large diameter are suitable - from 240 to 260 mm or more. Thin logs can also be used if the house is located in a region with a mild climate or additional insulation is expected.
The actual value of the thermal resistance of the walls is calculated using the formula:
After calculation, the resulting value is compared with the standard value for a specific region of residence (reference data).
For example, for Moscow and the Moscow region R = 3.0 (m²*°C)/W.
It should be noted that according to SNiP II-3-79, the value of the thermal conductivity coefficient (λ) depends on the humidity in the region.
Excerpts from SNiP II-3-79 in order of increasing thermal conductivity coefficient of building materials for the dry humidity zone (A) and the normal and wet zone (B)
- logging period . Logs harvested in winter are drier, because... In winter, the process of sap flow in the trunk slows down greatly. And the drier the log, the fewer cracks there will be on the constructed walls. The best forest in Karelia, Arkhangelsk and Angarsk regions.
- breed _ Rounded logs are made from coniferous wood - pine or spruce. However, for the lower crown you should choose denser wood, for example, larch;
- log color . The shade must be uniform, corresponding to the breed, without blue;
- extraneous inclusions . The presence of knots, resin pockets, mechanical damage or biological activity in a quality log is not allowed;
- cracks _ Allowed, but their depth cannot exceed a third of the diameter;
- geometry _ The log should be smooth, not twisted, with neatly cut longitudinal grooves and bowls;
- surface quality . The surface should be flat and smooth. The presence of burrs and roughness indicates poor sharpening of the cutting tool and will require grinding the wall after installation;
- compensation cut . Not every manufacturer makes cuts. However, its presence makes it possible to reduce internal stress in the barrel and reduce the likelihood of cracks;
- profile . There are two types of profiles - lunar and Finnish. The first is more traditional, allowing for quick installation. The second one has shoulders (shoulders) - protrusions on the ridge that protect the junction of the logs from the appearance of cracks during the shrinkage process. In addition, the thermal groove with this profile is larger, which leads to an increase in the number of crowns when building a wall, but makes it warmer, because The width of the wall at the junction becomes larger. For example, a log with a diameter of 220 mm. with a lunar profile, has a thermal groove 110 mm thick, and with a Finnish profile - 140 mm;
- the ratio of the diameter of the core and the total log . It should make up 75% of the cut;
- degree of processing of the log . Antiseptic treatment of logs is a must;
- storage conditions . The logs are stored in stacks, without packaging, in a place with good ventilation, protected from moisture and direct sunlight.
Technology of building a house from rounded logs
Step-by-step instructions for assembling a log house with your own hands or for understanding the construction process when involving private craftsmen or a contractor (turnkey construction). All stages of construction with explanations and photos.
Tools for building a log house
It is generally accepted that in the “old days” the question of how to make a log house was solved with one ax, which is not entirely true. Of course, a good craftsman can build something suitable for living with one ax, but both before and now, to make a log house with your own hands, you will need:
- Two-handed saw, hacksaw.
- Scraper, a special plow for removing bark (when working with unsanded logs).
- Chisel and hammer.
- Low-speed drill (or hand crank).
- Measuring and marking tools - carpenter's pencils, chalk, tape measure, square, plumb line, hydraulic level, strong cord with a pair of reliable awls.
Tools for building a log house
A chainsaw will be an excellent help that will significantly speed up the work. It is especially useful if the log house is made from natural, untreated logs.
For temporary fixation of logs, steel carpenter's staples are used.
An important tool is the carpenter’s “dash”, which looks like a massive, durable compass. Its task is not only to build arcs and circles, but mainly to mark lines when making grooves.
Carpenter's trait
For caulking you will need a mallet and special hardwood spatulas.
I recommend: Are we thinking about repairing the foundation correctly?
Foundation for a house made of rounded logs
The strength and stability of the house, as well as the uniformity of shrinkage, are determined at the stage of laying the foundation.
The cost of the foundation for the construction of stone houses is up to a third of the construction budget. Wooden houses are much lighter, and therefore the requirements for the foundation are more flexible.
For a house made of rounded logs, it is better to pour a strip foundation or install a columnar (pile) foundation. The type and depth of installation depends on the characteristics of the soil: type, freezing depth, groundwater level, relief.
The recommended height of the foundation (basement) is 40-50 cm from the ground (to protect the logs of the lower crown from snow and splashes of rainwater). For the same purpose, a visor (low tide) is made along the upper edge of the base to reflect splashes.
Before starting work, the foundation must be checked with a level, because laying logs requires a perfectly flat surface.
After the walls are built, the foundation will be covered with tide to protect it from water.
Foundation waterproofing
Due to the fact that wood and concrete have different thermal conductivity, the wood of the lower crown needs protection from moisture and condensation. To do this, the foundation must be insulated. As a waterproofing material, roofing material is used, laid in two layers, and glass insulation (in one layer). The material should lie flat on the surface of the foundation and protrude beyond its edges by 30-50 mm.
Stages of designing a house
- Sketch and architectural designs of the future house are created. This includes the location of the rooms and their sizes, the general plan of the house, floors, roofing, and the appearance of the facade. The locations of doors, windows, stairs, etc. are also calculated. At the same stage, a decision is made on the type of wood and the size of logs for construction.
- Now it’s time to accurately calculate all the elements of the building. Namely, the type and depth of the foundation, the design features of interfloor ceilings, the location of the chimney, rafters, etc. are thought through. At this stage, the required amount of building materials is precisely calculated.
- After the constructive planning stage, they begin one of the very important stages - engineering design. Here it is necessary to stage-by-stage plan the work on laying water supply, sewerage, heating system, ventilation, and electrical equipment.
- The final design stage is the final development and approval of the house design. This includes both the exterior design of the house and its interior decoration. It would be a good idea at this stage to also think through the preliminary interior design of the rooms and the possible arrangement of furniture in them.
So, the house project has been drawn up and approved, it’s time to move on to construction. The next step is to lay the foundation.
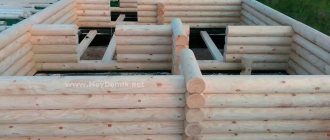
Laying the crowns of a house made of rounded logs
The crown is one row (belt) of logs laid along the perimeter of the building. The assembled and fastened crowns form the walls of the house.
When building a house from rounded logs, different types of crowns are used:
- the frame crown is the first row of logs that are laid on the foundation (also called the lower, first, mortgage);
- bottom trim - the second (lag) crown, which allows you to form a subfloor in a house from rounded logs, as well as an interfloor ceiling;
- ordinary crowns - the remaining rows (wall);
- window - are shortened logs (short logs) from which window openings are made;
- window sills - logs laid from the bottom crown to the window;
- over-window - logs laid on top of window crowns. The first crown above the window is the closing crown.
- the top trim is the basis for constructing the roof truss system.
Regardless of the type of crown, each log must be coated with an antiseptic before laying. This will protect it from all sides, incl. at the junction. The treated log will be protected primarily from biological activity and will prevent rotting.
The first crown of the house (flat or bottom)
To lay the first row, denser logs are used, usually from larch. Hardwoods are more difficult to process, so they are less common on sale. But, aspen and oak are perfect. Before you begin laying, you need to make a longitudinal cut on the log. Unlike the grooves that are on every log, the cut is needed to ensure that the log rests on the foundation with the maximum area. This will distribute the load evenly and make the log house more stable.
Advice. Some users recommend making a backing crown from laminated veneer lumber, as the material that is most resistant to deformation, or a backing board.
The logs of the embedded crown are treated with antiseptics in 2-3 layers.
After laying the first crown, the diagonal of the laying is checked; the discrepancy should not exceed 5 mm.
Beams and halves of logs (cut in half) for the frame crown and wood processing
Laying timber under a frame crown made of rounded logs
The first (flat) crown made of rounded logs
Note. The foundation log is not attached to the foundation.
The second crown (lag) is the lower trim
The floor in the house is made of rounded logs and is formed directly during the process of laying the crowns. Logs can be installed in the first crown, but insertion reduces their strength. Therefore, according to new technologies, logs are installed in the second crown on support beams.
Bottom frame of a house made of rounded logs
Laying the second crown of a house made of rounded logs (bottom trim device)
How to embed floor beams (joists) in a log house:
- the beam is fixed with a pin made of reinforcement, which is inserted into a pre-drilled hole or using a metal support for beams (joist holder);
- the beam is impregnated with antiseptic and fire retardants;
- places for installing beams are outlined;
- a groove is cut inside the log (using a chainsaw). The depth of the groove is selected so that the support beam fits firmly into the log;
- installed in a prepared place;
- After the erection of the ordinary walls, logs will be laid on the beam in increments of 600-700 mm.
Technology of inserting floor beams into logs
How to cut a groove in a log for a beam with a chainsaw
Shallow cutting of floor joists into logs
Deep cutting of floor beams into a log
Method of installing floor joists on a support beam
Floor joists rest on a beam attached to the foundation
Installation of floor beams in a log house
Fastening unit for floor beams in a log house
Installing a floor along logs in a log house
Fitting chipboard floor joists for subsequent insulation
Ordinary Viennese
Ordinary crowns are laid in the same way as the first, with mandatory checking of horizontal, vertical and diagonal lines. Rolled insulation, usually jute fabric, is placed between the crowns.
Note. The vertical check is carried out from the inside of the wall.
The figure shows how to lay a rounded log correctly.
Laying ordinary crowns of a house made of rounded logs
Construction of house walls from rounded logs
Construction of internal walls of a log house
Installation of shortened logs (short logs)
Roof installation
Installation of windows in a log house.
The next stage involves installing the roof. Beams and rafters are included. The last elements are mounted on the logs of the upper crown. If desired, pre-lay the Mauerlat. If the project includes a veranda, then shrinkage compensators are inserted into the supporting frame (vertical). To prevent the structure from skewing, each vertical log is equipped with the last elements.
Metal pins are used to connect ridge analogues. The rafters are installed in increments of 600 mm. To do this, you will need a beam with a cross section of 50x200 mm. To fix the structure, sliding supports are used to the last crown. Waterproofing material is laid on top. When installing the sheathing, a step is followed that depends on the type of roofing material used. The next step involves installing the roof.
Upon completion of the roof installation, you will need to caulk the insulation. This will require a special tool. The material is wrapped 5-6 cm downwards, pushing it into the cracks between the crowns. The house is left in this state for a year (for its shrinkage). After the specified time, the caulking process is repeated. The resulting cracks are sealed with jute or hemp.
Installation of the roof of a log house.
Some builders recommend caulking a building after its annual operation. An important point when building a log house is the installation of doors and windows. Partitions and openings are installed one year after the building is erected. Casing boxes with special fasteners are pre-installed. Windows and doors are inserted into the resulting structure. Since wood tends to expand and shrink, this process takes a long period of time.
Related article: Which curtains to hang in the bedroom: selection rules and fashion trends
The construction of the floor of a log house involves inserting logs into the mortgage or a subsequent crown. The last elements must be securely fastened. The mortgage crown needs good ventilation. Experts recommend installing the floor covering on the joists of the upper crown. At this stage, various communications are installed, including the heating system, baseboards, and plumbing.
If the construction of a house is made from logs of insufficient length, then joining them is allowed.
The best posts
- DIY Christmas tree toys
- DIY New Year's houses made of cardboard: master class with photos
- DIY balcony cabinet: diagrams, PVC, chipboard, other materials (video)
- Main types of upholstered furniture
- Ideas for home crafts made from chestnuts, acorns, cones, spikelets and other autumn gifts of nature (28 photos)
- DIY candle holder from a glass jar: ideas for Halloween
- How to make a patio with your own hands?
- Waterproof and water-repellent fabric - types and properties
Methods for joining logs in a log house
Regardless of how the type of crown is laid, special attention is paid to the formation of longitudinal, corner and T-shaped connections.
For chopped logs, three “bowl” cutting technologies are used: Russian, Canadian and Norwegian log cutting, as well as “paw” cutting. For rounded logs, the formation of planting bowls is typical using Russian technology:
Longitudinal connection of logs (lengthwise)
To lengthen a log, a dovetail joint is used, since it allows you to create the most durable and reliable joint connection.
Dovetail joining of logs (trapezoidal tongue-and-groove joint)
Longitudinal connection of logs to studs
End connection of logs to staples
End joining of logs on brackets
Splicing logs along the length - tongue and groove on brackets
Type of tenon joint of logs along the length
Corner connection of logs
Planting bowls are usually made in a factory way to form a “bowl” joint in half a tree.
When building a house from rounded logs, three types of angular connections with the remainder are used:
Corner notch “in the oblo” from logs and a carriage with the remainder (half a tree, a rolled bowl, a fat tail)
Cutting “into the bowl” or “into the cloud”
In this case, the connection has a residue, looks beautiful, but increases wood consumption.
The technology for installing rounded logs using this method has three varieties:
- with an oval comb . There is an oval ridge in the recess of the bowl;
- half a tree . A seat is cut out in half the diameter of the upper and lower logs;
- in the fat tail . In the recess of the bowl of one log there is a special recess, and in the bowl of the other log there is an additional protrusion.
Types of cutting corners from logs “in a clap”, connection with a ledge
Cutting "in a hurry"
This fastening method is distinguished by cutting out a bowl in the lower part of the log; as a result, the upper log seems to slam down the lower crown, which is why it is called clap.
Cutting a corner from logs “in okhryap”, corner knot with remainder
Cutting "in the okhryap"
When cutting corners using the “sharp” method, the log has additional notches in the seats.
Much less often they use the residue-free connection method - “in the paw” . In turn, it has three options: a simple (straight) paw, a paw with a cut, and an oblique paw with a cut.
Corner cut of a log - straight paw with a notch
Corner felling of logs - oblique paw (dovetail) without residue
Connecting logs in the corners without leaving a trace - an oblique paw with a cut
T-joint of logs
Connection (cutting) of internal walls into load-bearing ones - dovetail and into a bowl. This is done using a dovetail connection (residue-free method) or “into a half-tree bowl” (connection with a remainder).
Wall construction technology
Before laying the first crown of the log house, it is necessary to waterproof the foundation by laying waterproofing material on it (roofing felt, hydroglass insulation).
For the first crown, choose the largest log in diameter and the most resinous one.
You can also use larch logs, but its price is quite high. To give greater stability to the log, part of it is removed, making a flat area. Treated with an antiseptic solution and laid on the foundation.
For a good fit to each other, a longitudinal groove is selected in the logs. When ordering a finished log house made from rounded logs, this groove is already made in production. In all other cases, the groove is made manually.
Video. How to make a longitudinal groove manually:
The logs are laid with the groove down on top of each other. For a tight and warm connection, moss or tow is laid between the logs. The logs are connected to each other using wooden dowels, which are inserted vertically into pre-drilled holes.
The corner connection can have several options: with or without a remainder.
When connecting logs with the remainder, there will be an overconsumption of material, since part of the log protrudes beyond the walls of the house. This method will increase the cost of construction.
The corner connection of the logs should be warm. It can be obtained by connecting into a paw (when connecting without a residue) and by connecting into a bowl (when connecting with a remainder).
If the diameter of the logs is large enough, then, most likely, to build a house from a log you will have to resort to the help of equipment: a crane or a manipulator.
It is easier to build a house from rounded logs than from regular logs. The log is smooth, all the necessary grooves and corner connections have already been made in production, all that remains is to assemble the construction set.
Dowel for logs
To give rigidity to the wall, the logs are fastened together using dowels - wooden fasteners. Often dowels are cut from the remains of a log, but it is more correct to use special fasteners for this that meet the following parameters:
- made of hardwood (for example, birch). This type of dowel is more durable compared to coniferous ones;
- the diameter of the dowel (usually 25 mm) exceeds the diameter of the hole by 2-3 mm;
- has a square shape (ensures uniform shrinkage);
- humidity corresponds to the moisture content of the log.
Note. Metal dowels or dowels made of corrugated fittings are not suitable for installation. Iron dowels tend to rust, and on corrugated reinforcement the log will hang during the shrinkage process and there will be cracks.
Layout of dowels in a log wall
How to install dowels correctly:
- Once the log is in place, it is temporarily fixed with nails. In this way, the displacement of the log during the drilling of a hole for the dowel is prevented;
- drill a hole for the dowel. Moreover, the diameter of the drill is 3-5 mm less than the diameter of the dowel;
- a hole is drilled through 2-3 logs;
- the dowel is driven into the hole using a mallet. It must enter with force. To simplify the installation of the dowel, it can be sharpened from below;
- The first dowel is installed at a distance of at least 200 mm. from the edge of the log;
- all dowels are recessed into the wood to a depth of 2-3 mm. Protruding fasteners will cause logs to hang; Material for the site www.moydomik.net
- The step for installing dowels in a log is 1-1.5 m.p. In piers, the installation step varies and depends on its length. There should be at least two dowels per log;
- installation is performed in a staggered manner. To avoid confusion and install fasteners correctly, craftsmen advise marking the installation locations of the dowels with a pencil on the inside of the wall;
- installation displacement occurs on every fourth log;
- after fixing the log with a dowel, the safety nails are removed;
- After some of the logs are fastened with dowels, they are pushed down with a mallet so that they accurately occupy the seats. This helps reduce the amount of shrinkage.
How to drill holes for dowels in a log
Hole for dowel in log
Birch dowel for logs
Metal dowel for logs
How to make a log house with your own hands
Work on constructing a log building can be organized in two ways.
- Chopping followed by “rolling”. At the same time, the log house is usually made in the place of logging. The log house sits for one and a half to two years, its logs dry out and shrink. Then the log house is dismantled and transported to the construction site, where it is assembled according to a permanent pattern, guided by the marks made on the logs.
- In the second case, felled trunks or logs are delivered to construction. They are processed at the site (often including debarking) and laid on the foundation.
Manual felling of a log house
A log house needs a foundation, just like any other. The log house does not have any special requirements for its type. Moreover, log houses are much less demanding on the quality of the foundation than houses made of stone materials.
Foundations for a log house can be strip, columnar, or pile.
The first, framed crown, in the absence of a foundation, is laid on pads. They are placed under the lower logs of the casing at a distance of about half a meter from the corners of the future log house. Strictly in the horizontal plane, with a deviation of the top edge from the horizontal by no more than 5 mm.
The bottom of the logs lying on the foundation is cut off by 3-5 cm, and a layer of horizontal waterproofing is laid between them and the foundation.
Having exposed the longitudinal logs, longitudinal grooves are cut into them for the next row of logs and semicircular recesses - bowls, into which the logs will lie, forming a perpendicular wall. Then perpendicular logs are laid, in which longitudinal grooves and bowls are also selected. The first crown is ready.
I recommend: How to connect several lamps to two dimmers?
Now comes the turn of the second - the main crown of the log house - the lower trim. Its logs are laid on the framed crown, processed similarly to the framed crown, as described above.
If the log house is not made for rolling, a sealant is immediately laid out between the logs: dried moss or tow. (Fig. 1)
Laying pattern along a “straight bowl”
When the lower frame is assembled, logs are cut into it, giving additional strength and serving as a base for the floor.
Vertical crowns can additionally be fastened with rectangular tenons, which are located at meter intervals along the perimeter of the crown, as well as near corners and openings. Arranging tenons and sockets for them is labor-intensive, so round dowels are often used instead, for which several crowns are drilled through with a brace or drill.
The rows of tenons or dowels are shifted so that, if possible, they are not located on top of each other.
Vertical column supports
Installation of vertical elements (pillars, columns, racks) in a wooden house is carried out using special devices (shrinkage compensators) - screw jacks.
- the log is cut to length minus 80-100 mm. By this amount, a house made of rounded logs will shrink, and the jack can be lowered;
- a bowl is cut out at the bottom of the support;
- a jack is installed on top, which will compensate for the shrinkage of the house;
- Vertical installation is checked;
- the remaining vertical elements are installed along the same line;
- The jack is height adjustable.
We carry out the work
House foundation
For a log house it is best to use a shallow strip foundation
For a log house, it is best to use a shallow strip foundation, but provided that the soil on the site is not heaving. The trench is dug according to the design parameters of the house, and the depth is increased by 20 cm for a sand cushion. Sand is poured into the bottom of the trench and compacted well. Then formwork made of polished boards is installed. Roofing felt is laid on the bottom and walls of the formwork to waterproof the base from the bottom and walls. After this, a reinforcing mesh of steel rods is installed and concrete mortar is poured. The finished and dried foundation is covered with bitumen mastic on top. Don’t forget to make vents in the base to ventilate the wooden subfloor. The holes are installed at the pouring stage in the upper part of the base on all four sides of the house.
Important: the reinforcement for the foundation should only be welded, but not knitted. And at the corners of the foundation, the rods should only be bent, and not tied at right angles. This technology will ensure the solidity of the foundation.
For heaving soil, a columnar foundation is made. In this case, supports are installed at all corners of the building, under load-bearing walls and at the junction of partitions. The supports are poured by analogy with a monolithic tape base. Then the support pillars are connected with a metal or concrete grillage with mandatory waterproofing.
Houses made of rounded logs and their advantages
We mount the walls
The walls of the log house must be erected on a backing board
- The walls of the log house must be erected on a backing board. That is, do not lay the log directly on the concrete, but first lay a linden or larch board with a cross-section of 150x50 mm. In this case, the backing board is securely fixed to the foundation using anchors.
- The logs of the first crown must be cut from the bottom so that an end is formed. It is on this that the first crown should be mounted.
Important: the factory rounded log already has such an end. If it is noted that such logs are missing, then you should contact the manufacturer to replace the lower crown of the log house.
- Laying out the first log crown is carried out by laying two opposite logs. They are leveled horizontally, and then two perpendicular cut logs are laid. As a rule, round timber already has end bowls for mounting the corners “into the bowl”. In a similar way, the walls are adjusted in height. All grooves in the corners and between are filled with insulation so that it protrudes outward. Then it is caulked into the resulting cracks.
- It is worth remembering that log crowns must be additionally secured with wooden dowels. These are rods made of hard wood. They are driven into holes drilled in the crowns. Holes are drilled every three rows of laid crowns to their entire depth. In this case, the dowels should be positioned offset relative to the lower dowels (that is, in a checkerboard pattern). The holes for the dowels are made slightly smaller than the diameter of the pins so that they fit into the groove as tightly as possible. In this case, the last two crowns are not fixed with dowels. This technology will allow the house to sit correctly and with the least distortion. The assembled body is covered with film and left to shrink.
Important: fastening crowns with metal nails is strictly prohibited.
Floor in the log house
The floor in a wooden house should rest on joists. They must be mounted in the lower crown of the house or in the next one after it. That is, cuts are made in the log that will neatly and end-to-end cover the logs laid in increments of 50-70 cm. Do not forget to waterproof the logs at the joints with the log. And along the perimeter of the house additional support pedestals are made for them. Insulation is laid between the joists and the floor is covered with tongue and groove boards.
Log roof
As soon as the house is well settled and settled, you can install the roof of the house
As soon as the house is well settled and settled, you can install the roof of the house. To do this, the upper crown of the house is covered with a mauerlat (beam for rafters). Then cuts are made in it in increments of 60 cm at the desired angle. The rafters are mounted into the resulting grooves and securely fastened with metal corners. All farms are connected to each other by a ridge. All that remains is to cover the rafters with lathing and cover the roof with hydro- and thermal insulation. At the very end, the roofing material is laid.
Advice: when installing a house, it is worth installing shrinkage compensators under all supporting vertical logs. This will allow the house not to change its linear contours in the area of the veranda, balcony, etc.
The fully assembled house is caulked with protruding insulation and left in this state until complete shrinkage. Subsequently, it will be necessary to caulk the log house again. After the final shrinkage of the house, windows and doors can be installed. But they need to be mounted only in a frame - a special wooden frame with compensators. Since wood tends to expand and contract under the influence of temperatures, this design will protect windows and doors from distortion and breakage.
After installing windows and doors, you can install communications in the house and celebrate a housewarming party. And rest assured, a log house, built according to all the rules, will last for decades.
Insulation of a house made of rounded logs
Thermal insulation can be divided into three stages:
1 – interventional insulation
How to lay inter-crown insulation for a log. Laying rolled thermal insulation material between the crowns of a log wall. The insulation sheet is laid in one layer and secured with a stapler for reliability. The width of the blade is 10-20 less than the width of the longitudinal groove. The amount of overlap is 50-70 mm. A meter before the end of the log (corner or opening), the insulation is laid in two layers. This is due to the fact that the log dries more intensively in the opening. The insulation in the bowls is also laid in two layers;
2 – first caulk
Performed one year after the construction of the house. During this time, the most intense shrinkage occurs;
3 – subsequent caulking
Performed as necessary during the operation of the building.
When performing caulking, you should remember:
- Only the outer walls are caulked;
- the bowls will definitely be caulked;
- a large amount of insulation can cause the crown to rise, causing the need to raise the crowns of other walls.
Interfloor ceilings in a house made of rounded logs
As a rule, houses made of rounded logs are one-story, but there are projects of two-story houses or houses with attics. In any case, during the construction process it becomes necessary to create a ceiling between floors or between a floor and an attic or basement.
The ceiling is formed similarly to the lag crown of the wall. Those. a support beam is cut into the log, onto which the logs are laid, on which, in turn, the boards of the subfloor of the upper floor or attic will be laid.
For support beams, rounded logs are used, but often preference is given to laminated veneer lumber.
The choice of beam cross-section, which is determined by the span width and the distance between the beams, is of great importance for the strength of the structure. To calculate, you can use the table:
Note. The log or timber can be replaced with paired boards of suitable width.
When installing interfloor ceilings, the insert is made so that only 10% of the groove falls on the lower log, and the rest on the upper log.
Roof of a log house
A house made of rounded logs involves the construction of a massive roof, which will accelerate its shrinkage and create additional pressure on the logs of the walls. A massive roof requires the installation of a reliable roof truss system.
Features of installing a rafter system on a log house:
- install the rafter leg not on the top log, but place it inside the log. This will avoid blowing through the joint;
- When installing the rafter legs on the top log, which serves as a mauerlat, use sliding fasteners. Similarly, using sliding fasteners, install the ridge girder. This compensates for shrinkage;
- the installation pitch of the rafter legs is 600-700 mm;
- further installation is carried out in accordance with the requirements of the roofing material;
- The under-roof space must be insulated.
Important points when working with logs
It is advisable to buy wood harvested in winter; the log will be more durable and strong in this case.
In order for the construction of a log house to be successful, it is necessary to adhere to the basic recommendations from professionals. Only if you follow these tips will the finished house stand long and strong.
- So, first you need to choose the right log. It is better to buy wood from trusted suppliers. At the same time, it is most profitable to buy pine or spruce for construction. The latter is excellent for installing internal partitions at home.
- It is advisable to buy wood harvested in winter. The log in this case will be more durable and strong.
- The diameter of the log depends on the climatic zone of the building site. The harsher the winters in the region, the thicker the log you need to take.
- The laying of logs in the corners is done “in a bowl” or “in a paw”. The first method requires more material, but provides warm corners to the house. As a result, the microclimate in the log house will be optimal. The second method saves building material, but makes the finished house colder, since the corners are the weak point of wooden log houses.
- It is imperative to insulate the house between the crowns. For this, jute, tow, flax or moss are used. The latter is the best option because it does not rot, changes the level of humidity along with the tree, and is also not of interest to birds and insects.
- The roof and internal wiring of communications are carried out only after the house has completely settled.
Important: for the beauty of the finished cottage, after it has settled, you can sand the log and varnish it.
Installation of a warm circuit
It is recommended to install window and door blocks after shrinking the house made of rounded logs. During installation it is necessary to use casing bars. The bars are placed in a vertical groove measuring 50x50 mm, which is cut at the ends of the logs facing the openings. The purpose of the block is to prevent the log from torsion and to compensate for the displacement of the block during the shrinkage process.
The window or door frame is attached only to the casing, but not to the end of the log. Galvanized nails or self-tapping screws are used as fastening elements. The length of the hardware should not exceed the thickness of the box and casing. A technological gap is left above the box, the size of which is 100-120 mm. (depends on the expected amount of shrinkage, which is determined by the moisture content of the log). The gap is filled with elastic heat-insulating material.
Step-by-step diagram of how to install a pigtail and casing with your own hands
How to make frames for windows and doors in a house from rounded logs
Groove and casing for windows and doors in a log house
Construction of a house from rounded logs takes from 5 days to a couple of months, depending on the complexity of the project, the experience of the workers and weather conditions for construction. A team of professionals can handle it in a short time, but assembling it yourself will take much more time.
However, regardless of the speed of construction, finishing work can begin only after the house shrinks, i.e. about a year after finishing assembling the box at home.
Note. From the remains of rounded logs you can make sub furniture, benches or decor to decorate the site.
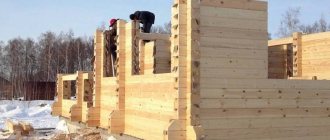
Main types of log material
The severity of the problems described above can largely be reduced at the stage of procurement of materials. The question of how to make a log house with your own hands is preceded by the question of what to make it from.
The options are as follows:
- log house made of natural logs;
- timber frame;
- log house made of factory-processed logs (rounded).
In turn, when deciding how to make a log house from timber, you have to make a choice between ordinary construction timber (1), profiled timber (2) and laminated timber (3).
Beam: construction (1), profiled (2), laminated veneer (3).
From the point of view of convenience and manufacturability of work, timber is noticeably superior to ordinary (natural) logs. A rounded log is fundamentally no different from timber, except, perhaps, for higher expressiveness and originality of building design.
I recommend: Question: How to strengthen the foundation so that it doesn’t “walk”?
The disadvantage of treated construction wood will be a noticeably higher cost, to some extent offset by higher quality and reduced labor costs during operation. And, in addition, the absence of that very spirit of “naturalness” of the log house.
It must be remembered that a log house usually only has external walls and (not always) partitions. To fully answer the question of how to make a log house, you will need a number of additional materials, in particular:
- timber for logs;
- boards for floors, cladding of gables, ceilings, ceilings, etc.;
- timber and boards for roof structures;
- window and door fillings (blocks);
- roofing material.
Shrinkage of a house made of rounded logs
How to control the shrinkage of a log frame:
- wait a year for primary shrinkage to occur;
- use jacks to adjust vertical elements;
- arrange gaps over non-shrinkable elements of the house: door and window openings;
- remember that walls can not only shrink, but also gain moisture and, therefore, swell;
- take into account that internal walls (piers) shrink faster than external ones, because they are more protected from external influences;
- warm up the house slowly, because in case of rapid heating, the internal walls will shrink quickly, and the external ones will lag behind in this process;
- remember that southern walls dry out faster, which means they shrink faster;
- control the process of shrinkage of the log house and caulk the cracks in time.
Finishing a house made of rounded logs
Finishing work includes: grinding, installation of drip lining, installation of communications, external and internal finishing.
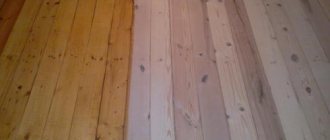
1 Sanding
The constructed wall must be sanded until the surface is smooth. The process of rounding involves obtaining a high-quality surface of the log, but during the installation process roughness may appear that is better to remove.
Grinding a rounded log with a grinder
2 Low tide
You can protect the lower crown log using galvanized steel, plastic, copper, concrete, etc. The ebb is installed in such a way that there are no gaps between it and the wood. If there are gaps, they are filled with sealant. The ebb is installed at an angle relative to the wall surface and fixed with hardware.
Ebb for the foundation of a wooden house
3 Communications
Wiring and other communications can be installed only after the house has settled. In this case, it is unacceptable to install wiring into the ends of the log, because it can be deformed during the process of torsion of the log, which will lead to a short circuit. Installation of communications is carried out in accordance with fire safety requirements.
To install electrical wiring, users recommend using special pads rather than cutting holes in the log, and thus not reducing its thermal insulation and load-bearing properties.
4 Exterior finish
Includes sanding logs, caulking cracks, finishing openings, etc. work.
5 Interior decoration
Includes all work that is carried out indoors. This could be finishing the walls with clapboard or plasterboard, installing a finished floor, installing a staircase to the second floor, etc.
Types of logs for construction
The choice of the type of wood for installing a house depends only on its price
In order to build a log cottage, you can use two types of logs:
- Chopped wood. This round timber (log) is processed exclusively by hand with an axe. During processing, only the top layer is removed - the bark without interfering with the bast layer. As a result, wood is the building material that is most resistant to external influences. However, a chopped log has a difference in cross-sections along its entire length. That is why the construction of a log house from a log house is more labor-intensive and expensive. After all, here you have to not only process the wood manually, but also correctly alternate the round timber at the ends in such a way as to compensate for differences in diameters and make the wall and crowns as horizontally even as possible. In addition, the installation of a house made of such material will take years, not only because of the complexity of laying the logs. Here you will also have to give the log time to shrink, since at the time of work its humidity is close to 30%. During the drying of the tree, the cottage will shrink by 5-7%.
- Rounded log. This type of wood is processed in production by removing its bark, bast and the next layer - sapwood. All knots and resin pockets are also removed. In addition, it is by industrial method that the log is given a single cross-section along its entire length. The finished log is treated with antiseptics and fire retardants to make it more resistant to burning, rotting and mold. Rounded round timber has a cross-section from 18 to 30 cm, while chopped logs can have a larger cross-section. In addition, rounded logs are less resistant to external factors.
Important: the technology for building log houses with your own hands from both types of round timber is identical. Therefore, the choice of the type of wood for assembling a house depends only on its price. And thanks to the decision made, you can already imagine how much it costs to build a house from a log.
Caring for a log house
In order for the house to maintain its original appearance for a long time, you should take care of it on a regular basis, in particular:
- promptly coat the log walls of the house with antiseptics. The frequency of application is determined by the product manufacturer's recommendation;
- cover log walls with fire retardants;
- apply stain or lighten walls. Under the influence of ultraviolet radiation, walls darken, and not always evenly. The use of various protective compounds can slow down the process, but the process cannot be stopped. Therefore, after time, it will be necessary to cover the walls with a darker composition;
- paint the walls with glazing translucent paints, which, on the one hand, allow you to see the structure of the wood, and on the other, create additional protection;
- as a last resort, cover the outside of the house with siding or clapboard. But, this is only if it is not possible to restore the wood.
Thanks to proper installation and maintenance, a house made of rounded logs will function fully for a long period and stand out among other buildings.