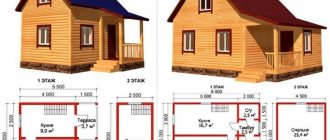
Forum member Demoncheg and his wife have long dreamed of getting out of the dusty city and settling near a river and forest so that their child, and they themselves, could breathe clean air. The family settled on the golden mean: the plot they liked was located 100 km from the city - not too far, but not so close either. They were captivated by the beauty of the spruce forest, which is located not far from their future place of residence. There they decided to purchase 10 acres of land. Initially, the family wanted to buy a ready-made 6x2.3 m change house, but they had to abandon this idea, since the desired quality did not correspond to the asking price. Therefore, it was decided to build a guest house with our own hands. Drawings of the future house 6x3 m were independently developed and an estimate was drawn up. They built the house in 15 days, the costs according to the estimate amounted to 120 thousand rubles.
Content
- Construction of the foundation
- Bottom frame frame
- Wall installation
- Roof installation
- Do-it-yourself cladding of frame walls and exterior finishing of a frame house
- Interior decoration of the house
- Installing a fence from corrugated sheets with your own hands
- Well house
- Basic materials and tools used in the construction process
- Bottom line
Attachments:
- Project in Sketchup
- Estimate for the frame of the house
Construction of the foundation
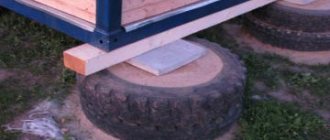
Developers learned how to build a guest house with their own hands after studying materials from numerous self-builder forums. First of all, we brought a truck of sand and crushed stone to the site and ordered building materials. As for the foundation, we decided not to overthink it, so we decided to install the structure on concrete blocks. This type of foundation is also often used when building a cabin with your own hands.
Advice: Before you start building the foundation, you need to choose high-quality concrete blocks, since the strength of the future building will depend on them. When choosing blocks, you need to pay attention to the following characteristics: boundary load, frost resistance of the blocks, the presence of granite crushed stone and the size of the blocks.
First, we marked the soil using metal pegs, rope and a construction meter, that is, we outlined the boundaries of the future building and foundation.
Note: During marking, it is necessary to take into account that the width of the foundation should a priori be greater than the width of the wall.
After completing the work on marking the territory, we began to prepare the soil for the construction of the foundation. For a columnar foundation, it is necessary to make holes in the ground for supports. Their depth should be approximately 1.5-3 cm, this depends on the unevenness of the area. That is, the recesses must be made so that after installing the blocks, their level matches.
You should definitely make cushions in the holes: pour sand and gravel at a level of 10-15 cm, fill with water and compact thoroughly. Next, the support platforms were installed and the blocks were placed.
Note: Support platforms allow you to increase the load-bearing capacity of the soil, and accordingly, a large weight of the structure is possible. It is not recommended to use paving slabs as support due to their fragility. The most reliable option is to fill the reinforced support platform in one row with road mesh or reinforcement.
How to make drawings of a frame bath with your own hands
It is quite difficult to find a person in our country who has never been to a bathhouse. Many people know what it’s like to sit and relax in good company after a steam room with a mug of aromatic herbal tea. Therefore, very often next to the house on the site you can see a small but cozy bathhouse.
It is made of wood (timber or logs), brick, stone, or made using frame technology. The latter will be discussed in this article.
In the photo - a plan of a frame bath
Project
Most often, a bathhouse is planned as a separate building, erected from rounded logs, regular or laminated timber. But, frame construction has recently begun to “tread on their heels” more and more often.
Quite a lot of companies are ready to offer their clients standard or individual drawings of a frame bath. Although the cost of the latter will be more expensive, you will get an exclusive option that will not be repeated anywhere else.
Bathhouse project using frame technology
What advantages does frame technology provide us with:
- significant reduction in time to construct a building;
- cost savings, since the price of the structure is much lower than the construction of, for example, a traditional log house.
You should also not forget that you can build such a bathhouse with your own hands, almost without involving help. But at the beginning of the process, you still cannot do without a project on paper, which will allow you to avoid making unnecessary purchases and movements.
Frame bath plan
Creating drawings requires certain knowledge, so if you doubt your abilities, it would be better to seek help from specialists. For those who are confident, below are instructions on how to compose them correctly.
Preparation
Before you start drawing up a drawing of a frame bath, you should decide on some points.
It is not enough that you have decided to make a bathhouse using frame technology; you will need to calculate the following details:
- Location of the structure on the site. Particular consideration should be given to sewerage and drainage. Very often, the laying of these communications becomes a decisive factor.
Frame bath foundation plan
- Soil at a construction site. This component is important, since for a bathhouse it is necessary to build a foundation, which directly depends on the soil on the site. By design it can be:
- strip (made of reinforced concrete or concrete);
- piles made of stone, concrete;
- columnar - made of brick, concrete or stone;
- made of separately lying blocks, the grooves between which are filled with cement mortar or clay.
Advice: if you plan to install a swimming pool in a bathhouse, groundwater should not be close to the surface of the site.
- Plan of the building and number of floors. If you decide to build a frame two-story bathhouse, you should take into account the additional load on the frame and base, which is quite difficult for a beginner. Also at this stage, it is necessary to think in advance about the location of the stove and what it will be made of in order to understand where and what type of chimney to install, as well as ventilation ducts in the rooms.
- Communications supply. This stage includes:
- electrical preparation, in particular laying electrical wiring;
- type of ventilation;
- thermal insulation;
- vapor barrier;
- features of drainage.
- Roof. An important element of any building, since the durability of the structure directly depends on it. It will be important to know what material should be used to make it, and what shape you want it to be in order to calculate the power of the floors.
Project of a frame bath with a veranda
Design and its features
As soon as you understand the above points, you can begin to create a drawing of the future bathhouse, entering into it all the information received, as well as supplementing the project with the necessary details. Follow this rule - the more detailed the drawing, the easier it will be to build the desired building.
Try to prepare several sketches so that you have some choice. For example, you will need to draw not only a general plan of a frame bath, but also floor drawings, where calculations and details should be indicated.
Frame bathhouse in detail
Separate plans should also be drawn up for communications. This way you will not get confused when laying highways. At the same time, do not forget that you should not complicate the project if you do not have enough knowledge. The best option is to use a ready-made option, only slightly adjusting it to suit your preferences.
Advice: use already built projects that have proven their reliability.
Plan of a frame bath with a terrace
The drawing shows a bathhouse for a suburban area with a terrace measuring 1.5x4 m, the total size of the structure is 4x6 m. This project is well suited for organizing summer gatherings in an open free area.
Plan of a frame bath with an open terrace
The plan of a frame bath assumes that the steam room consists of three rooms:
- steam rooms;
- washing or shower bath;
- rest rooms.
The vestibule is shown separately on the plan. There is no room for a changing room, but there is a small area for changing clothes in the washing block. Outerwear is removed and stored in a special closet installed in the relaxation room of the bathhouse. The terrace itself merges with the living room, being its summer version.
Conclusion
Frame technology began to be used to its full potential by settlers in America. Due to the speed and ease of construction, it quickly gained popularity. Today, not only houses are built this way, but also outbuildings, including bathhouses.
Frame technology will allow you to have a full-fledged structure, even if you have a small budget. In the video presented in this article you will find additional information on this topic.
9ban.ru>
Bottom frame frame
We made the bottom trim from 150x100 mm timber. The bottom trim is the first layer of timber; it is necessary to fix the future structure on the foundation. Also, the strapping acts as a reference point for the walls and floor.
Tip: Traditionally, the bottom trim is made from softwood. The builder can choose from a timber, a board or a bunch of boards and a log. If a bunch of boards is used, then it should be secured with screws or nails of different lengths and in a checkerboard pattern.
The size of the bottom trim should be 5-7 cm smaller than the foundation in order to install the ebb and make the outer cladding of the house. We laid out the prepared timber with the quarters cut out on the foundation, checked the dimensions, compared the diagonals and the horizontal level. You can assemble the harness using self-tapping screws or wood glue-sealant.
Tip: In order for the connection of the lower trim to be sufficiently strong and rigid, it is recommended to make it in a “quarter”
The gaps between the lower beams and the foundation were sealed using a gasket made of polystyrene foam. As expected, the entire timber was treated with Senezh antiseptic.
At first it was planned to build the building according to the “platform” principle, but during the construction process they decided to build it according to a different principle.
We attached the logs made of antiseptic timber “in a quarter” to the bottom trim with self-tapping screws and glue-sealant. We also made the basis for the future floor: along the lower edge of the floor joists, bars were attached, on which a subfloor made from edged boards was laid. The entire structure must be antecepted.
Construction on your own
I tried to break down all the construction into small blocks, which will be explained separately from each other. They proceed gradually from the foundation and lower frame to the installation of the roof and decoration.
Before moving directly to the active stage, I will describe the basic characteristics of the gazebo. So that we all understand in advance what we are going to build.
Characteristics of the gazebo
The main characteristics and building materials used are presented below.
Ready gazebo
- Dimensions ; 4 by 3 meters.
- Pillar height : 2 meters.
- Type : semi-closed.
- Foundation : block.
- Bottom trim : beam 150 by 100 mm.
- Posts : timber 100 by 100 mm.
- Rafters : 6 pieces with dimensions 100 by 50 mm.
- Roof : gable.
- Roof : corrugated sheet.
- Internal cladding : oriented strand board (OSB).
- External covering : siding.
Foundation
The base of the gazebo consists of a block foundation. 9 foundation blocks of 20 by 20 by 40 cm are used, set strictly according to the level. In order to align them evenly, it is necessary to prepare the area for the foundation in advance - remove large grass, debris, roots, and the like.
Important point : roofing felt waterproofing sheets are laid on top of the installed blocks. They protect the lower trim from rotting.
Installation of foundation blocks
Bottom harness
The lower frame is a wooden base made of timber 150 by 100 cm, on which the pillars are supported. Inside the frame there will be logs attached to which the floor boards will be attached.
Laying the bottom trim
Pillars
Setting the pole straight and securing it is a more difficult task than it might seem at first glance. To do this you will need:
- Place the post on the harness.
- Secure it with temporary wooden slopes.
- Fix tightly using metal corners.
- Remove temporary slopes.
Installing a pole using slopes
This work is best done by two or three people, since you need to do several tasks at the same time: hold the pole, hold the slopes and screw in the screws.
Installed pillars
Upper harness
By analogy with the lower harness, the upper one is attached to the poles. This is done immediately after installing the pillars. In the future, the top frame will be the basis for the roof rafter system.
Top railing on poles
Cross railings
Next, transverse railings are installed between the posts; they are also attached to metal corners. In the future, these railings will serve as the basis for OSB sheathing and siding.
Don't forget to leave room for the main entrance.
Cross railings fixed to metal corners
Joists and floor
When the gazebo has already taken its shape, you can begin to lay the floor. To do this, it is necessary to attach logs to the bottom trim - wooden blocks on which boards will be laid on top.
Installed logs
The owner of the video did not indicate the size of the board, so you will need to choose it yourself. You can use a standard “magpie” floorboard - 40 by 100 by 6000 mm.
Layed floor
Roof rafter system
To create a gable roof, 6 rafters with dimensions of 100 by 50 mm are used.
Inverted rafters
The correct technology requires sawing out all the corners and installing the rafters evenly, joint to joint. In this case, the builders decided to save time and effort and simply fixed the rafters to metal corners, additionally securing the rafter legs with tightening ties.
For the lathing, six-meter boards 20 by 100 mm were used.
Ready rafter system
Sheathing with OSB and siding
It was decided to close the back wall of the gazebo to create some coziness inside the room. For this, oriented strand boards were used, which, in addition to the blank back wall, closed the lower openings in the gazebo.
OSB sheathing
Additionally, the lower openings are covered with siding.
Siding
Roof
Corrugated sheeting is one of the cheapest and most reliable roofing materials, which is used for non-insulated roofs. Classic fastening with self-tapping screws and a washer will allow you to securely fix and lay the sheets on a wooden sheathing.
Despite all the advantages of corrugated sheeting, it has one “disadvantage”: it makes a very loud noise when it rains from drops falling on it.
Screwing the roof
Decor and interior design
A very interesting solution was the addition of decorative curtains and wooden trim to the window openings. This made it possible to almost completely close the room from prying eyes, as well as partially cover the gazebo from wind and rain.
Decorating with curtains
Additionally, lighting was installed inside the building, a TV and a microwave were installed. The result was almost a residential holiday home.
Microwave in the gazebo
A portable pool was installed outside.
Video
The above approach to building a 4 by 3 meter gazebo was shown in a video presented by a user named Ivan Ivanov .
In addition to the step-by-step construction instructions, on his channel I found another video with this gazebo, which shows the interior of the gazebo and the pool installed outside. The photos were presented above.
Wall installation
After the logs were laid, we began installing the walls. The distance was made a multiple of the insulation; the material chosen was 100x50 mm timber. The assembly of the house frame proceeded as follows. At the corners of the frame building and between them, load-bearing frame posts were installed, which were aligned and secured with temporary jibs from the outside.
We installed the top trim on the frame racks. Here you need to once again carefully check the horizontal and vertical positions of the supporting structure of the frame mini-house. Now you can install the remaining wall posts, focusing on the distance of the floor joists. Secure the entire structure with corners and screws.
Tip: Fastening with nails is cheaper, but it is unreliable because the wood often cracks. It is recommended to select metal corners and fasten them using self-tapping screws and a screwdriver.
We started installing the upper floor joists. They were laid in grooves in the same way as the floor joists, the only difference being that the floor joists were longer. This is provided in order to later attach the roof rafters. The frame racks were strengthened with jibs.
At this stage, construction was suspended for 10 days due to the drilling of a well. Upon completion of the work, construction continued.
Roof installation
After a short break we moved on to installing the roof. First they made the overlap. It is important to lay the timber strictly on the wall posts of the frame house to ensure the strength of the structure. The ceiling is laid with a projection of more than 40 cm from the outer wall - this will protect the walls of the mini-house from rain.
Six farms were assembled right on the ground. The trusses were built from the same timber from which the frame of the house was made, and were guided by the standard size of metal tiles. The trusses were fastened with metal plates.
Tip: To add rigidity to the structure, it is recommended to additionally secure the rafters with metal plates. You can purchase them or make them yourself from a sheet of galvanized iron using a jigsaw.
After installing the truss, we moved on to roofing work: waterproofing and sheathing. Waterproofing material was placed over the entire roof area and secured with bars. These bars are assigned several tasks: to maintain waterproofing, create a ventilation gap above the roof and serve as the basis for the counter-lattice.
The sheathing must be done staggered to avoid ruptures of the roofing material in the event of shrinkage and warping of the lumber. To create a cornice, the lathing should be laid with an extension of 30-40 cm. Next, a counter-lattice was installed for laying the metal tiles.
It was time to lay the metal tiles, and here we encountered some difficulties. The installation of metal tiles should begin by placing the first sheet in the lower corner of the rectangular slope directly onto the sheathing and fastening it with a self-tapping screw.
Note: It is important to remember that metal tiles should be laid parallel to the eaves.
When installing the next sheet, you need to pay attention to the line that the edges form. It must be perfectly level, otherwise there is a possibility that the structure will collapse. All other sheets are attached in the same way. And finally, we sewed up the gables with sheet moisture-resistant material.
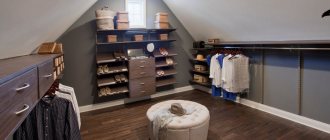
Everything is at hand in a country house
Well, now about how I arranged the space of my little “mansion”. The small area of a garden house requires economical solutions, namely, a clear division into functional zones with the most rational use of their internal volume. I made a scale plan on a piece of paper and began to figure out where to draw the boundaries so that at least some of the rooms would be comparable in size (see figure).
As a result, I divided my rectangular house into three parts, depending on the general needs of family members. The middle part, due to the fact that the entrance door is located in the center, has a dominant position, subordinating the other two. This means that it is more logical and profitable to place them symmetrically to the left and right relative to the middle one. But since the total usable area is small, I decided to make the central zone smaller than the rest (photo 2).
I think that this option is the most optimal for any small house. And the human brain is also divided into two characteristic areas - left and right. The first is responsible for rational thinking, and the second is responsible for imaginative thinking. Therefore, by analogy, to the left of the door (and, accordingly, from the middle part), as from the center of reference, I placed a rational zone (mini-kitchen and living room), and on the right side - a figurative zone (bedroom - for relaxing and watching TV).
At the same time, I practically chose the height of the kitchen and dining tables, window sills and shelves on the walls so that my hostess could freely reach any object with her hand while cooking (photo 3).
In other words, I turned the modest size of the room into its dignity.
The mini-kitchen consists of a work table with drawers and a minimum set of everything necessary: an electric stove on a ceramic stand, boards for cutting food, pots for cooking the first course, frying pans for the second courses. On the shelves there are jars with cereals, spices, and seasonings, and on the right side there is a sconce to illuminate the evening preparation of dishes for dinner.
Behind the kitchenette there is a bright living room. And now it is a place that unites all household members into a single whole (sorry for the pathos, but it is so).
There is an oval dining table, three chairs and a three-tier shelf with plates and a tea set (all of this is arranged in a rhythmically precise order), and on the wall hangs a panel with bunches of grapes (photo 4).
In fact, the coffee and tea atmosphere is very important for a summer resident, because it enhances mental balance. Naturally, the dimmed side lighting from the sconces on the side also creates a mysterious atmosphere at the table for a special meal in the evening.
I will add that the entire central area, from the front door to the opposite back wall of the house, is brightly illuminated by direct sunlight from the windows, but the living room and bedroom are more diffused, calm, and peaceful. I also came up with another design solution - wooden lattice doors, which clearly separate the kitchen from the bedroom and living room, and at the same time carry all sorts of other useful functions. Well, for example, you can throw clothes on them or hang keys. Not only for beauty, I also built an arch on the back wall of the house: a heater is installed in its lower part (so, despite the “lightness” of my house, you can live in it from mid-spring to mid-autumn), and at the top there is a clock and a thermometer.
Reference by topic: DIY frame house
Do-it-yourself cladding of frame walls and exterior finishing of a frame house
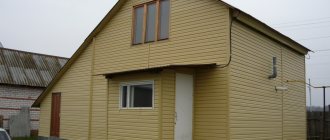
First, the walls were covered with windproofing film from IZOVEK, after which we moved on to covering the back wall. It was decided to cover the facade of the frame house with imitation timber measuring 185x21x6 mm. We made this choice because the material imitating timber has a number of advantages:
- Does not deform;
- Does not change its appearance over time;
- Does not rot or wood fungus;
- Easy to install.
To minimize the ingress of moisture, the lining panels were fastened in a horizontal plane.
We installed Chinese doors and plastic windows purchased in advance.
The walls of the house were painted with white Dufatexaqua antiseptic. The impregnation was applied in two layers, trying to ensure that the wood texture remained visible.
We made trims for the windows, painted the corners and trims dark with PinatexUltra paint in rosewood color.
Finally, we installed the drainage system and screwed in the lanterns.
Do-it-yourself frame bath: step-by-step instructions
Currently, it is difficult to imagine a summer cottage without a bathhouse on it. Taking a steam bath in a warm bathhouse is a real Russian tradition, with its roots going back centuries. A bathhouse can be built not only in a country house, but also in the city: the availability of a plot is an excellent opportunity to implement this initiative. Moreover, a frame bath is a modern high-tech design that does not require large expenses.
You can build a frame bathhouse with your own hands, without the help of specialist craftsmen. This type of construction is the fastest and most affordable: a frame bathhouse requires several times less materials than structures made of timber or logs of similar dimensions.
Where to start building a frame bath?
First of all, you need to decide on the location of the bathhouse. It may be an extension to the house, or it may be separate from it. Before starting to lay the foundation for a future bathhouse, it is necessary to determine the type of soil on the site and plan the construction itself: the number of floors and rooms, dimensions, interior.
Before building a bathhouse, a plan must be drawn up, where it is necessary to take into account the specifics of the structure and estimate the volume and duration of work. The plan should indicate all elements of the ventilation system, chimney, roof features and other important aspects. You can also attach a veranda or terrace to the bathhouse.
In order for the bathhouse to be comfortable and able to accommodate several people at the same time, its dimensions must be appropriate. The most optimal option for a steam room is 240x200x220 centimeters.
At the discretion of builders or customers, the bathhouse can be equipped with a billiard room, a relaxation room or an additional steam room.
The plan for the future bathhouse should be drawn up as accurately as possible and taking into account the smallest details - this way the construction process itself will be much simpler. The bathhouse project can be ordered from specialists. They will do everything competently and clearly, which will help avoid major mistakes during construction.
Also, when planning a bathhouse, a table is drawn up to record all the materials necessary for construction, which is correlated with the plan.
Materials required to build a frame bath:
- cement for pouring the foundation;
- sand;
- beams for mounting the frame and ceiling;
- beams;
- insulation material in a roll (mineral wool, ready-made mats, polyethylene, roofing felt, glassine);
- waterproofing film for walls and ceilings;
- lining for internal wall cladding;
- roofing material for the roof.
What foundation to choose for building a frame bath?
Since the frame bath itself is very light, a strip foundation, which is poured directly under the walls along the entire perimeter of the structure, will be sufficient for its construction. A columnar foundation is also a common option, but its installation requires stable soil, otherwise the structure may collapse.
Due to the lightness of the frame bath, the foundation for it is poured according to a fairly simplified scheme.
When the main points are determined, you can begin the construction itself.
- Pouring the foundation.
Step one. The perimeter of the future bathhouse is determined in advance; special pegs are driven into the ground along its edges, within which it is necessary to dig a ditch 60 centimeters deep and 40 centimeters wide.
Step two. The ditch is filled with sand to one third of the depth. The sand is poured from above with water and thoroughly compacted.
Step three. After compacting the first layer, finely chopped red brick or gravel is poured over it.
Step four. A layer of broken brick or gravel is covered with a layer of sand, which should be level with the ground level.
Step five. Formwork is assembled from reinforcement. The entire structure is poured with concrete and insulated on top with a thin layer of roofing felt.
Important! Before building a frame bathhouse, at least a week should pass so that the foundation has the opportunity to properly settle.
- Construction of walls.
Step one. Lumber prepared for a frame bath must be thoroughly dried before starting work. It is not recommended to use birch wood for construction, as it quickly rots. The best option would be linden, aspen or larch. The wood of these species is able to maintain its shape for a long time and has thermal insulation properties, which is very important for a bathhouse.
Step two. After all construction work is completed, the inside of the boards should be coated with an antiseptic solution, and the outside with furniture varnish, in two layers. This procedure must be done around the entire perimeter of the room, avoiding only the steam room and the washing compartment.
Step three. The bottom trim, made of a reliable beam with a cross-section of 10x10 centimeters, must be fixed firmly enough, after which the beams should be properly fastened at the corners with nails. It is recommended to place the racks on metal pins so that during the construction of the walls they cannot change their location and knock down the structure.
Step four. Corner posts must be embedded in concrete.
Advice: The pillars - the basis of the walls of the future bathhouse - should be placed directly under load-bearing walls, corners, stoves - that is, in those places where the load is greatest.
Step five. Along the perimeter of the walls, intermediate racks are installed, made of the same timber as the main structure.
Step six. To make the floor waterproof, it should be laid out with timber made of any wood, with a cross-section of 15x15 centimeters.
Step seven. To cover the bathhouse outside and inside, they use lining, which is affordable and easy to use. To ensure that there are no gaps between the sheets of lining located in a horizontal position, they should be overlapped. This procedure is very scrupulous in nature, but it can protect the walls from excess moisture.
- Let's move on to building the roof.
Step one. It is necessary to take 8 special ceiling beams, sawn to the angle of the rafters. To begin with, you should set up only the outer rafters, and only after that fix a couple more pieces in the center of the future roof. The remaining rafters are connected to the main structure, first on one side of the roof, then on the other (through the ridge).
Step two. After the rafters, vertical posts are installed, and if necessary, an exit to the attic is also made.
Step three. On the rafters located at the edges, beams are cut out, to which the front boards are nailed, after which the battens are attached on top.
- It is necessary to insulate the walls.
The most common material for this purpose is roll insulation about 50 millimeters thick. In some cases, mineral wool or ready-made mats are used. The insulation is laid between vertical wooden posts, after which slats are nailed to them. For thermal insulation of the room, it is recommended to use polyethylene or glassine.
Advice: it is not recommended to use roofing felt for wall insulation, since under the influence of high temperatures it begins to emit an unpleasant odor.
For floor insulation, it is better to choose expanded clay or other types of backfill, and for the ceiling - polystyrene foam. If the insulation is selected correctly, heat will be lost several times less. Thanks to this, the cost of heating the bath will also be reduced.
After the walls and roof are built, you can begin installing windows and doors in the openings previously left for them. Upon completion of this work, it will be possible to enter the finish line.
The final stage of construction of a frame bath
For a bathhouse to be a pleasure to use, it must not only be comfortable and well designed, but also have a beautiful interior decoration. Therefore, after completing the main work inside the bathhouse, finishing work must be carried out.
First, you should protect the walls and ceiling from the adverse effects of moisture and high temperatures. Coniferous upholstery is perfect for this purpose. Then you can proceed directly to installing the most important part of any sauna - the stove. It must be installed in accordance with all safety requirements. It is recommended to make the wall separating the steam room and the relaxation room from brick - this way it will let in less heat.
To make the walls look more attractive, it is recommended to cover them with clapboard. Linden wood is best suited for this purpose.
Interior decoration of the house
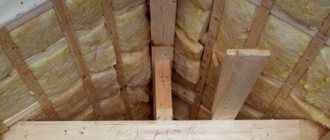
First of all, we insulated the walls with 100 mm thick Rockwool, made a vapor barrier on top, sheathing and sheathed the walls with PVC panels. The panels were fastened with a stapler, we also built a sheathing on the ceiling and installed corners. To begin with, we covered only one wall to connect electricity, and then all the others.
The next stage of finishing is laying the floor. They did it on the same principle as the walls. From the very beginning, it was planned to insulate the floor with 50mm thick material, but in the process of building a frame house with our own hands, it was decided that this would not be enough. Since the floor joists were already lying down, we decided to get out of the situation in the following way. We wove a web from synthetic twine, laid windproofing, laid 100 ml of insulation on top, and at the end - vapor barrier and plywood.
The doors were installed and linoleum was laid. The kitchen was also covered with panels, shelves and a coffee table were assembled. We can assume that we have successfully completed the task of how to build a guest house with our own hands.
Walls
Let's find out what walls are most often built from.
Shell rock, limestone
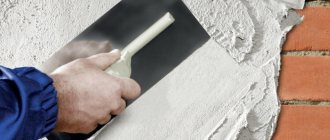
Residents of the southern regions of the country, where open-pit mining of sedimentary rocks is carried out, often build a garden house from these materials with their own hands. A one-story building can be safely built with a thickness of half a stone (about 20 cm), followed by insulation or plastering of the walls.
An important point: a large-porous shell with such a thickness of masonry will be blown through. For winter operation of the building, it will have to be plastered on both sides at a minimum.
For masonry, a regular cement-sand mortar is used in a ratio of 1:3; rows are laid with ligation of vertical seams and level control. The first row of the strip foundation is laid out on a 2-centimeter concrete pad.
Aerated concrete, foam blocks
A small garden house made of foam blocks can be built with your own hands without a reinforced frame or even an armored belt; the strength of the masonry is ensured only by the rigidity of the foundation and the ligation of the rows. For masonry, aerated concrete adhesive is used; The thickness of the seam is no more than 3-4 millimeters. This ensures minimal heat loss through the seams and ideal wall geometry.
Laying aerated concrete.
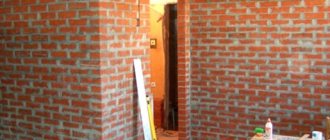
Brick
A thin-walled garden house made of brick with your own hands is the worst solution in three respects at once:
- Cost per square meter of masonry. Brick is noticeably more expensive than foam blocks or shell rock.
- Speed of wall construction. Large blocks are placed much faster.
- Degrees of insulation. In order not to be unfounded, let's compare brickwork with alternatives. In the table we present wall thickness values for different materials that provide the same degree of thermal insulation.
| Material | Wall thickness |
| Dry wood | 140 mm |
| Foam concrete | 250 mm |
| Limestone | 300 mm |
| Expanded clay concrete | 500 mm |
| Brick | 650 mm |
Nevertheless, brick is popular due to its strength and presentable appearance of walls made from it.
The wall material is brick.
In our case, it is better to use a porous building material: its lower mechanical strength with a small wall height is not decisive, but the lower cost and better thermal insulation qualities will come in handy.
Frame construction
It is a frame made of timber and boards, covered with OSB boards on one or both sides. If necessary, the cavities inside the walls are filled with insulation with vapor and waterproofing.
In most cases, partial reconstruction of a garden house or the addition of an attic is carried out using frame technology: a timber frame can easily be combined with any other building materials.
If you wish, it is easy to find drawings of a garden house with your own hands on the Internet. Before us is a frame structure indicating the main dimensions.
Sip panels
They provide the maximum degree of insulation and the highest speed of construction. The panels, which are a sandwich of two sheets of OSB and a layer of expanded polystyrene, are connected by an insert made of timber. The OSB is hemmed to the timber with self-tapping screws; Before assembly, the seams are foamed.
In addition to low thermal conductivity, sip panels are interesting for their high rigidity with low weight. For example, you can build a garden hut with your own hands without a frame and rafter system: panels and insert beams will provide sufficient strength.
Construction from sip panels does not require the construction of a frame.
A nuance: the dimensions of the panels are tied to the standard dimensions of the OSB sheet (1.2 x 2.5-2.8 m). In turn, to minimize the amount of waste, it is better to make the dimensions of the house a multiple of the panel size. If so, you can’t build a 3x4 garden house with your own hands; its dimensions will be either 2.4 x 3.6 or 3.6 x 4.8 m.
Installing a fence from corrugated sheets with your own hands
It was also planned to install 90 meters of a two-meter fence made of corrugated board. We ordered the following material: for the pillars a six-meter profile 60x60, it was cut into 2 parts, for the veins we used a 40x20 profile, for gates and wickets 3.5 m in size 80x80. We sanded the iron and painted it with Hammerite metal paint. They decided to drive in the pillars because the soil was clay. They were hammered with a sledgehammer from a stepladder to a depth of approximately 1-1.2 m, the tops were cut off. Before driving in, they dug holes the depth of a spade bayonet, then filled them with crushed stone. The posts were completely driven in on both sides of the site.
On the long side of the site, holes were drilled with a gas drill approximately 1 m deep and filled with crushed stone with a tamper. We poured a concrete strip with reinforcement under the gate posts and gates.
During this construction season, three sides of the site were sheathed. The sheathing required 85 sheets of corrugated sheets. It was decided to do the gate and the fourth side of the fence next year.
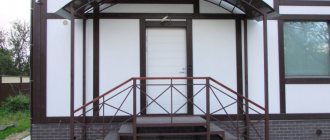
Well house
In parallel with the construction of the frame house, we started constructing a well without a caisson using an adapter. We loaded the pump, laid out the base with paving stones and made a house for the well in one day. They covered it with clapboard, covered the roof with the remains of imitation timber material, and laid flexible tiles on top. It was planned to leave equipment for the well in this house.
Basic materials and tools used in the construction process
- Concrete blocks
- Sand and gravel
- Rockwool1 cm for wall insulation;
- Boards 150x50 m;
- Antiseptic for treating all wooden coverings Senezh;
- Metal tiles;
- windproofing IZOVEK
- Windows and doors;
- plywood for floor 18 mm
- PVC wall panels
- Dufatexaqua antiseptic for house painting
- PinatexUltra impregnation, rosewood color for painting window frames and corners
- For the fence: profile 60x60 6m, profile 40x20, gates and wicket 80x80 3.5m
- Hammerite
- Imitation timber material for house cladding