What is a strip foundation on piles?
In terms of structure, a pile-strip foundation is a structure made of piles dug into the ground to a depth below the freezing point, and a reinforced concrete grillage on them. It combines the advantages of two types of foundation structures. The grillage tape serves to evenly redistribute loads. And the buried pile foundation plays the role of anchors, which prevent the reinforced concrete from above from “floating away” during soil heaving and a strong rise in groundwater.
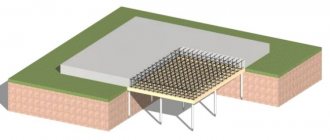
Scheme: 1-reinforced frame, 2-asbestos-cement piles, 3-concrete strip, 4-technical terminals, 5-waterproofing, 6-ventilation holes
We recommend:
Any work on the foundation of a house from the company GLAV-SVAI
Calls within Russia are free: 8 (800) 70-70-988
A conventional pile-screw foundation is somewhat inferior to the type of supports for houses under consideration in terms of distribution of vertical loads. A reinforced concrete tape laid on piles is more resistant to spot raising or lowering of one of the support pillars. On the other hand, this design outperforms its purely strip counterpart in terms of construction costs, as well as stability on heaving and waterlogged soils.
What is a pile foundation
A pile foundation is a system of point supports immersed in the ground to a certain depth before contacting solid layers.
The length of the vertical elements can be significant , depending on the depth of stable soils and often exceeds the height of the above-ground part of the building.
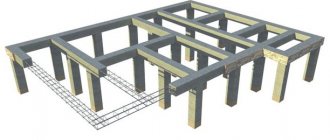
The upper part of the supports is rigidly connected into a single system, which allows you to distribute the load across all piles and obtain the most efficient mode of operation of the base. The strapping is called a grillage; it is designed to receive and transmit loads to the support rods .
According to the principle of operation, the operation of a grillage is in many ways similar to the functions of a strip base, but the difference between them is that the strip rests on the prepared soil surface along its entire length, and the strapping is installed on the top points of the piles.
This difference puts forward special requirements for the rigidity and strength of the grillage beams, the spans of which work only due to the own rigidity and strength of the walls.
Types and subtypes of foundation
A strip foundation on piles is ideal in the presence of soils with weak heaving. In such areas it can be used for the construction of two-story brick cottages. But in general, such a design is more intended for light frame or timber buildings.
However, if the site for the house has a slope, then it will be difficult to do without a pile strip foundation. It will be too expensive to pour a monolithic slab here, and other options will not be able to withstand all the loads that arise in the future.
Based on the depth of immersion of the grillage into the soil, pile foundations with it are divided into two types:
- Shallow.
- Not buried.
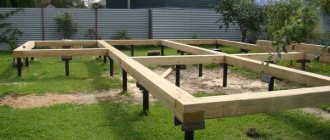
Non-recessed option
In the first case, the tape is immersed in the soil by 20–50 cm, and in the second, it hangs above the ground. Due to its greater strength, heavier buildings can be erected on a foundation with a shallow grillage. However, if the soil is heavily heaving, then the strip part of the structure on piles will simply be destroyed by heaving. It is not made too high, so it is simply not able to withstand strong loads from rising soil.
Do-it-yourself pile foundation - step-by-step instructions.
Do-it-yourself pile foundation.
- Independent foundation design
- Preparatory work
- Do-it-yourself foundation marking
- DIY installation of bored piles
- Self-installation of reinforced concrete piping
- Do-it-yourself installation of a pile foundation - video
This article provides detailed instructions for manual installation of a foundation made of bored piles. We will consider all stages of creating a foundation - from its design and marking to pouring piles and tying them with a reinforced concrete grillage.
Advantages and disadvantages
Among the advantages of a pile-strip foundation are:
- Sufficiently high installation speed;
- Possibility to erect buildings on construction sites with a slope;
- A simple technology that makes it easy to build such a foundation with your own hands;
- High resistance to movement of heaving soils;
- No need to use special equipment.
If the grillage is not buried, then it is not afraid of heaving and moisture in the soil. In terms of service life, this option outperforms its buried counterpart on piles and its shallow-depth strip foundation. It also beats them in terms of cost and the complexity of the work. You will have to dig several times less, the depth of immersion is the same, but you only need to remove the soil under the support pillars. Plus, all construction materials can be delivered to the site without the use of heavy cargo and lifting equipment.
When independently constructing pile-grillage foundations, bored supports made of asbestos pipes are usually used, which are reinforced and filled with concrete inside. It is this option that is discussed in the step-by-step instructions below. In terms of speed of construction, only a foundation made of FBS or screw piles made of steel can compete with such a foundation for a house.
There are only three disadvantages:
- The need for additional floor insulation in the cottage;
- Inability to use for arranging a basement or basement;
- Building weight restrictions.
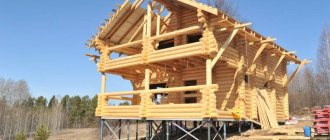
A strip-pile foundation is great for a small log house
All types of pile foundations have one common problem - drafts in the underground. In the far north, piles help avoid heating the permafrost layer. At the same time, in other regions, wind freely flowing under a building is a serious problem.
Construction of a pile-strip foundation
The load forces from the constructed object are transferred to the ground by two foundation structural elements - a tape poured along the perimeter of the structure, load-bearing partitions and piles, which give the foundation strength during seasonal shifts in the soil composition.
Pile supports and monolithic tape are reinforced with reinforcement cages. Piles are made using the bored method or using asbestos-cement pipes into which the solution is poured.
Today, the technology of constructing a strip-pile foundation allows the use of screw piles made of metal material, with drill blades at the lower ends.
The foundation strip itself is made of concrete mortar poured over the reinforcement base.
Step-by-step instructions for building a foundation
When preparing to make a pile-strip foundation, you must either plan in advance for high heating costs, or immediately include insulation of the basement-foundation part of the building in the estimate and project. In the second case, you will need moisture-resistant insulation for the walls and cladding, but the home will definitely be warm.
It will be necessary to construct a false wall around the perimeter of the cottage to cover the pile pillars and prevent drafts between them. To do this, you can take facade panels for exterior finishing or corrugated sheets. If you want something more beautiful and elegant, then there are clinker tiles and decorative bricks. There are many finishing materials for the exterior of a building.
The entire process of constructing a belt on piles can be divided into two stages. First, the pile part is made from bored pipes. And then a strip structure is laid on them. You just need to remember to tie them together with reinforcement before pouring the concrete.
In general, the step-by-step instructions for a strip foundation on concrete piles are divided into five steps:
- Preparatory and drawing work
- Excavation of earth, installation of asbestos cement pipes and their reinforcement.
- Pouring permanent asbestos-cement formwork with concrete.
- Creation of strip formwork from boards and bars.
- Reinforcing the tape on piles and filling it with concrete mortar.
- Waterproofing reinforced concrete.
We draw on paper or in the program the future foundation - tape and piles
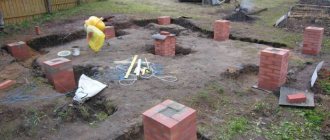
Marking wells with “stakes” for the piles of the future foundation
Using a tractor with a drill to make wells
Piles must be immersed to a depth below the freezing level of the soil at the construction site. Holes for them will have to be dug 40–50 cm below this mark. The foundation must rest on a stable soil foundation.
We get these wells
After preparing wells with dimensions 10–15 cm wider than the outer diameter of asbestos-cement pipes, a sand cushion is poured at their bottom 30 cm thick. The pipe formwork is installed precisely on this compacted sand. The diameter of the pipes themselves is selected at the rate of 1/3 of the width of the reinforced concrete grillage.
We prepare reinforcement for tying the pile frame
Next, each pile is reinforced with three or four vertical steel rods with a cross-section of 10–12 mm and a length equal to the sum of the heights of the support and the tape on it. They are placed in the pipe at approximately equal distances from each other and from the asbestos-cement walls. To simplify, they can be tied with wire into the desired structure on the ground before installation.
We knit pile frames from reinforcement and insert them into the wells
The next stage is pouring the pipes with concrete solution. This is usually done before reinforcing the foundation strip on the piles. But the instructions given may be slightly modified. Then, first, the reinforcement is laid in the grillage and formwork is made for it, and then the whole thing is poured with concrete. The cells of the reinforcing belt are knitted with a size of 30–40 cm, depending on the width and height of the tape.
We fill the piles to the level of the tape reinforcement. The photo shows a situation where the pile was “overfilled” and had to be drilled out to install the strip frame
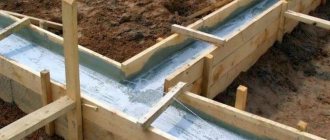
We dig up the “tape”, add sand, lay down roofing material and knit tape reinforcement
We set up the formwork and pour concrete to the required level. Don't forget to vibrate the concrete while pouring
To perform waterproofing, it is enough to take ordinary roofing material and wrap it around the grillage. This is the cheapest option. You can also use bitumen or polymer mastic. On this, the foundation of the house in the form of a strip on stilts is made. In the future, it will only need to be covered with cladding and, if necessary, insulated.
After drying, coat the foundation with bitumen and cover it with roofing felt.
Done - you can lay out the walls
Construction of a pile-strip foundation
Today, construction work is quite expensive. For this reason, many developers try to independently build various types of pile-strip foundations, using available means for this.
Let's figure out what features this kind of work has.
Preparatory work
It all starts with cleaning the site allocated for construction work. Garbage is not removed, bushes and trees are cut down. When preparing a site for a pile-screw strip foundation, it is very important to remove weeds so that in the future there will be fewer difficulties with landscape design.
Axle breakdown
The construction site is leveled, then you can begin to lay out. The process involves transferring a plan from paper to the soil surface. Using pegs and a cord, the foundation axes and the width of the strip foundation are marked, the distances between piles in the pile-strip foundation are determined, and points for the installation of supporting elements are marked. This information is taken from the calculations attached to the drawings of the pile-strip foundation.
The corner areas should be perfectly smooth. This will make it possible to correctly lay out the future foundation.
First of all, the overall axes are taken out, which determine the main dimensions of the foundation. To do this, two points are marked on the ground, which are separated from each other by the distance of the maximum axis, the distances along the guides are marked, and the binding is performed.
The entire marking procedure consists of several stages:
- the main axes are determined;
- they are applied to the site;
- casting is done (marking of the entire object).
Experts advise following two basic rules in such work:
- corners, if the building is square or rectangular, should be straight;
- When making concrete floors from panels with large voids, it is necessary to ensure that the dimensions of the foundation base fully correspond to them.
Excavation
If the soil on the site is stable, then the width of the foundation trench is determined by the appropriate size of the tape. In this case, the installation of formwork panels is not required. If the soil is soft, prepare the trench wider, taking into account the thickness of the formwork.
Wells are drilled at the designated points, the depth of which should exceed the soil freezing level by fifty centimeters.
To drill wells, a manual or mechanical method is chosen; the installation step of the supports should be about two meters. The diameter of the hole should be one third larger than the width of the tape base.
A sand cushion is placed in each hole, the thickness of which is twenty centimeters. Packed tightly, it perfectly protects the foundation tape from moisture. After this, covering the walls of the wells with roofing material, piles are installed.
Preparation of formwork
Sand is poured into the trench prepared for the monolithic tape, and it is leveled with a fifteen-centimeter layer around the entire perimeter. After moistening it, compact it thoroughly. For additional strength, you can use crushed stone when constructing the pillow.
For formwork panels, chipboards, boards, and panels are used. If you plan to reuse the structure, the walls should be covered with plastic film.
The prepared shields are nailed to pegs driven into the ground from the outside. The upper and lower edges are additionally fixed with strips that hold the walls.
Reinforcement
Let's figure out how to make a reinforced foundation for a pile-strip foundation. To do this, steel reinforcing bars are placed in the formwork structure. Laying is carried out in three directions to form three-dimensional walls. The intersection points of the rods are fixed using binding wire.
A prerequisite is that the frames of the tape and piles are connected to each other so that the foundation is strong.
The pile frame is made of three rods mounted in a triangle. The ends of the frame should protrude about twenty centimeters above the ground.
Pouring concrete
How to properly pour a pile-strip foundation?
Concrete should have medium density, but not be too liquid. Filling must be done simultaneously, without interruption, having previously connected all the reinforcement cages.
First of all, the pile supports are poured, after a couple of days you can start concreting the tape. It is recommended to carry out work from several points so that the concrete mass is laid in layers. To speed up the process, you should use concrete mixers or purchase a ready-made solution to be delivered to the site.
During concreting, it is necessary to compact the solution to remove air bubbles from it.
The final stage is checking the horizontal plane of the grillage. If something is wrong, it should be straightened.
In wet weather, the foundation base is not concreted, since the strength indicator may decrease due to excess moisture.
Waterproofing
When building such a foundation, it is necessary to resolve the issue of its waterproofing and ventilation. If the piles are made of asbestos cement or metal, there is no need for a waterproofing layer. And a protective layer is provided for concrete supports, as well as for the foundation strip itself. Roofing material is better suited for this.
The purpose of this event is to preserve the strip foundation from the negative effects of moisture. As we know from reviews from developers, a protected foundation lasts much longer without being damaged.
By the way, you should not forget about the insulating layer.
Where to use?
When comparing the pros and cons of using a pile-strip foundation, first of all you need to focus on the material of the cottage walls and the characteristics of the soil. If a dwelling is being built from lightweight building materials and on water-logged soils, then the support discussed above with a grillage raised above the ground is an ideal option. Such a foundation will last for many years and will definitely not be damaged by heaving, and it is not difficult to make. Fortunately, the step-by-step instructions provided allow you to avoid unnecessary mistakes.
House
Technology for self-construction of a strip foundation on piles with step-by-step instructions
It should be immediately stipulated that this instruction is not a direct guide to the exact implementation of the points, but is advisory in nature. In each specific case, the developer makes its own adjustments to it related to local construction conditions.
Experts recommend following the steps below:
determining the distance between piles;- marking and excavation work;
- installation of piles;
- production and installation of tape formwork;
- reinforcement of piles and grillage;
- waterproofing and ventilation of the foundation;
- pouring the foundation with concrete;
- thermal insulation.
Determining the distance between supports
Despite the estimated number of piles, the distance between them is regulated by the standards for the construction of light buildings at the rate of 1500 - 2000 mm.
The minimum gap between the piles when the grillage is located above the ground surface must be at least 1.5 m. This is explained by the fact that it is necessary to minimize the load on the beam (grillage span).
The foundation plan is first marked with corner supports , and then pile installation points are placed every 1.5 - 2 m, depending on the position of the monolithic strip in space.
If the construction plan provides for the installation of a monolithic slab for a boiler or other heavy equipment, then supports are placed under it every 1000 mm.
Marking and excavation work
The work is carried out in the following order:
- Before starting work, debris, vegetation and the fertile layer of soil are removed from the construction site.
- The marking of pile supports and shallow-buried tape begins from one corner of the foundation plan and spreads it along adjacent sides. The route is punched with a double cord, which marks the width of the grillage. The centers of future wells are fixed with wooden pegs.
- The SLF plan can represent one or more rectangles. The correctness of their construction is checked by the equality of the diagonals between opposite corners using a cord.
- According to the markings, trenches are dug to the design level, taking into account the thickness of the crushed stone-sand cushion.
- Using a garden drill, holes are drilled in the ground to the designed depth.
- I fill the bottom of trenches and wells with crushed stone and sand with a thickness of each layer of 100 - 150 mm, followed by compaction.
- A laser level and a rod are used to check the equality of the bottom marks of trenches and wells.
Installation of piles
According to the recommendations of professional builders, the wells are made slightly wider than the outer diameter of the pile shells. This is necessary to adjust the verticality of the point supports.
The installed pipe can be moved or tilted if the hole in the ground is made with a slight deviation from the vertical. The position of the pile is fixed by securing it with pieces of timber.
Production and installation of tape formwork
There is a big difference between shallow strip formwork and above-ground grillage formwork.
It lies in the fact that in the first case, plank boards are placed only on the sides of the trenches, and in the other version, the formwork is an open box with a strong bottom .
If it is enough to use boards with a thickness of 25–30 mm for the sidewalls, then for the manufacture of the bottom of the box, wood with a thickness of at least 50 mm is used. In some cases, additional supports are installed between the piles for the formwork of the ground grillage.
To prevent liquid concrete from leaking through the gaps between the boards, the inner surface of the shield fences and the bottom of the trenches are covered with plastic film . It is attached to the boards with a stapler or small nails. The film contributes to the formation of a smooth surface of the monolithic tape.
The shields are reinforced with supports and spacers made of timber. The boards are nailed into panels. If the formwork is assembled from construction plywood, then its elements are assembled into a single structure with screws using a screwdriver.
In those places where the grillage should rest on the piles, holes are cut with a diameter equal to the pipe opening.
Reinforcement
After installing the pile shells and grillage formwork, they proceed to their reinforcement . Reinforcement is lowered into the pipes; this can be one or several vertical rods of a periodic profile ø 8 - 10 mm with smooth sections ø 6 mm, connected with a binding wire.
The vertical reinforcement rods are carried upward to a height sufficient to connect to the reinforced frame of the grillage. Reinforcement frame segments are placed in the formwork, which are connected with wire to each other and to the outlets of the pile reinforcement.
Waterproofing and ventilation
Protecting reinforced concrete structures from moisture is an important task in maintaining the integrity of the monolith. Waterproofing of the pile-strip foundation is carried out after removing the formwork.
Rolled material (roofing material) is fused to the sides of the grillage with hot bitumen mastic or liquid rubber is sprayed.
Piles, the shell of which is made of asbestos-cement or plastic pipes, do not need waterproofing. Their hydrophobic material is absolutely not susceptible to moisture.
Ventilation of the underground space, fenced with a shallow monolithic tape, plays a big role in preventing air stagnation, which stimulates the occurrence of:
- accumulations of harmful microorganisms,
- mold,
- fungi,
- increased humidity levels.
To avoid these negative phenomena, vents are installed in the foundation monolith.
Products are placed in the formwork before pouring concrete . They are made from scraps of polyethylene pipes. They form through holes in the tape, located opposite each other in opposite sides of the perimeter of the grillage. Typically, pipes are laid in increments of 3–4 meters.
How to fill it correctly?
Concrete mortar is prepared in a mortar mixer, observing the proportions of the parts of sand, crushed stone and cement.
For foundations, grade 300 concrete is used . To prepare it you need to use cement M 400–500. This condition must be met.
While mixing the ingredients, water is gradually added to the mixer until a homogeneous solution of thick consistency is obtained. The solution is delivered to the pouring site by wheelbarrow.
First, pile pipes are poured with a layer-by-layer tamper. If possible, use an electric vibrator. After this, concrete is poured into the grillage formwork, also using a vibrator or tamper made from available material.
The concrete surface is covered with a film to protect it from drying out on sunny days and waterlogging during rain. After 30 days, the formwork is dismantled and the film is removed.
Thermal insulation
Shallow SLF is protected from cold penetration by insulating the blind area around the house. To do this, the gaps between the foundation and the plinth in front of the blind area are filled with expanded clay or covered with sheets of expanded polystyrene. When erecting a pile grillage at a height, the floors of the 1st floor are insulated.
You will find a lot of important and useful information about the construction of strip-pile foundations in this section.
Types of piles
Such a foundation is built on screw and bored type piles. The first group includes products made from metal pipes. At the end of the piles there are blades designed for screwing into the ground. Based on the principle of operation, these elements can be compared to screws. The blades give rigidity to the screw pile. They sink into a hard layer of soil.
Piles are made of different diameters - from 57 to 133 mm. For low-rise buildings, pipes with a length of 165 to 350 cm are chosen. Such piles are screwed into the ground using special equipment. Hand-held devices can be used. To extend the life of the piles, they are coated with a primer and a layer of paint.
Bored piles are made by hand. First, a well is drilled until it is immersed 60 cm into a solid layer of soil. The bottom should be covered with sand to a depth of 30 cm. Then the pillow is thoroughly compacted. The well is reinforced with steel rods. Then it is filled with concrete. For pile formwork, pipes made of asbestos cement, cardboard or plastic are chosen. The work does not require special skills or knowledge.
A pile-screw foundation, unlike a pile foundation, has a reinforced concrete grillage. Tape bases are made recessed, shallowly recessed or not recessed. In some cases, concrete grillages are created that are above the zero mark.
When erected independently, a strip foundation with piles is usually made shallow. A monolithic reinforced concrete strip is buried 20-40 cm into the ground. It is placed on a bed of gravel and sand 30 cm deep and piles. These foundations are poured on slightly heaving and non-heaving soil. If the soil is heaving, make a hanging type tape.
Any construction on your own requires a thoughtful approach, so the best assistant would be a step-by-step manual made with your own hands for working with a pile-strip foundation. Pre-thought-out steps will help you avoid serious mistakes. For example, before planning a building with a strip pile foundation with your own hands, as in the video, you must first perform drainage on the site. Otherwise, rain and surface waters will negate all efforts to make wells and cast a pile-strip foundation:
Advantages and disadvantages
The advantages of pile-tape foundations include::
- Possibility of use on problematic soils.
- To build such a foundation, a relatively small amount of building materials is required.
- High resistance to soil influences - heaving, small movements.
- Some types of piles can be created directly on site, which can significantly reduce the cost of purchasing, delivering and driving them into the ground.
- It becomes possible to build in areas with high groundwater levels.
- High speed of construction.
There are also disadvantages:
- Before starting construction, it is necessary to carry out a thorough comprehensive survey of the site regarding the composition of the soil, the height of groundwater, etc.
- There is no possibility of creating a basement or basement.
- High-quality insulation of the floor of the lower floor laid on the ground is necessary.
- There is no possibility of constructing multi-storey buildings.
- Piles must be properly waterproofed. This is especially true for wooden or steel supports.
Most of the disadvantages are in one way or another due to the properties of the soil , so in this case these are not exactly disadvantages of the foundation, but necessary limitations in the existing conditions.