What are railings and what are they for?
Railings are a structure made of vertical elements (balusters) connected by a handrail into a single unit. On stairs, railings provide an extra point of support for those who need it: not all of us are young and slender. On balconies, loggias and roofs they reduce the risk of falling from a height. Railings can also be attached directly to the wall, in which case balusters are not used.
Railings without balusters
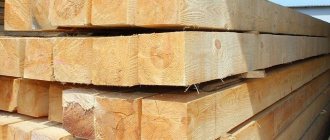
They consist of balusters that are attached vertically to the floor (steps) and a handrail of a convenient shape for the hand. The choice of material depends on the location where the fence is installed. Wooden structures are often used indoors. Metal is more suitable for open air.
Features of fastening wooden balusters to surfaces
The fastening of stair railings must be reliable and as strong as possible. The safety of people who will use the stairs depends on this. At the bottom, balusters can be attached to the floor, steps or string.
Fixing to the floor
Floor installation of pillars is provided for the lower and upper support elements, on which the handrail rail subsequently rests. To fix their position, a hole is drilled in the floor and the following can be installed:
- expansion anchors for concrete floors and monoliths with reverse conical thread;
- embedded elements for reinforced concrete monoliths;
- steel studs with a metric thread on one side and a conical thread, like on screws, on the other for wooden floors.
In the first case, before attaching the balusters to the floor, a hole corresponding to the diameter of the anchor is drilled in the concrete. When screwing in the metric thread of the pin, the fastener expands and is firmly fixed. After this, the wooden support post is screwed onto a cone-shaped thread protruding from the floor, pre-lubricated with glue.
In the second option, a recess of at least 80 mm is knocked out in the concrete monolith and an embedded element with a conical or metric thread in the upper part is installed into it. The embedded part is filled with cement mortar and after it hardens, a baluster is screwed onto a vertical stud.
Both options are equally reliable. It is not recommended to use self-tapping screws in this case, since they will not be able to provide a sufficient level of reliability for the outer support pillars.
Installation on the plane of steps
Installation on horizontal wooden surfaces can be done using studs, dowels or self-tapping screws. The technology describing how to fasten balusters on a wooden staircase along the steps was discussed in some detail above.
When installing posts, it is recommended to cover the end surface with glue. This will increase the strength of the connection, although it will ultimately make it completely inseparable.
Installation using dowels.
Mounting on an inclined string
The presence of an inclined plane does not allow the balusters to rotate during installation. Therefore, wooden dowels or screws are used to fix them. The bottom of the balusters must be cut to match the existing angle of the installation support.
Installation can be significantly simplified if you use a sub-baluster - a longitudinal rail of a certain cross-section. It is temporarily fixed on the surface of the bowstring, marking the installation locations of the elements and removed.
After this, the balusters are screwed in and the already assembled structure is returned to the surface of the string. Next, the sub-baluster itself is fixed with self-tapping screws in the open areas between the posts.
Basic rules for installing railings
The design and installation of railings is subject to certain rules.
- A height difference of more than 1 m (high porch) is already a reason to install railings or fencing.
- The height should be at least 90 cm. If everyone in your family is tall, you can increase this size, without forgetting about the guests. Do you have sociable children and there is always a “kindergarten” in the house? Keep them safe by attaching an additional handrail at the appropriate height.
- The distance between vertical elements should not exceed 150 mm, for children - 120 mm.
- For wide stairs (more than 1.25 m), handrails are required on both sides.
- The slope must correspond to the slope of the stairs and be constant.
- Railings with a height of 110 cm are required on a pitched roof of a building over 10 m. In private houses they rarely go onto the roof, and the height is not the same, and therefore this rule is not relevant. But for rare cases of repair, it is a good idea to install some kind of fencing along the edge of the roof.
- Reliable structures must withstand a load of 30 to 150 kg per m, depending on their location.
Installation of stair railings
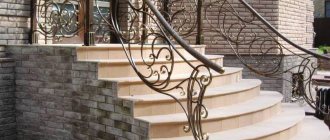
To give the porch an aesthetic appearance, especially if the house has carved elements, the fencing can be made of turned products - balusters. Installing stair railings also has a practical purpose - ensuring safety.
Despite the fact that the baluster assembly scheme requires care, accuracy and some carpentry skills, it is quite simple.
How to install a railing on a staircase
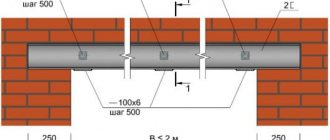
Now let's look at how to install railings on the stairs. First, prepare the installation site and fastening system for the “bulls” - supporting balusters. At the foot of the stairs, along the center line of the railing, a tie anchor is secured and the base is poured into concrete. The same bolted anchors are installed at the top point of the flight of stairs, at the corners of the landing in front of the entrance, as well as in gaps where the distance is more than 2.5 m. Next, holes are drilled at each step and along the edge of the landing, focusing on the center line of the railing under the tenon connection with ordinary balusters so that the gap between them is no more than 15 cm. Tenons are machined under these holes on the bases of the balusters. The tenons on the tops of balusters for a flight of stairs are made taking into account the slope of the railing, and for the upper landing - taking into account the height of the railing. In addition, railings with corresponding holes for the tenons of the balusters, railings along the length of the fence and a system for tightening the tops of the “bulls” are prepared. The tightening system consists of front and row clamps and a tightening head. The groove in the railing and the slots in the clamps must correspond to the width of the railing.
Fastening the railings of wooden stairs
The sequence of assembling a fence made of balusters is shown in the photo.
When all the parts are ready, begin assembling the porch fencing. You can begin attaching the wooden staircase railings. First, “bulls” and ordinary balusters are installed in the appropriate places. Supports are attached to them on top, and then the clamps and the entire structure are tightened with a head. Finally, install the railings, securing them with screws on the back side of the railing. The assembly process on the front and intermediate “bulls” with horizontal or inclined railings is the same.
Fastening the railings
When manufacturing and installing home-made structures, try to think in advance about the most reliable method of fastening and select the appropriate fittings.
What will you need?
The usual set of tools: a hammer drill (for brick walls), a screwdriver, a tape measure, a hacksaw or a jigsaw.
To attach balusters, purchase special bushings-shoes; for handrails, purchase brackets. The appearance of the fittings is a matter of taste of the owner. The main thing is that beauty does not come at the expense of reliability.
INSTALLING A STEEL GRAIL ON THE BODY
- Place the handrail on the bed.
- Mark the attachment points.
- Decide on the length of the handrail.
- Mark the trim line for the handrail.
- There are several ways to attach the handrail to the stock: with a self-tapping screw, with a rivet, with a screw.
- For durable installation, we offer either steel rivet or screw mounting.
- To install on a screw, tap the hole using a tap or install a threaded rivet.
- Place the handrail on the bed and fix it.
Fastening railings on stairs and balconies
This type of fence has two attachment points: to the floor and to the wall.
Fixing to floor and wall using flange
First, the installation sites for the balusters are marked and a “nest” is prepared for them. Recesses are made in the steps, sufficient to fix the bottom of the racks. Additionally, a special sleeve is put on - a flange and secured to the floor with self-tapping screws. Then install the handrail and adjust it to size. It is attached not only to balusters, which serve more of a decorative function. Below, on the intermediate and upper platforms, pillars are installed, which serve as fastening points. If the railing serves as a fencing for the second floor landing, it is recommended to attach the handrail to the wall.
On the balcony, the handrail is attached to the wall on both sides. To do this, use metal brackets, which are fixed with dowels on a brick wall or with self-tapping screws on a wooden one.
How to attach wooden balusters to a wooden staircase and floor in a country house
Attaching balusters to the stairs can be done using:
- self-tapping screws;
- dowels;
- hairpins
Staircase with wooden balusters
The most reliable and technologically advanced is the third option, which deserves a detailed description. Installation of balusters using studs or bolts consists of the following steps:
- An axial hole is drilled in the balusters;
- A pin with a diameter of 8 mm is screwed into it so that 5-7 cm protrudes;
- Additionally, the pin is fixed with wood glue;
- At the top and bottom steps, screws are screwed in at the places where the balusters are installed;
- A thick thread is pulled between them;
- Focusing on the thread, mark the installation locations for the balusters; Baluster installation locations
- Using a drill equipped with a device for drilling perpendicular holes, recesses with a diameter of 5 mm are made in the places where the balusters are fixed; Baluster mounting options
- Screw in the balusters and check their position.
Attaching balusters to the stairs
Attaching the railing to the wall
In this case, we are talking about an additional handrail, sometimes more decorative, and sometimes necessary on a wide staircase. In any case, the fastening should not be weak. After all, you can’t hang a sign on the wall: “Don’t touch the railings!”
Variety of wall mounting options
How is installation done?
- We carefully study the instructions for installing the handrail and follow the steps.
- Before installing hand-made railings, watch videos on the Internet and consult on forums.
- We purchase the necessary materials: brackets, screws, dowels.
- We mark the installation locations of the power elements. They should be located no more than 15-20 cm from each edge of the handrail, with intermediate ones evenly spaced.
- The recommended distance from the wall to the handrail is from 5 to 25 cm.
- We respect the slope of the stairs: for beauty and safety.
If the handrail is already connected to the brackets, you need an assistant - it is impossible to mark and mount the railings alone. A separate design is more practical: first the holders are attached to the wall, and then the handrail is attached to them. In addition, there are adjustable brackets, they allow you to slightly adjust the position of the handrail.
- We drill the marked holes and fix the brackets-holders on the wall with dowels and wood grouse.
- We fasten the handrail to the holders with self-tapping screws and bolts.
- We check the reliability of installation.
It is wrong to treat the installation of such a fence only as an additional decoration of the interior. No matter how beautiful they are, sometimes the safety of your loved ones depends on them. High-quality materials, installation in compliance with requirements - this is the key to reliability.
Installation of a wooden staircase: video and explanations
Let's take a closer look at the process of installing a wooden staircase. The staircase on prefabricated strings has a simple and at the same time durable design. It is perfect for installation both on the porch and on a relief area.
For a flight of stairs that has the same dimensions as in the previous version, for the bowstring you will need:
- 2 boards with a section of 50x300 mm (board 1);
- 2 boards 50x250 mm (board 2) of the appropriate length;
- 10 boards 1200x50x100 mm for risers;
- 10 boards 1200x50x350 mm.
The required width of the lumber is achieved by connecting tongue and groove boards.
Board 1 is leaned against any support at the angle of inclination of the flight of stairs and a vertical line is drawn along the plumb line. The height of the step (15 cm) is laid parallel to it in the middle part from the edge of the board, and then perpendicular to the width of the step (30 cm). This continues until the entire contour of the staircase is marked. A zigzag is cut along the resulting line using a jigsaw, then the halves are attached to board 2. The fasteners are made along the entire contour using screws - two per step and two per riser. You can also use nails; in this case, the boards are pierced through and the ends of the nails are bent tightly. The boards are nailed together to form a tray. Then the steps are put on the completed grooves and secured at the ends with screws - two per riser and two per step.
The flight of stairs can be installed on separate supports or tied to the frame of the upper landing. The fence posts are attached from the outside of the string to a bolted connection under and above the step.
How to attach railings to the wall and floor
Railings are an important part for ensuring safe movement on the stairs. The realities of today are such that there are many design solutions that use new material properties. Sometimes such stairs, methods of fastening handrails, and design options for side railings use components that operate at the breaking point.
How to attach the railings?
Accepted Standards
Relatively recently, there were clear requirements for the dimensions of stairs, the number and height of steps, the angle of inclination, as well as the design and number of railings. Fastening methods were clearly limited. They concerned balusters and “starting points” - the places where the railing or fence begins and ends. These are the requirements
- when there is a difference in height of a meter or more, fencing is required;
- the minimum height of railings and other fences is 90 cm;
- if the stairs are higher than 12 m above ground level, the height of the railings should be at least 110 cm;
- the distance between the posts of lattice fencing should not be more than 160 cm;
- the height of the first handrail should be 900 mm from the crest of the step;
- for additional safety of children, balusters should be located at a distance of no more than 120 mm if the staircase is located higher than one and a half meters from the floor;
- stairs must have a handrail on one side if their width reaches 125 cm;
- for larger widths – up to 2.5 m – it was necessary to install fences on both sides;
- all railings of one staircase must have the same slope;
- The minimum load requirement is 110 kgf/m. This is exactly the load the railings must withstand in the lateral direction.
There are also recognized standards for the installation of railing posts. The classic method is to make indentations for them, at least six centimeters deep. After installing the racks, the free space is filled with cement or concrete. To prevent loosening, a shoe made of cast iron, copper or steel is put on top. At the top of the racks, a mandatory strip of iron with a thickness of at least four millimeters was required. This tape was used to attach the railings to the balusters. The railing posts were required to be located at a distance of at least 60 mm from the edge of the stairs.
INSTALLING THE HAND RAIL. MARKING AND INSTALLATION OF HANDBAIL HOLDERS
- Mark the attachment points for the handrail.
- When marking, take into account that the attachment points will be located below the handrail line. The height of the handrail installation is based on the project or personal discretion. In most cases, the handrail is placed at a height of 900 mm.
- We recommend that the distance between the attachment points be no more than 1 m.
- A larger distance is allowed, but you must take into account the strength of the installation of fasteners (wall strength, load-bearing capacity of the anchor), and the deflection of the handrail itself.
- To install fasteners to the wall on the central anchor, we recommend the use of an M10 stud (thread) and an injection compound or a chemical capsule anchor.
You can also use a wedge anchor or any other type of fastening, with which it is possible to form an M10 thread section coming out of the wall.
Today's fencing options
It is worth immediately noting that modern solutions without fencing, as in the photo above, or options for fencing with cables are complete irresponsibility and disregard for safety rules.
Otherwise, the generally accepted methods of attaching railings to the wall and to the floor have been preserved. However, new materials and design solutions make it possible to make three types of fastening:
- Vertical to the surface of the floor or stair step.
- On the side, at the end of the string of a staircase or balcony slab.
- On the other side of the slab or staircase element.
In terms of “interaction with the wall,” the mounting parameters have changed little. Classic solutions are used - anchor bolts or welding connections with pre-installed support points. There is a technique when the elements on which the handrail is mounted are structurally a special part of the load-bearing elements of the walls. Also, the use of load-bearing points is implied in cases where it is necessary to attach the railings to the posts.
Attaching handrails to stairs and floors
Fastening the posts and balusters of the fence to the surface of the floor or stairs is a more complex issue.
The classic method is to act according to standards. In fact, today most solutions follow accepted requirements, for example, as in the photo. A recess is made in the surface into which the stand is installed. A shoe is put on top, which, in turn, is also securely attached to the surface. Additionally, it firmly fixes the rack, preventing scrolling or loosening.
The side fastening of the railing posts is fastening to the end of the stair string or the balcony slab. This method can be carried out using appropriate accessories. Usually this is a power block into which the stand is inserted and rigidly fixed. The fastener element that bears the entire load can be attached using anchor bolts or spacer tubes. An option is possible when it is simply welded to special zones made on the string of the stairs or removed from the slab.
The option of fastening on the other side of the bowstring works as a hybrid of the first two solutions. A rigid fixation of the rack and, at the same time, a power element of the fastener are required. In this case, two methods are usually used.
- A through hole is made in the slab or stair element. The entire block that secures the stand is located on the reverse side.
- The recess for installing the stand is blind. However, there is a hole for the passage of a bolt, one or more, which connects the bottom of the rack and the power element located on the other side.
General Tips
If fastening of metal railings is required, use appropriate connecting hardware. This way you will preserve the appearance of the coating, and also ensure the disassembly of the structure.
Whatever solution you choose, remember that safety must come first. The railings should not dangle, the posts should have a good margin of safety under lateral loads, the height of the fences should be sufficient, preferably in accordance with the standards. The fastening of any elements must be reliable. You should not sacrifice safety for the dubious benefits of beauty and unusualness with minimal protection.
Requirements for stairs and calculations
The wooden staircase to the second floor is an engineering structure that should ensure the safe movement of people. Standards regulating the rules for designing structures - SNiP 2.08.01-89, 2.08.02-89.
Requirements that must be observed when making a wooden staircase with your own hands:
- span width of at least 90 cm for free movement of people;
- the length of the march is 3-17 steps, with a larger number an intermediate platform measuring 130 cm is arranged;
- height of steps 15-20 cm;
- width 25-30 cm, the entire leg should stand on the tread;
- the optimal angle of ascent is 26°-33°, the maximum is 45°, with greater steepness the staircase poses a danger to children and the elderly;
- the height of the fences is at least 90 cm, and in a house with children - 120 cm;
- the interval between balusters is 10-15 cm for reasons of stability of the fences and safety for small children;
- the railings are designed for a lateral load of 100 kg;
- from the first or last step to the nearest door at least 1 m.
In a flight of stairs, it is advisable to design an odd number of treads, since it is more convenient to start and end the movement with a step with the same foot.
To calculate the structure you need to perform the following algorithm:
Wooden staircase diagram
- Draw up a drawing of the plan and section of the room with exact dimensions, taking into account the thickness of the ceiling.
- Find the required number of steps. To do this, the total height is divided into 15-20 cm.
- Determine the length of the stairs as the product of the number of steps and the tread width of 25-30 cm.
- If the number of steps is more than 18, you need to provide a platform 130 cm long.
- If the height is insufficient, you can arrange a 90° turn of the march or provide winder steps.
- Calculate the length of the stringer or bowstring using the Pythagorean theorem as the root of the sum of the squares of the height and length of the stairs.
Drawing of a staircase on the wall
The ceiling opening is designed with the expectation that a person walking up the stairs will not touch his head on the upper structure. The minimum height from the step is 2 m.
You can use an online calculator to calculate the stairs. The program produces the result in the form of a drawing with detailed dimensions of all elements.
Basic installation rules
1) Railings are installed at a height of 90 cm and above. If there are children, disabled people, or short people in the house, an additional handrail is placed slightly lower than the main one.
2) If the staircase is wide (from 1.25 m), railings are installed on both sides.
3) The distance between the balusters should be no more than 15 cm; if there are children in the house, then no more than 12 cm. A good option is solid screens, for example, made of plexiglass, which completely cover the space and prevent falls.
4) A good stair railing can withstand heavy loads of 30 kg or more.
5) And finally, railings are required for height differences of 1 meter or more. For example, if the porch is high, this is already a good reason to install high-quality and reliable fencing.
Requirements for railings
It is important to make the railings durable and easy to use. Their main tasks are to increase the safety of the stairs and strengthen them.
When installing railings, it is necessary to take into account the requirements that are accepted by general standards and regulatory documents:
- Handrails must be installed if there are more than two steps on the stairs.
- The minimum height of the railings, adopted by Russian standards, should not be lower than 90 cm, the optimal height is 90-120 cm, depending on the installation location. If the stairs are used by children, it is recommended to install additional handrails at a height half of the main one.
- The design of the fence must be made in such a way that the child’s head does not pass through it. For example, the distance between balusters should not be more than 15 cm; in the case of forged railings, it is necessary to think through the pattern in such a way as to fulfill this requirement.
- The fastening of balusters or other type of fencing should be carried out at the top and bottom of the railing.
- The railings must withstand a lateral load of at least 100 kg.
- If the flight width is small, up to 120 cm, and the staircase is located along the wall, it is permissible to install railings on one side. When increasing the width of the flight, it is necessary to additionally attach the railing to the wall. If the staircase is not located near a wall, railings are installed on both sides for any width of the staircase, with the exception of unique design solutions.
Railing
In order to connect the railings to the balusters, you must do the following:
- Make a groove in the handrail that will repeat the upper cut of the baluster;
- Prepare a rail the same width as the lower groove in the handrail;
- Turn a decorative strip the same width as the upper groove of the handrail;
- Fasten the rail to the side of the balusters in order to trim their tops, taking into account the slope of the flight of stairs;
- Using self-tapping screws, attach the rail to the supporting part of the balusters;
- Cut the handrail at the bottom and top so that there is no gap between it and the support posts;
- Fix the railings to the rail using glue or self-tapping screws. Fixing the railings
On balustrades, where the fence must support a weight of 100 kg, it is necessary to take responsibility for attaching the handrail to the support posts. To do this, I use a capercaillie bolt or zipbolt.
Attaching handrails to balusters
Selection of materials
The railings should have a beautiful appearance and fit into the overall interior of the room. They can be made from a wide variety of materials and their combinations.
- Wooden railings. They are mainly used for internal stairs, much less often for outdoor ones. The reason for this is the fact that this material wears out quickly and loses its attractive appearance under the influence of temperature and sun.
- Metal railings. Their use is much wider due to the fact that the metal is much more resistant to external factors. Metal railings, in turn, are distinguished by the type of metal, the most common being forged and stainless steel.
- Plastic railings. Analogue of almost any material. Modern production technologies make it possible to obtain the appearance and texture of any type of wood or stone. The advantage is resistance to rotting and corrosion.