Installation
Date of publication: 10/13/2015
2
65268
- What is the essence of construction
- First stage of construction: foundation
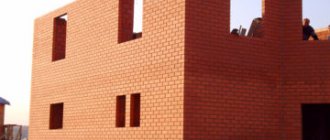
- Second stage of construction: walls
- Third stage of construction: roofing
- Fourth stage of construction: floors
- Fifth stage of construction: finishing
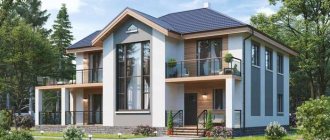
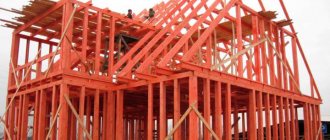
Over the past few years, the construction market has been flooded with so-called frame houses, which are erected weekly in huge numbers both by companies and with their own hands. The reason for such love for “frameworks” lies in the ease of construction and the pace of construction. The phased construction of a frame house allows you to assemble a full-fledged residential building in one season, which will look quite presentable, and have an attractive price and cost-effectiveness in maintenance. The technology is easy to understand and implement with your own hands.
DIY frame house
Content:
- Basic rules of frame construction
- Choosing a place to build a house on the site
- Fasteners
- Construction order
- Stage 1. Foundation
- Stage 2. Bottom trim and floor
- Stage 3. Frame
- Stage 4. Interfloor ceilings
- Stage 5. Roof
- Stage 6. Insulation and sheathing of the frame
- Stage 7. Internal partitions
- Stage 8. Interior decoration
- Conclusion
In Russia, the technology of constructing lightweight frame houses is gaining popularity, relegating traditional construction made of bricks and cinder blocks to the background. This is due to the advantages of the prefabricated technique: cost-effectiveness, speed of installation, light weight and strength of finished structures, compatibility with any architectural solutions. The construction of frame buildings is carried out in several stages.
Buying a ready-made house
An alternative to building a Canadian house from scratch is to purchase a ready-made building. Most construction companies provide installation services for prefabricated mobile homes. It should be taken into account that this option is fraught with many pitfalls, so without a thorough inspection of the most vulnerable places, you should not buy an inexpensive frame house.
So, what you should pay attention :
- Foundation and walls. Cracks or fresh finishes on an old building should raise red flags. It is also important to look at the diameter and thickness of the piles to make sure there is no corrosion.
- Attic. It must be well insulated and dry.
- Roof. If an error was made in the design or installation of the rafter system, defects will be found in the form of ridge subsidence .
- Condition of the bottom trim. Mold, rot or dampness in these areas indicates improper waterproofing and errors in the installation of the wind and moisture barrier membrane.
- Floors. Rocking of the floor under your feet and creaking are signs of a large distance between the joists, failure to use glue when installing slabs, etc. These mistakes can be corrected, but you will have to add repair costs to the cost of buying a house.
- Doors and windows. If the shrinkage is incorrect, the windows and doors will not close well.
- Communications. It is important to check whether the heating is working, what condition the electrical wiring is in, and whether the sewer pipes are leaking.
In addition, the seller may completely lack a house design and quality certificates confirming the safety of the materials used. Before you buy a cheap frame house, you need to make sure that everything is in order with the developers’ documents.
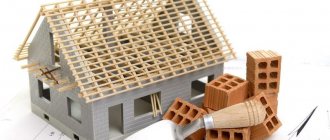
Basic rules of frame construction
Figure 2. Frame construction technology
When constructing frame-panel buildings, you need to pay attention to the following nuances:
- Selection of lumber for the frame . To prevent the wood from deforming due to drying out, it is better to choose timber with transport humidity. Wood with a high percentage of natural moisture will not provide a high quality building frame.
- Protection from biological influences . This refers to wood rotting, the activity of wood-boring insects, as well as rodents that live in the insulation. To combat pests, the base of the house is treated with antiseptic.
- Quality of materials . You should not skimp on insulation, moisture and vapor barriers, window and door units, fasteners connecting frame elements. The strength and safety of the structure depends on the quality of these materials.
- Laying electrical wires . Poor quality wiring is the main cause of fires in wooden buildings. Electrical communications in frame houses must be well insulated, and all sockets and switches must be certified.
It is important to strictly follow the technology for constructing panel houses. To avoid serious mistakes, it is better to entrust the installation to a construction organization that performs such work. In St. Petersburg and the Leningrad region, he is professionally engaged in frame construction.
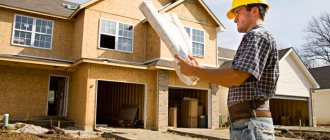
Recommendations for choosing a developer company
If your budget allows, you don’t have free time, or you don’t want to delve into all the intricacies of construction work, you can use the services of contractors. A responsible approach to choosing specialists is the key to the reliability, functionality and safety of your future home.
Useful: How to build a frame house for permanent residence
You can enter into a contract for construction and installation work with a developer company if:
- The company has existed for many years and specializes specifically in frame house construction (gross technological errors are the prerogative of recently opened organizations).
- Prices for services do not differ much from the prices of competitors (too low prices should alert you).
- Negative reviews on the Internet are either absent or insignificant.
- The contractor, upon request, can provide photographs of all stages of construction work (otherwise there is a risk of running into scammers who pass off beautiful photos as their work).
- There is an opportunity to personally communicate with the contractor’s former clients or at least visit the company’s demonstration site.
- The final cost of the work was discussed and indicated in the contract (to exclude “surprises” in the form of additional unaccounted for work).
- The warranty provided by the contractor for materials and work performed does not exceed 5 years (the deadline for identifying all existing installation deficiencies). A lifetime warranty from a company that has existed for three years is just a bait for gullible customers.
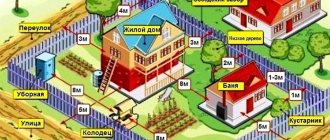
Choosing a place to build a house on the site
You should think about choosing a place to build a residential building at the stage of purchasing a plot. Not only the relief matters, but also the distance from the highway, power lines, neighboring buildings, the presence of nearby reservoirs, ravines, and green spaces. You also need to place the house correctly on the site itself. There are mandatory standards here. This:
- Sanitary building codes . They stipulate the standard distance to the road, power lines, underground utilities, neighboring houses, outbuildings, wells, trees.
- Fire safety restrictions . Fire safety standards regulate the distance to fire hazardous objects and between building buildings. At the same time, they take into account what the house is built from.
The location of the future home is chosen during design. To put a building into operation, the project must be agreed upon with the responsible services.
Figure 3. Scheme of a pile-screw foundation. Project Vsevolozhsk D-15
In addition, there are more general recommendations that will help improve the comfort of your future home. When choosing a construction site, take into account:
- orientation to the cardinal points - affects the illumination of rooms;
- wind rose - on the windy side it is better to reduce the degree of glazing;
- the presence of noise sources (roads, playgrounds) - it is better not to make windows on this side.
When choosing the location of rooms, it is advisable to think in advance about the view that will open from the windows.
Roof
The roof is no less important part of the house than all other elements. Therefore, you need to choose it from a practical point of view.
Shed roof
Shed roof using frame technology.
It has a simple design. It withstands strong winds well and is cheaper in cost than the gable option. But, as such, she really has no shortcomings. Only when designing a house, it is necessary to take into account the fact that too large a roof area can become a big problem in winter, when there is a lot of snow and it will put pressure on the roof.
Gable roof
Gable roof.
Creates an additional room that can be used either as an attic or as another living space. At the same time, the size of the roof area can be designed as desired. All accumulated precipitation will be evenly distributed and fall to the ground on its own.
Flat roof
Requires minimal effort to install. But in order to take care of it, you need to use a lot of effort. That is, all precipitation (snow, rain, hail) will accumulate at the top. If the snow is not removed in time, the entire house may simply collapse.
What type of roofing to choose is up to you. To do this, you need to weigh the pros and cons. For this purpose, solely personal preferences are taken into account. For example, if you do not need an attic space, then a pitched roof is quite suitable for a cheap frame country house. But if you want to hold receptions on the roof and at the same time there is someone in the house to remove accumulated water or snow, then you can do a flat version.
Fasteners
When building a prefabricated house, nails and profiled metal fasteners are used to connect frame elements:
- Mounting corners . They are installed at corner joints: floor frames, vertical beams, wall corners, roof rafters. Corners differ in size, type, and design. Products with additional stiffeners can withstand bending loads.
- Mounting plates . Used for butt joints. The plates are placed on both sides of the slabs being connected, and then secured with bolts and nails. Such fasteners can withstand high tensile loads.
- Beam holders . They are used when installing floors and attic floors. The holder fixes the beam to a wall or other structure, preventing it from moving. Withstands significant tensile loads.
- Beam support (shoe) . Designed for installing beams on a wall or column. There are supports for open installation or for finishing, right/left or universal.
- Shoe of a supporting post or column . The element is installed in the foundation and has a high load-bearing capacity.
- Mounting profiles . Needed for installation of sheathing and installation of sheet sheathing.
Fastening elements securely fix the frame, giving it rigidity.
Cheap foundation
The cheap foundation of a frame house is determined by two types: pile or strip. There are other types of foundations, but these two types are considered one of the cheapest options.
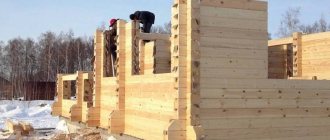
Strip foundation
The foundation is suitable for the most daring and diverse projects. It consists of blocks that are laid on a sand cushion. The entire structure is held together with a cement-sand mixture. But the rigidity of this foundation leaves much to be desired. There is also a risk of cracks occurring at the seams.
Strip foundation.
In order to lay this type of foundation, you will have to try a little and dig a pit to a depth where the ground freezes. And also install underground walls. But this inconvenience is compensated by the fact that the base will be insulated.
On a note
It is better to choose a monolithic reinforced foundation, which has a depth well below the freezing level. This approach makes it more stable during strong winds.
Pile foundation
The foundation has small piles and a high upper part (grillage). This design is very suitable for those areas where frequent earthquakes occur or there is a high groundwater level. To do this, the grillage itself is strengthened just above ground level. This method will protect the foundation from groundwater.
Pile foundation.
This type of foundation is also suitable for areas where the ground is heaving, or construction is taking place on peat or loess soil types. Consequently, this type of foundation is laid in problem areas. And its task is primarily to strengthen the foundation.
The principle of installing such a foundation is as follows. Piles are drilled deep into the ground and are located inside asbestos-cement pipes. A solid grillage is installed on top of them. It should be noted that this type of foundation is much stronger than the strip version, but it costs much more and this is extremely important.
On a note
The depth of notching of a pile foundation is always determined by the terrain on which construction is taking place.
Construction order
After developing the project, selecting materials and completing preparatory activities, construction of the house begins. Let's consider the algorithm for constructing a frame house in stages.
Stage 1. Foundation
Figure 4. Pile foundation
Compared to stone or brick buildings, wooden frame-panel houses are very light in weight. This allows them to be erected on any foundation. In frame buildings and houses made of SIP panels, the following types of foundations are used:
- Shallow tape – buried 30-80 cm from the surface level;
- slab - slabs with a thickness of 30 cm or more are used for it;
- columnar - the house is built on supports tied with mortar;
- pile - on driven, screw or bored piles, burial depth 2-12 m.
If the soil allows, you can make a strip-type base with a slight recess. But most often, pile or columnar foundations are chosen for light buildings. These are relatively inexpensive structures that form a ventilated space under the building.
To correctly select the foundation, geodetic surveys are carried out at the construction site before starting work. During their implementation, the type of soil, the height of groundwater, and its seasonal fluctuations are determined.
Refusal to study the soil on the site can lead to errors when constructing the foundation: choosing an insufficiently strong foundation or, conversely, an unreasonable waste of materials.
After installing the foundation, it must be waterproofed. This protects the wooden piles from dampness, rotting or mold, which is possible due to contact of the wood with groundwater. As insulation, bitumen mastic or rolled materials are used: roofing felt, waterproofing.
Stage 2. Bottom trim and floor
Figure 5. Scheme of the first crown of the lower trim.
Project Vsevolozhsk D-15 Piping is required for all types of foundation. It is laid on top of the waterproofing layer, positioned above the ground level. The wood used for strapping must be carefully treated with an antiseptic.
In frame houses, timber with a cross-section of 150x150 mm is usually used for the bottom frame; they are laid along the perimeter of the entire foundation. If the foundation piles are located at a distance of more than 3.0 m relative to each other, more powerful lumber is required. For greater strength of the strapping, the boards are laid in two layers. In this case, the upper row overlaps the joints of the lower one.
To perform the strapping, you can also take a beam with a section of 100x150 mm.
Wooden logs with a cross-section of 150x40 mm are placed on top of the frame and placed on edge. The logs serve as the basis for the subfloor. They are attached to the frame beams with nails and fastening angles. The pitch for them is chosen based on the length of the boards - the longer it is, the more often the logs need to be laid. Usually the distance is taken to be 60 cm. This is enough to give the structure rigidity and prevent the boards from sagging.
At this stage, it is imperative to insulate the lower part of the house. You can use polystyrene foam, extruded polystyrene foam or mineral wool sheets. When laying fiber insulation, it is necessary to lay a layer of waterproofing underneath it. The insulation is cut into layers, then placed between the joists.
The final step of this stage is the installation of the subfloor. There are two variants of its design:
- load-bearing – used with pile, columnar or strip foundations;
- lattice – used with slabs or concrete screed.
Figure 6. Floor diagram The
subfloor is made from a board 2.5-3.0 cm thick or a sheet of plywood 1.5 cm thick. Sometimes both materials are used (plywood is placed on top of the boards). In this case, you can take sheets about 0.5 cm thick.
Stage 3. Frame
Figure 7. Wall frame design diagram
Figure 8. Scheme of a house wall pie
The procedure for installing the wall frame depends on the chosen technology. There are two methods:
- Assembly of all elements directly at the site of their installation.
- Assembly on a horizontal surface followed by installation of the finished structure.
The second option is simpler and installation is faster. This is exactly how houses are assembled from factory-made SIP panels. But this method may require the use of special equipment or the participation of several people to lift and install the wall due to the significant weight of the finished structure.
You can assemble the house directly at the installation site yourself. Installation of the frame of a panel house begins with the installation of corner vertical posts. Typically, double boards with a section of 100x40 mm or 150x40 mm are used for this. A larger cross-section is required for the construction of two-story houses. Also, the increased size of the board is convenient for laying insulation with a thickness of 150 mm - this is exactly the layer required for the North-West region of Russia.
To ensure the rigidity of the house structure, the frame beams are fixed with metal corners and also reinforced with inclined slopes.
The remaining simple vertical posts are installed between the corner beams at a distance of 1.0-1.5 m from each other. For them, boards measuring 100x40 mm or 150x40 mm are used - the width must match the standard size of the beam of the corner posts.
Next, horizontal beams are mounted on top of the vertical posts, thus creating a rigid frame for the building. In this case, openings for window/door blocks are immediately provided. The openings are reinforced from below with crossbars that evenly distribute the load across the foundation.
To create finished panels, OSB boards with a thickness of 12 mm are usually used. The final thickness of the wall of a frame-panel house is equal to 180-250 mm. The dimensions of boards made of oriented strand boards are 125x250 cm. It is advisable to install supporting columns for them (vertical posts) at a distance of 62.5 cm - along the edges and center of the board.
Stage 4. Interfloor ceilings
Figure 9. Scheme of the interfloor floor
After the frame assembly is completed, the top frame of the house is completed. Here the installation technology is similar to the lower trim. For it, timber or double boards are used.
The ceiling beams of the first floor are attached to the top frame. The cross-section of lumber is selected based on the chosen layout of the house:
- For two-story houses and buildings with a residential attic, beams of the same cross-section as for the floor of the first floor are used to construct the floor.
- For one-story buildings with an attic for service purposes, lightweight ceiling beams are used.
In two-story buildings, the frame of the walls of the second floor is assembled on top of the interfloor ceiling. The principle is the same as on the lower floor. The topmost ceiling is made slightly larger than the perimeter of the house - it should protrude about 30 cm on all sides. In the future, this protrusion serves as a support for the rafter system of the house.
I install the floor beams in 60 cm increments. A subfloor is laid on top of them for the convenience of constructing a second floor or roof. For it you can use wooden boards 2.5 cm thick or board materials - OSB, plywood.
When installing the upper attic floors, it is necessary to lay insulation, a layer of wind protection, and a vapor barrier. And for interfloor ones they perform sound insulation.
Stage 5. Roof
Figure 10. Frame house with hip roof.
Construction according to the Peterhof D-2 project Various roofs are made in frame-panel houses: single- or double-slope, hip, hipped, broken. The choice depends on the configuration and style of the building. The easiest way is to make a regular gable roof, so this option is most common.
In order for snow to easily slide off the roof, the slope of the slopes must be at least 28-30°. But it is not recommended to make the angle of inclination more than 50°, otherwise the wind load on the roof will increase.
To form the slopes, a rafter system made of wooden boards with a section of 150x40 mm or 200x40 mm is used. Installation of a gable roof begins with two pairs of outer rafters. They are installed on opposite sides of the roof, reinforced with a wooden crossbar in the shape of the letter “A”.
The installation pitch of the rafters depends on the wind and snow load in the construction region, the area of the roof (span), and the selected beam section. The support for the rafters is the top frame of the house.
The roof sheathing is mounted on top of the rafters. Its type depends on the selected roofing material. This can be corrugated sheeting, metal or soft tiles. It is better to choose light coatings that minimally increase the load on rafters, floors, and load-bearing walls. Under the roofing material, insulation and a layer of vapor and waterproofing are laid.
Stage 6. Insulation and sheathing of the frame
Figure 11. Insulation of walls
In frame houses, all enclosing surfaces are insulated: external walls, floors, ceilings. Thermal insulation is laid in the spaces between the vertical and horizontal beams. The following is used as insulation:
- mineral wool - in rolls or mats;
- ecowool - it is laid dry or wet;
- fibreboards;
- extruded polystyrene foam (EPPP) in slabs;
- Styrofoam.
Fiber insulation is more environmentally friendly; it allows steam to pass through well. They are laid between the frame beams in two layers, offset by about 15 cm relative to each other. To prevent the mineral wool from getting wet, it is covered on the outside with a layer of hydro-wind protection, and on the inside with a membrane vapor barrier or polyethylene.
Rigid insulation (foam plastic, EPP) does not allow air to pass through. They ensure complete tightness of the fences and give the walls additional rigidity. This type of insulation does not break down and is easier to install in vertical structures.
A typical multi-layer wall pie of a frame house contains the following materials: OSB boards for external and internal cladding, insulation, wind protection, vapor barrier.
Factory-produced SIP panels consist of 3 layers: two OSB boards and insulating polystyrene foam between them. There is no need to additionally insulate such houses.
To finish the house from the outside, external cladding is performed. Here they apply:
- siding (vinyl, metal);
- fiber cement panels;
- wooden lining;
- decorative brick;
- plaster.
External finishing gives the walls strength and protects them from mechanical damage and precipitation. It serves as additional sound and thermal insulation and also determines the appearance of the building.
Stage 7. Internal partitions
Internal partitions are used to zone rooms in the house. With their help, living rooms, office spaces, and arches are formed. There are board and frame-sheathing partitions. By device type they are:
- simple single-layer;
- double-layer with an inner layer of insulation.
The presence of insulation between the rigid layers slightly increases the cost of the partition design. Installation of multilayer partitions is more difficult; they slightly reduce the internal usable volume of the building. But this design option provides insulation and soundproofing of rooms, and generally reduces the echoing sound of the building.
In terms of installation method, internal partitions differ little from external walls. For them, choose vertical racks from edged boards about 10-15 cm wide and 3-5 cm thick. The pitch of the racks is taken as for external walls. Horizontal struts are also made from boards. This frame is sheathed on top with OSB sheets, plywood, chipboard or plasterboard.
Basalt wool or wood fiber boards are usually used as sound insulation. The main requirement here is the non-toxicity of the material, simplicity and safety of design, and low weight.
Stage 8. Interior decoration
The interior decoration of the floor, walls, and ceiling of the house makes the room suitable for habitation. It includes the following stages of work:
- Installation of finished floor . First, a base of wooden boards 50-150 mm wide is laid, waterproofing, insulation, and vapor barrier of the floor are performed. OSB boards or slabs and flooring - laminate, parquet, linoleum - are placed on top.
- Ceiling lining . A sheathing of wooden beams is attached to the support beams, between which thermal insulation is laid. The inside of this structure is covered with plasterboard.
- Wall decoration . The easiest way to finish the interior walls of a house is with plasterboard. In this case, there will be no restrictions on the final finishing: you can lay tiles, apply decorative plaster, paint the surface or cover it with wallpaper.
Utilities (heating pipes, water supply) are usually installed in the cavity of multi-layer walls under the cladding. Electrical networks are laid openly in boxes or inside walls in special corrugated hoses.
Frame house - step by step instructions
A frame house is a rigid system of support posts, horizontal and inclined connections, resting on a pile, pile-grillage, slab or shallow strip foundation. In the classic version, the space between the racks is filled with insulation. Most often - basalt wool. The outside and inside of the structure is sheathed with finishing materials.
Another way to build a frame house is to install walls and ceilings from rigid SIP panels, consisting of two OSB boards and a layer of polystyrene foam between them. Systems are assembled in different ways. In the first case, the frame is installed element by element or in blocks, and in the second, large-sized panels are mounted like a constructor, observing the sequence. The easiest way to assemble a frame house with your own hands is step-by-step installation of the supporting system, insulation and finishing. In this case, construction lifting mechanisms and a large team of workers will not be needed. All operations can be performed independently or with the help of 1-2 friends.
Prices for cement and basic mixtures
Building materials for roofing
The building materials market offers such a wide range of roofing materials that any developer will be able to choose an option that suits its performance and budget.
Useful: Frame house kit
Criterias of choice
Meanwhile, each individual house project includes recommendations for the construction of the roofing system and its coating. This depends on several factors:
- maximum permissible load on the structure, according to the characteristics of a particular project;
- roof configuration (architecture);
- taking into account the weight of a particular roof covering.
The most popular roofing materials for frame houses can be divided into several categories.
Ceramic tiles
This roofing coating is made from quartz sand, clay and various additives. The most practical and durable in use are glazed tiles. It has a smoother surface, which speeds up the removal of sediment from the roof.
There are several types of ceramic tiles in shape:
- tape;
- grooved;
- single wave;
- two-wave.
The average weight of one ceramic tile element reaches two kilograms . This type of roofing is chosen for its durability, lack of corrosion processes and frost resistance. However, there is also a significant drawback for frame construction - heavy weight. In this regard, it is not suitable for lightweight structures; reinforcement of the entire frame is required.
Bituminous tiles
In production, a mixture of cellulose and fiberglass is used to cover bitumen tiles. This roofing material is best suited for frame technology.
It is compatible with roofs of complex configurations, as it is quite light and flexible, and the damaged part can be replaced without dismantling the rest of the roof. However, this type of roofing also has disadvantages: a high combustion rate and fading in direct sunlight.
Metal tiles
This type of roofing consists of a galvanized sheet coated with a layer of polymers. In appearance, metal tiles are similar to ceramic tiles. At the same time, it is considered a universal covering for the roof of a frame house, thanks to some features:
- high installation speed;
- low weight;
- fire safety;
- low price.
The only disadvantage that can be called for this roofing material is the high noise level during rain.