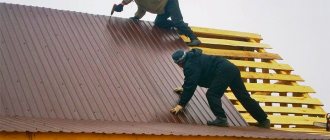
Laying the first row of aerated concrete blocks is a very important stage of construction, since the next rows and the evenness of the walls as a whole depend on it. In order not to complicate the laying, the first row should be laid as evenly as possible.
So, to begin with, we will briefly describe the masonry algorithm, and for more details about each stage, see the text below. Tools, waterproofing, preparing mortar, leveling blocks, reinforcement, we will talk about all this in this article.
Brief technology for laying the first aerated concrete row:
- Level the surface of the foundation with mortar;
- If it is already very smooth, then remove dust from the tape;
- Spread bitumen mastic on the tape;
- We lay waterproofing, for example, roofing felt;
- We determine the highest angle with a hydraulic level;
- We lay gas blocks in the corners on the solution;
- We align the blocks horizontally and vertically;
- We stretch the thread between the blocks;
- We lay the remaining blocks on the solution along the thread;
- We reinforce the first row of blocks with reinforcement.
Tools for aerated concrete masonry
Before starting construction work, you should prepare the necessary tools:
- Construction level or laser level;
- Hydraulic level;
- Roulette;
- Cord plumb line;
- Special saw and trowel for aerated concrete;
- Square;
- Trowel;
- Rubber mallet;
- Wall chaser.
Work process
Wall markings
Any work begins with the need to clean the base from debris and dust. If we are talking about the first floor, then you should remove it on the foundation, and if you are laying the second and higher floors, then we will start with the ceiling. All you need to do is sweep the walls with a broom. As was previously done when laying out the foundation, now it is necessary to correctly break the corners of the building so that they turn out straight everywhere, because this will be the last moment when it will be possible to correct everything, since otherwise errors in geometry will crawl out onto the ceiling and roof. The best option to solve the problem would be to call a surveyor who will cut right angles with an accuracy of 0.3 cm, but this will cost several thousand rubles, and usually such a master is called only to break down a building or to overly long houses.
Small houses can be demolished without outside help. To do this, you will need a roll of rope and a construction tape, preferably made of metal. The technology is quite simple - place the blocks dry and take measurements of the diagonals of the resulting rectangle. The accuracy will be within 0.3-0.5 cm. You should take into account the fact that a metal tape measure does not stretch, but a thread or fabric tape measure will stretch, and quite a lot. If you do not plan to do cladding, then you can extend the block or brick beyond the vertical border of the plinth to approximately 1/3 of the brick/block. BUT try not to abuse this, especially if the buildings are higher than 1 floor. When the main corners of the building are exposed, it will be possible to simultaneously expose additional ones, if any. At the same time, it will be possible to put up partitions, especially if there are no columns, so that they can be laid at the same time as the outer walls.
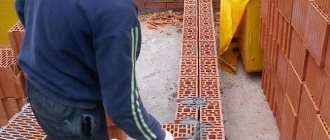
Laying blocks with your own hands in the first row
Before starting the laying of the first row, it is necessary to check all the vertical type marks on the foundation, because the first row is the most important stage. If you do not level the base with mortar or there are large differences, then there is a high probability that the walls will crack. The check is carried out with a regular spirit level or a laser level, which was set during marking. If deviations from the horizontal are up to a maximum of 2 cm, then you can level out the unevenness with a solution. If it is more, then it is better to fill the belt with reinforcement and make sure that the horizontal level of the concrete is normal. The first row should be laid on roofing felt, cut the roll in half and laid directly on the foundation. This is done in order to cut off capillary moisture from the blind area and the ground.
In seismic areas where the standard value is higher than 6, such waterproofing is prohibited! During a seismic wave of a lateral type, a building can be moved from its foundation and completely collapse. For this reason, waterproofing is made from mortar if roofing felt cannot be installed. So, before starting masonry, check the base again for debris and wet the base. The mortar is placed on the first corner stone and the second on the opposite corner with the holes down, and you also need to carefully monitor the height of the masonry. Be sure to check the side edges and ends of the blocks by level so that everything is only vertical.
When all the blocks stand exactly horizontally and vertically, you should stretch a cord between them and align them along it. Now, in the same way, make a perpendicular wall - this technology is called “bringing corners.” While you are making the second and third corners, on the first floor the solution will have time to lose its mobility, and the block will lie tightly. Once this has happened, you can begin laying the first row further. If we are talking about a seismic region, laying in a wasteland is prohibited. We are talking about work when only horizontal rows are placed on the mortar, and the vertical rows are not filled with mortar. Thus, masons often try to save time, and then plasterers will have to tinker a lot and seal the cracks.
For this reason, apply two portions of mortar on the end side of the next block where the block on the foundation/slab will be laid out and carefully place the block, almost touching the thread. With a light tap of a pick or trowel, the block should be tapped to the first block and then aligned with the thread so that the block touches it slightly. When everything is finished, check the side edge for verticality. We do the same for the rest of the wall.
Wall laying and mesh reinforcement
The second and all other rows will hardly differ from the masonry of the first row, but the main difference will be that the corners, in addition to the level, will need to be checked with a plumb line. The more rows, the greater the accuracy of the plumb lines, because the level has quite large errors. Typically, plumb lines are bought in stores in the form of metal weights, to which you must attach a rope yourself.
To mark the load, you should make a conical hat in order to know exactly the point where it will look. For masonry and plastering, it is best to use Armenian plumb lines rather than store-bought ones. It was invented by builders to do work accurately and quickly, and not be distracted by anyone.
Yes, to lay aerated concrete and other blocks with your own hands, you will need an Armenian plumb line, which is shaped like a spinning top, and not a thin nylon thread is inserted into it, but a thick rope. At the second end of the rope there should be a pipe where the rope is threaded in the middle. Inside the hole, the rope will pass with force, and behind the pipe it will be tied with a knot. It will be the same size as the plumb line.
To measure, you can easily measure the required length of rope, and attach the end of the tube to the block, and release the plumb line down. A light touch will indicate verticality, and other deviations can be easily noticed and corrected in time. It is unlikely that you will be able to buy such a plumb line, but you can make it yourself. In addition, it would not be superfluous to lay a mesh for “resistance from vandals,” because in most crime reports you can often see cases of theft from stores in a tree without signals, where the store was broken into by breaking the wall.
Banding masonry in a block wall
As a rule, external walls are placed in a block, and internal ones in half. Bandaging of the partitions should be at least 30% of the block in the run. It is unlikely that we will be able to come up with something new here. External walls can be bandaged in different ways.
Lintels in a block wall
In a block wall above the opening of windows and doors, it is necessary to install lintels, and in load-bearing external walls, a depth of embedding into the wall of 0.2 meters is allowed, and with an opening width of more than 1.5 meters, at least 0.25 meters is allowed, for other cases the optimal figure is 0.35 meters. You can pour all the concrete, but it is inconvenient and time-consuming. To implement it, you will need to install formwork, reinforce it with a spatial frame and fill it. In this case, the laying will be suspended. If you do everything yourself, then you can use this method - although it is the most labor-intensive, it is also the cheapest, and nothing will stick out from the wall.
Ready-made lintels are heavy and are placed in several pieces per row to match the thickness of the wall. This method is much faster, but it will be difficult for 1-2 people to do it while standing on scaffolding. During private construction, reinforcement and a corner are most often used as a lintel. In partitions, you can use 1-1.2 cm reinforcement, 4 pieces each, which will be embedded in the masonry, and pull up the board from below, and then spread it with a stand, and apply mortar through the rods. When the cement becomes less mobile, the blocks can be laid. But for external walls, which are much thicker than partitions, corners are used. To do this, cut it to size and weld the reinforcement together through the strip in several places. Next, prime the metal to prevent rust and install it on the block. Apply the solution to the shelves and install the blocks with the holes facing up. This will be the most expensive method, but very reliable and fast.
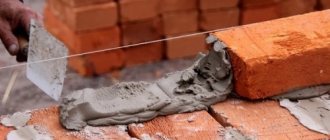
Masonry mortar
A typical concrete mixer, which is capable of producing in a home/factory environment, contains about 10 buckets of materials. One mixer will require half a bag of M500 cement, 8 buckets of sand and approximately 1.5-2 buckets of mortar. As a result, we get an excellent 1 to 5 solution with excellent strength. You can use any sand, but it’s better to wash it, because it has practically no shrinkage. To prevent the solution from settling, you need to add liquid soap to it. If it is good, then 0.8 liters will be enough for all the given proportions, but there are soaps of such quality that you have to pour up to 2.5 liters - it is better not to use it.
The mixing technology is as follows:
- Lay 2 bricks and place reinforcement between them. A bag of cement should be placed on top of it in front and leveled in the middle. Using a trowel, cut the bag on one side, and then lift the bag using the reinforcement. The cement should be carefully divided in half, cut and use one half.
- Pour 1.5 buckets of water into the mixer.
- Then carefully pour in the cement and start the device.
- After 1 minute of work, sand begins to be poured in little by little.
- When everything is finished, add water or sand to adjust the fluidity of the solution.
Please note that it should not be liquid and not dry - not roll on the trowel, but not clump.
Horizontal waterproofing under masonry
Laying the walls must be preceded by waterproofing the foundation, so that in the future the moisture of the foundation cannot be transferred to the aerated concrete. For this procedure, modern bitumen materials are best suited, which are sold in rolls, are easily cut into pieces with a construction knife and fit well.
Brief instructions for horizontal waterproofing
- Dust the surface of the tape;
- Apply bitumen mastic to the tape;
- Cut the waterproofing rolls into strips of the required width;
- Lay on the tape with an overlap of at least 150 mm;
- You press.
Preparation before starting masonry
After the foundation has hardened and the concrete has gained strength, a leveling screed must be applied to its surface. The solution for it is prepared from cement and sand. With the help of this composition it will be possible to eliminate the discrepancy in heights, which could cause uneven walls.
The horizontality of all parts of the tape should be controlled by the building level. Waterproofing material is laid on top. It should first be cut into strips, the width of which will be slightly larger compared to the foundation. The material should hang 10 cm on each side.
How to Find the Highest Foundation Angle
First, it is necessary to determine the highest corner of the foundation, where the first aerated concrete block will later be laid. It is determined using a laser level or hydraulic level.
Proper marking is the most important factor influencing the correctness of the masonry and the speed of work itself. Using a laser level will help you avoid mistakes, but if you don’t have one at your disposal, a level, tape measure and proper professionalism will be enough.
The construction of an aerated concrete foundation requires great care and attention in terms of the horizontal plane, because the future stability and reliability of the structure depends on this.
The first row is laid only when the difference between the highest and lowest angle of the foundation does not exceed 3 cm.
Preparation of mortar for laying the first row
For laying the initial row of aerated concrete blocks, as a rule, an ordinary cement-sand mortar is used, which is prepared using standard technology with a substance ratio of 3:1. In this case, thick seams will be more of an advantage, because they will allow you to make adjustments and achieve the ideal horizontal position of aerated concrete.
Laying the first row
The first block is laid in the previously determined highest corner, after which its correct position should be checked on all sides. Next, three more blocks are laid in other corners. To adjust the height on the solution, a rubber mallet is used. The use of metal tools is excluded, as they can easily damage porous aerated concrete.
When the corner walls are laid, a cord is pulled between them. The cord will help control the correctness of the masonry.
If the length exceeds 10 m, it is necessary to secure another block in the middle of the span.
Also, in order to control the quality of masonry, a comparison of diagonals is performed. Equipped with a tape measure, you need to measure the distance between diagonally opposite corners. The resulting values must be identical.
Each block of the first row is aligned plane, vertically and horizontally. For leveling, use a rubber mallet.
Most often, at the end of laying a row, an additional element is required, which is prepared from a whole aerated concrete block. An even mark is carefully applied to the surface of the latter, along which the excess is then cut off, or a special triangle is used.
Aerated concrete can be sawed very easily using a hand saw with large teeth.
Adjacent blocks must have the same height, so to maintain it you will need a level and a special grinding float. All dust and small particles must be removed immediately using a soft brush.
It takes approximately 2-4 hours after laying the blocks (depending on temperature) for the solution to harden well. After this, you can begin further construction.
Step-by-step masonry technology
If the internal load-bearing wall according to the project is also made of blocks, its installation is carried out simultaneously with the external walls. In this case, the blocks in the masonry are bandaged. Don’t forget to also leave openings for the entrance and interior doors in the aerated concrete walls, the installation of which can be found in this article.
At the first stage, you need to check the heights and horizontality of the foundation . Differences of up to 5 cm are allowed, since with such a thickness the solution does not shrink.
Other cases are considered defective and require repair. Any imperfections that are not too pronounced need to be cut off or filled with cement mixture. Very significant unevenness will require the installation of additional formwork, followed by filling the surface with a concrete mixture with plasticizers, and further leveling. The height of the leveling layer should be about 30-50 mm. Laying can be done after the layer has dried.
At the next stage, the cut-off waterproofing is laid . The surface is covered with rolled waterproofing with overlapping material at the joints.
A waterproofing layer has been made, blocks are placed evenly in the corners according to a level or level, the lace is stretched in a horizontal position.
Masonry begins at the corners, and the highest point of the foundation serves as a guide . It is at this point that the first block is installed. Then blocks are placed in other corners. Installation of corner blocks with a tongue-and-groove connection is carried out with the ridges facing outward.
Advice
After placing the blocks in the corners, measure the heights again and mark the thickness of the required layer of mortar on each corner block with a pencil.
The correct installation of corner aerated concrete blocks can be checked with a building level or an optical level. If necessary, adjustment of corner block elements is carried out with a special rubber hammer.
Attention!
Before installing the blocks on the mortar, measure all sides and diagonals again. In a rectangular building, opposite sides should be parallel and equal. Adjacent sides must be perpendicular, which is checked by measuring the diagonals.
Install the corner blocks on the mortar , checking the mortar thickness value written on each block.
Install the blocks exactly level. Use an optical level to check the height of the block corner. If there is a discrepancy, press down the block with a mallet, or add mortar. After installing the corner blocks, the string is pulled and the row is filled with gas blocks. The cord makes it easier to perform strictly horizontal masonry.
Attention!
When the wall length is ten meters or more, a block is placed in the central part to prevent the cord from sagging.
Further along the cord, focusing on the lighthouse blocks, block masonry is installed, checking horizontally and vertically.
Important!
Solutions for installing aerated building blocks must be applied to the surface of the base using a trowel. The first row of gas silicate blocks is laid using cement-sand mortars, and all subsequent rows are installed exclusively using adhesives. The side surfaces in both cases are coated with adhesives.
A rubber mallet is used to adjust the blocks. The dimensions of the elements, if necessary, are adjusted by cutting gas silicate blocks. Here you will need an aerated concrete saw or a special power tool. In this case, the grouting of the cut is carried out using a trowel or aerated concrete plane.
After the first blocks have been laid and the cement mortar has completely set, it is very important to carry out reinforcement. Read about the reinforcement of aerated concrete and its necessity in this article:.
Before further installation, you need to wait until the solution has completely hardened, which will prevent the risk of deformation of the starting blocks by the weight of subsequent rows.
Reinforcement of the first row of aerated block
Aerated concrete blocks, due to their cellular structure, are easily susceptible to physical impact, so in the future, due to changes in humidity and movement of the foundation, cracks may form. To avoid such troubles, reinforcement is used - strengthening the masonry with metal reinforcement. The profile of the latter should be corrugated, the cross-section of the rods should be about 8-10 mm.
It is optimal to use rods A-III for reinforcement. For aerated concrete blocks with a width of over 250 mm, a pair of rods is required, while for partition walls with a similar indicator of 150-200 mm, one metal rod is sufficient.
Grooving and laying of reinforcement
The reinforcement is placed in recesses made in advance with a wall chaser, and all dust and sand particles must be removed with a brush. The size of the grooves must be larger than the diameter of the cross-sectional rods so that they fit inside without resistance.
The grooves are made at a distance of 60 mm from the edges of the block, and a special aerated concrete adhesive is poured inside, which will secure the metal rods and protect them from corrosion.
Due to the fact that it is extremely difficult to make an even strip of grooves along the entire length of the first row of blocks, a template is used, which can serve as a fixed board of the required width.
It is necessary to make grooves with rounding at the corners; a similar bend is first given to metal rods. The reinforcement is connected by an overlap with a length of about 30 cm.
The grooves with the laid reinforcement are once again filled with glue and leveled with a spatula flush with the plane of the gas block. The laying procedure of the first row is completed.
Many self-builders want to save on everything, including reinforcement, but such savings can lead to even greater costs in the future.
Subsequently, ignoring this process can come out sideways in the form of cracks on the walls and violation of the integrity of the structure, so we advise you to resort to reinforcement without fail, and in general, to do all the stages according to the technology. Then your aerated concrete house will last a hundred years.
First three rows
We clean the top of the plinth from dust and small debris and install waterproofing. In our case, roofing felt. Completely, along the entire perimeter and internal walls. We overlap at the joints. There is no such thing as too much waterproofing.
Waterproofing on the plinth - preparation for laying the first row of gas blocks.
Laying the first row of aerated concrete walls
The first row is laid on a cement-sand mortar so that it is possible to adjust the level of the masonry. The smoother the first row, the smoother the house will be. The beginning of the masonry is the corner. In order to determine which of the available angles will be the first and guide, we look for the highest. This is done using a hydraulic level, since we do not need the exact height of the corner above sea level, but the relative height of all the corners. There is a minimum thickness of the mortar layer on which a block can be laid - 1 cm, but there is no maximum. Therefore, you need to align all the corners and move from the top to the rest, trying to even out the shortcomings in the construction of the base (increasing or decreasing the layer of cement if necessary).
In addition, we need to check the geometry of the building so that our aerated concrete house is still rectangular and not a trapezoid or rhombus. Everything may seem perfect to the eye, but if you pick up a tape measure, minor flaws will appear that can still be corrected at this stage. We measure the diagonals one by one. They should be the same. If there is a difference, we look and, if possible, note where and how much the block needs to be moved to make it level. The process is long and tedious, but it's worth it!
Once we have decided on the height of the corners, we outline the future wall with fishing line. The ideal option is when it is possible to move the edges of the stretched line outside the base. Then even the very first block will be laid beautifully and correctly. If this is not possible, we begin to build by eye. We lay the first block, in the remaining corners we simply place the blocks on the roofing felt and stretch the fishing line. As mentioned above, we place the first row of aerated block walls on a cement-sand mortar, armed with a level and a rubber hammer.
Laying the first row of gas blocks.
Why use cement if there is a special glue for blocks:
- it is possible to vary the thickness of the layer on which the masonry is made;
- The glue is good on flat surfaces, but the top of the plinth, no matter how hard you try, did not turn out perfectly smooth. The cement-sand mortar will perfectly smooth out all the unevenness.
Let me emphasize once again that you need to check the evenness of each laid gas block using a level in all directions - both horizontal and vertical.
Correcting the evenness of aerated block walls using a level.
We laid blocks along the entire perimeter and interior walls, not forgetting the doorways. Of course, you should skip them.
The first row of gas blocks has been laid.
As mentioned above, they were built from blocks with tongue-and-groove fastening. We chose them because their design has handles - it’s more convenient to carry, and there’s no need to coat the sides with glue. Due to the tongues and grooves, the wall is strong enough even without it. If you are building walls from a smooth block, then do not forget that you must coat the side parts with glue. And in the case of the first row, fasten it with cement-sand mortar.
To simplify and speed up the process of further laying gas blocks, they were moved inside the rooms. The ideal option is if the loader can immediately unload pallets of aerated concrete blocks into the middle of the future house.
Blocks inside rooms.
Second and third rows
Before proceeding with further laying of aerated concrete, we polish the surface of the first row. We repeat this procedure before each new row.
Polishing of stacked blocks.
This is done so that the surface on which the glue will be applied is as smooth as possible - this will ensure the best adhesion of the blocks. The layer of glue required for laying the walls of a house is quite thin (0.5-0.7 cm). If a corner of a block sticks out somewhere, even if only a little, the next row will “play.”
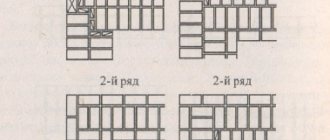
We lay the second and third rows of the walls of the house made of aerated blocks with glue, starting from the corners. Be sure to bandage the rows, as in brickwork, so that you get a shift of half a block. The minimum shift for aerated block masonry is 8 cm.
Second and third row with dressing.
Laying with glue is much faster and easier than with cement: we apply the glue with special ladles with teeth, place the block as close to the previous one as our fingers allow, and push it end to end. It is important to continue to check the evenness of the masonry. If necessary, correct it with a rubber hammer. All manipulations must be carried out as quickly as possible - the glue dries quickly and you may have to tear off the laid block to fix something.
When reaching doorways, it is not always possible to hit the exact length of the block. This is not a problem - aerated concrete can be sawed perfectly using a regular wood saw with set teeth. There is no need to buy expensive special saws for aerated concrete blocks. Any regular saw will do; the only thing that can simplify the sawing process is the length of the teeth. The longer, the easier. But the corner is a necessary thing for an even cut.
Cropped block.