Advantages and disadvantages of a wet facade
Along with its analogues, the “wet facade” system has a number of advantages:
- Firstly, it is worth noting the fact that this thermal insulation system does not require additional space.
- In addition, this type of insulation is very light, meaning it does not need to be reinforced. Weight per 1 sq. m of the outer wall is insignificant, so the wet facade does not require any modification of the structure and walls of the buildings.
- It can last 30 years without requiring repairs. In addition, it can be updated, the color of the plaster coatings can be changed and supplemented.
- The external thermal insulation system is considered a leader in terms of heat savings. Thanks to the “wet façade”, apartments become much warmer and quieter.
But not everything is so smooth; this type of insulation also has disadvantages:
- The main one is that façade insulation work cannot be carried out at temperatures below 5 degrees. If the walls need to be insulated when it is cold outside, then during work it is imperative to use heat guns and scaffolding covered with film.
- “Wet facade” does not like high humidity and precipitation, so such precipitation should also be avoided. Drying of materials can result from exposure to direct sunlight, so installation is best done in the morning or evening, when the sun is not shining so strongly.
- It is imperative to protect the plastered surface from the wind - dust and dirt, settling on the materials, worsen the appearance of the facade.
Insulation of the house
When constructing external walls, their load-bearing capacity is first taken into account. This is fair - after all, they must bear the weight of overlying structures, decoration, interior items and even snow on the roof. The thickness required for this is not so great. So, for a house up to 5 floors, a wall of one brick - 25 cm - is quite enough.
But the load-bearing capacity in seasonal climates gradually decreases if the walls do not have thermal protection. This is caused by the constant freezing and thawing of water trapped in the wall; even if you have a good roof, water in the form of steam will still end up inside the wall.
And it will be uncomfortable to be in a house with freezing walls. Conditions with a temperature of 20 to 25 degrees and a humidity of about 60% are considered comfortable for humans.
Thermal calculation
To select the correct insulation, you will need to purchase a thin SNIP brochure 02/23/2003 and determine the following:
- the duration of the heating season in your home;
- average air temperature during the heating period;
- temperature of the coldest five-day period of the year;
- humidity in your area.
If you live in an apartment building, all this will not matter to you - there is heating
included according to the agreement (usually when the temperature is below 15°C for 10 days). In your home, your heating is your business, so you can approximately calculate the number of days of the heating season using weather services.
The next step is to calculate GSOP - degree-days of the heating period:
GSOP= (T(in)-T(from))*Z,
where T(in) is your desired temperature inside the house, T(ot) is the average temperature outside during the heating season, and Z is the duration of this season. After this, you need to find the optimal value of heat transfer resistance using the table from SNIP. Since we are talking about external walls, you don’t have to present the entire table here, but highlight a fragment of it:
| GSOP | heat transfer resistance standard |
| 2000 | 2,1 |
| 4000 | 2,8 |
| 6000 | 3,5 |
| 8000 | 4,2 |
| 10000 | 4,9 |
| 12000 | 5,6 |
Now let's move on to your cold wall and see how it corresponds to the norm. To do this we use the formula:
R(0)=d/l,
where d is the thickness of the insulated wall, and l is its thermal conductivity. Thus, the heat transfer resistance of a wall made of dense ceramic bricks 38 cm thick will be 0.38/0.56=0.68. For an aerated concrete wall 40 cm thick, grade 700, the value of R(0) will be 0.14/0.4=0.35.
Your task is to select a layer of insulation such that the thermal resistance of the wall patty corresponds to the standard value from the SNIP table. The full formula for this pie will look like this:
R=(1/a(n))+(1/a(c))+(d(1)/l(1))+…+(d(n)/l(n)),
where the last component is the next layer of the wall. Typically, a wall consists of the following layers:
- interior finishing (plaster);
- the design itself;
- insulation;
- exterior finishing.
You can determine the thickness of all layers, except for the insulation, yourself, and take the thermal conductivity value from the table:
| dry room | normal room | wet room | |
| sand-lime brick | 0,64 | 0,7 | 0,81 |
| ceramic brick | 0,56 | 0,7 | 0,81 |
| hollow ceramic block | 0,14 | 0,16 | 0,18 |
| aerated concrete 800 | 0,21 | 0,33 | 0,37 |
| coniferous log house | 0,09 | 0,14 | 0,18 |
| concrete | 1,69 | 1,92 | 2,04 |
| expanded clay concrete 1800 | 0,66 | 0,80 | 0,92 |
| drywall | 0,15 | 0,34 | 0,36 |
| lime plaster | 0,47 | 0,7 | 0,81 |
| gypsum plaster | 0,25 |
Example.
You need to insulate a house made of expanded clay concrete, the inside of which is plastered with lime plaster. The thickness of the wall is 40 cm, the plaster thickness is 2 cm. You live in a humid region, with a winter minimum temperature of -30°C, an average heating season of -7°C and a duration of this season of 200 days.
Your GPSP is (20-(-7))×200=5400
Using the table from SNIP we find the thermal resistance of the wall we need, it is between 4000 and 6000. Let's calculate it using adjacent values:
2,8+(3,5–2,8)×(5400–4000)/(6000–4000)=3,26
Let's create an equation for the wall:
3.26=1/8.7+1/23+0.02/0.81+0.4/0.92+d/l
d/l=2.642
Let's take the most affordable insulation materials: mineral wool 180 kg/cubic meter, polystyrene foam and penoplex. Their thermal conductivity in a humid climate will be equal: cotton wool - 0.048, polystyrene foam - 0.044, penoplex - 0.031. Let's substitute these values instead of l and get the thickness of the insulation: cotton wool - 126 mm, polystyrene foam - 116 mm and penoplex - 81 mm. Comparing these data with real products, we get 3 layers of cotton wool, 1 layer of polystyrene foam and 2 layers of extruded polystyrene foam of 5 cm each. Since it will be difficult to stick so much cotton wool, you can take lighter varieties - the density of wool in hard mats starts from 25 kg / cubic meter ., and its thermal conductivity decreases with density.
Choice of insulation
You shouldn't rely only on these numbers. When you purchase insulation, look at the vapor permeability of the wall. Thus, aerated concrete walls should not be insulated with vapor-proof materials, and if this is done, be sure to check the operation of the ventilation - it must remove excess steam. And from the inside, such walls should be plastered with vapor-proof compounds.
The insulation must hold its shape rigidly. This leads to the conclusion that cotton wool in rolls is not suitable for insulation .
What layers does a wet façade consist of?
If you imagine what a layer cake looks like, the design of a wet façade will be clear. It is created from several layers of building materials.
Pros and cons of wet facades
The most important advantage of a wet façade is that the so-called dew point is moved outside. Quote. The dew point is the temperature at which water vapor condenses into dew.
During operation, a residential building constantly undergoes moisture movement: water vapor moves outward from the warm internal environment. The volume of steam depends on the following factors:
- the number of people, animals and plants in the house;
- water consumption;
- temperature difference inside the house and outside;
- air humidity outdoors and indoors.
There is a rule: when creating a cake from external insulation, their vapor permeability should increase from the inner layer to the outer one. If you neglect this rule, a dew point will form inside the thermal insulation materials, which will lead to the accumulation of condensation, heat loss and the formation of mold.
The remaining characteristics (pros and cons) of wet facades are reflected in our table.
The advantages of a wet facade are much greater than the disadvantages. Therefore, this method of insulation is becoming increasingly popular.
Preparation for installation of the wet façade system
Installation of a wet facade is done after the main stages of construction work have been completed.
- The roof installation has been completed.
- The building has already shrunk and dried out sufficiently.
- The installation of air conditioning, ventilation, and double-glazed windows has been completed.
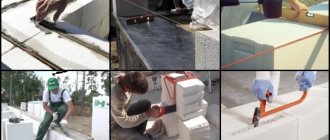
- Immediately before performing facade work, you need to prepare consumables.
Before facade work, you need to prepare the necessary consumables and components.
- Insulation (mineral board or foam plastic) is taken at the rate of 1.05 sq.m per 1 sq.m of wall surface. A few centimeters are taken in reserve. As for the thickness of the insulation, it depends directly on the climate. 2. The consumption of reinforcing mesh is about 150 g/cub.m. 3. Required number of mushroom dowels: 6-7 pieces per 1 sq.m. 4. Profiles. The corner profile is needed so that the wall does not crumble due to mechanical stress. The base profile will serve as the basis for the lowest row of slabs. 5. The wall itself must be primed. 6. Glue for attaching insulation boards and mesh. 7. The volume of plaster for finishing is taken from the area of the facade + 10% for windows and doors.
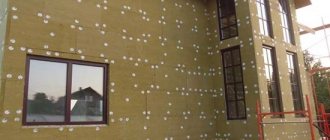
When starting to apply materials, you need to make sure that the surface is cleaned of previous coatings and there are no cracks on it (if an old building is being dismantled). A mixture is first applied to the wall to increase adhesion.
The entire cake made of insulation and other layers stands on a supporting base U-shaped profile. It is attached at a height of 0.4 m from the ground using dowels and self-tapping screws. And the corners are strengthened with corner profiles.
Glue on the insulation boards must be applied around the perimeter in the form of a wide strip with the expectation that it will cover 40% of the area of the board. The thermal insulation layer will dry out within 2-3 days, after which it must be specially reinforced with dowels. Then it’s time to install the reinforcing layer. Do not rush to immediately apply the plaster solution; let this layer dry too.
Types of wet facade
Depending on the installation methods, a distinction is made between heavy and light facades.
Heavy wet facade
This technology involves fastening the insulation without glue, but only using a system of dowels with hooks. In this case, the surface of the insulation does not directly contact the wall, but remains independent. Thanks to this, the thermal insulation layer is not subject to deformation and moisture from the inside.
In this technology, you need to use a special metal mesh, which needs to be masked with a thick layer of plaster. That is why the method was called difficult. Its cost is significantly higher than that of the alternative easy method.
Quote
It is important that the wall material is able to withstand heavy loads. Such materials include: cellular concrete, brick or expanded clay concrete block
Light Wet Facade
Mineral slabs or high-strength foam are usually used as a heat-insulating layer for a lightweight wet facade. The plaster should be finely dispersed, and the total thickness of its layers should not exceed 0.1 cm. Thus, the total weight of the structure will be small.
So, we told you what wet façade technology is. It is widely used in construction, and the main requirement it imposes is careful adherence to technological standards during external insulation and finishing work.
What is finishing with a wet facade?
The classic material used for the construction of private houses is brick. It has many advantages, but brick also has disadvantages.
Among them are high thermal conductivity and a tendency to accumulate moisture.
To preserve the integrity of the brick walls and ensure comfort inside the building, a wet facade is finished, and how to implement this technology with your own hands will be discussed below.
Features of the wet facade system
The facade of the cottage can be decorated in different ways. Against the backdrop of a wide variety of technologies, the wet façade system stands out. What is this method of insulating and protecting the external walls of residential buildings and industrial buildings from the effects of negative factors?
Insulation of houses for various purposes using this technology involves covering the external walls with moisture and frost-resistant material, and then plastering and painting the facade. Also, instead of using plaster and paint, special decorative panels can be used or finishing can be done with clinker tiles. Let us describe the layer-by-layer structure of such cladding in the table.
| Layer | Comprises | Purpose |
| Thermal insulation | Insulation material, adhesive mixture and dowels | Provides the façade of residential buildings with high heat and sound insulation qualities |
| Glue-reinforcing | Adhesive mixture, reinforcing mesh, soil | Provides the cladding of a residential building with strength, resistance to wear, durability, and high external aesthetics |
| Decorative and finishing | Decorative plaster, panels, other finishing materials | This design gives the building an attractive appearance and acts as additional protection for its walls from external influences. |
In other words, such a system is a complex layered structure, due to which the external walls of a residential building are provided with reliable protection.
Installation of a wet facade
Advantages and disadvantages
Finishing the external walls of residential cottages using the wet method has been in great demand in recent years, as it has a number of advantages:
- provides the facade of the house with high resistance to wear, durability, and practicality. Such a system serves without loss of its properties for more than 25 years;
- A significant advantage of such a façade system is its affordable cost. In the case of using polystyrene foam, sq. m of cladding will cost 1,500-2,000 rubles, and when using mineral wool, the price will double. However, other methods of cladding the external walls of residential buildings, which would have similar operational parameters and practically no disadvantages, will cost you many times more;
- Insulating a house in this way makes it warmer and more comfortable to live in. Thanks to this finishing, a healthy microclimate is formed inside the home, which has a positive effect on the well-being of each family member. In addition, a positive quality of a wet house facade is the ability to save on the cost of electric or gas heating. And if you also insulate the windows, then you won’t be afraid of any frost;
- the fact that the insulation is mounted on the walls from the outside allows you to save precious square meters of living space inside the building and even in places where there is a window;
- due to the light weight of such cladding, it can be used without additional strengthening of the foundation and walls of the house;
- relatively easy implementation in practice without the help of professional builders;
- Using this technology, the finished house looks incredibly attractive, and its design fits well into the surrounding landscapes. We also note that after some time, if desired, the finishing layer of cladding can be replaced or updated.
Wet insulation options
Note that a wet façade also has some disadvantages.
For example, it is not recommended to finish the facade and carry out its insulation work if the air temperature has dropped below 5° Celsius.
In addition, it is not worth arranging the façade in this way if the air humidity level is high or there is precipitation. Such weather phenomena prevent uniform drying of the cladding layers.
Types of wet facade
Finishing private houses using wet facade technology can be done with your own hands. But before starting work, you need to decide which type is relevant for the walls of your home:
- heavy - the name reflects the main difference between a façade of this type: significant weight, which limits the possibilities of using this technology;
- lightweight - the technology can be applied to the walls of private houses built from any building material.
Light heavy
Heavy
Due to the rather high weight of such finishing, it is important to use it for walls made of those building materials that can cope with such a high weight load: brick, cellular concrete or expanded clay concrete blocks.
Fastening insulation with dowels
The distinctive characteristics of the heavy type wet facade system is the fixation of thermal insulation without the use of an adhesive. The insulation is fixed to the base using special dowels with hooks.
They are installed on the wall, only then a slab-type insulating material is mounted on them.
The thermal insulation layer is additionally fixed using a reinforcing metal mesh, and then a plaster solution is used and finishing is carried out.
Due to the fact that the metal mesh needs to be masked, the plaster layer turns out to be thick and heavy. Hence the name of the cladding method.
Easy
This method is quite common, as it is affordable and easy to implement in practice. The weight of the structure is minimal, so it is applicable to walls built from almost all standard materials: brick, concrete, foam concrete, stone, wood, and so on.
The lightweight wet facade system involves the use of finishing materials in several layers:
- the first layer of plaster will be the base layer and will allow the use of a reinforcing mesh to give the cladding additional strength;
- the second layer of plaster will be leveling and will make the base ideally even;
- the third layer (finishing) can be made with different finishing materials: paint, decorative bark beetle plaster, siding, decorative panels, etc. The main thing is that the selected option has as low a weight as possible.
Please note that light-type façade finishing should be done using a finely dispersed and breathable plaster mixture. And the total thickness of the layers of the entire cladding, including on window slopes, should not exceed 10 mm.
Main nodes
Today, wet facade finishing is used most actively, which is due to the large number of advantages inherent in this type of finishing. This technology itself is a multilayer structure, each layer of which is aimed at performing its own function:
- the first is the wall of the building, which, before starting work, must undergo certain preparation, which consists of leveling and cleaning;
- the second is a thermal insulation material, which can be used as foam or mineral wool. The first option is cheaper, but the second has better characteristics;
- the third is a reinforcing lining designed to protect the slabs during the further finishing process;
- the fourth is a decorative layer, for which decorative plaster or other finishing materials can be used.
Main components of a wet facade
Types of insulation
An important stage in the implementation of wet facade technology is the choice of insulation material.
What material is best used for this purpose? In most cases, craftsmen use mineral wool in the form of slabs. This is a rather hard material, the density of which exceeds 150 kg/m³.
Foam plastic is also often used to decorate facades in this way. The main thing is to choose the right brand (at least 35).
When comparing these two insulation materials, experts note that the best option is mineral wool, because it is resistant to fire and has high breathability, which is extremely important in the case of the walls of a stone house.
When insulated with mineral wool, moisture from the masonry freely comes out through the pores of the material, which allows you to recreate the optimal microclimate inside the home and significantly improve the thermal insulation parameters of the facade.
If the budget for repair work is extremely limited, then you should prefer cheaper foam plastic.
Remember, you should only choose products from trusted manufacturers with a well-known name, the quality of their products is documented. Then the facade will definitely be durable and resistant to wear.
Mineral woolFoam plastic
Recommendations for choosing finishing materials
When arranging a wet facade, attention should be paid to the selection of finishing materials. To make the task easier, we suggest that you carefully familiarize yourself with the possible façade systems that are ideal for such finishing:
- organic - with this finishing method you will need polystyrene foam boards, organic reinforcing mass, organic or silicone plaster;
- mineral - in this case, mineral slabs are suitable for insulation, and mineral mixtures are suitable for reinforcement. As for the decorative layer, you should choose silicate or mineral plaster;
- combined - in such a façade system both polystyrene foam and mineral materials are used. The first is suitable as insulation, and other materials can be used for reinforcement and subsequent plastering.
Separately, it is worth dwelling on the choice of suitable adhesive compositions. The best option for a wet facade is Ceresit SM-11 glue. As for plaster, the most suitable types would be fur coat or bark beetle.
CombinedMineralOrganic
Possible errors during work
When installing a wet facade, a number of mistakes are often made that negatively affect the quality of the coating:
- ignoring the temperature conditions of the work - this can cause destruction, peeling and even rotting of the layers of the system;
- improper preparation of the base layer - the service life will be significantly reduced due to destruction inside;
- the appearance of air gaps between seams and layers, which can occur in the area of windows, will lead to the appearance of cracks on the surface of the facade and the design of the building will be spoiled;
- Improper installation of the reinforcing mesh will cause chips and cracks on the outer layer.
Service life and repair
A façade finished using the wet method can last up to 30 years. But this period may well vary up or down, depending on humidity, climatic conditions and possible temperature changes.
During operation, a wet facade may be subject to repair work if necessary. But for this, it is necessary to save documents for all building materials, so that if it is necessary to paint a certain area, you can purchase the paint that was previously used. Otherwise, you may not guess with the shade and then a prominent spot will appear on your facade.
If after a while you notice that a piece of plaster has begun to peel off in a certain area, which especially often happens near windows, then in this case it is worth carrying out the following work: clean this area to a strong layer, prime it and apply a new layer of plaster.
To better understand the principle of a wet façade, we recommend watching the video.
Photo of wet facade finishing
In the selection of photos you can see what finishing using the wet facade system looks like.
Source: https://folksland.net/vidy/20-otdelka-mokryj-fasad.html
Advantages and disadvantages
Any building material or technology has a number of advantages and disadvantages. You need to know about both the first and the second in order to make a deliberate, informed choice, which you won’t have to regret even after many years.
To begin with, we list the main advantages characteristic of wet facade plaster:
- Occupies a minimum of space, practically without increasing the volume of the house.
- The service life in most regions of our country with moderate humidity and relatively small daily and annual temperature changes is about 25 years. All this time, the facade will not need repairs, which require additional time and money.
- This type of insulation does not increase the load on load-bearing structures, which means there is no need to strengthen the walls or install an additional frame.
- Despite its simplicity, this technology can significantly reduce thermal conductivity and increase the sound insulation characteristics of buildings.
- A huge variety of colors - the owner of the house can use decorative plaster of the color that, in his opinion, looks the most advantageous.
Unfortunately, this method of insulating decorative plaster has certain disadvantages:
- It is advisable to protect plastered surfaces from dirt and dust. If dust settles on the surface of the walls before the plaster has hardened, the appearance of the house will be affected.
- It is not advisable to use this technology in the cold season. In cases where this is necessary, it is necessary to use special heat guns, as well as scaffolding covered with film, which complicates the work process and significantly increases the cost of the work.
- It takes at least a few days for the plaster to completely harden. There should be no precipitation during this entire time; you must carefully monitor the weather forecast before you can begin finishing the façade of the house.
- It is not advisable to carry out work on hot summer days - when the plaster gets too hot in the sun, it can dry out and crack. Therefore, it is better to choose either the end of spring, the beginning of autumn, or early morning, late evening, when the sun is not so hot.
Now you know about the most important features of wet facade plaster and can make the right choice by carefully weighing the main pros and cons.
General description of the design
This type of construction consists of several layers that perform a specific function:
- Glue. It consists of an adhesive mixture, the quality of adhesion of the insulating material to the wall of the building depends on it;
- Thermal insulation. Insulation using the “wet” method is performed using expanded polystyrene or mineral wool. This choice is determined by the fact that these materials have low thermal conductivity, which allows for high-quality insulation of the facade;
- Reinforced. A reinforcing alkali-resistant mesh is applied to the insulation attached to the wall, which makes it possible to strengthen the adhesion of the protective and decorative layers to the surface of the slabs. Fastening is done using mineral glue;
- Protective. Priming the surface allows you to increase the durability of the entire structure;
- Decorative. Includes finishing decorative plaster, which protects the facade from the harmful effects of climatic conditions and mechanical damage. With its help you can create a facade of almost any shade.
Wet facade installation technology: subtleties and nuances
Okay, we’ve sorted out the material, a little remains to be learned in detail about the intricacies and aspects of the “wet façade” technology. It looks quite simple, but, nevertheless, it is necessary to treat it with the utmost seriousness - you should understand that the entire appearance of the house depends entirely on your attitude to details. To better understand the essence of the process, let's consider it step by step, in the form of simple instructions.
- – Determine the curvature of the walls. We hang plumb lines at the corners of the walls; when they calm down, we tighten them and fasten them to the dowels hammered in advance at the bottom of the wall. After this, we stretch a couple of horizontal threads that will serve as beacons for us - such a system is popularly called a “spider”. Moving the horizontal threads from top to bottom of the wall, we check that there is space between them and the wall for insulation and glue. That is, if the foam is 50mm, then you need to add another centimeter or two to it for glue. Thus, the smallest gap between the thread and the wall should be 60mm. If it is more or less, then we simply move it away or, conversely, move all the vertical threads to the same distance.
- – We glue the insulation, but first we prepare the glue. Everything is standard here, and the glue is diluted like any other dry construction mixture. After it is ready, apply it to the foam in small slides - along the edges and in the middle. After this, we simply take and glue the sheet to the wall, carefully placing it in contact with the stretched horizontal threads. Now, as for the nuances at this stage of work, which involves finishing a wet facade - there are few of them, but they are significant, and ignoring them will lead to the appearance of cracks. Firstly, you need to glue the sheets of polystyrene foam in stages - you need to make sure that the seams between the sheets or slabs are as short as possible. Secondly, these are the corners that are most susceptible to cracking - they also need to be glued at intervals - their dressing is done like brickwork. Thirdly, at the same time as gluing, it is better to fill the seams with glue - this is just a recommendation that will reduce the time required for plastering the facade.
- - We install umbrellas. Everything here is quite simple - we arm ourselves with a hammer drill and a hammer - using the first we drill holes, and with the second we install plastic dowels. There is only one nuance here - the correct placement of the umbrellas. At least one dowel must be installed in the middle of the insulation sheet and four at its corners. Those that will hold the corners of the insulation can be hit directly into the seam between the plates - in this way, installing one umbrella on two sheets, you will save some material. This approach to business does not violate technology.
- – Reinforcement. Here, too, everything is relatively simple, and there are few nuances - the mesh is simply glued to the surface of the insulation by pressing it into the glue applied in advance. It won’t work any other way - if glue is applied on top of the mesh, then this is already a violation of technology, which does not lead to anything good. First, a layer of glue of a couple of millimeters is spread on the insulation, then the mesh is pressed into it, and the excess glue is removed with a spatula. The second nuance is the joining of individual fragments of the reinforcing mesh - they must be glued overlapping each other. Otherwise, immediately after drying, cracks will form at the joints. Third are the corners of the house. At the inner corners the mesh is wrapped, moving to another plane with a single covering, and at the outer corners it is cut off. Subsequently, this corner connection is reinforced with a perforated corner with a mesh glued to it - this product is sold in stores in finished form.
- – After the reinforcing layer has completely dried, the surface is plastered, which in essence is nothing more than putty - for these purposes, the same glue is used that is used to reinforce the insulation. To more thoroughly level the surface, the plastering operation can be repeated two or even three times.
In principle, that’s all - consider that the wet plaster of the facade is finished. After it has dried, proceed to decorative finishing. By the way, it can be done in any way
Doesn't matter tiles or plaster
How to make a wet facade with your own hands
Finally, I should say a little about the primer. With the help of which your wet facade will serve you for a very long time. Everything is primed - before gluing the polystyrene foam, the wall is coated with a deep penetration primer; after reinforcement, each layer of plaster is also primed. But before applying the decorative material, the finished facade must be treated with a special primer that contains quartz sand - for example, Ceresit CT117.
Selection of finishing materials
The choice of finishing materials must be approached very seriously, as they will become a kind of “face” of the building, and it must be beautiful. Wet facade, the technology of which involves the use of various finishing materials, is very diverse.
You need to think through all the details of the overall design of the entire house and the surrounding area, then it will be easier to choose the finishing material
You also need to pay special attention to the color of the facade; it should be pleasant and not irritate. It is necessary to give some general characteristics of several types of finishes
Facade siding
This finishing material is one of the most accessible, as it has a relatively low cost. When they want to make a wet facade with their own hands, siding can be used to create combined facades, in combination with glued porcelain tiles or applied plaster.
You see that in this case we are not talking about using a ventilated facade, since we still make a wet substrate, and use vinyl panels only to decorate the external walls. And then, only in some places, in segments.
Why do we need siding if we have a wet facade on our agenda? Then, siding will protect the areas of the facade that are most exposed to atmospheric moisture:
- Basement section of the façade.
- Corners of external walls.
- Areas under vertical drains.
- Plots on gables above low tides.
As you can see, even in such an option as a wet facade, vinyl siding can be used, albeit in a combined form.
Decorative plaster
Finishing with plaster requires some skill from the master, so its use by beginners can be difficult, to put it mildly. But since its decorative indicators are very high, you can try it. And if you succeed, the result will exceed all your expectations from this façade material.
Plaster can be of any color and shade, goes well with any materials and looks very beautiful, which is why it is often used to create a wet facade.
This material can be easily restored; after a while, it is enough to paint the facade, and it will become like new.
The wet facade, the technology of which is quite simple, allows the use of any finishing finish. You can detail the finish with beautiful wooden beams that are mounted on top of the plaster. The result is a very cozy and stylish appearance, like a half-timbered structure.
Porcelain tiles
This type of finishing material has a fairly high cost, but its characteristics fully justify it. Wet facade technology is determined by the use of precisely such materials. If you want to create a high-quality and durable facade, then it is better to choose it.
The textures and colors of modern porcelain stoneware are so varied that you can create a truly chic façade. But working with this material requires some skill and the use of special tools.
Porcelain tiles are glued over insulation and reinforcing mesh. For gluing porcelain stoneware, a reinforced mesh is used; sometimes, instead of a fiberglass mesh, a steel mesh is used.
Decorative brick
This finishing option also requires a professional approach, since for the facade it is necessary to lay brick “under the jointing”. This method requires professional knowledge and skills, but the wet facade technology using brick as a decorative layer can be performed by a beginner.
The facade made of decorative brick is reliable and highly durable. How to finish a façade with brick using the wet method:
- First, the insulation is installed on the walls using glue and façade dowels.
- Then the reinforcing stack is installed.
- Next, a durable base layer is applied to the mesh for decorative finishing.
- Next, a layer of decorative brick half a brick thick is laid out.
Naturally, the brickwork must rest on the foundation. To do this, leave a protrusion on the top shelf of the foundation of 12-15 cm. With this technology, they do not make well masonry, but connect the decorative layer to the base.
Wet façade installation technology
One of the options for performing a “wet” facade technique could be the following approximate step-by-step description of the order of the stages of work. The start of all work must be preceded by thorough preparation, including assessment and installation of the base, on which, layer by layer, the entire finishing “pie” will be applied.
Preparatory operations for the installation of a wet facade:
- the outer surface of the walls is cleaned of all types of dirt and remnants of old coatings;
- to improve the load-bearing capacity, rough plastering, leveling and strengthening of damage and cracks is carried out;
- the slopes of window and door openings are cleaned of old plaster;
- To obtain the required adhesion, the surface is first thoroughly primed.
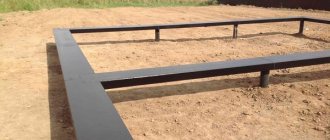
A mandatory operation is the installation of a support bar. With its lower edge, the entire insulation system rests on a special U-shaped profile, called the “support base”. With its marking and fastening along the perimeter of the house, all work on the direct installation of the “wet” facade begins. The profile performs several important functions:
- is the basis for distributing the weight of the entire set of layers;
- protects the bottom edge of the set from moisture.
The support base is mounted at a height of 40 centimeters from the zero level (from the ground). To take into account thermal expansion, a gap of 0.3 centimeters must be left between its horizontal slats. The profile fastening technology uses self-tapping screws and dowels. The quantity per linear meter depends on the total calculated weight of the facade layer in height. At least 5-10 points are needed per linear meter, i.e. the fastening step is from 10 to 20 centimeters. The corners of the plinth support strip are made from a special corner profile.
layer of thermal insulation. along the perimeter of the slab
Rules for installing slabs
Installation of slabs, starting from the bottom row, resting on the base profile, is carried out according to the rules:
- seams between slabs in adjacent rows must overlap; continuous vertical seams along the height of several rows are not allowed;
- When gluing, the base of the slab is pressed tightly against the base, and the end, with a minimum gap, is pressed against the adjacent slab of the row being glued. We must strive to minimize the thickness of the seams;
- Any glue protruding from the seams is immediately removed.
plastic dowels at least 5 cm
The order of fastening with dowels:
- symmetrically and evenly, according to the previously completed marking of the panel area, the required number of holes is drilled to the required depth;
- nests for dowels are made in the material;
- dish-shaped parts are installed flush;
- The expanding plastic nails are carefully hammered in.
The reinforcement phase begins no earlier than 1 - 3 days after the final installation of the thermal insulation layer. This stage includes:
- processing the corners of window and door openings, joints and horizontal lintels, external corners, for which a special corner profile is used;
- The insulation material is covered with an adhesive composition, the layer thickness is from 2 to 3 millimeters;
- construction mesh made of fiberglass (a special alkali-resistant coating is required) is embedded in the adhesive layer;
- The adhesive composition is applied in a layer of up to 2 millimeters, based on the total thickness of the entire reinforcement up to 6 millimeters.
Finishing is the final phase of the construction of a “wet” facade and begins no earlier than the final drying of the reinforcing layer. This may take from 3 to 7 days. Finishing includes applying plaster to the reinforcement layer. The following requirements apply to its properties:
- high steam permeability;
- resistance to external moisture and other climatic factors;
- mechanical strength.
For this purpose, special compositions for external work are used. In addition, the decisive factor in the quality of work is compliance with temperature requirements: the working range is considered to be from +5 to +30 degrees Celsius. It is necessary to protect the applied layer from direct sunlight.
Detailed technology for finishing the facade with wet plaster + technical characteristics
The modern construction industry successfully uses new technological developments and building materials.
Buildings that were built not so long ago look elegant, beautiful and neat. In addition to aesthetic parameters, it is worth noting quality indicators. Houses can last a very long time and perfectly withstand the negative influences of the environment.
A particularly beautiful design is obtained when wet plaster is used to finish the facade.
It makes the building attractive, insulates it and protects it from wind, moisture, and mechanical influences. Let's consider this issue in more detail, study what types of plaster are suitable for finishing and how to organize the work of applying plaster to the walls.
Advantages and disadvantages of wet plaster on the facade
Wet plaster got its name not because of its strange appearance, but because special finishing materials are used to perform the necessary work. The compositions used to create this design contain a large amount of water.
This technology came to Russia from Western European countries in the early 70s and gradually gained popularity among the population. Let's consider what advantages and disadvantages experts note in such compositions.
The following points can be highlighted as advantages:
- applying plaster can be done with your own hands, since this work does not require special skills or special abilities;
- the facade can be painted in any color at the request of the artist;
- financial costs for the purchase of the composition and additional materials are insignificant;
- this technology can be used for finishing a building of any level of complexity;
- plaster can withstand any load, including the placement of stands and other signs.
Based on these advantages, you can add the composition to the list of high-quality and practical materials, however, you should not forget about some of the disadvantages that also exist.
First of all, it is important to remember that plaster can absorb a lot of moisture and therefore needs additional protection from the negative effects of the external environment . If you neglect this advice, the finished coating may warp and become deformed. The most correct action in this situation would be to organize waterproofing.
You should also remember that the plaster will be applied to the insulation in the form of polystyrene foam or mineral wool, so it is necessary to take into account that the thickness of the insulation should be no more than 150 kg per cubic meter, otherwise the plaster will crack after drying . Therefore, in order to ensure the safety of the structure and ensure a long service life, finishing materials should be used that will have the necessary technical characteristics.
Which is better, dry or wet plaster?
The first and most important difference between the compositions is the finishing procedure. For dry plaster, the base is plasterboard, so this method is the least labor-intensive and cost-effective.
Wet plaster requires more time to apply the composition and significant physical costs.
This finishing method, such as wet plaster, is suitable even for walls suffering from high levels of humidity. The plaster absorbs condensation and moves the dew point outside the house.
The interior remains dry and warm. The microclimate improves significantly. Dry plaster is more suitable for finishing walls inside a building, since it does not have improved technical characteristics and does not withstand low temperatures.
Both plasters are used to finish an already prepared facade, since the thickness of the coating should not exceed 5 mm. In addition, the walls must be covered with special mixtures and plaster.
This will ensure a smooth surface and maximum adhesion to the putty.
both mixtures can be used as finishing mixtures, since they are used for the final finishing of the outer surface of the walls of various structures and buildings.
Material Specifications
The method, called wet plaster, has many advantages, especially in situations where the walls are very wet and it is not possible to use dry plaster. This material easily absorbs moisture, which ensures a dry, warm microclimate indoors.
If the contractor wants to provide a higher level of thermal protection, wet plaster can have a different thickness, just like all other layers. If there is also a problem with wet soil near the house, then additional finishing is also required for the basement of the house.
Despite the fact that applying wet plaster requires a lot of effort and is accompanied by dilution of dirt, this technique has many positive characteristics:
- versatility - suitable for any surface;
- has an affordable price - you can choose the composition within the approved budget;
- ease of use - you can do the work yourself;
- strength and solidity - the material is practically resistant to external influences and with its help you can create a solid coating that is perfect for subsequent finishing;
- moisture resistance – the composition protects the walls from the negative effects of moisture.
Each of these qualities makes wet plaster a universal and practical material . In addition to these characteristics, indicators such as elasticity and ease of application of the material should also be noted.
When choosing putty, you need to take into account the type of binder, its cost and manufacturer. It is best to purchase finishing from trusted companies, as this guarantees high quality of the finished product.
Preparing the wall for application
Before proceeding with the direct application of the composition to the facade of the building, it is necessary to prepare the walls for this work. In general, the preparatory work is quite simple and can be done even by a beginner.
The following activities will be required:
- at the initial stage, you should assess the condition of the facade and determine in which places there are irregularities that need to be removed;
- after the assessment, it is necessary to clean the walls from existing dirt , debris, old plaster, if any;
- in places that need additional restoration, it is necessary to place a plaster solution;
- if the wall surface can easily absorb moisture, then additional finishing should be done in the form of priming . This will prevent the development of mold and mildew;
- In the area of doors and slopes, it is necessary to remove old plaster.
An important preparatory stage is the installation of a reinforcing layer on the facade. This event is carried out three days after the installation of thermal insulation. To do this, you first need to apply an adhesive composition, lay a reinforcing mesh on it and cover it with a special layer of plaster. After drying, the walls are ready for finishing with wet plaster.
Installation of the base profile
When the surface is prepared for further finishing, a profile strip should be installed, which will protect the walls from moisture absorption in the first row of insulation, and also to ensure that the heat insulation slabs lie as evenly as possible.
The profile strip is fastened in the basement and self-tapping screws and dowels are used for this purpose . Fastening elements are attached in increments of 20 cm. It is important to consider that the height from the ground should be no more than 0.4 meters. The gap between the slats is 3 mm. To protect the corners of the structure, it is recommended to use a special corner profile.
Application technology
All previously applied layers will dry within a week, after which it is necessary to apply an outer layer of putty.
The composition is applied to the prepared reinforcement and for this purpose a finishing mortar used for exterior work is used..
Additionally, a special adhesive composition can be used if decorative finishing is planned to be applied in the future.
After the 3-7 days required for the applied layers to dry, you can begin to apply the leveling layer.
There are several subtleties of applying plaster that can play an important role in the construction of façade finishing.
If the facade is exposed to excessive moisture, then it is worth using mineral wool instead of insulation, because it perfectly resists the development of mold and mildew.
Sometimes, wet plaster is applied in a thick layer and is heavy. This is necessary to reduce heat loss. It is the thickness that plays a big role in this case. The first layer of plaster is applied with a thickness of at least 20-30 cm . It is important that the insulation layer should also be thick.
Of course, the mass of the finishing in this case is very large, so additional fixing dowels, hooks and a base strip are used.
The protruding reinforcing mesh must be covered with a special adhesive composition 5 mm thick . Then the mesh should be reapplied and the last layer of 20-30 mm should be applied.
The final finishing must be done in two layers.
If the soil is very wet, then it is necessary to additionally finish the base of the walls, using a special non-absorbent and moisture-resistant material. Before starting to apply the leveling layer, it is recommended to saturate the surface of the walls with a primer with antiseptic properties.
Master class on applying plaster with your own hands:
Conclusion
In recent years, wet plaster has become popular and used for finishing buildings. The facade of the building, decorated in this way, has a beautiful appearance and is particularly durable.
The important thing is that wet plaster perfectly absorbs moisture and acts as an additional protective agent against the negative effects of the external environment - from rain, moisture, wind. Using such finishing material, you can extend the life of the building by several years and achieve a beautiful effect. Wet plaster lasts for a very long time without bursting or deforming.
2017-06-17
Country expert
Source: https://expert-dacha.pro/stroitelstvo/steny/otdelka-fasada/shtukaturka/mokroj-sht.html
Preparing for work
Before proceeding directly with installation, you need to select the material for the insulation. It was already mentioned above that mineral wool is better suited as such. But it can be different.
The insulation must withstand the plaster on the front side and the glue on the other. It should be dense and not afraid of compression or delamination. No glass wool or slag wool, only basalt wool of increased strength and density. Some manufacturers produce a ready-made version specifically for a wet facade.
The thickness of the material also plays a role. Too small a thickness will not produce the desired effect, and too much will lead to condensation accumulation. The thickness is selected from the standard indicators for a particular region. In addition to the insulation itself, you will need other materials and tools.
Base profile for the bottom row. Its width must exactly match the thickness of the insulation. To fix the profile you will need connectors. With their help, the profile will stand straight. The connector is placed one at a joint if the thickness of the insulation is less than one hundred cm. And if more, then two. The profile must be fixed. Dowel nails are used for this purpose.
The length of the nails varies depending on the wall material. Concrete and brick walls - 4 cm. Empty brick - 6 cm. The pitch between dowels is calculated from the thickness of the insulation. More than 8 cm, step - 3 cm. Less - step - 5 cm. The dowel is secured with a spacer washer.
Priming is a necessary step for a more durable fixation. A coat of primer increases adhesion and increases protection. It must be applied, so you will need a deep penetration primer.
The insulation is fixed with glue. Therefore, the solution must be special for attaching the thermal insulation layer. Manufacturers often indicate on the insulation itself the optimal solutions for a given material. Dowel mushrooms will be needed to secure the insulation. Their length should be the same as the thickness of the insulation and spacers.
A suitable option would be to use the same glue in this capacity. You will also need a reinforcing mesh. And also the corners that will cover the corners along the entire height of the corners. For cladding you will need decorative plaster or paint. It all depends on your personal preferences.
Preparing walls for work
The insulation process consists of several stages, among which there are those that are not directly related to installation, but for that reason they are no less important. Failure to do one of these could result in a poor-quality installation and subsequently wasted effort and materials.
Preparation is one of these stages. At first glance, it seems insignificant, but how well the material fits depends on proper preparation. The glue will adhere well only to a clean surface.
The old layer of plaster or paint must be completely removed, otherwise the adhesive may come off. You can heat the wall with a hair dryer or use special solutions to remove old finishes.
It would be a good idea to wash the wall too. If you direct a strong pressure of water onto the wall, this will save you from many contaminants: stains or peeling plaster. But after that it must be allowed to dry. Mold and mildew also need to be removed and then treated with a bactericidal solution.
To prevent microflora from forming on the wall, it is subsequently treated with an antiseptic. If there are irregularities, they need to be repaired. Putty is suitable; it must be applied tightly and leveled to the general level of the wall. On the contrary, all potholes are removed.
Check the walls for slopes. Deviations of more than 2 cm must be corrected immediately. Cement plaster is suitable for these purposes. But you will have to wait for it to dry completely, which may delay the repair. After all the work is completed, the walls are primed. If the base material absorbs well, then two layers will be needed.
Let's get started with the work
Materials
First you need to purchase the necessary building materials. The following materials are needed for a wet facade:
Insulation (rigid mineral boards or C-25 foam) - 1.05 m2 per 1 m2 of facade (excess is necessary for trimming corners). Polystyrene foam is the most popular insulation material. Its thickness directly depends on the climate.
The insulation is secured using mesh and profiles
- Umbrella dowels (“fungi”) - 5-8 pcs. per 1 m2 of facade.
- Fiberglass mesh, the density of which is 140-160 grams per m2, or 1.35 m2 per 1 m2 of facade.
- Corner and base profiles.
- Primer, since the wall being finished needs to be primed. All manufacturers of quality products indicate primer consumption per meter of coating on the packaging.
- Glue that secures the insulation and reinforcing mesh. The consumption will depend on how many irregularities there are on the wall.
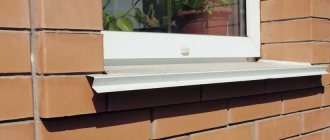
| The base profile for a wet facade is installed horizontally at the bottom of the wall; it is the basis for the first row of insulation boards, as well as a blind area for precipitation and protection of the insulation from mechanical influences. |
The consumption of decorative plaster is calculated over the entire area of the facade with a margin of 10% for processing slopes in door and window openings. Also, in the case of planned painting on structural plaster, it is necessary to purchase paint. Its volume must be calculated over the entire area of the facade. Please note that two layers must be applied.
| A corner profile is a corner with holes that protects the corners from falling off under any impact. Therefore, the corners of your home will always be in perfect condition. |
Work order
After purchasing all the necessary materials, you can begin work, following the detailed step-by-step instructions:
- Along the line from which the wall insulation will begin, you need to cut off the horizon and secure the base profile.
- The wall must be thoroughly cleaned of dust and crumbs, and then primed with a primer. The goal is to firmly secure the surface and increase its adhesion to the glue. The better the adhesion of the glue and insulation, the warmer the housing will be in the end.
- Laying insulation can begin from any corner. The glue must be applied to 40% of the insulation area and its edges; in this case, at least one attachment point is required in the center of the insulation board. The glue is best applied to the wall.
Video instruction that reveals in detail all the intricacies of a wet facade
- After the glue has dried (after about 3 days), the insulation boards must be additionally secured with “fungi”. You need to use 5-8 fungi per 1 square meter of coverage.
Mushroom dowels are mounted directly into holes in the wall
- The next step is reinforcement. A thin layer of glue is applied to the surface of the insulation, and the fiberglass mesh is pressed into it with a spatula. It needs to be coated with glue on top one more time. Ideally, the mesh should not be visible on the surface. The overlap between the horizontal panels is about 10 cm. The corners additionally need to be strengthened for reliability with a corner with holes. This profile is necessary to protect the corners from any damage.
- Application of structural plaster must be done using well-dried glue. There are no special recommendations here, you just need to follow the manufacturer's instructions.
- Final painting is done in at least two layers. The facade must be painted by alternating vertical, horizontal and oblique movements of the spray source, brush or roller: in this case, the surface will look quite uniform. The overall appearance of the home and its beauty will depend on the quality of the final painting. The facade plaster can be painted in various colors.
We recommend studying the information about systems for attaching wires to facades within the framework of this material.
| It is worth remembering that mineral slabs must be primed with a very thin layer of the same glue before sticking to the wall. The slabs of the second and all subsequent rows must be glued with a slight offset of the vertical seams. The corners of the insulation boards are cut to size. |
In conclusion, let's summarize
Almost anyone who has at least a little knowledge of construction can make a wet facade on their own. To do this, you just need to follow the recommendations given in this article, as well as the instructions of manufacturers of building materials. To perform plastering, skills are still required.
A wet facade has a number of advantages, and most importantly, the result is always pleasing to the eye
What is a wet façade insulation system?
This is one of the lightweight insulation methods that allows you to:
- Give wall panels additional thermal protection.
- Increase heat saving of premises.
- Give the building a finished, attractive look.
Basic system for installing wall insulation using “wet facade” technology
The outer decorative layer is plaster, thanks to which the facades become attractive. Insulation of facades using the wet method involves the use of thermal insulation. The list of layers of the system from internal to external looks like this:
- the wall itself;
- adhesive composition;
- insulation;
- reinforced starting plaster layer;
- decorative finishing plaster for exterior use.
The main advantage of the technology is that the wet façade can be installed in any climatic zone. Minus - work must be carried out at an ambient temperature of at least +5 C and no more than +30.
During the cold period, the work site should be heated and hidden from the environment by a tent. This technology is called a wet facade because the binders are diluted with water and are wet at the time of application.
The beginning of façade insulation
Choosing the best insulation for exterior house walls under siding and installation technology
At what stage of construction is facade work carried out?
- When the roof installation is completed;
- External waterproofing of the foundation has been completed;
- Shrinkage of the house has already occurred;
- Windows, ventilation, air conditioning and other systems have been installed;
- The building has been dried out;
- Weather with a stable above-zero temperature is expected for 2-3 weeks (beginning of autumn or end of spring, facade work “does not like” heat or frost).
Preferred, but not required:
- We completed the initial finishing of the interior walls, concrete work, pouring and screeding of floors;
- Installed electrical wiring, alarm, etc.;
- The building is heated (for the cold season).
The main steps will be listed below in order to understand how to insulate a wet facade. Each “system” seller provides installation instructions, taking into account the installation features of this particular system. Don't forget this.
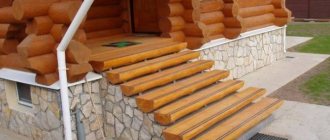
Installation of a wet facade begins with the foundation
Insulation of façade walls using plaster
The cold penetrates into rooms through the outer walls and floors. Insulation must begin from the foundation, especially if the building has a basement. The lower part of the house is cleared of dirt and excess soil is removed around the perimeter. The blind area is done after finishing the wet facade. At the same time, a water drainage system is installed.
The technology for insulating the upper part of the foundation is more complex than that of the facade; it requires additional waterproofing and durable finishing material. The basement level of the building is constantly subject to destruction by rain, snow and frost. It gets hit with various objects. The load of the walls and the entire house falls on the foundation through the base compensating layer, the lower part of which is in contact with the ground. Operating procedure:
- Clean the base from dirt, peeling and crumbling areas. Treat the surface with a protective compound against moisture, insects and rodents.
- Along the horizon line – from the top point of contact with the soil, install a U-shaped profile. Its width must correspond to the size of the insulation. It will prevent the glued slabs from slipping and warping.
- Prepare places for supplying pipes and wires. If the water supply, electricity and gas supply system comes out at the basement level, then fence off such a place with special extensions and make frames from the profile.
Installation of the facade is done according to the usual scheme. Basalt wool can be used as insulation. A layer of Ceresit waterproofing mixture is applied on top of the plaster. It protects the basement of the building from moisture.
Decorative finishing on the basement wet facade creates the basis of the image of the house and is made of solid materials. Clinker tiles, porcelain stoneware panels, polymer sand slabs, artificial or natural stone are glued on top of the primer. A profile for the façade insulation is installed on top along the entire perimeter, and flashings are attached to it.
Insulating the walls of a private house with plaster
Step-by-step execution of work
Throughout the entire working area, it is necessary to seal existing cracks and cracks and, if possible, get rid of pronounced irregularities.
Creating an insulating coating
Typically, mineral (basalt) wool is used to create a thermal insulation layer. This material has a fairly dense structure and has acceptable tensile strength.
The use of foam sheets (expanded polystyrene) is not excluded. But in this case it is necessary to choose a special low-flammable material.
Structure with polystyrene foam: 1 - layer of paint; 2, 4 - primer; 3 - plaster; 5, 7, 10 - adhesive solution; 6 — reinforcing mesh; 8 — polystyrene foam; 9 — hat dowel; 11 - soil; 12 - brick
Expanded polystyrene has been developed for the “wet facade”, which has optimal insulating properties for such systems. The material is made using technology that takes into account the use of different structures on facades.
The basis of façade expanded polystyrene is raw material tested by fire testing (GOST 31251). The material is documented as PPS 16F (facade grade according to GOST 15588-2014). The density of PPS 16F approaches values of 16.5–18.5 kg/m3.
Based on the fire test performance, the insulator was assigned a fire hazard class - K0. Therefore, polystyrene foam PPS 16F is allowed to be used as insulation for thermal insulation of facades.
The use of expanded polystyrene is characterized by making cuts along the perimeter of each sheet. Such cuts are filled with mineral wool. This is an additional fire safety measure.
Basalt wool is recommended as the optimal insulating material for a wet façade. In addition, this choice provides a high level of fire protection
Thermal insulating sections made of mineral wool are initially fixed with glue, and then additionally attracted to the wall with “hat” dowels.
Adjustment, reinforcement, plastering
After cladding with slabs, work is carried out to adjust the insulation in window and door openings. “Contiguous” systems and reinforcement in corners, depressions, and slopes are also made there.
The next step is to lay a reinforcing mesh over the insulation and secure this material to the wall in a checkerboard pattern using the same dowels.
Next, the first layer of plaster (4-6 mm) is applied to the mesh. A day later, another layer is applied - the main one - and covered with a dye of the appropriate color.
It would seem that the “wet facade” technology is simple and understandable. However, in practice, the execution of a “wet facade” is professional, with high quality, and is available only to specialists. Without work experience and knowledge of construction features, it is difficult to achieve high-quality results.
Features and benefits of the technology
Wet facade, or wet plastering technology, is the finishing of the walls of a building, during which it is necessary to place the dew point on the base version of the profile, which helps reduce the formation of condensation on the internal walls and minimizes the need for repairs.
A special feature of this system is its ease of use in regions where temperature indicators inside and outside the room have a noticeable difference for a significant number of days a year. Such climatic conditions are characterized by frequent problems associated with steaming walls, resulting in the risk of mold and cracking.
Wet facade, or wet plastering technology, is the finishing of the walls of a building, during which it is necessary to place the dew point on the base version of the profile
The finishing is called wet due to the fact that the installation of a significant part of the components is carried out using special adhesive mixtures that are diluted with water. Such elements of the system can be represented by foam glue, cement or special decorative plaster of the “dry bark beetle” type.
Positive aspects of the wet facade system:
- the design of such finishing is characterized by ease of execution, and the technology is available for independent implementation;
- finishing is available, and its installation does not require the use of special fasteners and the cost of installing a frame base. When performing all work, a cement mixture can be used, which is much cheaper than other facing materials;
- the technology allows you to save space and, unlike a ventilated facade, the installation of a wet façade does not require the allocation of space outside the walls;
- The finish is very light in weight and is perfect for installation on the facade of a frame or timber house. This finish is ideal for structures on strip or pillar foundations.
The design of such a system also has some disadvantages, including the hydrophobicity of the cement used. This finish is not suitable for installation in regions with high humidity levels, as well as near open sources of large water. In addition, for insulation using solutions, you should choose days with positive temperatures. It should be noted that repairs to well-made wet facades are not required for at least ten years.
It should be noted that repairs to well-made wet facades are not required for at least ten years
Advantages
The list of positive characteristics of a wet facade significantly outweighs its disadvantages. Let's take a closer look at them.
Price
Due to the unstable economic situation in the country in recent years, this issue is relevant for many. Insulation using the “wet method” is one of the most affordable in terms of price. For example, if you do the work yourself, the cost of one square will be in the range from 400 – 850 rubles. The basic amount will depend on the chosen insulation (foam or mineral wool), as well as on the brand of finishing plaster. Thanks to the wide assortment presented in construction markets and specialized stores, the modern buyer has every chance of purchasing inexpensive but high-quality finishing materials.
Dew point offset
Dew point is the cooling temperature of the surrounding air at which the air vapor contained in it condenses, forming dew. In simple words, this is the temperature regime at which condensation forms. When constructing a wet facade, the dew point is placed on the outer surface of the walls. Thus, the formation of condensation inside the walls, on the insulation or the main surface of the wall is impossible. This allows the owner of the premises to forget about dampness, freezing of walls and the formation of fungus.
Light weight
Although the wet facade is listed as a multilayer structure, it is light in weight (after all, it consists only of foam plastic/mineral wool, a thin layer of plaster and glue). Therefore, we can say that for its installation there is no need to strengthen the foundation and load-bearing walls of the building.
Wide choose
For the final finishing of a wet facade, you can choose all kinds of color shades to suit the owner’s taste. Even if the desired result does not match, this can be achieved by tinting the paint. In addition to painting the insulated surface, there is a second option. It consists of decorative plaster of the facade. At the moment, the range of finishing decorative coatings for such structures makes it possible to finish even individual design options.
Durability
The advantages of insulation using this method are the long service life of structures. If all work is carried out correctly and competently in compliance with the technological recommendations of material manufacturers, the average service life is 25-30 years.
Vapor barrier
Both polystyrene foam and mineral wool allow you to create an appropriate vapor barrier for the room. Thus, the walls of the building can “breathe,” which has a beneficial effect on their service life and the preservation of a microclimate indoors that is favorable for human life. In addition to the above, the design has some other advantages:
- Insulating the walls of a room using the “wet method” allows you to reduce heat loss and increase the service life of the load-bearing walls of the building;
- Installation can be done independently, which allows you to significantly reduce the cost of money, and use it for another purpose;
- Mineral wool and expanded polystyrene have good sound-proofing qualities, which suggests an improvement in these characteristics in terms of the house-room ratio;
- Installation of materials is possible on almost any wall surface. Moreover, finishing can be done at any height;
useful in work
An example of this is the insulation of “corner” apartments in high-rise buildings. The technology allows for high-quality thermal insulation of an object located on any floor.
- Due to the fact that the structure is carried out on the outside of the walls of the building, the area of the room does not decrease due to an increase in the thickness of the walls;
- There is an opportunity to close all the disadvantages of old walls:
- Cracks;
- Holes made by insects and rodents.
Can be installed on new or old buildings without significant surface preparation (surface leveling is carried out during the process of gluing the insulation).
Facade plastering technology
The technology for plastering a facade is quite simple, but it requires certain skills so that the walls have a flat and smooth surface after completion of the work.
Depending on the complexity of execution, plastering the facade of a house can be simple, improved and high quality. External plastering of a house is carried out in three stages, which are called: spraying, priming and covering.
With simple plastering, after spraying, a primer is applied in several layers and when the specified coating thickness is reached, usually no more than 18 mm, the last layer of primer is rubbed off.
The technology for applying an improved type of plaster differs from a simple one in that during plastering a special straight wooden or metal lath is used - as a rule. This rule constantly checks the correct application of the plaster mortar, while the depressions are filled and the protruding parts are cut off until the gaps between the rule and the working surface are minimal. Next, the third layer, the covering, is applied and rubbed using a special tool. The thickness of improved plaster should not exceed 20 mm.
High-quality plastering of walls outside the house should represent strictly verified planes of plastered walls and slopes. To do this, such plaster is performed on beacons. Beacons can be both vertical and horizontal. Before starting work, the surface of the walls is verified using plumb lines. Screw pins are screwed into the four corners of the wall, aligned so that their heads are in the same plane, and a thread is stretched along them diagonally. Under the thread of plaster mortar, so-called “marks” are placed, rectangular sections of mortar, 25 mm thick, with surfaces aligned under the tensioned thread. Long slats made of wood, metal, plastic, and galvanized profiles are installed on these marks in increments of 1000...1200 mm, secured and leveled using self-tapping screws.
Next, the space between the slats and the wall is filled with plaster mortar, from which ribs are formed along the entire length of the slats. After the mortar has set, the slats are removed, and ribs of plaster mortar with a smooth surface remain on the wall, which will then serve as beacons when leveling the plaster mortar using the rule. The rule in this case should be 150...200 mm longer than the pitch between the beacon ribs.
Before plastering previously painted surfaces, all old paint coatings must be removed, and the base surface must be dust-free and washed.
To decide on insulation for plaster, read the article.