Examples of do-it-yourself shower cabins
Where to start when creating your own shower stall? Yes, it’s probably better to study the experience of those people who have already passed this stage and are now enjoying the fruits of their own efforts.
If we talk about a shower stall in a private house, then it can be placed anywhere. Or rather, where will she fit?
If you pay attention to the photographs, the booth is comfortably located in the space between the wall and the stove, in an ordinary kitchen. This creation of engineering does not have a steel tray; it is replaced by tiles, which are laid at a slight angle to the drainage drain
The floor in the cabin is raised above the floor in the kitchen. In this case, this is a necessary measure so as not to dismantle the floor to install a drainage funnel. To prevent water from the cabin from getting into the kitchen, it was separated by a threshold with two degrees.
The craftsman needed bricks, tiles and moisture-resistant drywall to create his booth. Seamless plastic panels are installed on the ceiling. Even the kitchen stove looks harmonious with the shower cabin, as they are finished together in the same style.
Water is supplied using a pumping station from a well. There is a compact size water heater. All this made it possible to obtain a small shower cabin with cold and hot water.
A shower stall will look very good and unusual if you assemble it yourself from glass blocks. This material is no less durable than brick, but at the same time it looks very decorative. You can learn how to lay glass blocks very quickly, and you can make the most unusual shapes from it. If you look at the photo, you can see how stylish the glass block looks paired with tiles that look like natural stone.
On the floor of the cabin there is a concrete screed, on top of which there are porcelain tiles. The walls are also made of ceramic tiles.
Not every person likes the option of replacing a transparent screen with a film curtain, but in this case it looks very good.
Mosaic cladding and fabric that does not get wet and is suspended on a chrome-plated arc. This whole composition looks like the work of a real designer.
When choosing a material to create your shower, you should pay attention to cellular polycarbonate. It is quite durable, not afraid of water and looks beautiful
Based on it, you will get nice transparent cabin walls and a door.
The edging for it is made on a base made of aluminum or plastic. The door itself can be hinged, or you can install a sliding one. This is easy to do if you attach the wheels from the cabinet to the bottom side of the polycarbonate and insert them into the guide.
Due to its flexibility, polycarbonate allows you to create a wide variety of shapes.
Plexiglas is no less popular for creating shower stalls. It is not as durable as polycarbonate, so it will have to be framed with stainless steel corners.
Based on glass, simple and airy homemade structures are obtained.
It is easy to combine with tiles.
A quite good cladding option is plastic lining. It can be easily and quickly combined into a single panel that is not afraid of moisture. It attaches to absolutely any surface.
The walls can be made from a homogeneous material, or they can be composed of different ones.
By using your imagination, you can create a cozy relaxation corner from durable plastic. As if in an oasis, you can not only take a bath here, but also relax under the streams of warm water and practice meditation.
It is quite easy and quick to make a cabin frame from plasterboard, then finish it with moisture-proof material and cover it with tiles. The design will be inexpensive and easy to install.
Conclusions on the topic
There is a bath in almost every apartment and some private houses. But the bath conditions do not always suit the residents. I would like to have my own full-fledged shower, made with my own hands. Modern materials make it possible to cope with this task. You can assemble a shower stall from glass blocks and sheet glass, plastic and polycarbonate.
The color of materials can be very different. You can buy a complete kit in a store with your own money and assemble it, or you can buy only part of the kit and do the rest yourself. Such a cabin will cost much less. The main thing is to make good waterproofing of the floor and walls.
There should also be lighting in the cabin. To do this, stretch the wires away from the water pipes. It is better to use special light bulbs for showers. They are made with steam and moisture protection properties. You can also install a radio, which is sold in specialized stores. The cabin is also equipped with small things like a towel holder, shelves for soap and detergents, and a mirror.
Partitions
To highlight zones, plastic, drywall, and glass are used. Each material has advantages and disadvantages:
- plasterboard allows you to build a fence of any configuration with internal shelves. The main disadvantage is the thickness of the partitions (at least 5 cm), and this is a significant drawback for small bathrooms in Khrushchev-era buildings;
- glass is the best option, allowing you to effectively divide a room into zones, without compromising its visual perception. Individual decor will give the room uniqueness and originality;
- plastic (plexiglass) is also very practical - easy to clean and does not take up much space. Disadvantage - the material is easily damaged and scratched.
Shower design without tray with wood tiles
Glass shower without tray in the bathroom
Shower design without tray with sloping floor
Shower without tray in a black and beige bathroom
Glass shower without tray in the bathroom
Shower without tray with wooden floor
Waterproofing walls and floors
You can make the walls resistant to moisture using a plaster solution with the addition of liquid glass or PVA glue, as well as facing material - tiles or plastic panels.
The seams between the tiles are rubbed with a special waterproof compound, to which an antiseptic is added, and between the panels they are sealed with silicone sealant.
Floor waterproofing is provided by:
- bitumen roll materials, mastics or polymer membranes;
- adding liquid glass or PVC glue to the screed;
- tiling.
How to make a shower stall with a tile tray
Small bathrooms often have showers. They are popular in bathhouses and dachas, they are installed instead of bathrooms in apartments and houses, or as an addition - depending on how you choose. But not everyone likes plastic cabins: they are too flimsy. A do-it-yourself shower cabin, although it takes more time, is more reliable.
If you look from the outside, there is not much difference
If you want to make your own shower stall to save money, do the math first. You will need good waterproofing, and most likely for swimming pools. You just need a good drain, which requires raising the floor, and this requires a decent amount of solution with plasticizers that increase water repellency. For finishing you will need good floor tiles with a non-slip surface or mosaic, and glue (water-repellent). It would also be nice to have underfloor heating - standing on a concrete floor in winter is very unpleasant. You will also need doors, although you can get by with a curtain. The amount is already considerable. There are cheaper options - simple shower enclosures.
If you also need to build walls, even from plasterboard, then there will definitely be no savings. Many people note that making a shower cabin with your own hands is no cheaper, and this is at a minimum. But what’s good is that you can make it exactly the way you like, in the size you want (or whatever it turns out to be). Installing a shower stall yourself is inexpensive only if there is a ready-made nook that is simply fenced off with a door or curtain, but the cost of installing a drain and a floor does not go away.
Ways to organize a drain in a shower stall
The content of the article
1 Ways to organize a drain in a shower stall1.1 Types of trays1.2 Organization of a drain2 How to make a shower tray2.1 From brick2.2 From monolithic concrete2.3 Determining the height of the screed3 Doors for a shower cabin4 Video on the topic
Despite the almost identical appearance - the walls and floor are tiled, some doors, homemade shower stalls have many options for internal structure. There really is plenty to choose from.
Types of pallets
The simplest and most reliable option to make a waterproof floor in the shower stall is to install a ready-made tray. It can be installed on bricks or made from foam blocks. By “finished pallet” we mean two types: acrylic and enameled. Acrylic is lightweight and non-slip, but turns yellow over time. Enameled - not bad to use, but slippery when wet: you have to put a rubber mat on it. Another advantage of acrylic is that it doesn’t feel as cold.
If both options do not work, make a pallet from brick or monolithic concrete, which is then lined with tiles - regular floor tiles, or mosaics. This is a capital decision, but difficult to implement. If you decide to make a shower tray from tiles, and you live in an apartment building, you will need very good multi-layer waterproofing: so that there are no problems with neighbors below and on the sides. This does not mean that in a private house a shower cabin is made with your own hands without waterproofing. It’s just that if you mess up, you will suffer yourself.
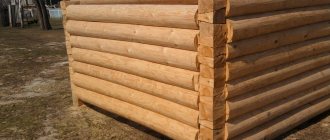
Half finished brick shower tray
There is another option - an intermediate one. A “trough” of suitable dimensions is made from metal, and it is well treated with anti-corrosion materials. They are installed on a podium made of bricks or foam blocks (a drain is also needed), if necessary, they are lined with bricks on the outside, forming a side or a step. A mosaic is glued on the inside.
These are the options you usually choose from. There is also a device without a visible tray at all, and the drain can be made into the wall, but then in the entire bathroom it is necessary to raise the floor level and form a slope towards the drain.
Now about the sizes of shower cabins and trays in particular:
80*80 cm is very small, it’s difficult even for a slender person to bend over, you constantly hit the walls; 90*90 cm - somewhat better, but still cramped; 100 cm or more - you already feel normal, you can sit down without any problems.
If you want comfort, make at least a meter gap from wall to wall, but if the dimensions are very limited, try to leave at least 90 cm.
Organization of drainage
Next, you need to choose how the drain will be arranged. There are two devices: a siphon and a ladder. The ladder is more expensive, but it is usually smaller in height and more reliable. Its safety margin is enough for a decent period and can be poured into concrete, which is what is usually done.
Gangway installation
The siphon is cheaper, but when installing a tray, you will have to provide for the possibility of replacing it. Simply cementing it in is not a good idea, because if a repair issue arises, you will have to work with a hammer drill to get to it. You present the results. Therefore, when using a siphon, leave an inspection passage, which is closed with a hatch or small door.
Do-it-yourself shower cabin: how to make an inspection hatch
In any case, the drain must be serviceable. This means that the upper part - the mesh - can be removed and the pipe can be cleaned with a cable. To make this possible, lay the drain pipe so that the maximum angle of rotation to the sewer is 45°, but it is better not to make it more than 30°.
Now about the slopes. To prevent water from stagnating in the pipes, the pipe from the drain to the sewer outlet is laid with a slope of at least 4-5%! (MISSING) This means that for one meter of length the height difference is 4-5 cm. The floor should have approximately the same bevel: water should flow to the drainage point.
Shower walls
- Brick
- Glass
- Polycarbonate
Glass walls are very durable, for them you need to take tempered glass, or regular thick glass and stick the film yourself at home, this will help protect against damage if the glass breaks.
Polycarbonate walls must be cut from large sheets, since gluing small pieces together increases manufacturing costs and reduces their strength.
Having installed brick walls, all we have to do is cover them with ceramic tiles. This is a tiled shower stall. We choose options that match the color scheme of the bathroom. And be sure to have a non-slip tile surface to reduce injuries when taking a shower.
The final stage remains. Installation of shower, taps and shelves for soap and other soap accessories. You need to take care of the purchase of materials at the stage of purchasing materials. We take into account the style in which the cabin and the entire room as a whole are designed.
Advantages
Long period of use. A tiled shower will last for a very long time, without repair work and maintaining an elegant appearance.
The main factor in the malfunction of factory-made shower cabins is considered to be the presence of a large number of moving elements that tend to quickly collapse. There are almost no such elements in a tiled shower, except for sliding doors.
In plastic booths there are a large number of areas where moisture accumulates. Humidity is a factor in the appearance of rust in metal elements and a breeding ground for microorganisms in plastic parts. In integrated showers, such inaccessible areas do not exist, which has a positive effect on their cleaning.
The strength of ceramic tiles is much greater than that of plastic. It is quite difficult to destroy, break or scratch.
Ceramic hobs have a large number of alternatives, which makes it possible to choose the type of shower to suit your individual taste.
If you create a shower stall from tiles with your own hands, you can save money, since it costs less than a factory-made plastic stall.
2
Choosing a shower tray - buy ready-made or make it yourself?
You can always purchase a ready-made pallet of the required size, which will save a lot of money and make all the work on arranging a shower room easier. As a rule, acrylic options are in great demand because they are cheap, lightweight and relatively warm. They have one drawback - they are not always durable and require a podium for installation.
Buying a ready-made pallet will save time and money
The next most popular are enamel pallets. They are reliable and easy to maintain, but their surface becomes slippery when wet, which is important to consider. If funds allow and you want to distinguish yourself, you can purchase a tray made of copper or other metals, ceramic, glass, etc. The market offers ready-made options of standard sizes (80×80, 90×90, etc.), and the larger they are, the expensive. By design, purchased pallets come in several forms:
semicircular; square; rectangular; corner.
However, not everyone is a supporter of purchased options and prefer to independently arrange a pallet from brick, block, or by pouring a concrete structure. This approach is complex, but allows you to create a space for showering of any size. After erecting the frame, it is necessary to install waterproofing and lay out the inner surface with tiles, mosaics or natural stone.
The interior decoration of the shower cabin with wood is allowed. In this case, special species are used that are resistant to water and have been treated with special agents and impregnations. This option is extremely rare, as it requires constant care of the wood and its processing from time to time.
If you wish, you can make a pallet yourself, for example, from brick
The fashionable trend of the last few years is the arrangement of a shower cabin without a tray. The base of such a structure is in the same plane with the floor and is visually no different from it. It may seem that such a design will cause constant stagnation of water, eternal dampness and the spread of fungus and mold. This may be true if such a shower cabin is built in violation of technology. Correctly, to the nearest millimeter, a designed and equipped area where water gets when taking a shower will never become a problem area, since it has a barely visible slope towards the drain hole, which, as a rule, is decorated with a special grill.
The advantage of this type of shower stall is ease of maintenance, because the entire floor in the bathroom is in one plane without many joints. However, this design is more suitable for construction in a house or commercial building, since during creation it is necessary to raise the floor level to create high-quality sewerage, which is almost impossible to do in city apartments.
Preparing for work tools and materials
Any work should begin with the preparation of the necessary tools. Materials for work should also be selected based on the features of the future design. To summarize, you need the following:
- sewer pipes with bends and seals;
- waterproofing;
profile, fasteners, etc.
To lay out the pallet, you can take bricks or expanded clay blocks. To fill the tray with cement mortar, you will need plastic to form a mold from it. If the fence is brick or block, you will need to prepare:
- trowel with hammer;
- mixer for solution;
- building level.
For plastic pipes you will need:
- soldering iron;
- pipe knife;
- screwdriver
In addition, you need to have on hand:
- sealant gun;
- roulette;
- construction square.
It should be remembered that laying out the pallet is not enough. It also needs to be lined. As a rule, tiles are used for finishing. It may require adjustment in size, so you need to have a tile cutter or grinder with a stone wheel.
If a factory acrylic tray is installed, you will need screwdrivers and sealant.
Preparation
When the type of shower and the location for it have been chosen, preparations for installation begin.
Wall requirements
The area where the cabin will be installed will be damp and damp due to frequent contact with water. Therefore, the walls near which it will stand must be made of water-repellent material. The best choice for this purpose is tiles secured with water-resistant material. Covering with PVC panels, brick, and stone is also suitable. If it is not possible to completely change the material of the walls, you can sheathe them with moisture-resistant plasterboard and additionally coat them with a waterproof compound. This will help completely prevent rotting and the proliferation of fungi and bacteria. In addition, the coating must be easy to wash and not deteriorate under the influence of cleaning agents.
In addition, ventilation and electrical conduction must be provided. Open communications can be covered with plaster, and the wires can be placed where the importance is minimal, that is, as far as possible from the shower itself.
Doors or fencing
When choosing what to install as shower doors, you also need to focus on the size of the room.
Drawing of swing doors
For larger spaces in your home, you can opt for fixed fencing. This way the shower will be open, looking beautiful, aesthetically pleasing and modern. Sometimes a rotating fence or screen is additionally installed - this advantageously combines a classic shower box and a modern open shower. With this solution, splashes will certainly fly away, and only one person can use the shower at a time.
Doors are a classic solution that will suit any shower stall. They can be matte or glossy, with different opening options. For cramped bathrooms in a private house, those doors that take up as little space as possible are suitable - sliding, folding and so-called “in-swing”.
Size calculation
The dimensions are also planned taking into account the area of the bathroom and your own needs, but you need to start from standard measurements. The minimum size of a cabin that can accommodate an adult of average build is 80x80 centimeters. But in such a space you can forget about comfort. It is better to install a cabin with dimensions of 90x90, 100x100, 90x110 centimeters, depending on the capabilities of the room. The most comfortable size would be 1.2-1.4 meters on at least one side.
Drawing of the communication line to the shower stall
In city apartments, the height of the shower is determined by the height of the ceiling. In any case, this parameter must be calculated so that a person can enter the cabin at full height, easily reach the mixer with his hand, and so that splashes of water fall on the ceiling as little as possible.
Tools and materials
Before building a shower, you need to prepare all the necessary tools:
- drill;
- putty knife;
- brush;
- roulette;
- level.
You also need to prepare materials:
- brick;
- cement;
- waterproofing mixture;
- film and mesh.
Once the materials are ready, assembly can begin.
Calculation of dimensions and selection of materials
Once everything has been decided on the installation location of the cabin, you can begin to calculate the dimensions of the future structure. The main thing is that the cabin does not take up all the available space, but also does not lose functionality due to its small size.
According to the standard, the shower cabin measures 900 by 900 millimeters. If the pallet is low, then the height is 2000 millimeters, and if it is deep, then the height of the structure will be 200 millimeters higher.
To construct the cabin, you can select materials that are available in a wide range on the market. Widely used:
- cellular polycarbonate;
- plastic panels;
- glass.
The most inexpensive way to attach these materials is aluminum profiles. To build a fence, it is quite possible to take moisture-resistant plasterboard, which then just needs to be tiled.
You can make a fencing based on glass blocks on a budget and beautifully.
We calculate the sizes
Having decided on the installation location, you can proceed to calculations of dimensions. The main rule is that the booth should not take up all the free space, and at the same time not lose functionality due to its small size.
The standard dimensions of a shower cabin are 900 x 900 mm. The height of the box with a low tray is 2000 mm. When installing a deep pallet, the height of the structure increases (on average) by 200 mm.
It should be understood that the height of the device is selected strictly individually, taking into account the height of all family members and some reserve.
Below are options for drawings of several types of cabins, depending on the shape and height of the pallet.
If it is assumed that this device will be used by teenagers or people of thin build, then the dimensions of the structure can be reduced to 800 x 800 mm. If you plan to build a shower without using a classic tray, then the dimensions, on the contrary, can be increased to 1100 x 1100 mm.
Do-it-yourself shower cabin stages of creation
It's time to get started with the creative process of creating the shower stall of your dreams. As mentioned above, you can make a pallet yourself, or you can purchase a ready-made one in a store. The second option is easier to install, so let's start with it.
We use waterproof plasterboard as a fencing material. Before you start, you need to stock up on the necessary building materials. You will need:
- sheet silicate glass;
- expanded clay concrete blocks;
- brick for laying sides;
- facing tiles;
- moisture-resistant tile adhesive;
- cement mortar;
- waterproof screed;
- waterproofing.
Naturally, you will need to purchase a drain and a siphon. The water must somehow get into the sewer system.
Installing the factory pan
To install the purchased pallet, you need to make a frame. It may take the form of a metal frame or be assembled from timber, which must be treated with a moisture-proofing compound.
The sequence of work will be as follows:
- We secure the frame to the pallet with metal pins. We attach one end to the frame supports, and the other to the holes on the edges of the pallet.
- We attach metal beams to the studs using nuts. After their position has been adjusted, they need to be locked.
- We install the pallet, adjust its height and inclination. It should have a slope towards the drain.
After this, we install a drain with a siphon, if they are not already installed at the factory. We treat the joints and joints with sealant.
Making your own pallet
Creating your own pallet has the advantage of allowing you to make a cabin of any size and shape. This is especially true for a small bathroom. We adhere to the following work plan:
- First of all, prepare the solution. The mixture must be diluted following the proportions specified by the manufacturer. It would be better to use a large bucket and a mixer. Instead of a mixer, a drill with a special attachment will do.
- We place the blocks on a prepared and waterproofed base. Between the blocks we lay communications and a ladder for draining water. To facilitate further maintenance, free space should be left between the blocks and communications.
- Along the edge we build sides from bricks laid on their sides. This will be the basis for the fence.
- The pallet is filled with waterproof screed. Filling layer, up to about five millimeters.
We are building a corner
We use brick as a material for building walls:
- We will apply mortar to the sides and lay bricks horizontally in a row on it - you need to lay it edgewise;
- In order for the masonry to be monolithic, proper dressing should be ensured - for this, the longitudinal seams lying in adjacent rows should be shifted by half of the brick;
- the corner is erected to a height of seven rows - the thickness of the seam should be twelve millimeters;
- The brick is attached to the wall using steel rods - the rods are laid in the seams between the bricks and driven into the main wall.
Installing a fence
Once the corner is laid out to the desired level, you can begin to install the fence. For example, consider a silicate glass fence six millimeters thick:
- We attach a plastic corner profile to the walls of the corner and to its upper edge. Dowel plugs and impact screws will help securely fasten it.
- The glass in the profile is secured with sealant. To ensure safety, the edges of the glass that remain exposed are chamfered.
- A curtain will be installed as a booth door. It will be supported by a frame made of stainless pipe. The pipe will be secured to the wall with flanges.
As you can see, everything is quite simple. With due diligence, patience and dexterity, the task can be completed quite easily and quickly. However, we have considered the simplest options; if the task is to create a shower stall of a more complex shape and with additional functions, this will require more time and work experience. In any case, if you do nothing, then nothing will happen!
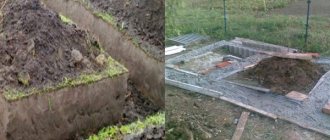
How to arrange a shower without a tray
When starting to analyze the question “how to make a shower at home with your own hands?”, you need to first of all think about the foundation. It is better to pour a concrete base, this way we will raise the floor, and we will eventually have a place in the corner for a shower.
First, create the formwork of the required dimensions; when pouring concrete, it needs to be leveled every 20 minutes. This must be done so that the base hardens at an angle of 1.5-2 degrees. This is done to ensure that water flows into the sewer.
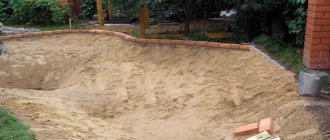
After the base has completely dried, you can begin arranging the pallet with your own hands. You can get by with purchasing a ready-made and monolithic structure, but since we are going to do the work ourselves, we will continue.
First of all, mix a small amount of cement mortar in a bucket. Using it, you need to lay out a neat brick side.
Next, plastering work is carried out, and after that the entire surface of the shower base is finished with tiles.
To complete the construction of a shower stall, you need to install a curtain made of material that is not afraid of moisture. We also install plumbing fixtures.
For convenience, you should take care of installing a handrail and several shelves for shower accessories.
If you have not mastered the material in text format well, then we recommend that you watch the video on how to make a shower with your own hands.
The right place for a shower stall
The main limitation that is imposed on the location for installing a shower stall is the size of the room and, naturally, the presence of communications for drainage and water supply.
First of all, before you start making your dream come true, you need to carry out preparatory work:
Check the water supply and sewer system. Make sure there are no leaks or rusty areas. Evaluate the quality of connections and seals. If something is of poor quality, these elements should be updated. It is imperative to check the condition of the partitions: walls, ceiling and floor
Particular attention should be paid to the part of the floor in the place where you plan to install the booth. If necessary, level the floor and ensure good waterproofing.