Replacing interior doors always leaves behind a damaged doorway. Previously, it was sealed with plaster mortars, and then painted or wallpapered. Today they have abandoned this practice and started using extras. Their installation does not require special knowledge or expensive tools and is completed quickly. The result of this work: very beautifully decorated walls around the door frame.
Even a professional in his field will not be able to perform even a simple technological operation without knowledge of its features. The same goes for extras. Therefore, for beginners, let’s talk about how to properly install extensions on an interior door.
Accessories for interior doors: what they look like and what they are needed for
Extensions (additional boards) are wooden planks or MDF panels that cover door slopes. Such slopes are formed if the thickness of the wall is greater than the width of the door frame. As a result, the box does not cover the entire end of the wall and bare concrete or broken bricks are visible. Sometimes this area is plastered, covered with wallpaper, covered with plastic, but it is easier, faster and more aesthetically pleasing to install extensions.
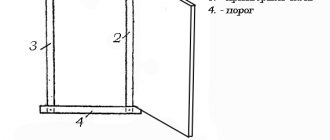
Design of a door block using extensions
Unlike ordinary slopes, additional boards seem to continue the missing width of the box itself, forming a single structure with it. In order not to make a mistake with the tone, the additions are purchased simultaneously with the door leaf and cash.
Benefits of use
- Correctly installed extensions look presentable and, depending on the overall style decision, bring an element of wealth and luxury or restraint and solidity to the interior.
- The extensions are attached simply and quickly, which saves time, effort and money.
- During finishing work, the door block does not come into contact with wet solutions, which prevents it from getting wet and deteriorating. The service life of the door increases.
The finished design looks beautiful and modern
Do-it-yourself installation of accessories
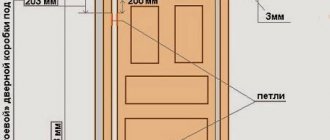
Before installing the extensions, fill the cracks and insert platbands to close the gaps between the wall and the door frame. The installation of interior doors is complete, now you can install the extensions. To do this, you need to take measurements in the opening. Measure the distance from the door frame to the end point of the wall thickness in three places on each side. It is this distance that will be equal to the width of the extensions. Also measure the vertical and horizontal length - this will determine the length of the slats.
See also: How to properly install an accordion door: video
Installing interior doors with additions yourself will be faster and easier if you purchase a frame with special grooves into which all the elements are simply inserted into a certain place. But such a design, as a rule, is very expensive, so many people prefer to install the box themselves. Of course, you can make the grooves yourself using a router.
First you need to measure the vertical length of the extension groove with a tape measure relative to the length of the box. Then do the same horizontally and cut off the required length. Thus, you should get three planks. Then drill holes and secure the frame with self-tapping screws or nails using a pneumatic gun. After installing interior doors with extensions with your own hands, you need to fill all existing cracks with foam.
Since foam tends to expand, thereby exerting a strong impact on the frame, certain rules must be followed. First of all, it is necessary to install spacer strips so that they support the extensions, and they cannot be removed until the foam has completely dried. It only blows out evenly and slowly. Make sure that the edge of the foam does not protrude beyond the slopes; it is better to leave a little free space.
Types and sizes of extensions: tips for choosing
You can make the extensions yourself or buy ready-made ones. The store will offer additional trim strips in standard sizes:
- length - 2.1 m;
- width - 7–25 cm;
- thickness - 6–30 mm.
To calculate the width of the additional strip, add the depth of the groove in the box to the width of the slope, or subtract the width of the box from the thickness of the wall, taking into account the groove.
With particularly thick walls, the width of the extension can reach 40 cm or more, but such planks are made to order. The thickness of the additional strip should not exceed the width of the groove in the door frame .
Based on design features, additional strips are divided into:
- ordinary;
- ordinary with edged ends;
- telescopic.
The simplest addition is a straight strip of fiberboard (MDF) or laminate without a facing edge. Many craftsmen believe that gluing facing edges to the ends is a waste of time and money. After all, one end fits snugly against the door frame, and the second will be covered with a platband. But in this case, the installation must be done with special care, because a deviation of even a couple of millimeters will give away a novice master: the gray untreated edge will be striking.
The simplest addition is a regular bar
If the end of the trim is previously covered with an edge tape matched tone to tone, minor flaws will be invisible. The edge itself costs a penny, and you can stick it on in a few minutes using a regular iron. This method is also preferable because edging the ends prevents the MDF board from swelling under the influence of moisture. This is especially true for door units in kitchens and bathrooms .
A more advanced additional strip is distinguished by the presence of an edge at the ends
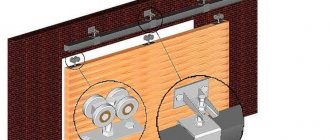
The telescopic extension has the most complex design. Its feature is the presence of special grooves that allow installation without the use of screws and nails. Moreover, it is almost impossible to miss: the extension fits perfectly with the box and trim. The width of the extension is adjusted by the depth of the groove. To make a telescopic extension yourself, you will need certain skills and a special tool. It's easier to buy ready-made planks.
The telescopic door panel has special recesses
Box assembly
If you purchased a unit with a universal box, before installation it must be adjusted to the size of the canvas and assembled. The box is laid out on the floor. The canvas is placed between the side slats on the porch. The top bar is put in place. Along the perimeter of the canvas there are gaps of 2.5 mm to the side strips and 5 mm to the top. On the upper vestibule, marks are made in alignment with the side ones.
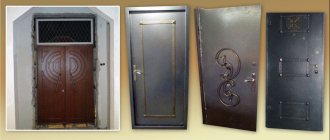
Installation of an extension on the front door.
From the lower end of the canvas, 10-15 mm is deposited on the side strips. For kitchen doors and doors of rooms with boilers and gas water heaters, this size is increased to 40-50 mm for normal air flow through the gap between the leaf and the floor. The locations of the loops are marked 20 cm from the ends of the fabric.
According to the marks made, all 3 strips are shortened. To make a perpendicular cut, it is better to use a miter box. Otherwise, you need to mark lines along the square and try to hold the hacksaw vertically. The upper vestibule is cut with a hacksaw along the marks and trimmed with a chisel in the areas where the top and side planks meet.
For standard awnings, use a chisel to remove excess material from the canvas and one of the side strips. After which they are fixed with self-tapping screws into the prepared seats. When using butterfly canopies, there is no need to select a material. They are simply screwed on. To prevent cracking of the material, holes for self-tapping screws are pre-drilled.
It is better to drill holes and screw the side planks to the top one with the sheet in place and the gaps set. To connect the parts, a pair of wood screws 75 mm long are screwed into the ends of the side elements through the top one. You need to make cuts in the top lintel to align the extensions. It is better to cut the extensions according to the length of the box elements before installing it; the width is determined later.
Related article: Original DIY hanging shelf for wine and glasses
Required tools and materials
When installing extensions, a minimum set of tools is used:
- level;
- roulette;
- pencil;
- saw or jigsaw;
- plane;
- hammer;
- sharp knife.
Necessary materials:
- polyurethane foam;
- fasteners (screws, nails or “liquid nails”);
- additional strips.
As a rule, extensions are purchased together with the door leaf, but if the doors are not going to be replaced, but only plan to close the slopes, for the manufacture of extensions they use:
- wooden planks;
- pieces of MDF;
- long pieces of chipboard;
- plastic.
If natural wood is used, it is pre-treated with antiseptic impregnations to extend its service life.
Homemade panels made from regular MDF will differ from factory ones, since in industrial designs the interior between two thin fiberboards is filled with cellular material.
Chipboards are inferior to wood and MDF in appearance and durability, but chipboard boards can be used indoors.
Plastic is rarely used as a material for making accessories. And if it is still used, then especially durable, metal-reinforced PVC panels are selected.
Extensions can be made of natural wood, chipboard, MDF panels or plastic
Materials and sizes
Each manufacturer produces a certain set of additional boards, in which the length is fixed - 230-250 cm, the thickness/width varies. For example, there are the following options (thickness, width, length):
- 10*50*2350 mm;
- 10*100*2350 mm;
- 15*150*2350 mm.
Shape, thickness, width may vary
Thickness and width - each factory has its own. Can be 60 mm, 65 mm or 75 mm. In general, any set. What if none of them suits your case? Take a larger width than required, then saw off the excess. What if your opening is wider than all available options? Order the size you need (many manufacturers make to order) or splice two smaller sizes. Another option is to use telescopic platbands. They come with a corner bend, which can cover your width gap.
If the doors are made of solid oak, it makes sense to install the same addition
What materials are interior door trims made from? From the same as platbands:
- wood;
- MDF;
- Chipboard.
MDF and chipboard can be covered with veneer and laminated. Wooden ones can be treated or untreated. Select the material and color for the door frame. And this is another reason to buy from the same manufacturer - even if the color/texture name is the same, there is no guarantee that they will actually be the same.
How to choose an accessory: material, sizes
Often, for the manufacture of extensions, edged or tongue-and-groove boards are used, which have a groove for better and more convenient installation. In addition to wood, additional planks are made from veneer, MDF, chipboard, plastic, laminate. If the width of the wall is too large, it is better to opt for waterproof plywood. It is also recommended to install it in rooms with high humidity, for example, in the bathroom.
Extensions come with or without edges. In the first case, the end of the plank has the same coating as the entire part. Most often these are products in the production of which laminate, laminate, and PVC are involved. Veneered products are mainly produced without edges. The thin section of wood, called veneer, is brittle and inelastic. Therefore, it is almost impossible to bend it at an angle of 90° without breaking it.
Please note that the additional profile used in glazed loggias is not suitable for the door. Factory products have standard dimensions:
- height – 2 m;
- thickness – 0.5-2 cm;
- width – 7-40 cm.
Interior doors with accessories
A part whose thickness is at least 1 cm is considered especially high quality. As for the width, 10 cm is usually enough. Even if you take several of these planks, it will not be difficult to install them by joining each other, and the finished structure looks aesthetically pleasing and neat. A profile with a large width is most often used not for interior doors, but for entrance doors.
Before buying an additional plank, take all measurements: by inviting a specialist or yourself. It is worth determining the dimensions after the main structure has already been installed. The width of the extension you need is the figure obtained after subtracting the width of the box from the wall thickness. It is better to add 1-2 cm to the result obtained so as not to make a mistake. Since the walls in many houses and apartments are often not perfectly smooth, measure the thickness of the opening in at least 4 places. Focus on the maximum indicator.
Advice. To furnish a country house, you can purchase a door with a frame that has a blank for additional installation of the extension - a grooved quarter.
Finishing the doorway with extensions
Doors of various types can be purchased for construction: with a box beam, on the outside of which a groove has already been selected for installation, with a frame without this device.
In the first case, everything happens quite simply . Chipboard or regular wooden planks ten millimeters thick are suitable. This thickness must be measured together with the frame placed in the doorway. And if you do this without it, then it is important to remember that the addition only complements the base box.
The distance from the end of the recess in the box to the edge of the opening is determined. In other words, the width of the extension should be equal to the sum of the transverse dimension of the recess and the width that is insufficient to completely cover the opening. Typically this value is one centimeter, but other options are possible.
Important! Measurements are taken at several locations, for example at four points. Perhaps the indicators will be different. In this case, the maximum size is considered the base size.
The fully assembled outer line of the extension itself should be flush with the opening. Tiny excesses are removed with a plane; later this place will be disguised by cashing.
The additional expansion of the door structure with a groove can only be nailed on the outside of the uninstalled base with small galvanized nails, the distance between which should be approximately 20-35 cm.
It is also possible to insert it into a pre-glued recess of a fixed box.
If you have to work with a box beam that does not have a special notch, the performer can proceed as follows:
- Select a quarter yourself using a router with a straight cutter and a ruler. After this, the box acquires a special device to facilitate the installation of the extension;
- The extensions can be attached through drilled holes to the box beam. Self-tapping screws are used for this;
- bars are screwed to the wall with self-tapping screws, onto which additional elements are mounted;
- the extensions together with the box are placed inside a kind of plywood base (plasterboard can be used);
- the box beam with the selected quarter is connected using a special strip with extension strips. The rail should run along the alignment line on the outside of the entire structure;
- the mentioned lath or plywood strip along the perimeter is attached in separate sections, and not in a continuous line.
Important! It is necessary to nail both the extension strips and the timber to the rail. To ensure that the central axis of the rail coincides with the connection line, you can shift it slightly.
Interior doors and installation in St. Petersburg
Do you remember when you hammered the first nail? Me not. Sometimes you just need to do something with your own hands, for your own pleasure. Work and hobbies make us happier! And it doesn’t matter if you want to save money and just get high.
Having read from cover to cover all kinds of online materials wishing to help in installing interior doors on your own, I understood one thing, the bulk of them are designed to either kill inspiration, repeating that installing interior doors with your own hands is an almost impossible task, or offering another opus on the topic “ How to install a new door with a hammer and a screwdriver." Articles for the sake of articles, water is water not giving step-by-step instructions. Difficult is difficult, but it is possible, the main thing is to approach the matter with the proper enthusiasm, without overestimating the possibilities. Our task is to show how to do this work beautifully and efficiently.
Do you want to hammer in the right nail and install interior doors - with your own hands?
Then let's get down to business, here are step-by-step instructions with all the intricacies of the process.
DIY door installation steps
- acceptance of goods
- fitting and assembling boxes
- insertion of locks and hinges
- DIY door installation
- installation of additional platbands, cornices, etc.
So, let's start with the number "one".
Acceptance of new interior doors
It’s strange, but removing the goods from the packaging and inspecting the delivered goods is an important stage, simply because after “do-it-yourself installation of interior doors” is completed, it is difficult to make claims to the supplier if mechanical defects are subsequently discovered. The inspection should be carried out immediately before installation, and not at the time of delivery, so we will not delay the driver more time. Having examined it, we give ourselves the green light and proceed...
Sawing boxes for assembly into a door block
The right choice is sawing using an electric miter saw, since it is really difficult to perform high-quality manipulation using a hacksaw or a hand miter box. By the way, now you can rent a tool, or purchase simple equipment for subsequent use in the country, or buy a used machine on Avito, and after the installation is completed, you can also safely sell it, without losing, as they say, a cent! We will cut at 45 degrees.
Important!
- In order to avoid confusion with the right and left corners, we arrange the door frames along the wall correctly, that is, large quarter to large quarter. Thus, on the left side of the door frame there will be a left corner and left hinges, and on the right side there will be a right corner and a counterpart of the lock, and vice versa for the right opening of the leaf. If you have, say, 5 doors, then we will step by step take and file the forty-fifths of the left corners of the frames, then the right ones. Boxes, canvases and doorways must be numbered. (For example: kitchen - canvas No. 1, opening No. 1, two vertical boxes, left and right No. 1 and No. 1)
- We will configure the purchased equipment. To do this, take a beam (2 meters of 40*40 timber must be prepared in advance, it will be needed), set the saw to the 45 degree position, place it, press it, saw it. We join and measure the angle with a square, it should be exactly 90 degrees, if not, take a plastic drawing square and adjust the miter saw as shown in the video.
- It is important to ensure good pressure of the workpiece to the vertical and horizontal planes of the equipment at the time of sawing. We start by filing the 45-degree angle, sawing as close to the top edge of the box as possible, while placing the workpiece on the large quarter plane, turning the miter saw in one direction or the other. It is necessary to lower the disc onto the workpiece smoothly, this is important for the cleanliness of the cut!
- First we file all the left corners of the vertical elements of the boxes, then all the right ones and one right or left corner of the horizontal element of the box.
Calculation, marking and trimming of boxes in height
Accurate markings are half the battle! In order for the installation of doors to be done correctly with your own hands, it is necessary to correctly trim the frames in height, and the upper element “crossbar” or lower “threshold” in width, respectively. The height of the boxes always varies depending on the four things, and the height of the left and right boxes may differ.
1. The height of the canvas is usually 2000 mm.
2. Floor level. It is necessary to take into account the floor level in the calculation so that both vertical elements “stand on the floor” and do not hang in the air after installation. A building level will help you; we place it on the floor between the jambs of the doorway. If the floor is level, there are no problems. If the floor is not level or inclined, its curvature must be taken into account. We raise the building level from the side of the floor obstruction, level the “bubble” and use a tape measure to measure the distance from the floor to the edge of the level, then we will add it to the corresponding standing part of the box. Manipulation can also be performed using a laser level. We place the level mark on the opening and measure the distances from the floor to the mark on the left and right sides of the jamb.
3. Gap between the floor and the door. The optimal clearance is 10-15 mm.
4. The gap between the crossbar and the door leaf. Its value is approximately 2 mm.
We make a calculation. So, box No. 1 “kitchen”, the door is on the left, opens into the room, the hinges will be on your left when you stand from the kitchen. With the previous manipulation, we found out that the floor slope is 5 mm on the side of the proposed hinges. This means that these 5 mm must be added to the vertical hinge bar of the box. We approach the numbered boxes, sawed at 45 degrees and lined up along the wall, and find No. 1 “kitchen”. You lined up the bars along the wall, according to the recommendations above? Take the left loop bar No. 1. Its calculation is 2000 + 10 + 2 + 5 = 2021 mm, for the right one 2000 + 10 + 2 = 2012 mm. Thus, we took into account the height of the canvas, the gaps between the floor, crossbar and canvas, and the collapse of the floor. Now we take a tape measure and, as shown in the photo below, mark “from ten” and saw off the block. Don’t forget that “from ten” means + 10 mm to the size (2027 mm and 2022 mm)!
Calculation, marking and trimming of the crossbar
To calculate the size of the crossbar, you need to add the loop and hem gaps to the width of the canvas. Our “kitchen” canvas is 700 mm, the loop gap is 2 mm, the false gap is 4 mm. The calculation is as follows: 700 + 2 + 4 = 706 mm. (806 mm from ten on a tape measure). The size must be set aside from the corner of the crossbar cut in advance. It is important that the markings are made on a thin quarter of the box, that is, where the canvas will go in! We lay it down, press it down and saw it smoothly.
Hurray, the door frames are cut, correctly, easily and, most importantly, with your own hands!
Do-it-yourself insertion of locks and hinges into doors
Milling of fittings is the most critical stage from a technical point of view, which easily fits into the framework of a separate material, and therefore we covered the insertion of hinges and locks with step-by-step instructions, methods and markings in detail in this article, be sure to read and come back, and we move on.
Assembling sawn door frames into a block
To assemble the door frames you will need: a drill or screwdriver, 2, 5 and 6 mm drills, wood glue, 3.5*55 black wood screws. We take a horizontal element, place a 2 mm drill at 90 degrees to the cut plane and drill two holes offset to the front edge of the workpiece.
Then we place the box on the floor, join the corners and, through the holes in the crossbar, drill holes in the vertical elements of the box. The next stage is to make holes in the crossbar with a 5 mm drill. Using a 6 mm drill, we make two holes on the plane where the hinges are inserted, for fastening to the wall. Place the box on the floor again, glue the cut planes with PVA, join the corners and twist.
That's it, the box is assembled, the fittings are embedded, we proceed directly to installation.
Do-it-yourself installation of interior doors in a prepared opening
We described in detail what a “prepared opening” is here, read it if you want, and be sure to come back)
Required materials and tools
- hammer drill, for drilling holes in concrete or brick wall
- screwdriver or screwdriver, hammer and 30 mm chisel
- We saw wooden wedges from timber 40*40 “per wedge”, of different thicknesses, across the grain. The wedges should remain in the opening forever after installation, since some mounting foams shrink and draw in the boxes after hardening, and from wedges sawn off exactly across the fiber, it is easy to chop off the excess with a chisel without removing them.
- self-tapping screws 4.2*90 black for wood + polypropylene dowel 6*30 “Sarmat”, 3 pcs.
- mounting foam, better TYTAN, manual sprayer for flowers with water
- plumb line or laser level
So, installing doors into an opening with your own hands begins with shooting through the vertical level of the jamb and fixing the frame. In our work, we use a laser level or plumb line, the latter being the most affordable and accurate option. It is not recommended to use a building level when installing doors with your own hands without experience, as it gives a large error. Ideally, the jamb is smooth in all planes and there are no problems. In practice, this is often not the case and there is a blockage at the bottom or top, although not large. Let's find out this moment.
Ideally, the gap on the mounting foam should be 10-20 mm, but this is ideal. Let's analyze the situation when the bottom of the jamb is blocked. Allow a deviation of 20 mm. We cut out a wooden insert 10 mm thick from the timber, and from there we will dance further. We insert the assembled door frame into the opening, place the liner between the wall and the frame at the level of the top hinge, just below the mounting hole, slightly wedge the top of the frame to fix it in the opening.
The trick is that we always start placing the box from the hinge side! We shoot through the level and set the box stand in all planes. We drive the upper fixing wedge a little harder. We take a hammer drill, drill a hole and secure the box with a self-tapping screw. We carry out the same manipulation with the lower fasteners, having previously measured and cut out the lining of the required thickness. The hinge part of the box is exposed!
We hang the canvas on the hinges. To install doors yourself, it is better to use detachable door hinges, as it is easier to hang the door on them. Next, you need to position the recessed part of the box in such a way that there is the same recess (good pressure against the seal along the entire height of the rack), taking into account the plane of the walls, of course. We wedge the entire structure around the perimeter, insert linings of the required thickness from MDF or cardboard into the gaps between the canvas and the box. We slightly moisten the installation space between the wall using a spray bottle, for better adhesion of surfaces with polyurethane foam, foam the block and sprinkle a little on the foam itself for good hardening. The foam has frozen, we chop off the wedges and cut off the excess.
Do-it-yourself installation of platbands, extensions and other decorative elements
We decided to separate the issue of installing platbands, their types and methods of fastening into a separate block and covered them in detail in this article.
How to install extensions on interior doors with your own hands is described in detail here.