Types of windows in the attic of a house
Dormer windows (MO) are classified according to several criteria.
By installation method
Vertical type
It is characterized by a vertical frame arrangement, and for this purpose a special structure (“birdhouse”) is mounted on the slope. Such MOs give the roof a special, decorative look, but limit the access of sunlight to the attic.
Inclined
The windows are located in the plane of the roof slope. They provide better natural light, but look much more modest, and the glass is not protected from vertically directed influences (for example, hail).
By shape and design features
Classic
These are rectangular frames made of different materials with double-glazed windows, which can belong to both types of MO.
With extensions
The upper part of the opening has an original shape to give originality (triangle, arc, etc.).
Window-balcony
The window is combined with balcony elements, allowing access to fresh air. This could be an additional horizontal platform or a rising canopy in a design with a vertical MO.
Combined
The design includes an opening (pivot) and a stationary part.
Combination of vertical and horizontal types
This option provides good lighting and allows you to look outside.
Light tunnel
A rather rare design designed to direct natural light into the living space of the house. A tunnel is formed through the entire attic, and a diffuser lamp is placed at the exit. This design is needed when a room in the house does not have windows.
By opening method
Rotary with central axis
The sash can be rotated in any direction.
Raised axle
It is located at the top of the opening. The sash opens by lifting upward (inward or outward).
From the side
The sash tilts to the right or left.
From the bottom
The sash swings outwards.
Combined option
The window is divided into 2 parts. There is a raised axis at the top with the door opening only outwards. A side axis is mounted in the lower part, which makes it possible to clean the window.
By material
In addition to the specified criteria, MOs differ in frame material:
- wooden;
- plastic;
- aluminum.
Modern cottages have begun to use “smart” MOs. They have a drive, and the valves are adjusted using a remote control.
How to install?
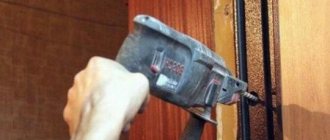
Before installing a roof window with your own hands, you need to choose a suitable place for it and mark it for preparatory work. After the area has been outlined, you need to make holes in the roofing material using a drill. This is done from the inside of the roof. The holes are needed so that the material can be cut without damaging the rest of its parts. The hole is made using a circular saw, the cut must first be made diagonally, cutting out triangles, and they are carefully pulled out and an opening is obtained. You cannot cut along the contour: you can damage the roofing material.
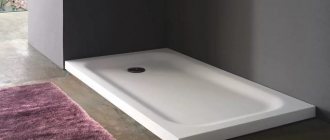
Distance from the bottom line of the window to the line of the roof covering
After the opening for the attic window is formed, you can proceed to the next installation stage - installing the frame. It is worth noting that you do not need to dismantle the roof. The exception is a seam roof, in which the material will have to be dismantled.
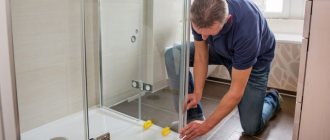
Construction of an opening in an existing attic
Choosing a location on the attic roof
The reliability of the entire roof and the illumination of the attic depend on the correct choice of installation location. To implement it, the following recommendations must be taken into account:
- When installing the MO, you should not disturb the rafter system. The opening must be made between the rafters, and the width of the opening should be at least 6–8 cm less than the pitch of the rafter legs. If the step is small, then it is better to make 2 small windows.
- The MO should not be located in places where there is a risk of condensation and moisture accumulation - a valley, a ventilation or chimney outlet, any abutment of the roof to elevated structures.
- The installation location should be open to natural light, i.e. there should be no high vertical walls nearby.
- The height of the opening depends on the slope of the slope. On a steep roof, it is recommended to lower the MO lower to the ceiling. The optimal height is 90–110 cm from the attic floor.
- It is better to position the opening so that you do not have to cut the roofing elements (tiles, corrugated sheets, slate) once again.
To ensure normal lighting in the attic, the window opening area is selected to be about 8–10% of the room area.
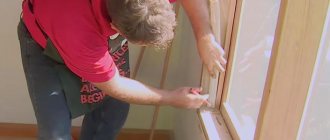
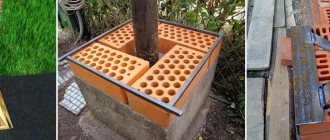
Assembling thermal insulation and installing a roof window frame
The thermal insulation circuit is mounted on a steel frame, which is easily assembled with latches.
The thermal insulation contour is installed in the prepared opening.
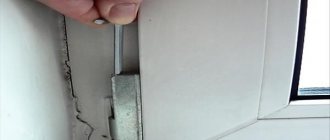
Then disconnect the rotating part of the sash with the double-glazed window from the frame of the attic window.
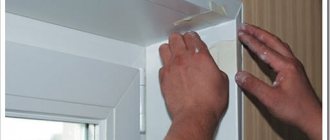
Mount the mounting plates and install the box in the opening.
Important! Mounting plates (4 pcs.) are installed in the corners of the skylight, in places in the frame prepared at the factory, in holes pre-drilled by the manufacturer for self-tapping screws.
If the roof window is long (more than 1.4 m), additional intermediate mounting plates (corners) are installed in the place of the rotating mechanism (hinges).
The roof window frame is installed in the finished opening. How to do this correctly, as well as adjust the side gaps and the rebate, is shown in the video.
DIY installation steps
Installation of the MO is carried out in a certain order. It includes preparing the site for the opening, installing the frame, securing the sashes with the opening system, glazing, sealing and insulating the joints.
Preparing the site
The preparatory stage includes the following steps:
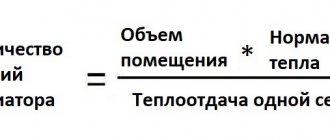
- Planning and calculation. Taking into account the design of the rafter system, the dimensions and number of openings are determined. The total area of the Moscow Region follows the rule: for every 10 square meters. m of room requires 1 sq. m of glazed surface.
- Choosing a location for installing the MO.
- Marking the location of the MO installation.
Preparing the roof area for direct installation depends on the stage of construction. If the MO is installed during the construction of the attic, then the opening is immediately linked to the rafters.
A more complex approach is required if a MO is installed in an already operating house with a finished roof. You will have to carefully dismantle the roof section at the installation site, moving from the inside to the outside. According to the marking of the opening, the counter-lattice, insulation, waterproofing, sheathing and roofing are cut out one by one.
The dimensions of the opening in width and length should be 4-6 cm larger than the corresponding dimensions of the MO.
To carry out the preparatory work you will need the following tool:
- Bulgarian;
- knife;
- scissors;
- hacksaw;
- chisel;
- hammer;
- roulette;
- metal ruler;
- building level.
Fixing the frame in the rafter system
The most important condition for reliable installation of a window structure is fastening its frame to the rafter system, and not to the sheathing. To do this, first a flashing is formed around the perimeter of the opening, and then the MO frame is firmly fixed on it. The frame consists of lower and upper overlays, which are firmly fixed to the rafters, and side bars, attached to the overlays. Depending on the ratio of the dimensions of the MO and the pitch of the rafters, the installation technology has its own characteristics.
If the window is narrower than the rafters
In the standard version, the MO is located between the rafters. In this case, the assembly of the flashing begins with the lower lining, which is fixed between the rafters at the required height. Its horizontalness is strictly controlled by the building level. Then the top trim is installed between the rafters parallel to the bottom element.
The side bars are fixed between these elements strictly perpendicularly. The window frame is fixed securely to the frame using self-tapping screws.
If the width of the MO is significantly less than the distance between the rafters, then additional rafters are installed at the place where the flashing is attached. To strengthen them, horizontal counter-battens are fixed at a distance of 40–50 cm from the upper and lower edges of the frame.
If wider
Despite the recommendations, sometimes MOs are installed whose width exceeds the pitch of the rafters. In this case, at the installation site, the rafter system is strengthened with horizontal beams. Then, a cutout is made in one of the rafters with a length corresponding to the height of the opening. The salary is set similarly to the previous option. Reinforcing bars are located at a distance of 30–40 cm from the upper and lower edges of the frame.
Non-standard installation options
In some cases, installation of MO requires non-standard approaches:
- On the roof with decorative roofing. The problem is that the roof waterproofing must be securely connected to the window flashing and the insulating window flashing. This condition is ensured when the MO is located in the plane of the roof. To do this, you need to install a support beam under the frame.
- Window in the rounded roof. On such a roof, the MO is recessed inside and sealed.
- Window for stargazing. Such a MO is installed on the ridge itself or in close proximity to it. In the latter case, the ridge beam is not affected, but 2 openings are mounted on both sides of it at a distance of 40–50 cm from the ridge crest. A window on the ridge can only be made at the construction stage. In this option, the rafter system uses hanging and layered rafters. The ridge beam is installed starting from the edge of the window.
A winter garden or a greenhouse under a roof is gradually becoming fashionable. To implement such a project, many windows are installed. The distance between them can be only 10–15 cm.
What calculations need to be made?
Before installing a roof window, you need to correctly calculate its dimensions and choose the appropriate model, otherwise you will simply waste your money and the window will not suit you. You need to choose a design, first of all, based on what material your roof is made of. You need to think about where the window will be located and at what angle. Typically, the window area is calculated based on the area of the room: for every 10 m² of floor there should be at least 1 m² of glazing.
It is worth considering that the higher the opening for the attic window is, the more light it will give. You should not place the window too high: it will not be convenient to use. The only exception is the roof, the angle of inclination of the sides is 15-20º.
If the roof has round slopes, windows installed 1-1.40 m from the floor will look best and provide good lighting. It is acceptable to place the window lower, for example, 80 cm from the bottom surface, but this is not always aesthetically appropriate. If it is higher than 1.9 m, it will be inconvenient to use. Installing one large window or several small ones is a personal choice of the owner of the room; it is worth noting that the more windows and the larger their area, the brighter the attic space will be.
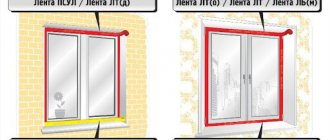
Steam and waterproofing
At the junction points of the MO, it is important to ensure reliable vapor and waterproofing. An insulating apron with such capabilities is installed around the entire perimeter of the window. It reliably covers the gap between the roof and the frame. A strip of vapor-waterproofing material can be secured with a stapler, but an adhesive connection is most reliable.
Gluing is carried out from the bottom edge and moves from bottom to top. Modern materials are produced immediately with an adhesive layer, which is covered with a protective film during storage.
The upper edge of the apron is located under the drainage gutter. To prevent moisture from getting under the roof waterproofing, cut when preparing the opening, the edges are sealed with butyl-based sealant.
Preparing a window opening for installing a roof window
In the video instructions, a specialist explains how to prepare a window opening for installing a roof window if the roof has been built and the roofing has been laid.
When installing vapor and waterproofing, the films are cut with an envelope (crosswise) and wrapped inside the room (vapor barrier) and outside (wind protection).
The upper and lower parts of the opening are reinforced with lintels (between the rafters).
And with sheathing bars, so that the edge of the OSB sheet does not hang in the air.
The lower support beam of the sheathing must be leveled in order to accurately align the frame of the attic window and avoid a noticeable difference in height on the side slope.
Important! If OSB has not yet been laid on the roof - the base for flexible tiles, then the opening is edged on top with a frame made of OSB sheet or plywood cut into strips.
This is necessary so that the mounting plates of the roof window rest on the OSB and not on the sheathing. In this case, the dormer window will be in the same plane with the future base for the soft roof.
Installation of thermal insulation
The area where the roof adjoins the building can become a cold bridge if it is not insulated. The optimal way to place thermal insulation is directly in the gap between the roof and the window frame. The insulation is placed on the edge of the flashing along the entire perimeter of the window, and only after that the frame is inserted. The material is secured using a stapler.
You should not fill the gap with foam. It does not provide good insulation and creates a force that can lead to distortions in the wooden structure. It is best to use a strip of stone wool, which, with reliable waterproofing, copes with the task perfectly.
How to install a salary
They begin to install it from the bottom up. First of all, the lower apron is installed, then the side parts and the upper edge, and finally the lining.
The installation of flashings from each manufacturer has its own peculiarities, so you must use the instructions. So, Roto products have a rubber seal on the frame, and the frame is placed under it. Fakro window products do not have a sealing element, and the frame is attached directly to the frame, and covered with additional parts on top.
All elements of the flashing are joined and then attached to the frame and sheathing. The lower apron is fixed to the roof covering from above. To install roofing material, a special element must be attached to the flashing. At the end of the work, the sash is hung and the protective coating is removed.
In order to seal the joints between the frame and the opening, you should not use polyurethane foam; you should use only special sealants.
Device nuances
Depending on the roofing material, the installation of MO has specific features. They are especially important to consider when working on metal roofing and soft roofing.
Metal roofing
When installing MO in a roof covered with metal tiles, it is recommended to take into account the following nuances:
- The metal tiles at the installation site of the MO should be cut with scissors or a hacksaw. With a grinder, you can only make an initial cut up to 10 cm long. This will preserve the integrity of the protective layer.
- The material of the MO frame must match the material of the rafters.
- Mineral and basalt wool are best suited for insulation.
- To fix finished MO structures, you must use proprietary fasteners.
- All gaps are carefully sealed with waterproof sealant.
In general, MO installation technologies, regardless of the roofing covering, have much in common. It is recommended that the final fastening of the elements be carried out after completion of the adjustment of the opening system.
In soft covering
Installation of MO in a soft roof does not require special qualifications, and it is easier to carry out than on a hard surface. Rolled materials are easy to cut, allowing you to create an opening using simple tools.
It is important to be careful when working and maintain precise dimensions. Technological gaps are minimal - no more than 3–4 cm. In the junction area, the roof sheathing is continuous.
Dormer windows provide the necessary comfort in attic spaces, allowing you to create living conditions in them. The correct placement of openings creates good natural light. If you follow all the recommendations, you can install a reliable system with your own hands.
Location determination
So, let’s move on, based on the technology for installing roof windows, to finding a place.
The location can be influenced by both the angle of the roof and the intended opening option.
The height of the window from the floor should be in the range from 80 to 130 cm. Now look where it is most convenient for you to place the window, so that from time to time you can ventilate the room, and the open sash does not interfere with movement. Also, consider the option of opening the sash and the location of the handle. The good thing about roof windows is that the manufacturer usually offers a huge range of options to choose from.
Installation of the trim
The handle should be positioned so that you can reach it and open the sash without any problems.
Also, take into account the type of material (after all, if you have ceramic tiles, you will not be able to cut them), and you will have to start installing the window from the place where the row goes, so that you can remove the piece elements without trimming.
Types of windows
A window in the attic can be placed vertically, with the obligatory installation of a separate roof, or obliquely - in the roof slope. The material for window frames can be hard wood, plastic or aluminum.
Balcony roof window
- Rectangular windows for attics are available with a rotating frame; the blind structure is made to individual order.
- The design of an inclined and vertical window allows you to open onto the balcony when both are opened.
- Composite window: its upper part is movable, and the lower part is blind; it serves to increase the lighting area.
Vertical roof windows
When the roof slopes are very steep and it is impossible to view the surroundings through the attic windows, vertical structures are installed under them.
How to properly insulate a window?
It is very important that the insulation of the structure is done correctly. Some builders use polyurethane foam and do not use insulation, however, this approach is not entirely correct, since the material narrows in winter and expands in summer, so the structure may sag.
The most convenient insulation for a roof window is mineral wool. It comes off easily and is installed in its place. You should not place heating appliances under the attic windows. Unlike a regular window, a dormer window is tilted, so condensation will form on it due to rising warm air.
Conclusion: knowing how roof windows are installed, you can perform this procedure yourself, significantly saving your budget. The procedure is simple and requires only strict adherence to the instructions.
How to install and adjust the frame?
Before inserting a roof window , you need to remove the double-glazed window. This will not only make the task easier, since without it the frame weighs much less, but will also make the work safer. The glass unit is inserted after all work is completed. To begin with, fix the brackets located in the delicate part of the structure. They need to be secured securely, but the top ones should not be completely tightened. They should hold, but be relaxed: this is necessary so that the frame can be adjusted.
You will need a building level: use it to measure the inserted frame. If it is skewed, it is leveled using plastic corners, which are sold complete with the window. Once you are sure that the frame is level, the screws of all fastenings can be tightened completely.
The best manufacturers of roof windows
Window systems from the following manufacturers have won a good reputation among users:
- Velux. The Danish company specializes in the production of wooden windows. High quality wood, antiseptic impregnations and multi-layer varnish ensure the durability of the systems. All products are equipped with ventilation valves, two- and three-level seals. The windows performed well in different operating conditions.
- Roto. German quality of plastic window systems. Roto products are unrivaled for arranging damp attic spaces. The profiles are resistant to moisture, the frames do not lose their original appearance, and do not require tinting or periodic treatment with antiseptics.
- Fakro. The Polish company produces windows from different materials, and accordingly, the pricing policy is very diverse. The profiles are supplied in standard sizes, so the architecture of the existing house must be taken into account.
The issue of making attic window systems with your own hands must be approached carefully. To perform high-quality installation and maintain the reliability of the roof, all technological requirements must be observed. An important point is competent calculation and choice of window location.
All known classifications
By type of materials used
There are three options:
- Wooden. Despite the emergence of more advanced and practical materials, wood is still widely popular. Its main advantage is environmental friendliness and a more attractive appearance. The disadvantages include a low service life (due to temperature changes and high humidity, they dry out) and a fire hazard.
Advice: wood should be treated with antiseptics and protective compounds - this will extend its life several times.
- Plastic. The most common option today. The advantages of PVC are known to everyone - practicality, resistance to external factors, accessibility, etc. They have only one serious drawback - too much tightness, due to which the ventilation process is complicated in winter (there is no natural ventilation).
- Aluminum. They have the best technical characteristics. However, their price is significantly higher. So far, this material has not received wide recognition, largely due to the high cost of the technology.
By design features
- Extensions are the upper elements of the opening that create decorative outlines. They may have a non-standard shape (triangular, semicircular, etc.).
- Additional lower elements. They are used in cases where the height of the room is small, and one opening is not enough for normal lighting.
- Light tunnel. It does not contact the attic - a reflective tunnel goes from it into the room, and a lampshade is fixed in it, which diffuses the light. It is most often used in small attics.
- Balcony elements. An addition that provides access to the balcony. They are often used when the roof has a strong slope.
- Cornice elements. They are installed vertically under the main roof window. The need for them arises when the wall is too high.
According to the location of the opening axes
The design of dormer windows varies; the opening method differs. The following varieties are distinguished regarding the location of the axis:
- Central. The most popular option, since this design allows the doors to be rotated in all directions.
- Elated. They are used in the area of the upper boundaries of the opening.
- Combined - the upper axis opens only outward, and the central part can be rotated (for example, to organize cleaning).
- The side one has hatches.
- Lower (balcony).
There is one more type that cannot be classified into any of the categories - the so-called “smart windows”. This is a system in which the doors are opened using a remote control. Such structures are used, as a rule, in two cases: if the height of the room is too high, or for aesthetic reasons.