In rooms heated using underfloor heating technology, the feeling is much more comfortable than with a traditional radiator system. When the floor is heated, the temperature is distributed optimally: the feet are warmest, and at head level it is cooler. There are two heating methods: water and electric. Water is more expensive to install, but cheaper to operate, so this is what is used more often. You can slightly reduce installation costs if you make a water heated floor with your own hands. The technology is not the simplest, but it does not require encyclopedic knowledge.
Distribution of heat flows for different heating systems
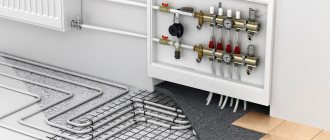
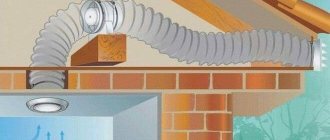
Connecting a water heated floor to the main heating system
So, we have dealt with the first issue of installing a heated floor in a private house - whatever one may say, we will have to redo the floor, investing a lot of money in this matter. But what about piping around the house? Don’t worry, you won’t have to tear down the walls either - in a private house you can easily power the system from the main heating riser.
In apartments, it is much more difficult to implement this, since you have to coordinate actions with heating networks
In apartments, this issue cannot be resolved so easily, since connection requires coordination with heating networks. When you put the system into operation, you will take a certain amount of heat, and other residents of your building will not receive it. If the apartment does not have individual heating, then the answer from the services will always be negative. Alternatively, you can use electric underfloor heating.
Scheme of inserting a heated floor into the heating main
For the equipment to work properly, two prerequisites must be met.
- The water in the pipes should not heat up above 55 degrees Celsius . Such overheating can cause damage to the floor covering and the release of toxic substances from inexpensive materials (laminate, linoleum). Walking barefoot on an overheated floor will be unpleasant.
- You need to ensure the required heat consumption , otherwise the temperature on the radiators will drop and you will not get any change in the heating level - only its redistribution in the room.
There are several ways to connect a heated floor.
Direct connection
The simplest and most primitive way is to directly connect the underfloor heating leads to the heating radiator. The first end is connected to the supply, and the second to the return. You will achieve acceptable floor heating in this way only if you observe the following points.
The water floor is connected in series with the radiator
- A common boiler that heats water must be able to automatically maintain the temperature of the water in the system. If it does not have such a function, adjusting the heating will be problematic.
- The total area of the heated room should not be more than 10 square meters.
- A powerful pump is installed in the system, which will ensure good circulation of the coolant.
Replacement or combination
We do not recommend using such a connection due to the following disadvantages.
- Water always moves along the path of least resistance. This path runs through the central line, that is, the main pipes and radiators. Along the winding paths of the heated floor, the liquid will move at a lower speed, which will lead to a decrease in temperature.
- As the temperature in the system increases, the floors may warm up more than expected.
Some would-be masters connect the heated floor circuit to the return line, and in a gap. It's never a good idea to do that. Yes, water will flow through the circuit, but the coolant consumption is significantly reduced. Both the floor and radiators heat worse.
Connecting a heated floor through a valve
The correct solution in such a situation would be to connect the floor heating circuit through the RTL thermostat valve. It is installed like this on the return line from the battery, after which it is fine-tuned.
RTL valve with thermostat
- This device is made in such a way that the internal parts (bellows) react according to the settings to changes in temperature. When the specified threshold is reached, the valve closes and the water in the heated floor circuit stops, giving off heat to the surrounding space.
- At this time, the coolant continues to flow through the radiators, which allows them to be heated quickly.
- Thermal energy from the pipes is transferred to the floor covering through the screed or metal plates, thereby ensuring its heating.
- The device has a lower threshold level of coolant temperature, upon reaching which the valve opens again. More precisely, all this happens gradually - there is no one-time overlap and then a complete opening. In fact, the flow of water simply slows down, stops, accelerates, and so on constantly in a circle.
Thermostatic valve structure
This mode of operation does not allow the radiators to cool down. Great, all this is good, but this system also has significant drawbacks. First, the total length of the pipeline should not exceed 50 meters. When this threshold is exceeded, uneven heating of the floor occurs, which is associated with high hydraulic resistance - there are a lot of turns. This issue can be resolved by dividing the circuit into 2-3 independent sections.
There are undoubtedly more advantages.
- This connection is much more profitable than systems that include powerful pumps and mixing units.
- Floor heating can be done in any room where a radiator is installed - there is no need to run multi-meter lines from the boiler. The issue of saving comes to the fore again.
- When there are air thermostats in the radiators, the floor can be started in the summer - it works, and the radiators remain cold.
Bundle of heating radiators and heated floors
thermostatic valve
Selecting a collector-mixing unit
The choice of collector (see types, principles of operation and installation of the collector, connection diagram and configuration) is directly related to the number of circuits that are planned to be installed. The device must have as many outputs as the water floor structure will have.
The device allows you to adjust and supply heated coolant into the system, and discharge it back to the device after working out.
The simplest model of the corrector has only a shut-off valve, and it cannot be used to adjust the operation of the structure. More expensive devices are equipped with valves for adjustment; they make it possible to independently set the level of intensity of water flows, separately for each circuit.
In addition, a mandatory attribute of any manifold is an air vent valve and a drain valve for emergency situations. In order for the device to work normally, you only need to adjust all the valves once, according to the required parameters.
It is worth noting that inexpensive collector models are often installed. But if you do not need to save money, then it is better to buy a model with servo drives and mixing units. This device allows you to automatically regulate the degree of heating of the water supplied to the water floor.
The collector is installed directly in the heated room or in a room nearby. To install the device, a special cabinet is made, its standard size is 50 by 50, and its depth is 12 - 15 cm. It is placed above the surface of a warm water floor. It is not uncommon that the manifold cabinet does not spoil the interior of the room, it is recessed into the wall.
Video
Manifold for heated floors. Three ways to configure flow meters.
Single-pipe wiring and connection to it
When there is only one pipe in the system through which the coolant flows, it is called single-pipe or “Leningrad”. Previously, all houses were connected in this manner, but now more efficient working schemes have been developed.
Single-pipe wiring
The Leningradka is characterized by trouble-free operation and high reliability. Its main drawback is the temperature drop as the coolant moves. The first radiators are much hotter than the last ones. The temperature may not be sufficient for rooms far from the boiler. If you connect a heated floor circuit to such wiring, the temperature will drop even more, plus the hydraulic resistance will increase, which will require the installation of an additional pump.
Coil of pipes for heated floors
To more or less balance such a system, you will need to meet the following requirements.
- To prevent the temperature on the radiators from dropping, the connection must be made on the return section of the line, after all the batteries.
- For this you need to use a DN pipe
- Such a connection is allowed only to a circuit with no more than 5 radiators.
- To maintain the floor temperature at the same level, you need to include a three-way mixing valve in the system.
- This valve is designed in such a way that it constantly mixes hot water into the cooled water, keeping the temperature at the same level.
- Together with it, a pump must be included in the circuit for forced circulation. Due to it, water will move even when the valve is completely closed.
Three-way valve for mixing coolant
No matter how you cast magic, the result will always be somewhat negative if you don’t initially do everything as it should be. This system is also rarely used, since its operation cannot be called stable. A running pump creates some pressure inside the circuit to force the coolant to flow in the desired direction. When the valve opens, this pressure is transferred to the radiators, creating additional hydraulic resistance. This causes the radiators to become unbalanced and changes water flow.
When heating operates in this mode, accidents often occur. Therefore, before connecting, think about whether it might be cheaper to run the route normally from the boiler, through the mixing unit.
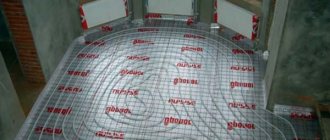
Pipe installation
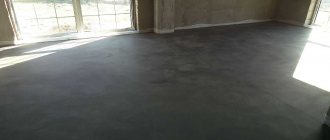
Before making warm floors from water heating, it is very important to pour a high-quality screed (cement-sand or concrete) under them. If we are talking about the ceiling on the ground floor, where the floors are located very close to the ground, then it is necessary to take care of high-quality waterproofing made of dense polyethylene or rolled roofing felt.
The laid waterproofing layer is covered with 2 centimeters of sand on top, and a layer of expanded clay is poured even higher. The thickness of the latter is selected based on how thick a layer of thermal insulation is required to effectively protect the room from heat loss.